【pytorch】Pytorch 中的 grid 与 各种变换
Pytorch 中的 grid 与 各种变换
数学原理
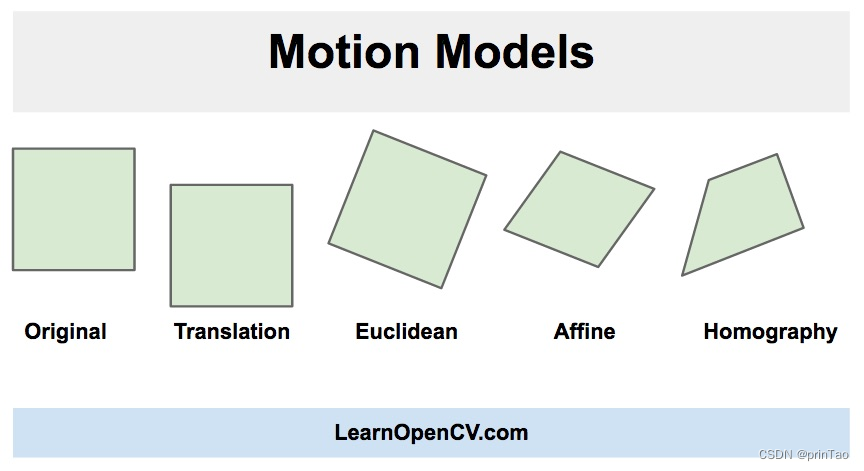
**单应性(Homography) : 也就是透视变换。**单应性最初用来研究欧几里得几何中的透视和投影,而单应性一词,从词源学上来说,大致意思是“相似的绘图”。单应性的概念被引入来理解、解释和研究视觉透视,特别是从不同角度观察两个平面物体的外观差异。
Affine
Perspective
透视变换将二维图像坐标转换为三维齐次坐标,然后应用透视变换矩阵,最后将结果转换回二维坐标。通过旋转和平移将世界坐标中的点转换为相机坐标中的坐标,然后将这些坐标投影到传感器平面上。
其中 f 是焦距,(lx, ly) 是像素的物理尺寸,(cx, cy) 是相机的光学中心,以像素为单位。
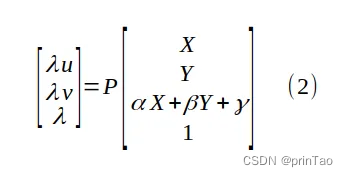
方程 (1) 明确显示了针孔相机模型如何将 3D 点 (X, Y, Z) 投影到图像坐标 (u, v)
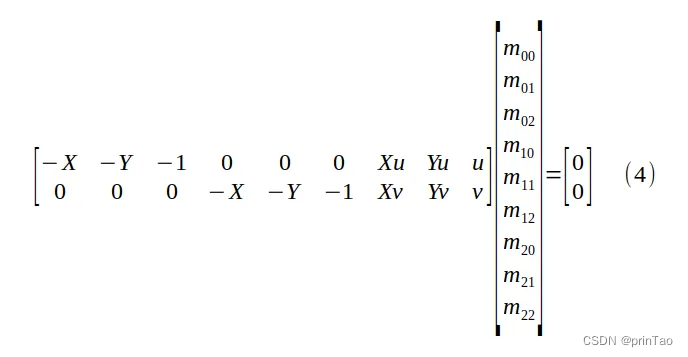
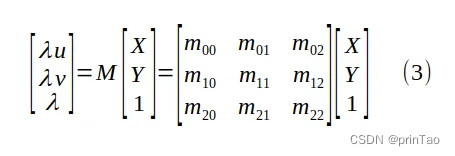
这里假设所有点**(X, Y, Z)**所在的scene是一个平面。也就是符合公式Z = αX + βY + γ。带入可得
将 P 的项与方程 (2) 中的 α、β 和 γ 混合,得到一个新的 3 x 3 未知矩阵 M,即透视变换矩阵:
为了求解 M 的项,我们必须首先将 λ=m20 X + m21 Y +m22 代入方程 (3),得到有 9 个未知数的齐次线性方程:
求解透视变换矩阵 M 的九个条目(最多一个缩放因子),以及物平面坐标 (X, Y) 与其像素值 (u, v) 之间的四个对应关系。
9个未知数,zero space为1维。因此有一个自由度,通常被设置为1。
Pytorch 官方文档解读
grid in pytorch
基础知识
grid in Pytorch
https://pytorch.org/docs/stable/generated/torch.nn.functional.grid_sample.html
grid in numpy
图像增强中的 变换api
torchvision.transforms.functional
torchvision.transforms.functional.affine(img: Tensor, angle: float, translate: List[int], scale: float, shear: List[float], interpolation: InterpolationMode = InterpolationMode.NEAREST, fill: Optional[List[float]] = None, center: Optional[List[int]] = None)
对比关系
torchvision.transforms.functional 中的 affine,通常用于图像处理和数据增强。
torch.nn.functional 中的 affine_grid 和 grid_sample 库,通常用于深度学习模型的操作和图像变换。torch.nn.functional.affine_grid 函数用于生成仿射变换的网格,torch.nn.functional.grid_sample 函数用于在输入图像上应用仿射变换。这些函数通常用于构建自定义的图像变换层或模型,以实现更灵活的图像空间变换。
另外图像变换中有perspective,而nn中没有。
torchvision.transforms.functional.perspective(img: Tensor, startpoints: List[List[int]], endpoints: List[List[int]], interpolation: InterpolationMode = InterpolationMode.BILINEAR, fill: Optional[List[float]] = None) → Tensor
img(Tensor):输入的图像,通常是一个PyTorch张量,可以是单通道或多通道的图像。startpoints(List[List[int]]):一个包含4个起始点坐标的列表,每个起始点用一个[x, y]列表表示。这些起始点用于指定透视变换的原始四边形的四个顶点。endpoints(List[List[int]]):一个包含4个目标点坐标的列表,每个目标点用一个[x, y]列表表示。这些目标点用于指定透视变换后的四边形的四个顶点。interpolation(InterpolationMode,可选):指定插值方法的枚举类型。它表示在透视变换期间如何对图像进行插值。可选的插值方法包括InterpolationMode.NEAREST(最近邻插值)和InterpolationMode.BILINEAR(双线性插值)等。fill(Optional[List[float]],可选):一个包含用于填充图像的颜色值的列表,通常表示为[R, G, B]。如果未提供此参数,则使用默认值[0, 0, 0]进行填充。startpoints和endpoints分别指定了原始四边形和目标四边形的四个顶点,通过这些顶点之间的映射关系,函数将原始图像进行透视变换。interpolation参数允许你选择插值方法以保持图像的质量。如果需要在深度学习中执行透视变换,这个函数可以用于构建自定义的图像增强层。
具体实现:
函数用于执行透视变换,它接受输入图像、原始四边形的四个顶点、变换后的四边形的四个顶点、插值方式和填充值作为参数。函数根据参数选择使用Pillow(F_pil.perspective)或PyTorch(F_t.perspective)来执行透视变换。如果输入是PIL图像,它将使用Pillow进行变换,如果输入是PyTorch张量,它将使用PyTorch进行变换。函数的返回值是变换后的图像。
def perspective(
    img: Tensor,
    startpoints: List[List[int]],
    endpoints: List[List[int]],
    interpolation: InterpolationMode = InterpolationMode.BILINEAR,
    fill: Optional[List[float]] = None,
) -> Tensor:
    """执行给定图像的透视变换。
    如果图像是 Torch 张量,则预期其具有 [..., H, W] 的形状,其中 ... 表示任意数量的前导维度。

    Args:
        img (PIL 图像或张量): 要进行变换的图像。
        startpoints (list of list of ints): 包含四个包含两个整数的列表的列表,对应于原始图像的四个角
            ``[左上角, 右上角, 右下角, 左下角]``。
        endpoints (list of list of ints): 包含四个包含两个整数的列表的列表,对应于变换后图像的四个角
            ``[左上角, 右上角, 右下角, 左下角]``。
        interpolation (InterpolationMode): 期望的插值方式枚举,由:class:`torchvision.transforms.InterpolationMode` 定义。
            默认为 ``InterpolationMode.BILINEAR``。
            如果输入为张量,则仅支持 ``InterpolationMode.NEAREST`` 和 ``InterpolationMode.BILINEAR``。
            也可以接受对应的Pillow整数常数,如 ``PIL.Image.BILINEAR``。
        fill (sequence 或数字,可选): 用于填充变换后图像之外区域的像素值。如果给定一个数字,则分别用于所有波段。

            .. 注意::
                在 TorchScript 模式下,不支持单个 int/float 值,请使用长度为 1 的序列:``[value, ]``。

    Returns:
        PIL 图像或张量: 变换后的图像。
    """
    # 检查是否处于 TorchScript 或 Tracing 模式下,如果不是,则记录 API 使用情况
    if not torch.jit.is_scripting() and not torch.jit.is_tracing():
        _log_api_usage_once(perspective)

    # 获取透视变换的系数,这些系数将在后续的变换中使用
    coeffs = _get_perspective_coeffs(startpoints, endpoints)

    # 如果 interpolation 是整数,将其转换为对应的 InterpolationMode
    if isinstance(interpolation, int):
        interpolation = _interpolation_modes_from_int(interpolation)
    elif not isinstance(interpolation, InterpolationMode):
        raise TypeError(
            "Argument interpolation should be a InterpolationMode or a corresponding Pillow integer constant"
        )

    # 如果输入不是 Torch 张量,则使用 Pillow 进行透视变换
    if not isinstance(img, torch.Tensor):
        pil_interpolation = pil_modes_mapping[interpolation]
        return F_pil.perspective(img, coeffs, interpolation=pil_interpolation, fill=fill)

    # 如果输入是 Torch 张量,则使用 Torch 进行透视变换
    return F_t.perspective(img, coeffs, interpolation=interpolation.value, fill=fill)
利用**_get_perspective_coeffs** 利用最小二乘法获取变换矩阵。
**
def** **_get_perspective_coeffs(startpoints:** **List[List[**int**]],** **endpoints:** **List[List[**int**]])** **->** **List[**float**]:**
用于计算透视变换的系数,这些系数会在透视变换时使用。函数根据给定的起始点(原始图像的四个角)和目标点(变换后图像的四个角)来计算这些系数,然后将它们返回供透视变换使用。函数内部使用了一些线性代数和矩阵运算,最终返回一个包含8个系数的列表,这些系数可以用于对图像进行透视变换。
def _get_perspective_coeffs(startpoints: List[List[int]], endpoints: List[List[int]]) -> List[float]:
    """Helper function to get the coefficients (a, b, c, d, e, f, g, h) for the perspective transforms.

    In Perspective Transform each pixel (x, y) in the original image gets transformed as,
     (x, y) -> ( (ax + by + c) / (gx + hy + 1), (dx + ey + f) / (gx + hy + 1) )

    Args:
        startpoints (list of list of ints): List containing four lists of two integers corresponding to four corners
            ``[top-left, top-right, bottom-right, bottom-left]`` of the original image.
        endpoints (list of list of ints): List containing four lists of two integers corresponding to four corners
            ``[top-left, top-right, bottom-right, bottom-left]`` of the transformed image.

    Returns:
        octuple (a, b, c, d, e, f, g, h) for transforming each pixel.
    """
    # 创建一个8x8的零矩阵 a_matrix,用于存储变换的系数
    a_matrix = torch.zeros(2 * len(startpoints), 8, dtype=torch.float)

    # 使用循环迭代四个角的坐标,计算变换系数并填充 a_matrix
    for i, (p1, p2) in enumerate(zip(endpoints, startpoints)):
        # 填充 a_matrix 的每一行
        a_matrix[2 * i, :] = torch.tensor([p1[0], p1[1], 1, 0, 0, 0, -p2[0] * p1[0], -p2[0] * p1[1]])
        a_matrix[2 * i + 1, :] = torch.tensor([0, 0, 0, p1[0], p1[1], 1, -p2[1] * p1[0], -p2[1] * p1[1]])

    # 创建 b_matrix,用于存储起始点坐标的矩阵并将其展平
    b_matrix = torch.tensor(startpoints, dtype=torch.float).view(8)

    # 使用最小二乘法计算变换系数 res
    res = torch.linalg.lstsq(a_matrix, b_matrix, driver="gels").solution

    # 将结果转换为列表并返回
    output: List[float] = res.tolist()
    return output
Pytorch 手写代码
perspective
# PyTorch 实现代码
import torch
import torch.nn.functional as F

def custom_perspective_transform(image, perspective_matrix):
    n, c, h, w = image.shape
    device = image.device

    # 创建二维坐标网格
    grid_x, grid_y = torch.meshgrid(
        torch.linspace(-1, 1, w, device=device),
        torch.linspace(-1, 1, h, device=device)
    )
    ones = torch.ones_like(grid_x)

    # 转换为齐次坐标
    grid_homogeneous = torch.stack([grid_x, grid_y, ones], dim=0).reshape(3, -1)  # [3, H*W]

    # 应用透视变换矩阵
    grid_transformed = torch.mm(perspective_matrix, grid_homogeneous)  # [3, H*W]

    # 将齐次坐标转换回普通坐标
    xy = (grid_transformed[:2, :] / grid_transformed[2:3, :]).t().reshape(h, w, 2)

    # 调整形状以适应 grid_sample
    xy = xy.unsqueeze(0).repeat(n, 1, 1, 1)  # [N, H, W, 2]

    # 应用网格采样
    transformed_image = F.grid_sample(image, xy, align_corners=True)

    return transformed_image

# 示例使用
# 假设 'checkerboard_tensor' 是之前创建的方格图像张量
# 'perspective_matrix' 是透视变换矩阵
transformed_checkerboard = custom_perspective_transform(checkerboard_tensor, perspective_matrix)
Perspective 可反向传播
import torch
import torch.nn.functional as F
from torch.autograd import Function
from torchvision.transforms.functional import InterpolationMode
from typing import List, Optional

class PerspectiveTransformFunction(Function):
    @staticmethod
    def forward(ctx, img, startpoints, endpoints, interpolation, fill):
        # 计算透视变换的系数
        coeffs = _get_perspective_coeffs(startpoints, endpoints)

        # 执行透视变换
        if not isinstance(interpolation, InterpolationMode):
            interpolation = InterpolationMode(interpolation)
        output = F.grid_sample(img, coeffs.view(1, 8, 1, 1), interpolation=interpolation, padding_mode='border', align_corners=True)

        # 保存需要的信息以备反向传播
        ctx.save_for_backward(coeffs, img)
        ctx.interpolation = interpolation
        ctx.fill = fill

        return output

    @staticmethod
    def backward(ctx, grad_output):
        # 获取需要的信息
        coeffs, img = ctx.saved_tensors
        interpolation = ctx.interpolation
        fill = ctx.fill

        # 计算梯度
        grad_input = F.grid_sample(grad_output, coeffs.view(1, 8, 1, 1), interpolation=interpolation, padding_mode='border', align_corners=True)

        return grad_input, None, None, None, None

class PerspectiveTransform:
    def __init__(self, startpoints, endpoints, interpolation=InterpolationMode.BILINEAR, fill=None):
        self.startpoints = startpoints
        self.endpoints = endpoints
        self.interpolation = interpolation
        self.fill = fill

    def __call__(self, img):
        return PerspectiveTransformFunction.apply(img, self.startpoints, self.endpoints, self.interpolation, self.fill)
使用测试案例
from torchvision.transforms.functional import to_pil_image, to_tensor
from PIL import Image

# 步骤1: 生成棋盘格图像并保存到磁盘
# 创建一个函数来生成棋盘格图像
def generate_chessboard(width, height, rows, cols):
    image = Image.new("RGB", (width, height), (255, 255, 255))
    draw = ImageDraw.Draw(image)

    cell_width = width // cols
    cell_height = height // rows

    color1 = (0, 0, 0)
    color2 = (255, 255, 255)

    for row in range(rows):
        for col in range(cols):
            if (row + col) % 2 == 0:
                color = color1
            else:
                color = color2

            x0 = col * cell_width
            y0 = row * cell_height
            x1 = x0 + cell_width
            y1 = y0 + cell_height

            draw.rectangle([x0, y0, x1, y1], fill=color)

    image.save("chessboard.png")

# 调用生成函数来生成棋盘格图像
generate_chessboard(400, 400, 8, 8)

# 步骤2: 执行透视变换
# 创建一个透视变换对象
startpoints = [[0, 0], [300, 0], [300, 300], [0, 300]]
endpoints = [[50, 50], [250, 0], [250, 250], [50, 250]]
transform = PerspectiveTransform(startpoints, endpoints)

# 读取生成的棋盘格图像
chessboard_img = Image.open("chessboard.png")

# 将图像转换为Tensor
img_tensor = to_tensor(chessboard_img).unsqueeze(0)

# 执行透视变换
transformed_img = transform(img_tensor)

# 步骤3: 将变换后的图像显示或保存
output_img = to_pil_image(transformed_img.squeeze(0))
output_img.show()  # 显示变换后的图像
output_img.save("transformed_chessboard.png")  # 保存变换后的图像
库代码
OpenCV 文档:
Perspective
https://docs.opencv.org/2.4/modules/imgproc/doc/geometric_transformations.html#warpperspective
Affine
https://docs.opencv.org/2.4/modules/imgproc/doc/geometric_transformations.html#warpaffine
https://docs.opencv.org/4.x/d4/d61/tutorial_warp_affine.html
尝试代码
import torch
import torch.nn.functional as F
import numpy as np
import matplotlib.pyplot as plt

def perspective_transform(image, perspective_matrix):
    n, c, h, w = image.shape
    # 生成标准网格
    grid = F.affine_grid(torch.eye(2, 3).unsqueeze(0), image.size(), align_corners=False)
    # 将网格转换为齐次坐标
    homogeneous_grid = torch.cat([grid, torch.ones(n, h, w, 1, device=grid.device)], dim=-1)
    # 应用透视变换矩阵
    warped_grid = torch.matmul(homogeneous_grid, perspective_matrix.transpose(1, 2))
    # 将齐次坐标转换回非齐次坐标
    warped_grid_xy = warped_grid[..., :2] / warped_grid[..., 2:3]
    warped_grid_xy = warped_grid_xy.permute(0, 3, 1, 2)  # 转换为 (N, C, H, W) 格式
    # 应用网格采样
    transformed_image = F.grid_sample(image, warped_grid_xy, align_corners=False, padding_mode='zeros')
    return transformed_image

# 创建一个简单的方格图像
def create_checkerboard(h, w, square_size):
    img = np.zeros((h, w))
    s = square_size
    for y in range(0, h, s*2):
        for x in range(0, w, s*2):
            img[y:y+s, x:x+s] = 1.0
            img[y+s:y+s*2, x+s:x+s*2] = 1.0
    return img

# 创建方格图像
h, w = 256, 256
square_size = 32
checkerboard = create_checkerboard(h, w, square_size)

# 转换为 PyTorch 张量
checkerboard_tensor = torch.tensor(checkerboard, dtype=torch.float32).unsqueeze(0).unsqueeze(0)

# 创建透视变换矩阵
perspective_matrix = torch.tensor([
    [1.0, 0.0, 0.0],
    [0.0, 1.0, 0.0],
    [0.0, 0.001, 1.0]
], dtype=torch.float32).unsqueeze(0)

# 应用透视变换
transformed_checkerboard = perspective_transform(checkerboard_tensor, perspective_matrix)

# 显示原始和变换后的图像
plt.figure(figsize=(12, 6))
plt.subplot(1, 2, 1)
plt.imshow(checkerboard, cmap='gray')
plt.title('Original Checkerboard')
plt.subplot(1, 2, 2)
plt.imshow(transformed_checkerboard[0, 0].detach().numpy(), cmap='gray')
plt.title('Transformed Checkerboard')
plt.show()

# 测试梯度
perspective_matrix.requires_grad = True
transformed_checkerboard_grad = perspective_transform(checkerboard_tensor, perspective_matrix)
loss = transformed_checkerboard_grad.sum()
loss.backward()

# 检查梯度是否存在
print("Perspective matrix gradient:", perspective_matrix.grad)
利用矩阵乘法解决这个问题。每次透视变换前,构造一个足够大的0值图像。对目标图像乘变换矩阵后,放入新建的图像中。注意不要让图像边缘超出去。
为了实现透视变换并确保梯度能够被正确计算,我们可以采取一种稍微不同的方法。这个方法包括以下步骤:
- 首先,我们会构建一个足够大的空白图像(全零值)作为变换后的画布。
- 然后,我们将使用透视变换矩阵来变换原始图像中的像素位置。
- 对于变换后的每个像素位置,我们将从原始图像中复制对应的像素值到新的位置上。
- 为了防止变换后的图像边缘超出新画布的边界,我们需要适当地选择画布的大小和变换矩阵。
这种方法可以通过矩阵乘法和索引操作来实现,允许在 PyTorch 中进行梯度的反向传播。我将编写一个示例实现来展示这个过程:
import torch
import numpy as np
import matplotlib.pyplot as plt
def apply_perspective_transform(image, perspective_matrix, output_size):
n, c, h, w = image.shape
# 创建输出图像(空白画布)
output_image = torch.zeros(n, c, *output_size, device=image.device)
# 生成网格
y, x = torch.meshgrid(torch.linspace(-1, 1, h), torch.linspace(-1, 1, w))
z = torch.ones_like(x)
grid = torch.stack([x, y, z], dim=-1).view(-1, 3).t() # 3 x (H*W)
# 应用透视变换
transformed_grid = torch.mm(perspective_matrix, grid) # 3 x (H*W)
# 将齐次坐标转换为笛卡尔坐标
xy = transformed_grid[:2, :] / transformed_grid[2, :]
xy = xy.t().view(h, w, 2)
# 将变换后的坐标映射到输出图像上
for i in range(h):
for j in range(w):
x, y = xy[i, j]
if -1 <= x <= 1 and -1 <= y <= 1:
# 将像素值复制到新位置
xi, yi = int((x + 1) / 2 * (output_size[1] - 1)), int((y + 1) / 2 * (output_size[0] - 1))
output_image[0, :, yi, xi] = image[0, :, i, j]
return output_image
```