Intel Quartus II IP之DP1.4 工程的创建与使用
前述:
Win10电脑安装了Quartus 21.4,这可以满足绝大多数情况,但是对于创建DMI/DP IP的设计demo工程时会报错,因为还需要Eclipse与WSL(Windows Subsystem for Linux)。
具体安装方法参考:
Intel开发环境Quartus、Eclipse与WSL的安装
如果没有 仅安装了Quartus,没有安装WSL,在创建DP/HDMI的Generate Example Design Completed时报错如下:
![]()
![]() 原因是没有安装wsl。
原因是没有安装wsl。
按照步骤安装完wsl后再次运行Generate Example Design Completed时成功,如下图:
![]()
部分缩写:
| PCR | Pixel Clock Recovery | 像素时钟恢复 |
|
SST
|
Single Stream Transport | 单流传输 |
| MST | Multi Stream Transport | 多流传输 |
| bpc | bit per color | |
| Eclipse CDT | C/C++ Development Tooling | |
| WSL | Windows Subsystem for Linux | 适用于Linux的Windows子系统 |
一、创建DP IP的demo工程
该工程实现DP的RX 与TX直通工程,也即是DP RX接收到的信号直接传输给DP TX来发送。
1、先创建一个包含FPGA芯片的空工程
具体创建方法参考如下:
Quartus II 17.1新建一个流水灯-CSDN博客
2、打开DP IP
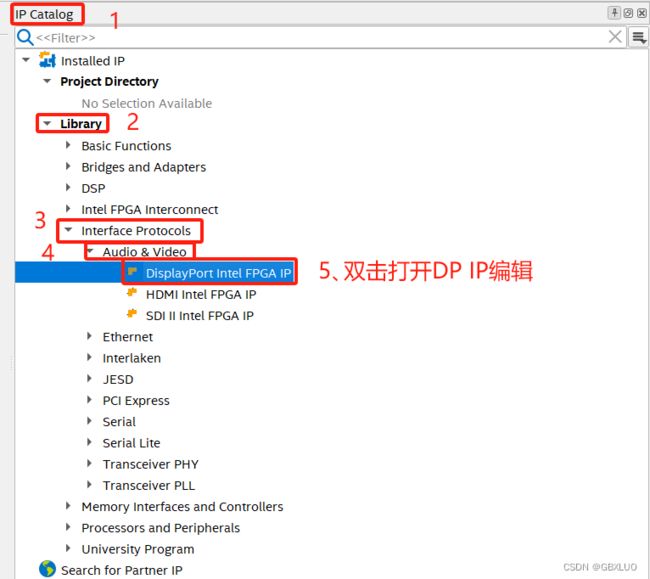
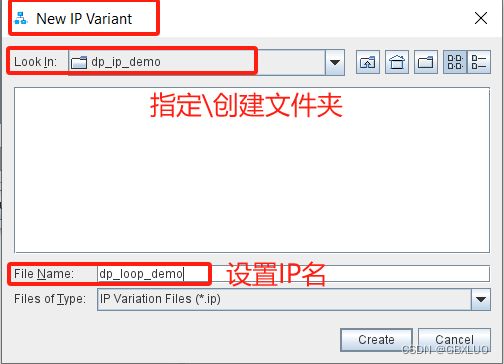
在IP Catalog中选择Library 》 Interface Protocols 》Audio & Video 》DisplayPort Intel FPGA IP,双击打开,如下两图:
3、编辑基本DP参数
分别编辑Source与Sink端的IP参数:
Source端IP参数如下:
Sink端IP参数如下:
Source与Sink端的IP参数我只设置了两个参数:
Maximum video output color depth为10 bpc(bit per color)
勾选了Enable AUX debug stream
4、生成DP的Example Design工程
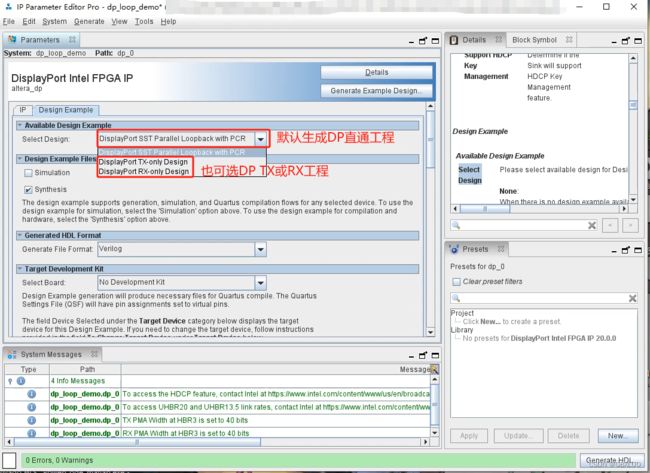
默认生成的是DP直通工程,即DisplayPort SST Parallel Loopback with PCR,可以实现DP RX接口的4K视频输入并通过DR TX接口输出该4K视频。
接着单击Generate Example Design接口。
等待创建完成,关闭IP Parameter Editor,并在保存位置找到qpf文件并打开即可.
![]()
二、DP demo工程的使用
打开后上述新建的demo工程并不能直接使用,因为引脚分配还没完成。
1、新建一个top层.v文件
将demo工程的顶层文件例化到top.v文件中。
一般为了通用性,再demo工程上再打包一层,这样的作用是将demo工程默认生成的输入输出wire/reg名称改为其他工程也在使用的名称,这样方便合入其他工程,且其他工程的引脚分配设置可以共用。
2、导入qsf文件
导入在demo板子上成功运行过的qsf文件,该qsf文件包含了引脚的分配与设置(I/O标准等);
导入qsf文件方法:
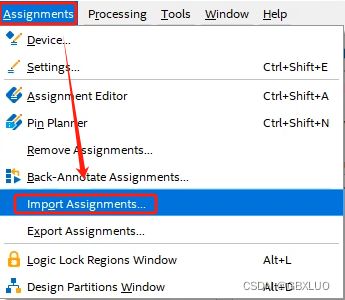
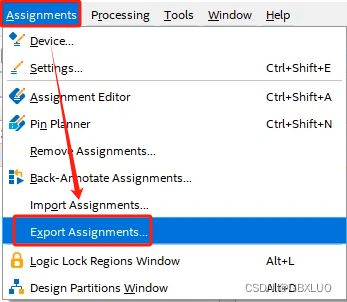
Assignments 》 Import Assignments,单击添加qsf文件(该qsf文件可以是其他工程里面的),再OK即可。
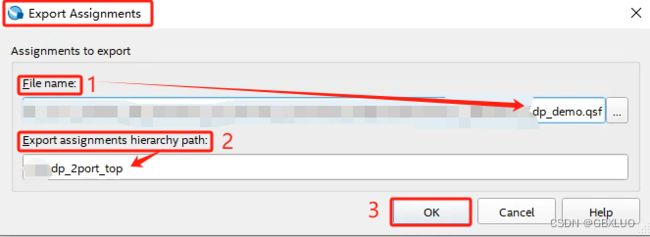
导出qsf文件方法:
Assignments 》 Export Assignments,无特别要求,默认即可。
错误:RX channel GXB_DP1_RX0P and TX channel GXB_DP1_TX0P are locked to the same duplex channel.
在最初未导入合适的qsf文件时,报错如下:
Error(12787): RX channel GXB_DP1_RX0P and TX channel GXB_DP1_TX0P are locked to the same duplex channel. In order for both the RX and TX channel to use the same duplex channel, you must assign them to the same group so the Fitter merges them into a single Avalon Memory-Mapped interface. To assign both channels to a group, use the Transceiver Avalon Memory-Mapped Interface Group logic option.
查阅到官网如下解释:
百度解释:
在Quartus的高速接口中,一对高速接口的动态配置接口是共用的。如果在例化的过程中把RX与TX是分开,那么如果要进行动态配置一定要保证它们的动态配置接口的数据来自同一个源,才能在综合适配时优化成一个接口。
解决方法:
在Assignment Editor中将GXB_DP1_RX0P与GXB_DP1_TX0P均设置为Transceiver Avalon Memory-Mapped Interface Group,并在Value中设置为同一数值0,其他同理即可解决。
3、编译工程并下载sof文件即可
在Programmer中下载sof文件。
下载过程中出错,报PMBUS通信异常:
error报错如下:
Device has stopped receiving configuration data
Error message received from device:External hardware access error.(subcode 0x0032,Info 0x00400008,Location 0x00001800).
Detected a PMBUS error during configuration. Potential errors: VID setting is incorrect in the Intel Quartus Prime project. The target device fails to communicate to a smart regulator or PMBUS master on a board.
Operation failed.
原因是用了Infineon(英飞凌)的PXE1410,需要在Quartus中进行PMBUS设置:
Assignments 》 Device 》 Device and Pin Options,并按如下几张图设置即可。
设置完成后,重新编译生成sof下载到FPGA板卡即可成功实现4K视频输入与4K视频输出。
