linux中nfs的使用以及ssl
目录
一、搭建静态网站——基于https协议的静态网站
1.配置使用ssl完成https访问apache服务器
2.配置访问apache的cgi程序
二、NFS的使用
b、开放/nfs/upload目录,该目录为192.168.xxx.0/24网段的主机的数据上传目录, 并将所有该网段主机上传文件的所属者和所属组映射为nfs-upload,其UID和GID为2001;
c、将/home/tom(该目录为uid=1111,gid=1111的tom用户的家目录)目录仅共享 给192.168.xxx.128这台主机上的jerry用户,jerry对该目录具有访问、新建和 删除文件的权限。
2.autofs自动挂载 远程nfs服务器要的目录为/nfs/autofs 客户端的的挂载目录/data/autofs 且设置自动卸载时间为60秒
三、https服务
1.使用https来访问的web服务器: 要求使用自签名的CA签名证书(openssl, x.509) .crt 以及私钥
一、搭建静态网站——基于https协议的静态网站
1.配置使用ssl完成https访问apache服务器
mod_ssl是一种以openssl 的工具箱为基础专门为apache webserver 提供密码保护的软件。
首先下载mod_ssl,下载完成后会有一个ssl.conf的文件
[root@localhost ~]# yum install mod_ssl -y现在为了实现,需要一个ssl要访问的目录,及目录下需要一个index.html文件
[root@good myssl]# echo "this is my first https page" > index.html
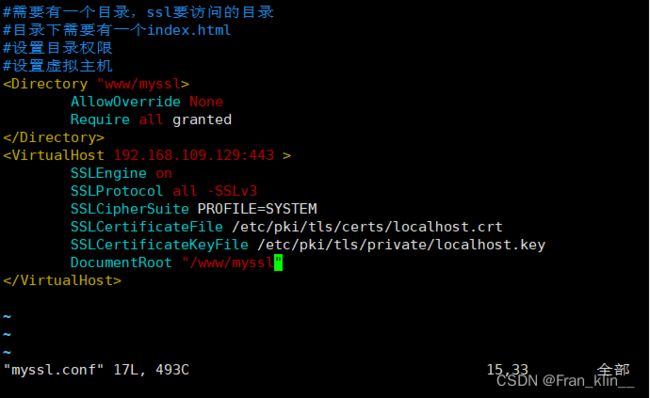
接下来配置权限及虚拟主机
[root@good conf.d]# vim myssl.conf
配置完成后重启httpd服务
[root@good conf.d]# systemctl restart httpd
通过浏览器访问或者curl --insecure https://IP地址
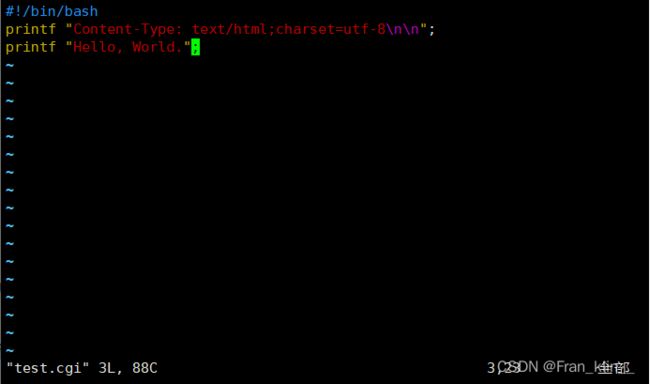
[root@good cgi-bin]# vim test.cgi
2.配置访问apache的cgi程序
[root@good conf.d]# cd /var/www/cgi-bin/
配置文件
[root@good cgi-bin]# vim test.cgi然后用浏览器访问
https://192.168.109.129/cgi-bin/test.cgi发现访问错误,是因为test.cgi 没有权限所以需要加一个权限
chmod +x test.cgihttps://192.168.109.129/cgi-bin/test.cgi发现访问成功
二、NFS的使用
首先下载所需要的软件
[root@localhost ~]# yum install rpcbind

[root@localhost ~]# yum install nfs-utils
1.nfs挂载
a、开放/nfs/shared目录,供所有用户查询资料;
[root@good ~]# mkdir nfs
[root@good ~]# cd nfs
[root@good nfs]# mkdir shared
服务器编辑 /etc/exports供所有用户查询
[root@good nfs]# vim /etc/exports重启nfs
[root@good nfs]# systemctl restart nfs-server客户端创建文件
[root@client ~]# mkdir client
[root@client ~]# cd client
[root@client client]# mkdir shuju
检测是否可以showmount
1.服务器自我检测
[root@good nfs]# showmount -e 192.168.109.1292.客户端showmount
[root@rhce ~]# showmount -e 192.168.109.129客户端挂载
服务器端在/nfs/shared添加内容,客户端可以在/data下看到。
1.在服务器创建
2.客户端查看
b、开放/nfs/upload目录,该目录为192.168.xxx.0/24网段的主机的数据上传目录,
并将所有该网段主机上传文件的所属者和所属组映射为nfs-upload,其UID和GID为2001;
服务器创建新的目录
[root@good nfs]# mkdir upload
[root@good nfs]# cd upload
服务器编辑etc/exports文件
创建用户和用户组
客户端将服务器端的开放目录挂载到自己的目录上,同时也可以查看到开放目录里面内容。
服务器端对upload目录加权限 o+w
客户端此时就可以在开放目录里面上传内容
c、将/home/tom(该目录为uid=1111,gid=1111的tom用户的家目录)目录仅共享
给192.168.xxx.128这台主机上的jerry用户,jerry对该目录具有访问、新建和
删除文件的权限。
进入exports配置目录文件传输信息
添加tom用户查看用户信息
[root@good home]# useradd -u 1111 tom
重启服务
在另外用户上创建jerry用户并且UID和GID同为1111,挂载到本地
[root@rhce data]# useradd jerry -u 1111
最后在客户机上测试Jerry用户进入tom目录增删改查
2.autofs自动挂载
远程nfs服务器要的目录为/nfs/autofs
客户端的的挂载目录/data/autofs
且设置自动卸载时间为60秒
(1)服务器端配置:
------------------------ server --------------------------
# 创建共享目录
[root@good ~]# mkdir /nfs
# 将目录的权限全部放开
[root@good ~]# chmod 777 /nfs/
# data需要共享的目录的配置文件
[root@good ~]# vim /etc/exports
------------------------------
# ro,rw,sync,async --- 只读,可读写,同步,异步
# hostname         ------ 可以指定主机名,ip地址,或“*”
/nfs/ 192.168.109.129(ro,rw,sync,async)
            hostname
            *
------------------------------
# 防火墙放行服务
[root@good ~]# firewall-cmd --set-default-zone=trusted
success
# 重启服务,开机自启动
[root@good ~]# systemctl restart nfs-server.service
[root@good ~]# systemctl enable nfs-server.service

------------------------ 此为实验内容 --------------------------
[root@good ~]# vim /nfs/autofs
(2)客户端配置:
[root@good ~]# yum install autofs -y
# autofs配置文件
[root@good ~]# vim /etc/auto.master
# 挂载点的父目录   /etc/auto.misc
/data       /etc/auto.mynfs

# autofs约束文件
[root@good ~]# vim /etc/auto.mynfs
#c 挂载点的真实目录     -fstype=nfs,rw   server:/nfs-share
autofs     -fstype=nfs,rw   server:/nfs/autofs

# 启动服务
[root@good ~]# systemctl restart autofs
[root@good ~]# systemctl enable autofs

# 此目录之前未手动创建,式服务启动自动生成的。切换到本地挂载点查看是否挂载成功(注意,当使用的时候才会显示)
[root@good ~]# cd /data/
[root@good data]# ls
# 结果为空,什么都没有

# 但是你仍然可以cd进入你设置的真实的挂载点目录,也就是/etc/auto.misc中的子目录
[root@good nfs-share]# cd autofs
[root@good autofs]# ls
file


# 检查文件系统挂载情况,也是正确的
[root@good autofs]# df -Th
192.168.109.129:/nfs/autofs nfs4       19G  4.4G   15G  24% /data/autofs
当你手动卸载掉client的挂载点之后,文件系统的挂载条目就会消失,但是当你在此时用的时候,autofs就会自动挂载,不需要像nfs一样刷新/etc/fstab或者是手动进行挂载操作。
[root@good ~]# df -Th
192.168.159.137:/nfs/autofs nfs4       19G  4.4G   15G  24% /nfs/autofs

# 手动卸载autofs的挂载点
[root@good ~]# umount /nfs-share
[root@good ~]# df -Th
# 此时发现没有了autofs的文件系统的挂载内容

# 而当你再次进入挂载点的目录时候,autofs的挂载的文件系统又会自动挂载,这就是autofs与nfs的区别之处。
[root@good ~]# cd /nfs/
[root@good nfs]# cd autofs/
[root@good autofs]# df -Th
192.168.109.129:/nfs/autofs nfs4       19G  4.4G   15G  24% /data/autofs
三、https服务
1.使用https来访问的web服务器:
要求使用自签名的CA签名证书(openssl, x.509) .crt
以及私钥
具体操作步骤如下:
1.CA根证书:
1)/root/ca目录下创建4个子目录:
- newcerts:存放CA签署过的数字证书。
- private:存放CA的私钥。
- conf:存放一些简化参数用的配置文件。
- server:存放服务器证书文件。
2)制作ca.key 私钥
[root@good ca]# openssl genrsa -out /root/ca/private/ca.key 2048
3)生成pem格式的根证书
[root@good ca]# openssl req -x509 -new -nodes \
> -key /root/ca/private/ca.key \
> -sha256 -days 1024 \
> -out /root/ca/private/ca.pem
会有如下交互式配置:
Country Name (2 letter code) [XX]:CN
State or Province Name (full name) []:Shaanxi
Locality Name (eg, city) [Default City]:sian
Organization Name (eg, company) [Default Company Ltd]:zyz
Organizational Unit Name (eg, section) []:Test
Common Name (eg, your name or your server's hostname) []:rhcsa
Email Address []:[email protected]
4).pem转化为.crt(用于浏览器信任)
[root@good ca]# openssl x509 -outform der -in /root/ca/private/ca.pem -out /root/ca/private/ca.crt
2.服务器自签证书:
1) 创建文件ca.conf:
![]()
2) 创建文件v3.ext
![]()
3) 生成服务端证书签名请求,同时生成服务端私钥(nginx用)
![]()
4) 用ca私钥以ca的名义(ca.pem)给网站证书签名,加上v3.ext中的配置
![]()
证书生成完毕!


