dolphinscheduler分布式集群部署指南(小白版)
1.Apache DolphinScheduler概述
官方文档地址:https://dolphinscheduler.apache.org/zh-cn/docs/3.1.9
1.1.DolphinScheduler简介
摘自官网:Apache DolphinScheduler 是一个分布式易扩展的可视化DAG工作流任务调度开源系统。适用于企业级场景,提供了一个可视化操作任务、工作流和全生命周期数据处理过程的解决方案。
Apache DolphinScheduler 旨在解决复杂的大数据任务依赖关系,并为应用程序提供数据和各种 OPS 编排中的关系。 解决数据研发ETL依赖错综复杂,无法监控任务健康状态的问题。 DolphinScheduler 以 DAG(Directed Acyclic Graph,DAG)流式方式组装任务,可以及时监控任务的执行状态,支持重试、指定节点恢复失败、暂停、恢复、终止任务等操作。
1.2.项目安装依赖环境
- Linux CentOS == 7.6.18(3台)
- JDK == 1.8.151
- Zookeeper == 3.8.3
- MySQL == 5.7.30
- dolhpinscheduler == 3.1.9
2.环境准备
2.1.通用集群环境准备
2.1.1.准备虚拟机
| IP地址 | 主机名 | CPU配置 | 内存配置 | 磁盘配置 | 角色说明 |
|---|---|---|---|---|---|
| 192.168.10.100 | hadoop01 | 4U | 8G | 100G | DS NODE |
| 192.168.10.101 | hadoop02 | 4U | 8G | 100G | DS NODE |
| 192.168.10.102 | hadoop03 | 4U | 8G | 100G | DS NODE |
在所有的主机上执行以下命令:
cat >> /etc/hosts << "EOF"
192.168.10.100 hadoop01
192.168.10.101 hadoop02
192.168.10.102 hadoop03
EOF
2.1.2.修改软件源
替换yum的镜像源为清华源
sudo sed -e 's|^mirrorlist=|#mirrorlist=|g' \
         -e 's|^#baseurl=http://mirror.centos.org|baseurl=https://mirrors.tuna.tsinghua.edu.cn|g' \
         -i.bak \
         /etc/yum.repos.d/CentOS-*.repo
2.1.3.修改终端颜色
cat << EOF >> ~/.bashrc
PS1="\[\e[37;47m\][\[\e[32;47m\]\u\[\e[34;47m\]@\h \[\e[36;47m\]\w\[\e[0m\]]\\$ "
EOF
让修改生效
source ~/.bashrc
2.1.4.修改sshd服务优化
sed -ri 's@UseDNS yes@UseDNS no@g' /etc/ssh/sshd_config

sed -ri 's#GSSAPIAuthentication yes#GSSAPIAuthentication no@g' /etc/ssh/sshd_config

grep ^UseDNS /etc/ssh/sshd_config

grep ^GSSAPIAuthentication /etc/ssh/sshd_config
2.1.5.关闭防火墙
systemctl disable --now firewalld && systemctl is-enabled firewalld

Systemctl status firewalld
2.1.6.禁用selinux
sed -ri 's#(SELINUX=)enforcing#\1disabled#' /etc/selinux/config

grep ^SELINUX= /etc/selinux/config

setenforce 0

getenforce
2.1.7.配置集群免密登录和同步脚本
1)修改主机列表
cat >> /etc/hosts << 'EOF'
192.168.10.100 hadoop01
192.168.10.101 hadoop02
192.168.10.102 hadoop03
EOF
2)hadoop01节点上生成密钥对
ssh-keygen -t rsa -P '' -f ~/.ssh/id_rsa -q
3)hadoop01配置所有集群节点的免密登录
for ((host_id=1;host_id<=3;host_id++));do ssh-copy-id hadoop0${host_id} ;done
4)免密登录测试
ssh hadoop01
ssh hadoop02
ssh hadoop03
5)所有节点安装rsync数据同步工具
#在线安装
yum install -y rsync
#离线安装方式一
yum localinstall -y rsync-2.7.0.rpm
#离线安装方式二
rpm -ivh rsync-2.7.0.rpm --force --nodeps
6)编写同步脚本
vim /usr/local/sbin/data_rsync.sh
脚本内容如下:
#!/bin/bash
# Author: kkarma

if  [ $# -ne 1 ];then
    echo "Usage: $0 /path/to/file(绝对路径)"
	exit
fi

#判断文件是否存在
if  [ ! -e $1 ];then
    echo "[ $1 ] dir or file not found!"
	exit
fi

# 获取父路径
fullpath=`dirname $1`

# 获取子路径
basename=`basename $1`

# 进入到父路径
cd $fullpath

for ((host_id=1;host_id<=3;host_id++))
    do
	  # 使得终端输出变为绿色
	  tput setaf 2
	  echo ==== rsyncing hadoop0${host_id}: $basename ====
	  # 使得终端恢复原来的颜色
	  tput setaf 7
	  # 将数据同步到其他两个节点
	  rsync -az $basename `whoami@hadoop0${host_id}:$fullpath`
	  if [ $? -eq 0 ];then
	      echo "命令执行成功!"
	  fi
done
7)授权同步脚本
chmod 755 /usr/local/sbin/data_rsync.sh
2.1.8.集群时间同步
1)安装常用的Linux工具
yum install -y vim net-tools
2)安装chrony服务
yum install -y ntpdate chrony
3)修改chrony服务配置文件
vim /etc/chrony.conf
#注释掉官方的时间服务器,换成国内的时间服务器即可
server ntp.aliyun.com iburst
server ntp.aliyun.com iburst
server ntp.aliyun.com iburst
server ntp.aliyun.com iburst
server ntp.aliyun.com iburst
server ntp.aliyun.com iburst
4)配置chronyd服务开机自启
systemctl enable --now chronyd
5)查看chronyd服务
systemctl status chronyd
2.1.9.修改sysctl.conf系统配置
编辑sysctl.conf文件
vm.swappiness = 0
kernel.sysrq = 1

net.ipv4.neigh.default.gc_stale_time = 120

# see details in https://help.aliyun.com/knowledge_detail/39428.html
net.ipv4.conf.all.rp_filter = 0
net.ipv4.conf.default.rp_filter = 0
net.ipv4.conf.default.arp_announce = 2
net.ipv4.conf.lo.arp_announce = 2
net.ipv4.conf.all.arp_announce = 2

# see details in https://help.aliyun.com/knowledge_detail/41334.html
net.ipv4.tcp_max_tw_buckets = 5000
net.ipv4.tcp_syncookies = 1
net.ipv4.tcp_max_syn_backlog = 1024
net.ipv4.tcp_synack_retries = 2


fs.file-max = 6815744
vm.max_map_count = 262144
fs.aio-max-nr = 1048576
kernel.shmall = 2097152
kernel.shmmax = 536870912
kernel.shmmni = 4096
kernel.sem = 250 32000 100 128
fs.suid_dumpable=1

net.ipv4.ip_local_port_range = 9000 65500
net.core.rmem_default = 262144
net.core.rmem_max = 4194304
net.core.wmem_default = 262144
net.core.wmem_max = 1048586
2.1.10.修改limit.conf配置文件
在/etc/security/limit.conf文件的末尾追加以下内容
如果已经创建了专门用来管理Elasticsearch的账号(例如账号名称为elastic),则配置如下:
elastic soft nofile 65535
elastic hard nofile 65535
如果嫌麻烦, 直接使用下面这种配置也可以
* soft nofile 65535
* hard nofile 65535
以上修改完成之后,建议重启服务器让系统配置生效。
2.2.JDK安装
这部分跳过,很简单,基本随便找个博客文章照着配置就能搞定。
2.3.Zookeeper集群安装
这里本来想跳过安装, 直接使用CDH集群中的zookeeper集群的,实际操作发现当使用低版本的Zookeeper集群,并在dolphinscheduler打包时进行低版本ZK适配之后,
部署成功之后总是集群启动总是会出现各种问题,所以这里就不折腾了,直接另外安装了一组Zookeeper集群, 下面给大家讲讲Zookeeper集群的安装部署方式
2.3.1.下载安装
首先配置集群的主机名,确保通过主机名称可以相互访问集群节点
vim /etc/hosts
在文件中追加如下内容(所有节点都需要进行此操作)
192.168.10.100 hadoop01
192.168.10.101 hadoop02
192.168.10.102 hadoop03
Zookkeper下载地址:https://zookeeper.apache.org/releases.html#download
下载之后将安装包上传到所有的集群主机上,解压安装到/opt/software


在安装目录下,创建data和logs目录(所有节点都需要进行此操作)
mkdir -p /opt/software/zookeeper/data
mkdir -p /opt/software/zookeeper/logs
2.3.2.集群配置
进入到安装目录下的conf目录/opt/software/zookeeper/conf,配置zookeeper的配置文件zoo.cfg
拷贝zoo_sample.cfg文件并重命名为zoo.cfg(所有节点都需要进行此操作)

cp /opt/software/zookeeper/conf/zoo_sample.cfg /opt/software/zookeeper/conf/zoo.cfg
配置文件的修改内容如下:
# The number of milliseconds of each tick
tickTime=2000
# The number of ticks that the initial
# synchronization phase can take
initLimit=10
# The number of milliseconds of each tick
tickTime=2000
# The number of ticks that the initial
# synchronization phase can take
initLimit=10
# The number of milliseconds of each tick
tickTime=2000
# The number of ticks that the initial
# synchronization phase can take
initLimit=10
# The number of milliseconds of each tick
tickTime=2000
# The number of ticks that the initial
# synchronization phase can take
initLimit=10
# The number of ticks that can pass between
# sending a request and getting an acknowledgement
syncLimit=5
# the directory where the snapshot is stored.
# do not use /tmp for storage, /tmp here is just
# example sakes.
dataDir=/opt/software/zookeeper/data
# the port at which the clients will connect
# 这里为了避免与主机上的hadoop集群依赖的Zookeeper集群发生冲突, 修改了服务端的端口以及ZK节点之间的通信端口
clientPort=2191
# the maximum number of client connections.
# increase this if you need to handle more clients
#maxClientCnxns=60
#
# Be sure to read the maintenance section of the
# administrator guide before turning on autopurge.
#
# http://zookeeper.apache.org/doc/current/zookeeperAdmin.html#sc_maintenance
#
# The number of snapshots to retain in dataDir
#autopurge.snapRetainCount=3
# Purge task interval in hours
# Set to "0" to disable auto purge feature
#autopurge.purgeInterval=1

## Metrics Providers
#
# https://prometheus.io Metrics Exporter
#metricsProvider.className=org.apache.zookeeper.metrics.prometheus.PrometheusMetricsProvider
#metricsProvider.httpPort=7000
#metricsProvider.exportJvmInfo=true

# zookeeper新版本启动的过程中,zookeeper新增的审核日志是默认关闭,在windows下启动需要开启
#audit.enable=true

# 这里指定Zookeeper集群的内部通讯配置, 有几个节点就配置几条
server.1=hadoop01:2999:3999
server.2=hadoop02:2999:3999
server.3=hadoop03:2999:3999
配置集群中各个节点的server_id, 这个配置需要和在zoo.cfg文件中的配置保持一致:
在hadoop01节点上执行以下命令
echo 1 > /opt/software/zookeeper/data/myid
在hadoop02节点上执行以下命令
echo 2 > /opt/software/zookeeper/data/myid
在hadoop03节点上执行以下命令
echo 3 > /opt/software/zookeeper/data/myid
2.3.3.测试验证
首先设置集群的启停脚本
vim /opt/software/zookeeper/zk-start-all.sh
脚本的内容如下:
注意:
- zookeeper集群的启动依赖JDK, 会用到
JAVA_HOME变量, 所以需要先安装JDK,设置JAVA的系统环境变量 - 以下脚本的执行,如果没有配置集群的免密登录,每次都需要输入密码,所以需要先进行集群免密登录设置
#!/bin/bash

case $1 in
"start"){
    #遍历集群所有机器
	for i in hadoop01 hadoop02 hadoop03
	do
		#控制台输出日志
		echo =============zookeeper $i 启动====================
		#启动命令
		ssh $i "/opt/software/zookeeper/bin/zkServer.sh start"
	done
}
;;
"stop"){
	for i in hadoop01 hadoop02 hadoop03
	do
		echo =============zookeeper $i 停止====================
		ssh $i "/opt/software/zookeeper/bin/zkServer.sh stop"
	done
}
;;
"status"){
	for i in hadoop01 hadoop02 hadoop03
	do
		echo =============查看 zookeeper $i 状态====================
		ssh $i "/opt/software/zookeeper/bin/zkServer.sh status"
	done
}
;;
esac
chmod 755 /opt/software/zookeeper/zk-start-all.sh
我这里已经启动过集群正在使用,就不演示启动了,演示一下查询状态命令,/opt/software/zookeeper/zk-start-all.sh status,出现如下报错:

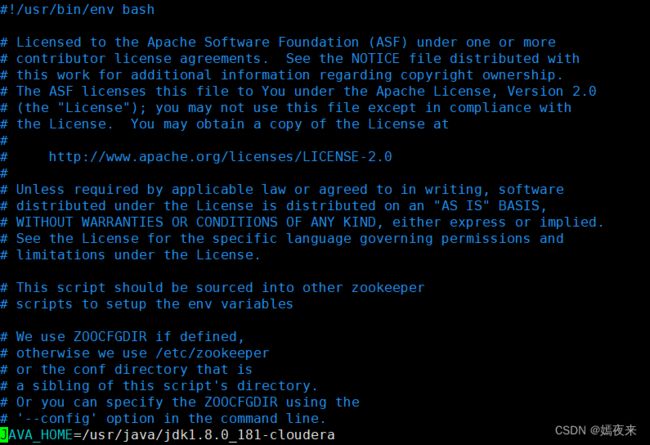
解决方法: 找到每台节点主机的/opt/software/zookeeper/bin/zkEnv.sh文件,在脚本文件代码部分的最前面 加上自己的JAVA_HOME路径即可。
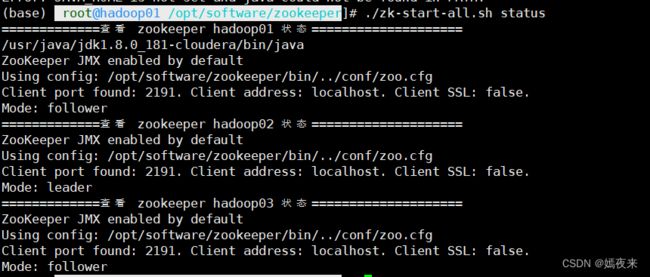
进入hadoop01的/opt/software/zookeeper目录下,执行./zk-start-all.sh status命令查看Zookeeper 集群状态,返回结果如下图:OK,集群的启停脚本基本没啥问题了。
zk集群启停、状态查询的命令如下:
# 启动zookeeper集群
sh /opt/software/zookeeper/zk-start-all.sh start

# 停止zookeeper集群
sh /opt/software/zookeeper/zk-start-all.sh stop

# 可以查询集群各节点的状态跟角色信息
sh /opt/software/zookeeper/zk-start-all.sh status
2.4.MySQL安装
MySQL安装可以参考我的另外一篇博客服务器linux-CentOS7.系统下使用mysql..tar.gz包安装mysql数据库详解
3.dolphinscheduler集群部署
3.1.下载dolphinscheduler
下载地址:https://dlcdn.apache.org/dolphinscheduler/3.1.9/apache-dolphinscheduler-3.1.9-bin.tar.gz
直接通过wget命令下载到服务器的某个路径下,如果服务器无法联网, 只能先联网下载二进制安装包到本地,然后再通过ssh客户端工具上传到服务器集群的每个节点。
3.2.创建dolphinscheduler的集群运行账户并设置
创建安装运行dolphinscheduler集群的用户ds
在root账号下,执行添加普通用户的命令
useradd dolphinscheduler
设置dolphinscheduler用户的密码
passwd dolphinscheduler
让dolphinscheduler用户具有执行sudo命令免密执行的权限
sed -i '$adolphinscheduler  ALL=(ALL)  NOPASSWD: NOPASSWD: ALL' /etc/sudoers
sed -i 's/Defaults    requirett/#Defaults    requirett/g' /etc/sudoers
拷贝二进制安装包apache-dolphinscheduler-3.1.9-bin.tar.gz到/opt/packages目录(没有则创建此目录)下
修改apache-dolphinscheduler-3.1.9-bin.tar.gz安装包的所属用户和用户组为dolphinscheduler
chmod -R dolphinscheduler:dolphinscheduler /opt/packages/apache-dolphinscheduler-3.1.9-bin.tar.gz
3.3.配置dolphinscheduler用户的集群免密登录
切换到dolphinscheduler用户,配置集群免密(这里只需要在hadoop01上执行就可以)
2)hadoop01节点上生成密钥对
ssh-keygen -t rsa
3)hadoop01配置所有集群节点的免密登录
for ((host_id=1;host_id<=3;host_id++));do ssh-copy-id hadoop0${host_id} ;done
4)免密登录测试
ssh hadoop01
ssh hadoop02
ssh hadoop03
3.4.数据库初始化
dolphinscheduler默认使用的数据库的名称是dolphinscheduler, 我们这里先创建数据库并创建管理用户并授权
-- 创建指定存储库
create database `dolphinscheduler` DEFAULT CHARACTER SET utf8mb4 DEFAULT COLLATE utf8mb4_general_ci;

-- 创建 dolphinScheduler 用户专门用户管理dolphinscheduler数据库
CREATE USER 'dolphinscheduler'@'%' IDENTIFIED BY 'dolphinscheduler';

-- 给予库的访问权限
GRANT ALL PRIVILEGES ON dolphinscheduler.* TO 'dolphinscheduler'@'%';

-- 让权限配置修改生效
flush privileges;
3.5.解压二进制安装包
tar -zxf /opt/packages/apache-dolphinscheduler-3.1.9-bin.tar.gz

mv
3.6.修改安装脚本和参数配置
dolphinscheduler中主要包含api-server、master-server、 worker-server三个服务,配置文件 /opt/oackages/apache-dolphinscheduler-3.1.9-bin/bin/env/install_env.sh 主要就是用来配置哪些机器将被安装 DolphinScheduler 以及每台机器对应安装哪些服务。
# ---------------------------------------------------------
# INSTALL MACHINE
# ---------------------------------------------------------
# A comma separated list of machine hostname or IP would be installed DolphinScheduler,
# including master, worker, api, alert. If you want to deploy in pseudo-distributed
# mode, just write a pseudo-distributed hostname
# Example for hostnames: ips="ds1,ds2,ds3,ds4,ds5", Example for IPs: ips="192.168.8.1,192.168.8.2,192.168.8.3,192.168.8.4,192.168.8.5"
#ips=${ips:-"ds1,ds2,ds3,ds4,ds5"}
ips="hadoop01,hadoop02,hadoop03"

# Port of SSH protocol, default value is 22. For now we only support same port in all `ips` machine
# modify it if you use different ssh port
sshPort=${sshPort:-"22"}

#
# Licensed to the Apache Software Foundation (ASF) under one or more
# contributor license agreements.  See the NOTICE file distributed with
# this work for additional information regarding copyright ownership.
# The ASF licenses this file to You under the Apache License, Version 2.0
# (the "License"); you may not use this file except in compliance with
# the License.  You may obtain a copy of the License at
#
#     http://www.apache.org/licenses/LICENSE-2.0
#
# Unless required by applicable law or agreed to in writing, software
# distributed under the License is distributed on an "AS IS" BASIS,
# WITHOUT WARRANTIES OR CONDITIONS OF ANY KIND, either express or implied.
# See the License for the specific language governing permissions and
# limitations under the License.
#

# ---------------------------------------------------------
# INSTALL MACHINE
# ---------------------------------------------------------
# A comma separated list of machine hostname or IP would be installed DolphinScheduler,
# including master, worker, api, alert. If you want to deploy in pseudo-distributed
# mode, just write a pseudo-distributed hostname
# Example for hostnames: ips="ds1,ds2,ds3,ds4,ds5", Example for IPs: ips="192.168.8.1,192.168.8.2,192.168.8.3,192.168.8.4,192.168.8.5"
#ips=${ips:-"ds1,ds2,ds3,ds4,ds5"}

# 在哪些主机节点上安装Dolphinscheduler,多台服务之间使用英文逗号分隔
ips="hadoop01,hadoop02,hadoop03"

# Port of SSH protocol, default value is 22. For now we only support same port in all `ips` machine
# modify it if you use different ssh port
sshPort=${sshPort:-"22"}

# A comma separated list of machine hostname or IP would be installed Master server, it
# must be a subset of configuration `ips`.
# Example for hostnames: masters="ds1,ds2", Example for IPs: masters="192.168.8.1,192.168.8.2"
#masters=${masters:-"hadoop01"}

# 集群中那些被指定为master节点,多台服务之间使用英文逗号分隔
masters="hadoop01,hadoop02"

# A comma separated list of machine : or :.All hostname or IP must be a
# subset of configuration `ips`, And workerGroup have default value as `default`, but we recommend you declare behind the hosts
# Example for hostnames: workers="ds1:default,ds2:default,ds3:default", Example for IPs: workers="192.168.8.1:default,192.168.8.2:default,192.168.8.3:default"
#workers=${workers:-"ds1:default,ds2:default,ds3:default,ds4:default,ds5:default"}

# 集群中那些被指定为worker节点,多台服务之间使用英文逗号分隔,那几台被指定为默认,就在节点名称后添加":default"
workers="hadoop02:default,hadoop03:default"

# A comma separated list of machine hostname or IP would be installed Alert server, it
# must be a subset of configuration `ips`.
# Example for hostname: alertServer="ds3", Example for IP: alertServer="192.168.8.3"
#alertServer=${alertServer:-"ds3"}

# 集群中那些被指定为alert告警节点,多台服务之间使用英文逗号分隔
alertServer="hadoop03"

# A comma separated list of machine hostname or IP would be installed API server, it
# must be a subset of configuration `ips`.
# Example for hostname: apiServers="ds1", Example for IP: apiServers="192.168.8.1"
#apiServers=${apiServers:-"ds1"}

# 集群中那个节点用来安装api-server服务
apiServers="hadoop01"

# The directory to install DolphinScheduler for all machine we config above. It will automatically be created by `install.sh` script if not exists.
# Do not set this configuration same as the current path (pwd). Do not add quotes to it if you using related path.
#installPath=${installPath:-"/tmp/dolphinscheduler"}
#installPath="~/dolphinscheduler"

# dolphinscheduler在集群中的默认安装路径/home/dolphinscheduler/dolphinscheduler
installPath="~/dolphinscheduler"

# The user to deploy DolphinScheduler for all machine we config above. For now user must create by yourself before running `install.sh`
# script. The user needs to have sudo privileges and permissions to operate hdfs. If hdfs is enabled than the root directory needs
# to be created by this user
# 指定dolphinscheduler集群的安装用户
deployUser=${deployUser:-"dolphinscheduler"}

# The root of zookeeper, for now DolphinScheduler default registry server is zookeeper.
#zkRoot=${zkRoot:-"/dolphinscheduler"}

# 指定dolphinscheduler集群在zookeeper中的注册根路径
zkRoot=${zkRoot:-"/dolphinscheduler"}
配置文件 /opt/oackages/apache-dolphinscheduler-3.1.9-bin/bin/env/dolphinscheduler_env.sh 主要就是用来配置 DolphinScheduler 的数据库连接信息、一些dolphinscheduler支持的调度任务类型外部依赖路径或库文件,如 JAVA_HOME 、DATAX_HOME和SPARK_HOME 都是在这里定义的。
#
# Licensed to the Apache Software Foundation (ASF) under one or more
# contributor license agreements.  See the NOTICE file distributed with
# this work for additional information regarding copyright ownership.
# The ASF licenses this file to You under the Apache License, Version 2.0
# (the "License"); you may not use this file except in compliance with
# the License.  You may obtain a copy of the License at
#
#     http://www.apache.org/licenses/LICENSE-2.0
#
# Unless required by applicable law or agreed to in writing, software
# distributed under the License is distributed on an "AS IS" BASIS,
# WITHOUT WARRANTIES OR CONDITIONS OF ANY KIND, either express or implied.
# See the License for the specific language governing permissions and
# limitations under the License.
#

# JAVA_HOME, will use it to start DolphinScheduler server
#export JAVA_HOME=${JAVA_HOME:-/opt/java/openjdk}

#配置JAVA_HOME变量
export JAVA_HOME=${JAVA_HOME:-/usr/java/jdk1.8.0_181-cloudera}

# Database related configuration, set database type, username and password
#export SPRING_DATASOURCE_URL


#配置Dolphinscheduler的数据库连接信息
export SPRING_DATASOURCE_URL="jdbc:mysql://localhost:3306/dolphinscheduler?serverTimezone=UTC&useTimezone=true&useUnicode=true&characterEncoding=UTF-8&serverTimezone=Asia/Shanghai"
export SPRING_JACKSON_TIME_ZONE=${SPRING_JACKSON_TIME_ZONE:-GMT+8}
export SPRING_DATASOURCE_USERNAME=dolphinscheduler
export SPRING_DATASOURCE_PASSWORD=dolphinscheduler

# DolphinScheduler server related configuration
export SPRING_CACHE_TYPE=${SPRING_CACHE_TYPE:-none}
export SPRING_JACKSON_TIME_ZONE=${SPRING_JACKSON_TIME_ZONE:-UTC}
export MASTER_FETCH_COMMAND_NUM=${MASTER_FETCH_COMMAND_NUM:-10}

# Registry center configuration, determines the type and link of the registry center

#配置Dolphinscheduler的使用的注册中心类型为Zookeeper
export REGISTRY_TYPE=${REGISTRY_TYPE:-zookeeper}
#export REGISTRY_ZOOKEEPER_CONNECT_STRING=${REGISTRY_ZOOKEEPER_CONNECT_STRING:-localhost:2191}

#配置Dolphinscheduler的使用的注册中心zookeeper集群连接信息
export REGISTRY_ZOOKEEPER_CONNECT_STRING=${REGISTRY_ZOOKEEPER_CONNECT_STRING:-hadoop01:2191,hadoop02:2191,hadoop03:2191}

# Tasks related configurations, need to change the configuration if you use the related tasks.
#Dolphinscheduler中各个任务类型相关的系统环境变量配置,找到你可能使用到的任务类型可能使用到的服务在服务器上的安装路径,配置到这里就可以,最好在集群安装之前配置好
#export HADOOP_HOME=${HADOOP_HOME:-/opt/soft/hadoop}
#export HADOOP_CONF_DIR=${HADOOP_CONF_DIR:-/opt/soft/hadoop/etc/hadoop}
#export HADOOP_CONF_DIR=etc/hadoop/conf
#export SPARK_HOME1=${SPARK_HOME1:-/opt/soft/spark1}
#export SPARK_HOME2=${SPARK_HOME2:-/opt/soft/spark2}
#export PYTHON_HOME=${PYTHON_HOME:-/opt/soft/python}
#export PYTHON_HOME=/opt/soft/python
#export HIVE_HOME=${HIVE_HOME:-/opt/soft/hive}
#export FLINK_HOME=${FLINK_HOME:-/opt/soft/flink}
#export DATAX_HOME=${DATAX_HOME:-/opt/soft/datax}
#export SEATUNNEL_HOME=${SEATUNNEL_HOME:-/opt/soft/seatunnel}
#export CHUNJUN_HOME=${CHUNJUN_HOME:-/opt/soft/chunjun}
#export SQOOP_HOME=${SQOOP_HOME:-/opt/soft/sqoop}

export PATH=$HADOOP_HOME/bin:$SQOOP_HOME/bin:$SPARK_HOME1/bin:$SPARK_HOME2/bin:$PYTHON_HOME/bin:$JAVA_HOME/bin:$HIVE_HOME/bin:$FLINK_HOME/bin:$DATAX_HOME/bin:$SEATUNNEL_HOME/bin:$CHUNJUN_HOME/bin:$PATH
3.7.关闭Python 网关(默认开启)
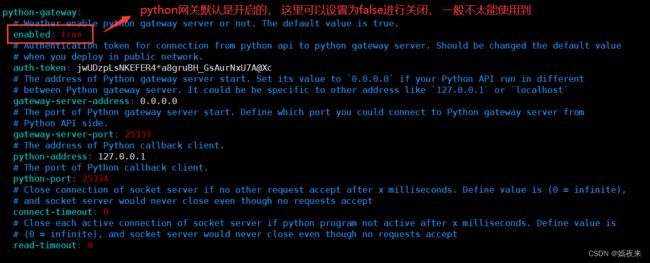
Python 网关服务会默认与 api-server 一起启动,如果不想启动则需要更改 api-server 配置文件 /opt/oackages/apache-dolphinscheduler-3.1.9-bin/api-server/conf/application.yaml 中的 python-gateway.enabled : false 来禁用它。
vim ./api-server/conf/application.yaml
3.8.执行数据库初始化脚本
#切换到数据库脚本所在目录
cd /opt/oackages/apache-dolphinscheduler-3.1.9-bin/tools/sql/sql
#从SQL备份文件中还原数据库
mysql -udolphinscheduler -p dolphinscheduler < dolphinscheduler_mysql.sql
3.9.配置数据源驱动文件
MySQL 驱动文件必须使用 JDBC Driver 8.0.16 及以上的版本,需要手动下载 mysql-connector-java 并移动到 DolphinScheduler 的每个模块的 libs 目录下,其中包括 5 个目录:
/opt/oackages/apache-dolphinscheduler-3.1.9-bin/api-server/libs

/opt/oackages/apache-dolphinscheduler-3.1.9-bin/alert-server/libs

/opt/oackages/apache-dolphinscheduler-3.1.9-bin/master-server/libs

/opt/oackages/apache-dolphinscheduler-3.1.9-bin/worker-server/libs

/opt/oackages/apache-dolphinscheduler-3.1.9-bin/tools/libs
将mysql的驱动复制到这些模块的依赖路径下
cp /opt/packages/mysql-connector-j-8.0.16.jar /opt/oackages/apache-dolphinscheduler-3.1.9-bin/api-server/libs/
cp /opt/packages/mysql-connector-j-8.0.16.jar /opt/oackages/apache-dolphinscheduler-3.1.9-bin/alert-server/libs/
cp /opt/packages/mysql-connector-j-8.0.16.jar /opt/oackages/apache-dolphinscheduler-3.1.9-bin/master-server/libs/
cp /opt/packages/mysql-connector-j-8.0.16.jar /opt/oackages/apache-dolphinscheduler-3.1.9-bin/worker-server/libs/
cp /opt/packages/mysql-connector-j-8.0.16.jar /opt/oackages/apache-dolphinscheduler-3.1.9-bin/tools/libs/
当然除了mysql之外,可能还涉及SQLServer、Oracle、Hive等数据源驱动,集成方式和MySQL是一样的, 不过最好在集群安装之前就将需要的依赖都提前添加到对应模块的libs目录下, 这样集群安装之后就不用再处理了, 不过之后再处理数据源依赖也是可以的。

以上数据库依赖有需要可以私信流邮箱,我看到会发给你们的。
3.10.执行集群安装
首先,再次修改/opt/packages/apache-dolphinscheduler-3.1.9-bin的所属用户和用户组为dolphinscheduler
chmod -R dolphinscheduler:dolphinscheduler /opt/packages/apache-dolphinscheduler-3.1.9-bin
切换到dolphinscheudler用户
su - dolphinscheudler
切换到解压根目录
cd /opt/packages/apache-dolphinscheduler-3.1.9-bin
执行集群安装脚本install.sh
./bin/install.sh
4.dolphinscheduler集群启停测试
安装完成之后, 所有节点上Dolphinscheduler服务的默认安装目录都是/home/dolphinshceduler/dolphinscheduler
启动之前, 确保zookeeper服务正常启动, 否则集群无法正常启动成功。
在hadoop01节点上切换到dolphinscheduler系统用户
su - dolphinscheduler
切换到dolphinscheduler安装目录
cd ~/dolphinscheduler
执行集群常用操作命令
#一键启动集群命令
./bin/start-all.sh

#一键停止集群命令
./bin/stop-all.sh

#一键查询集群状态命令
./bin/status-all.sh
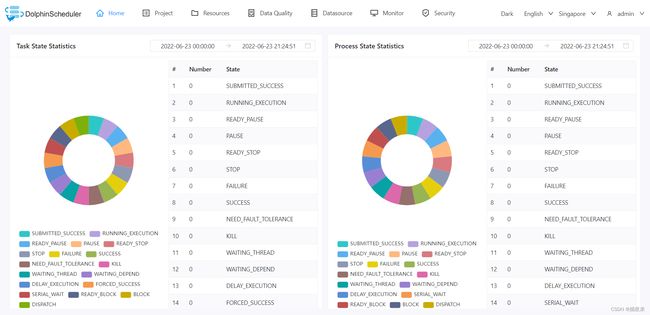
访问UI地址:http://hadoop01的IP:12345/dolphinscheduler/ui
用户名:admin 密码:dolphinscheduler123

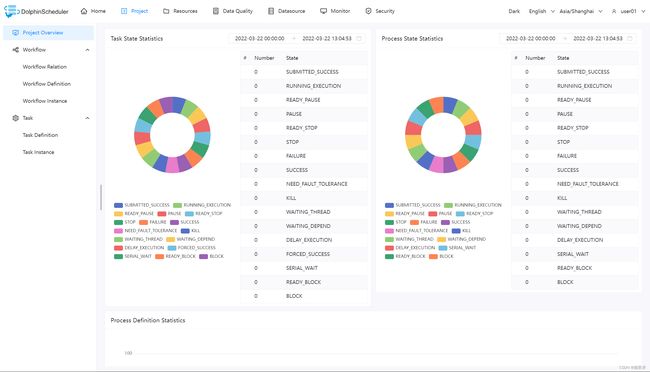
OK, 至此dolphinscheduler分布式集群就搭建完成了。


