Pyecharts直角坐标系图:热力图
Pyecharts直角坐标系图:热力图
文章目录
- Pyecharts直角坐标系图:热力图
- 前言
- 一. HeatMap:热力图
-
- 1.1 add 函数
- 1.2 热力图数据项
- 二. 例子
-
- 2.1 标签显示
- 2.2 笛卡尔系
- 总结
前言
本文主要是展示了Pyecharts热力图的基本应用和简单案例。
一. HeatMap:热力图
1.1 add 函数
主要是:名称,数据,x轴的索引,配置项。
# func pyecharts.charts.HeatMap.add_yaxis
def add_yaxis(
    # 系列名称,用于 tooltip 的显示,legend 的图例筛选。
    series_name: str,

    # Y 坐标轴数据
    yaxis_data: types.Sequence[types.Union[opts.HeatMapItem, dict]],

    # 系列数据项
    value: types.Sequence[types.Union[opts.HeatMapItem, dict]],

    # 是否选中图例
    is_selected: bool = True,

    # 使用的 x 轴的 index,在单个图表实例中存在多个 x 轴的时候有用。
    xaxis_index: Optional[Numeric] = None,

    # 使用的 y 轴的 index,在单个图表实例中存在多个 y 轴的时候有用。
    yaxis_index: Optional[Numeric] = None,

    # 标签配置项,参考 `series_options.LabelOpts`
    label_opts: Union[opts.LabelOpts, dict] = opts.LabelOpts(),

    # 标记点配置项,参考 `series_options.MarkPointOpts`
    markpoint_opts: Union[opts.MarkPointOpts, dict, None] = None,

    # 标记线配置项,参考 `series_options.MarkLineOpts`
    markline_opts: Union[opts.MarkLineOpts, dict, None] = None,

    # 提示框组件配置项,参考 `series_options.TooltipOpts`
    tooltip_opts: Union[opts.TooltipOpts, dict, None] = None,

    # 图元样式配置项,参考 `series_options.ItemStyleOpts`
    itemstyle_opts: Union[opts.ItemStyleOpts, dict, None] = None,
)
1.2 热力图数据项
主要是:名称,数据项值,提示框配置项
class HeatMapItem(
    # 数据项名称。
    name: Optional[str] = None,

    # 数据项的值。
    value: Optional[Sequence] = None,

    # 图元样式配置项,参考 `series_options.ItemStyleOpts`
    itemstyle_opts: Union[ItemStyleOpts, dict, None] = None,

    # 提示框组件配置项,参考 `series_options.TooltipOpts`
    tooltip_opts: Union[TooltipOpts, dict, None] = None,
)
二. 例子
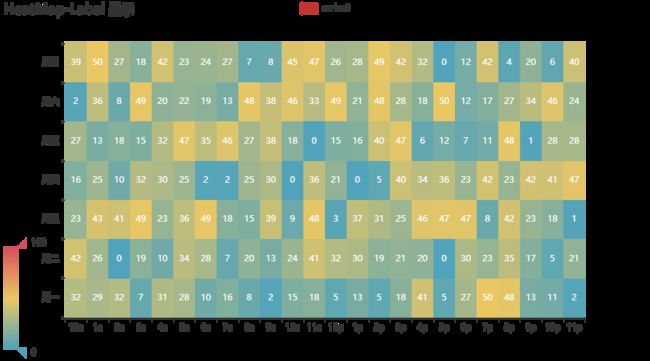
2.1 标签显示
import random

from pyecharts import options as opts
from pyecharts.charts import HeatMap
from pyecharts.faker import Faker

value = [[i, j, random.randint(0, 50)] for i in range(24) for j in range(7)]
c = (
    HeatMap()
    .add_xaxis(Faker.clock)
    .add_yaxis(
        "series0",  # 名称
        Faker.week,  # y轴数据
        value,  # 系列数据
        label_opts=opts.LabelOpts(is_show=True, position="inside"),
    )
    .set_global_opts(
        title_opts=opts.TitleOpts(title="HeatMap-Label 显示"),
        visualmap_opts=opts.VisualMapOpts(),  # 可视组件
    )
    .render("heatmap_with_label_show.html")
)
2.2 笛卡尔系
这个建议生成 html 看会更有意思。
import pyecharts.options as opts
from pyecharts.charts import HeatMap

"""
Gallery 使用 pyecharts 1.1.0
参考地址: https://echarts.apache.org/examples/editor.html?c=heatmap-cartesian

目前无法实现的功能:

1、官方示例中的 label 暂时无法居中,待解决
2、暂时无法对块设置 itemStyle
"""

hours = [
    "12a",
    "1a",
    "2a",
    "3a",
    "4a",
    "5a",
    "6a",
    "7a",
    "8a",
    "9a",
    "10a",
    "11a",
    "12p",
    "1p",
    "2p",
    "3p",
    "4p",
    "5p",
    "6p",
    "7p",
    "8p",
    "9p",
    "10p",
    "11p",
]
days = ["Saturday", "Friday", "Thursday", "Wednesday", "Tuesday", "Monday", "Sunday"]

data = [
    [0, 0, 5],
    [0, 1, 1],
    [0, 2, 0],
    [0, 3, 0],
    [0, 4, 0],
    [0, 5, 0],
    [0, 6, 0],
    [0, 7, 0],
    [0, 8, 0],
    [0, 9, 0],
    [0, 10, 0],
    [0, 11, 2],
    [0, 12, 4],
    [0, 13, 1],
    [0, 14, 1],
    [0, 15, 3],
    [0, 16, 4],
    [0, 17, 6],
    [0, 18, 4],
    [0, 19, 4],
    [0, 20, 3],
    [0, 21, 3],
    [0, 22, 2],
    [0, 23, 5],
    [1, 0, 7],
    [1, 1, 0],
    [1, 2, 0],
    [1, 3, 0],
    [1, 4, 0],
    [1, 5, 0],
    [1, 6, 0],
    [1, 7, 0],
    [1, 8, 0],
    [1, 9, 0],
    [1, 10, 5],
    [1, 11, 2],
    [1, 12, 2],
    [1, 13, 6],
    [1, 14, 9],
    [1, 15, 11],
    [1, 16, 6],
    [1, 17, 7],
    [1, 18, 8],
    [1, 19, 12],
    [1, 20, 5],
    [1, 21, 5],
    [1, 22, 7],
    [1, 23, 2],
    [2, 0, 1],
    [2, 1, 1],
    [2, 2, 0],
    [2, 3, 0],
    [2, 4, 0],
    [2, 5, 0],
    [2, 6, 0],
    [2, 7, 0],
    [2, 8, 0],
    [2, 9, 0],
    [2, 10, 3],
    [2, 11, 2],
    [2, 12, 1],
    [2, 13, 9],
    [2, 14, 8],
    [2, 15, 10],
    [2, 16, 6],
    [2, 17, 5],
    [2, 18, 5],
    [2, 19, 5],
    [2, 20, 7],
    [2, 21, 4],
    [2, 22, 2],
    [2, 23, 4],
    [3, 0, 7],
    [3, 1, 3],
    [3, 2, 0],
    [3, 3, 0],
    [3, 4, 0],
    [3, 5, 0],
    [3, 6, 0],
    [3, 7, 0],
    [3, 8, 1],
    [3, 9, 0],
    [3, 10, 5],
    [3, 11, 4],
    [3, 12, 7],
    [3, 13, 14],
    [3, 14, 13],
    [3, 15, 12],
    [3, 16, 9],
    [3, 17, 5],
    [3, 18, 5],
    [3, 19, 10],
    [3, 20, 6],
    [3, 21, 4],
    [3, 22, 4],
    [3, 23, 1],
    [4, 0, 1],
    [4, 1, 3],
    [4, 2, 0],
    [4, 3, 0],
    [4, 4, 0],
    [4, 5, 1],
    [4, 6, 0],
    [4, 7, 0],
    [4, 8, 0],
    [4, 9, 2],
    [4, 10, 4],
    [4, 11, 4],
    [4, 12, 2],
    [4, 13, 4],
    [4, 14, 4],
    [4, 15, 14],
    [4, 16, 12],
    [4, 17, 1],
    [4, 18, 8],
    [4, 19, 5],
    [4, 20, 3],
    [4, 21, 7],
    [4, 22, 3],
    [4, 23, 0],
    [5, 0, 2],
    [5, 1, 1],
    [5, 2, 0],
    [5, 3, 3],
    [5, 4, 0],
    [5, 5, 0],
    [5, 6, 0],
    [5, 7, 0],
    [5, 8, 2],
    [5, 9, 0],
    [5, 10, 4],
    [5, 11, 1],
    [5, 12, 5],
    [5, 13, 10],
    [5, 14, 5],
    [5, 15, 7],
    [5, 16, 11],
    [5, 17, 6],
    [5, 18, 0],
    [5, 19, 5],
    [5, 20, 3],
    [5, 21, 4],
    [5, 22, 2],
    [5, 23, 0],
    [6, 0, 1],
    [6, 1, 0],
    [6, 2, 0],
    [6, 3, 0],
    [6, 4, 0],
    [6, 5, 0],
    [6, 6, 0],
    [6, 7, 0],
    [6, 8, 0],
    [6, 9, 0],
    [6, 10, 1],
    [6, 11, 0],
    [6, 12, 2],
    [6, 13, 1],
    [6, 14, 3],
    [6, 15, 4],
    [6, 16, 0],
    [6, 17, 0],
    [6, 18, 0],
    [6, 19, 0],
    [6, 20, 1],
    [6, 21, 2],
    [6, 22, 2],
    [6, 23, 6],
]
data = [[d[1], d[0], d[2] or "-"] for d in data]


(
    HeatMap(init_opts=opts.InitOpts(width="1440px", height="720px"))
    .add_xaxis(xaxis_data=hours)
    .add_yaxis(
        series_name="Punch Card",
        yaxis_data=days,
        value=data,
        label_opts=opts.LabelOpts(
            is_show=True, color="#fff", position="bottom", horizontal_align="50%"
        ),
    )
    .set_series_opts()
    .set_global_opts(
        legend_opts=opts.LegendOpts(is_show=False),
        xaxis_opts=opts.AxisOpts(
            type_="category",
            splitarea_opts=opts.SplitAreaOpts(
                is_show=True, areastyle_opts=opts.AreaStyleOpts(opacity=1)
            ),
        ),
        yaxis_opts=opts.AxisOpts(
            type_="category",
            splitarea_opts=opts.SplitAreaOpts(
                is_show=True, areastyle_opts=opts.AreaStyleOpts(opacity=1)
            ),
        ),
        visualmap_opts=opts.VisualMapOpts(
            min_=0, max_=10, is_calculable=True, orient="horizontal", pos_left="center"
        ),
    )
    .render("heatmap_on_cartesian.html")
)
总结
本文主要展示了Pyecharts热力图的简单应用和有趣的案例。
