通过fastlane打包上传到appstore
需要mac设备
一、Fastlane 安装
1、安装 Xcode command line tools:
命令行 xcode-select --install
2、安装Fastlane
命令行 brew install fastlane
3、初始化Fastlane
cd到你的需要打包的项目目录,然后执行命令
fastlane init
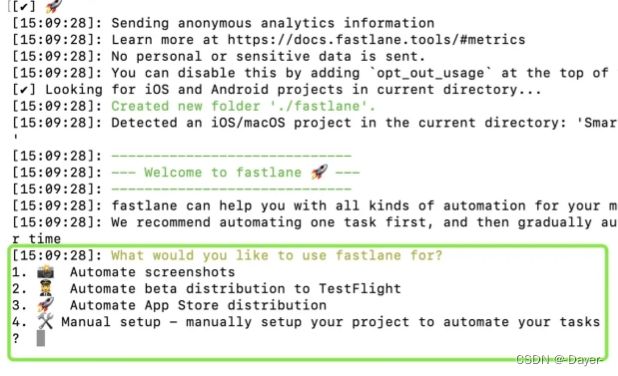
解释:
(1)、自动截屏。这个功能能帮我们自动截取APP中的截图,并添加手机边框(如果需要的话)
(2)、自动发布beta版本用于TestFlight
(3)、自动发布到AppStore
(4)、手动设置
我选的第四个 然后一直enter最后会生成几个文件
二、生成 deliver 文件
1、初始化Deliverfile 文件
打开终端cd到你的iOS项目根目录
执行下面命令 fastlane deliver init
如果提示你要输入Apple ID,照做就是了
然后就会多一些文件 如上图
2、编辑Deliverfile 文件
文件填充 username "你的苹果开发账号"
三、编辑Appfile 文件
1、添加下面信息
app_identifier("xxxxxxxxx") # The bundle identifier of your app
team_id("xxxxxxxx") # Developer Portal Team ID
apple_id("xxxxxxx") # Your Apple email address
itc_team_id("xxxxx") # App Store Connect Team ID
2、信息说明 及获取
app_identifier 对应app的Id
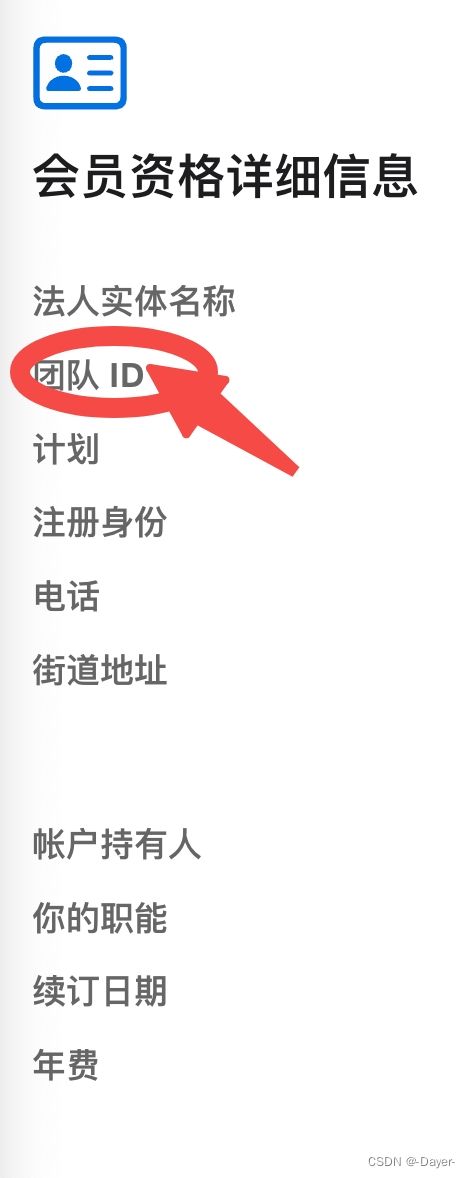
team_id 去哪里找
访问这个https://developer.apple.com/account#MembershipDetailsCard
查看这个
apple_id 你登录的邮箱
itc_team_id 这个去哪里找
https://sarunw.com/posts/fastlane-find-team-id/ 访问这个 有对应的文档
找到这里
或者直接访问 https://appstoreconnect.apple.com/WebObjects/iTunesConnect.woa/ra/user/detail
contentProviderId 这个值就是 itc_team_id
四、Fastfile文件的配置及脚本打包命令配置
1、具体代码
default_platform(:ios)
platform :ios do
desc "Description of what the lane does"
#-----------------------------------------------------------------------DEV配置
lane :build_dev do |options|
#options参数
uuid = options[:uuid] || '默认的uuId'
version_number = options[:version_number] || '1.0.0'
build_number = options[:build_number] || 100
increment_version_number(
version_number: version_number
)
increment_build_number(
build_number: build_number
)
gym(
scheme: "demo",
configuration: "Release",
clean: true,
workspace: "demo.xcworkspace",
output_directory: "./releases",
output_name: "iosAppName",
export_xcargs: "-allowProvisioningUpdates",
export_options: {
method: 'development',
provisioningProfiles: {
'app包名': uuid
}
}
)
end
#-----------------------------------------------------------------------PROD配置
lane :build_prod do |options|
uuid = options[:uuid] || '默认的uuId'
version_number = options[:version_number] || '2.0.3'
build_number = options[:build_number] || 99
increment_version_number(
version_number: version_number
)
increment_build_number(
build_number: build_number
)
currentTime = Time.new.strftime("%Y-%m-%d %H:%M:%S")
gym(
scheme: "demo",
configuration: "Release",
clean: true,
workspace: "demo.xcworkspace",
output_directory: "./releases",
output_name: "iosAppName",
export_xcargs: "-allowProvisioningUpdates",
export_options: {
method: 'app-store',
provisioningProfiles: {
'com.energy.anneng.pd': uuid
}
}
)
puts "uuid#{uuid}"
puts "version_number#{version_number}"
puts "build_number#{build_number}"
puts "上传 ipa 包到 iTunes Connect"
# deliver(
# submit_for_review: true,
# metadata_path: "./metadata",
# #跳过截图上传
# skip_screenshots: true,
# #跳过元数据上传
# skip_metadata: true,
# #跳过审核直接上传
# force: true
# )
end
end
2、关于Fastlane的打包工程代码已完成更改,脚本打包命令
开发证书 打包 的命令
fastlane ios build_dev uuid:$UUID version_number:$APP_VERSION build_number:$APP_VERSION_CODE
生产证书打包 的命令 及上传 appstore
fastlane ios build_prod uuid:$UUID version_number:$APP_VERSION build_number:$APP_VERSION_CODE
五、如何解决fastlan上传deliver 苹果的双重认证 (短信、密码)
fastlane ios build_prod 执行这个并上传的时候需要登录 校验如何篇破解?
目前采用的方案是
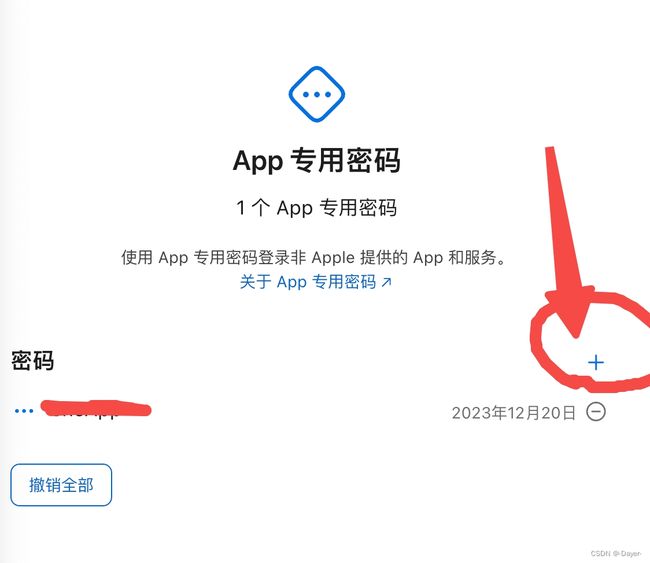
1、生成一个不需要进行短信认证的application specific password,这个需要到 苹果开发者中心的账号管理下进行生成 app 专用密码。注意生成后将其备份,因为页面一旦关闭将无法再次查看
访问 https://appleid.apple.com/account/manage
选中这
点击加号 下一步 保存这个application specific password字符串 后面会用到
2、执行命令 fastlane spaceauth -u [开发者账号] ,生成FASTLANE_SESSION,将其备份
3、配置环境变量
打开 终端 输入 命令 vim ~/.bash_profile
按i键进入编辑模式,输入下面信息
export FASTLANE_APPLE_APPLICATION_SPECIFIC_PASSWORD=[application specific password(替换为你自己的)]
export FASTLANE_SESSION=[FASTLANE_SESSION(替换为你自己的)]
上面两个字符都是你备份的只需要替换就好了
再按esc键,输入 :wq 保持并退出
执行source ~/.bash_profile使新增的环境变量生效,分别执行以下命令查看环境变量是否设置成功
echo $FASTLANE_APPLE_APPLICATION_SPECIFIC_PASSWORD echo $FASTLANE_SESSION
4、继续执行还是 提示错误 fastlane ios build_prod
如何解决
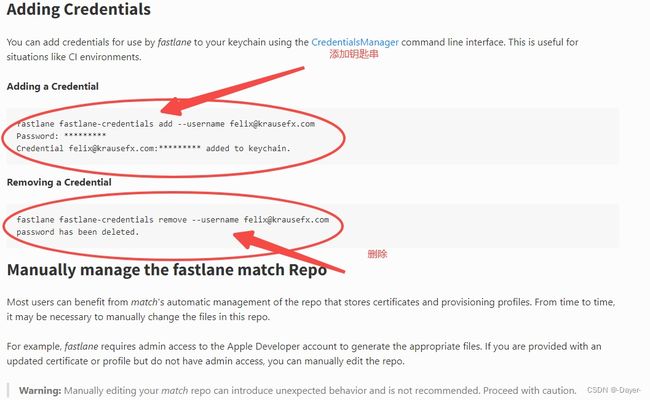
我们可以使用CredentialsManager重设钥匙串对应的开发者账号密码为专用密码(切记此处的密码为上面生成的专用密码)
访问这个 https://docs.fastlane.tools/advanced/other/
找到这个
Adding a Credential
执行 fastlane fastlane-credentials add --username [email protected]
会提示输入密码 这个密码就是app 专用密码
Credential [email protected]:********* added to keychain.
提示这个就是添加钥匙串成功了
Removing a Credential
fastlane fastlane-credentials remove --username [email protected]


