K8s(六)Deployment资源
Deployment是Kubernetes中的一个重要组件,用于管理应用程序的部署和更新。它提供了一种声明性的方式来定义应用程序的期望状态,并确保集群中的Pod按照这个状态进行部署和维护。 简化了应用程序的部署和更新流程,并提供了健康检查、自动扩缩容、历史版本回滚等功能。
相当于Deployment可以来管理ReplicaSet,ReplicaSet是Deployment底下的一个子功能。
Deployment可以管理多个rs,进行更新时,可以同时具有多个rs,但同时只使用一个rs。支持版本回滚,并可以支持多种更新策略
yaml文件编写
#Deployment yaml文件编写
#查看帮助
kubectl explain Deployment
apiVersion
kind
metadata 扩容与缩容
#修改dp.yaml
...
replicas: 5 #副本数,默认为1
...
kubectl apply -f dp.yaml
#再查看,已经变成五个了
kubectl get deploy
NAME      READY   UP-TO-DATE   AVAILABLE   AGE
dp-test   5/5     5            5           13m
kubectl get pods
NAME                     READY   STATUS    RESTARTS   AGE
dp-test-648cf4f5-b82kv   1/1     Running   0          3m29s
dp-test-648cf4f5-dssv7   1/1     Running   0          3m29s
dp-test-648cf4f5-hbhmx   1/1     Running   0          13m
dp-test-648cf4f5-x9gb4   1/1     Running   0          13m
dp-test-648cf4f5-znktp   1/1     Running   0          13m
#修改dp.yaml
...
replicas: 2 #副本数,默认为1
...
kubectl apply -f dp.yaml
#查看,删除的时候是随机删除的
kubectl get deploy
NAME      READY   UP-TO-DATE   AVAILABLE   AGE
dp-test   2/2     2            2           14m
滚动更新与自定义策略
#当前状态
curl 10.10.179.43:80
Welcome to nginx!
Welcome to nginx!
If you see this page, the nginx web server is successfully installed and
working. Further configuration is required.
For online documentation and support please refer to
nginx.org.
Commercial support is available at
nginx.com.
Thank you for using nginx.
#修改yaml文件,修改镜像
...
replicas: 4 #副本数,默认为1
...
image: docker.io/library/tomcat
...
kubectl apply -f dp.yaml
#查看————滚动更新的策略默认为 先创建新的,后删除老的,25%
kubectl get pods -w
NAME READY STATUS RESTARTS AGE
dp-test-648cf4f5-b82kv 1/1 Running 0 80m
dp-test-648cf4f5-znktp 1/1 Running 0 90m
dp-test-6b98994689-v7d9w 0/1 Pending 0 0s
dp-test-6b98994689-v7d9w 0/1 Pending 0 0s
dp-test-6b98994689-v7d9w 0/1 ContainerCreating 0 0s
dp-test-6b98994689-v7d9w 0/1 ContainerCreating 0 1s
dp-test-6b98994689-v7d9w 1/1 Running 0 1s
dp-test-648cf4f5-znktp 1/1 Terminating 0 90m
dp-test-6b98994689-fzfv6 0/1 Pending 0 0s
dp-test-6b98994689-fzfv6 0/1 Pending 0 0s
dp-test-6b98994689-fzfv6 0/1 ContainerCreating 0 0s
dp-test-648cf4f5-znktp 1/1 Terminating 0 90m
dp-test-6b98994689-fzfv6 0/1 ContainerCreating 0 1s
dp-test-648cf4f5-znktp 0/1 Terminating 0 90m
dp-test-648cf4f5-znktp 0/1 Terminating 0 90m
dp-test-648cf4f5-znktp 0/1 Terminating 0 90m
dp-test-6b98994689-fzfv6 1/1 Running 0 2s
dp-test-648cf4f5-b82kv 1/1 Terminating 0 80m
dp-test-648cf4f5-b82kv 1/1 Terminating 0 80m
dp-test-648cf4f5-b82kv 0/1 Terminating 0 80m
dp-test-648cf4f5-b82kv 0/1 Terminating 0 80m
dp-test-648cf4f5-b82kv 0/1 Terminating 0 80m
#新的rs接管了,老的rs废弃
kubectl get rs
NAME DESIRED CURRENT READY AGE
dp-test-648cf4f5 0 0 0 92m
dp-test-6b98994689 2 2 2 88s
#当前状态
curl 10.10.234.66:8080
HTTP Status 404 – Not Found HTTP Status 404 – Not Found
Type Status Report
Description The origin server did not find a current representation for the target resource or is not willing to disclose that one exi
#回滚版本
#查看历史版本
kubectl rollout history deployment #两个历史版本
deployment.apps/dp-test
REVISION CHANGE-CAUSE
1 #对应nginx镜像
2 #对应tomcat镜像
#进行回滚
kubectl rollout undo deployment.apps/dp-test --to-revision=1
#查看rs,发现老的rs又被使用了
kubectl get rs
NAME DESIRED CURRENT READY AGE
dp-test-648cf4f5 2 2 2 99m
dp-test-6b98994689 0 0 0 8m22s
#查看网页状态
curl 10.10.179.46:80
Welcome to nginx!
Welcome to nginx!
If you see this page, the nginx web server is successfully installed and
working. Further configuration is required.
For online documentation and support please refer to
nginx.org.
Commercial support is available at
nginx.com.
Thank you for using nginx.
#自定义滚动更新策略
#帮助
kubectl explain Deployment.spec.strategy
rollingUpdate #滚动更新
type #类型,支持下面这两种,即Recreate与RollingUpate两种
Possible enum values:
- `"Recreate"` Kill all existing pods before creating new ones. #创建之前删除所有老的
- `"RollingUpdate"` Replace the old ReplicaSets by new one using rolling
update i.e gradually scale down the old ReplicaSets and scale up the new
one. #根据更新策略进行更新
kubectl explain Deployment.spec.strategy.rollingUpdate
maxSurge #更新过程中最多的,比如4个里25%就是最多能同时存在5个
maxUnavailable #几个不可用的副本数,默认为25%,比如4个里25%最多只能有一个不可用
#可用整形或百分比,如果出现小数,maxSurge向上取整,maxUnavailable向下取整
#且这两个值不能同时为0,默认都为25%
#使用ollingUpdate模式
#一个一个删
maxUnavailable: 0 #不能少于目标副本数,不能有存在不可用的副本
maxSurge: 1 #顶多多一个
#maxUnavailable越小,更新越稳妥
#maxSurge越大,更新速度越快
#修改yaml文件
...
replicas: 4 #副本数,默认为1
strategy:
rollingUpdate:
maxUnavailable: 1
maxSurge: 1
...
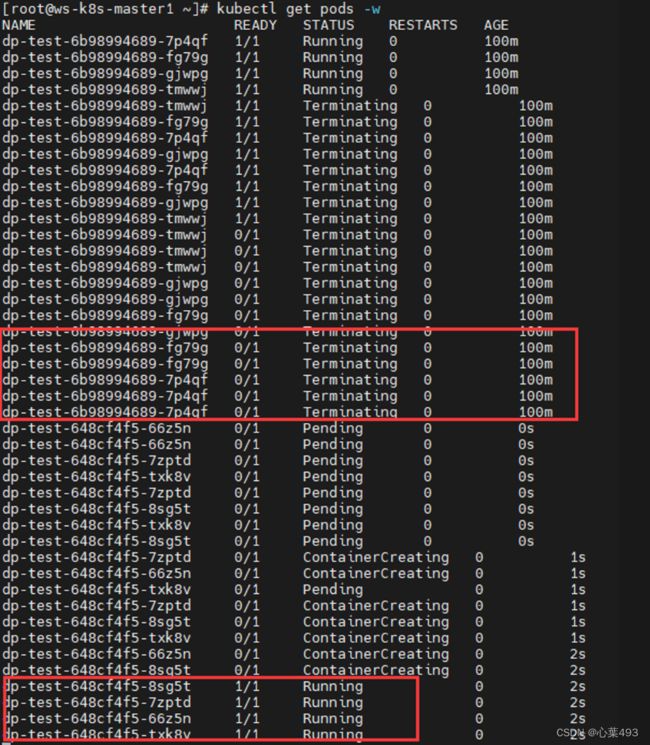
kubectl apply -f dp.yaml
kubectl get pods -w #rollingUpdate模式下先创建,后删除
NAME READY STATUS RESTARTS AGE
dp-test-6b98994689-7p4qf 1/1 Running 0 26s
dp-test-6b98994689-fg79g 1/1 Running 0 28s
dp-test-6b98994689-gjwpg 1/1 Running 0 28s
dp-test-6b98994689-tmwwj 1/1 Running 0 26s
#使用recreate模式
#修改yaml文件
...
strategy:
type: Recreate
...
image: docker.io/library/nginx #镜像改回来
...
kubectl apply -f dp.yaml
#可以看到是先进行删除,后进行创建,在生产环境中大部分情况下都不会这么操作
kubectl delete -f dp.yaml
使用Deployment进行蓝绿部署
蓝绿部署(Blue-Green Deployment)是一种在应用程序部署过程中实现零停机和无缝切换的策略。它通过同时维护两个完全独立且相同配置的生产环境(蓝色环境和绿色环境),使得在切换新版本应用程序时不会中断用户访问。
与滚动更新不同的是蓝绿部署是同时存在两个环境,然后通过流量切换来切换环境,而滚动更新从始至终只使用了一个环境
#创建蓝色和绿色的命名空间
kubectl create ns blue-green
#创建绿色与蓝色环境的yaml
cat > green.yaml << EOF
apiVersion: apps/v1
kind: Deployment
metadata:
name: green
namespace: blue-green
spec:
replicas: 2
selector:
matchLabels:
color: green
template:
metadata:
labels:
color: green
spec:
containers:
- name: test1
image: docker.io/library/nginx
imagePullPolicy: IfNotPresent
ports:
- containerPort: 80
EOF
kubectl apply -f green.yaml
kubectl get pods -n blue-green --show-labels -owide
NAME READY STATUS RESTARTS AGE IP NODE NOMINATED NODE READINESS GATES LABELS
green-748cc6748f-76jq6 1/1 Running 0 67s 10.10.179.52 ws-k8s-node1 color=bluegreen,pod-template-hash=748cc6748f
green-748cc6748f-tv2rd 1/1 Running 0 67s 10.10.234.73 ws-k8s-node2 color=bluegreen,pod-template-hash=748cc6748f
#创建service文件
cat > service_bluegreen.yaml << EOF
apiVersion: v1
kind: Service
metadata:
name: lanlv
namespace: blue-green
spec:
type: NodePort
ports:
- port: 80
nodePort: 30050
name: http
selector:
color: green #service关联color=green的标签的pod
EOF
kubectl apply -f service_bluegreen.yaml
kubectl get svc -n blue-green
NAME TYPE CLUSTER-IP EXTERNAL-IP PORT(S) AGE
lanlv NodePort 10.105.133.209 80:30050/TCP 3h23m
#创建蓝色环境
cat > blue.yaml << EOF
apiVersion: apps/v1
kind: Deployment
metadata:
name: blue
namespace: blue-green
spec:
replicas: 3
selector:
matchLabels:
color: blue
template:
metadata:
labels:
color: blue
spec:
containers:
- name: test2
image: docker.io/library/tomcat
imagePullPolicy: IfNotPresent
ports:
- containerPort: 8080
EOF
kubectl apply -f blue.yaml
#查看当前状态
kubectl get pods -n blue-green --show-labels
NAME READY STATUS RESTARTS AGE LABELS
blue-6c4db4cbcc-79mlg 1/1 Running 0 3h13m color=blue,pod-template-hash=6c4db4cbcc
blue-6c4db4cbcc-pv76m 1/1 Running 0 3h13m color=blue,pod-template-hash=6c4db4cbcc
green-7fc6f944df-5br85 1/1 Running 0 3h14m color=green,pod-template-hash=7fc6f944df
green-7fc6f944df-jvblp 1/1 Running 0 3h14m color=green,pod-template-hash=7fc6f944df
#当前状态————通过访问service代理的端口
curl 10.105.133.209:80
Welcome to nginx!
Welcome to nginx!
If you see this page, the nginx web server is successfully installed and
working. Further configuration is required.
For online documentation and support please refer to
nginx.org.
Commercial support is available at
nginx.com.
Thank you for using nginx.
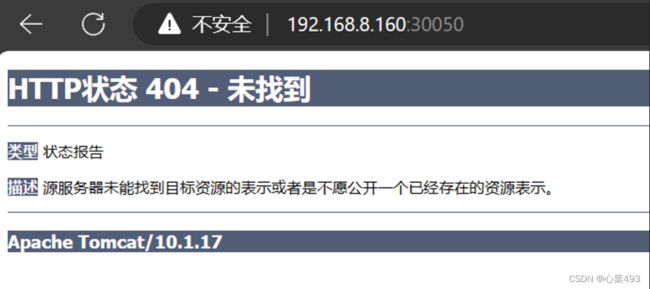
#也可以宿主机访问192.168.8.160(k8s集群master地址):port(service定义的)来访问
#修改service的yaml文件,使其匹配到labels=blue的pod
...
- port: 8080
nodePort: 30050
name: http
selector:
color: blue #service关联color=blue的标签的pod
...
kubectl apply -f service_bluegreen.yaml
#再次查看状态
curl 10.105.133.209:8080
HTTP Status 404 – Not Found HTTP Status 404 – Not Found
Type Status Report
Description The origin server did not find a current representation for the target resource or is not willing to disclose that one exists.
Apache Tomcat/10.1.17
[root@ws-k8s-master1 ~]#
#通过宿主机网页访问,清除缓存
使用Deployment进行金丝雀部署
金丝雀部署(Canary Deployment)是一种逐步发布新版本应用程序的部署策略。它的目标是在生产环境中逐渐引入新版本,以评估其性能、稳定性和用户反馈,同时最小化潜在的风险。
在金丝雀部署中,只有一小部分流量被导向到新版本,而大部分流量仍然被发送到稳定版本。这样可以在真实环境中进行测试,同时保持对用户的影响最小化。如果新版本表现良好,逐渐增加流量份额,直到完全切换到新版本。如果出现问题,可以快速回滚到稳定版本。又称灰度发布
#
kubectl set image deployment blue test2=docker.io/library/nginx -n blue-green && kubectl rollout pause deployment blue -n blue-green
#查看发现只运行了一个
#继续运行
kubectl rollout resume deployment blue -n blue-green
会开始更新剩余未更新的pod

#清理
kubectl delete -f service_bluegreen.yaml
kubectl delete -f blue.yaml
kubectl delete -f green.yaml


