springboot 原理分析之自动配置
一、Condition
Condition 是在 Spring 4.0 增加的条件判断功能,通过这个可以功能可以实现选择性的创建 Bean 操作。比如说,只有满足某一个条件才能创建这个 Bean,否则就不创建。
SpringBoot 是如何知道要创建哪个 Bean 的?比如 SpringBoot 是如何知道要创建 RedisTemplate 的?
其实 springboot 就是使用 Condition 来进行判断,它会去判断你当前的环境里面有没有导入 redis 的 starter,如果导入了它就帮你创建 RedisTemplate
1.1 获取 Bean
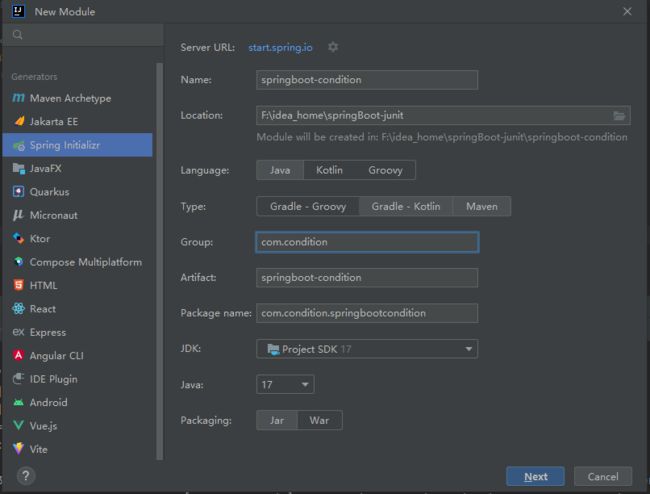
如果我们想要在 spring 中获取一个 Bean,该如何操作呢,接下来我们演示,首先创建一个名称为 springboot-condition 的工程,如下图:
可以在启动类里面通过 ConfigurableApplicationContext 来获取自己想要的 Bean,如下代码:
@SpringBootApplication
public class SpringbootConditionApplication {

	public static void main(String[] args) {

		// 启动 springboot 应用,返回 Spring 的 IOC 容器
		ConfigurableApplicationContext context = SpringApplication.run(SpringbootConditionApplication.class, args);

		// 获取 bean,redisTemplate
		Object redisTemplate = context.getBean("redisTemplate");
		System.out.println(redisTemplate);
	}

}
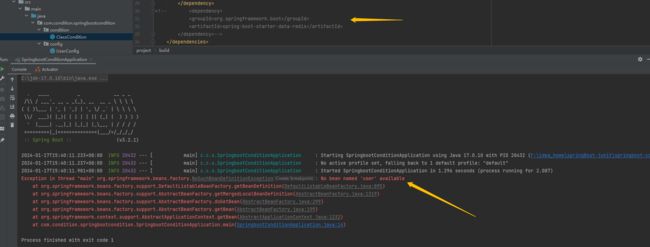
启动工程,如下,可以发现,并没有找到名称为 redisTemplate 的 Bean,那是因为我们没有导入 redis 的依赖。
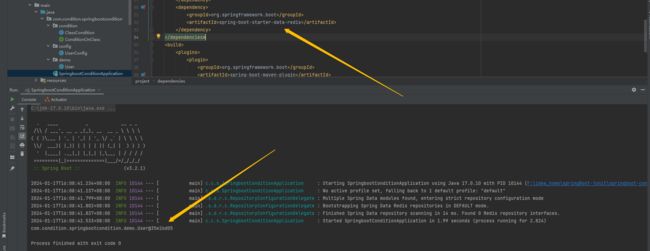
我们在 pom.xml 中引入 redis 的依赖,如下,然后再次运行启动类
	org.springframework.boot
	spring-boot-starter-data-redis
可以看到获取到了,如下图
1.2 需求
在 Spring 的 IOC 容器中有一个 User 的 Bean,现要求:
需求一:如果导入了 redis 坐标,则加载该 Bean;若没导入,则不加载。
需求二:将类的判断定义为动态的。判断哪个字节码文件存在可以动态指定。
1.3 需求一实现
首先,我们创建一个 User 和一个 UserConfig 的配置类,如下:
package com.condition.springbootcondition.demo;

public class User {

}
import com.condition.springbootcondition.demo.User;
import org.springframework.context.annotation.Bean;
import org.springframework.context.annotation.Configuration;
@Configuration
public class UserConfig {
@Bean
public User user(){
return new User();
}
}运行 main 方法,可以发现,可以正常获取 user 对象,如下:
@SpringBootApplication
public class SpringbootConditionApplication {

	public static void main(String[] args) {
		// 启动 springboot 应用,返回 Spring 的 IOC 容器
		ConfigurableApplicationContext context = SpringApplication.run(SpringbootConditionApplication.class, args);
		// 获取 bean
		Object redisTemplate = context.getBean("user");
		System.out.println(redisTemplate);
	}
}
可是需求里面要求的是如果存在 redis 坐标才创建,现在是存不存在都创建。
我们可以让 spring 容器在创建 bean 的时候加上条件注解 conditional,来达到动态控制的效果,修改 UserConfig 代码,如下:
package com.condition.springbootcondition.config;

import com.condition.springbootcondition.condition.ClassCondition;
import com.condition.springbootcondition.demo.User;
import org.springframework.context.annotation.Bean;
import org.springframework.context.annotation.Conditional;
import org.springframework.context.annotation.Configuration;

@Configuration
public class UserConfig {

    @Bean
    // 使用 @Conditional 注解需要传入一个实现了 Condition 接口的实现类,并指定匹配规则
    @Conditional(ClassCondition.class)
    public User user(){
        return new User();
    }

}
编写实现类 ClassCondition 它需要实现 Condition ,代码如下:
package com.condition.springbootcondition.condition;

import org.springframework.context.annotation.Condition;
import org.springframework.context.annotation.ConditionContext;
import org.springframework.core.type.AnnotatedTypeMetadata;

public class ClassCondition implements Condition {

    // match 方法,返回 true 则创建 bean,返回 false 则不创建 bean
    @Override
    public boolean matches(ConditionContext context, AnnotatedTypeMetadata metadata) {
        // 思路:判断 org.springframework.data.redis.core.RedisTemplate.class 是否存在
        boolean flag = true;
        try {
            Class aClass = Class.forName("org.springframework.data.redis.core.RedisTemplate");
        } catch (ClassNotFoundException e) {
            flag = false;
        }
        return flag;
    }
}
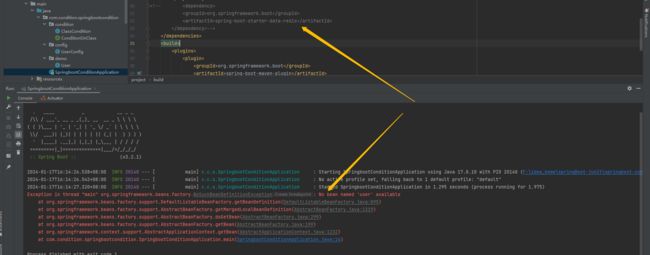
执行 main 方法进行测试,可以发现,如果注释掉了 redis 依赖则创建 bean 失败,未注释则创建成功。
1.4 需求二实现
在实现需求一时,我们创建了一个 ClassCondition,他只能判断 redis 的坐标,太局限了。能不能采用一种动态的方式,任意的指定类是否存在于当前的环境中。
首先,我们创建一个自定义注解 ConditionOnClass,这个注解要完成和 conditional 注解一摸一样的功能,
package com.condition.springbootcondition.condition;

import org.springframework.context.annotation.Condition;
import org.springframework.context.annotation.ConditionContext;
import org.springframework.core.type.AnnotatedTypeMetadata;
import java.util.Map;

public class ClassCondition implements Condition {

    /**
     *
     * @param context 上下文对象,用于获取环境,IOC 容器,ClassLoader 对象
     * @param metadata 注解元对象,可以用于获取注解定义的属性值
     * @return
     */
    @Override
    public boolean matches(ConditionContext context, AnnotatedTypeMetadata metadata) {
        // 通过注解属性值 value 指定坐标后创建 bean
        Map map = metadata.getAnnotationAttributes(ConditionOnClass.class.getName());
        // 遍历获取到的 value 数组
        String [] value =(String[]) map.get("value");
        boolean flag = true;
        try {
            for(String className:value) {
                Class cls = Class.forName(className);
            }
        } catch (ClassNotFoundException e) {
            flag = false;
        }
        return flag;
    }
}
将自定义注解作用到 UserConfig 类上,如下:
package com.condition.springbootcondition.config;

import com.condition.springbootcondition.condition.ConditionOnClass;
import com.condition.springbootcondition.demo.User;
import org.springframework.context.annotation.Bean;
import org.springframework.context.annotation.Configuration;

@Configuration
    public class UserConfig {
    @Bean
    // 使用 @Conditional 注解需要传入一个实现了 Condition 接口的实现类,并指定匹配规则
    // @Conditional(ClassCondition.class)
    @ConditionOnClass("org.springframework.data.redis.core.RedisTemplate")
    public User user(){
        return new User();
    }
}
此时就可以实现根据传入的类名判断 bean 是否被加载了,如下图:
1.5 总结
自定义条件
1、定义条件类:自定义类实现 Condition 接口,重写 matches 方法,在 matches 方法中进行逻辑判断,返回 boolean 值 。 matches 方法两个参数:
# 上下文对象,可以获取属性值,获取类加载器,获取BeanFactory等
context

# 元数据对象,用于获取注解属性
metadata2、判断条件: 在初始化 Bean 时,使用 @Conditional(条件类.class)注解
SpringBoot 提供的常用条件注解
1、ConditionalOnProperty:判断配置文件中是否有对应属性和值才初始化 Bean
2、ConditionalOnClass:判断环境中是否有对应字节码文件才初始化
3、BeanConditionalOnMissingBean:判断环境中没有对应 Bean 才初始化 Bean
二、切换内置 web 服务器
2.1 内置服务器
SpringBoot 的 web 环境中默认使用 tomcat 作为内置服务器,其实 SpringBoot 提供了 4 种内置服务器供我们选择,我们可以很方便的进行切换。
首先我们引入 web 模块的依赖,然后启动工程,如下:
	org.springframework.boot
	spring-boot-starter-web
可以看到,此时我们的工程是部署在 tomcat 服务器上的。
2.2 内置服务器分类
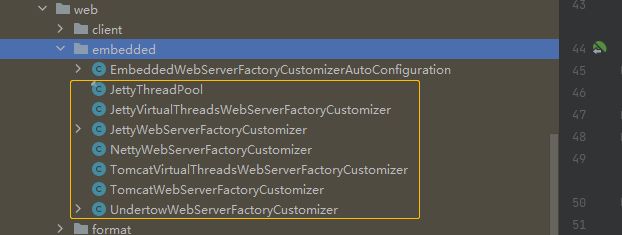
springboot 支持的内置 web 服务器一共有四种,分别为 Jetty、Netty、tomcat 和 Undertow,我们只需要导入服务器的坐标,就可以进行服务器的切换。
修改 pom.xml 文件,添加 jetty 依赖,去除 tomcat 的依赖,启动工程,如下:
	org.springframework.boot
	spring-boot-starter-web


			spring-boot-starter-tomcat
			org.springframework.boot


	spring-boot-starter-jetty
	org.springframework.boot
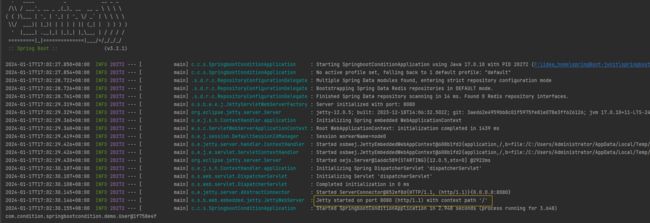
此时就将工程部署到了 jetty 服务器上,如下
三、Enable* 注解
SpringBoot 中提供了很多 Enable 开头的注解,这些注解都是用于动态启用某些功能的。而其底层原理是使用 @Import 注解导入一些配置类,实现 Bean 的动态加载。
SpringBoot 工程是否可以直接获取 jar 包中定义的 Bean?答案是不可以的,需要做一些操作才可以。
3.1 现象演示
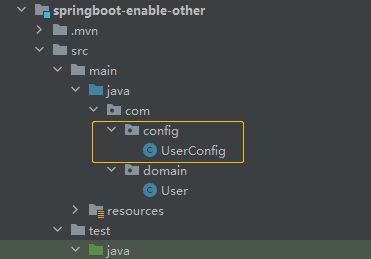
接下来我们演示下不可以直接获取第三方 jar 包中定义的 Bean 的现象,首先创建两个模块,springboot-enable 和 springboot-enable-other。
其中 springboot-enable-other 模块只是为了提供一个测试用的 Bean,在这个模块下创建一个 User 类和一个配置类 UserConfig,其他的不用配置,如下
package com.domain;

public class User {
}
package com.config;
import com.domain.User;
import org.springframework.context.annotation.Bean;
import org.springframework.context.annotation.Configuration;
@Configuration
public class UserConfig {
@Bean
public User user(){
return new User();
}
}在 springboot-enable 模块下引入 springboot-enable-other 的依赖,如下:
	com.xhf
	springboot-enable-other
	0.0.1-SNAPSHOT
测试下是否可以在 springboot-enable 模块下获取 springboot-enable-other 模块里面的 Bean,如下:
@SpringBootApplication
public class SpringbootEnableApplication {

    public static void main(String[] args) {

        ConfigurableApplicationContext context = SpringApplication.run(SpringbootEnableApplication.class, args);

        // 获取 Bean
        Object user = context.getBean("user");
        System.out.println(user);
    }
}
可以看到是无法获取的,如下图:
3.2 原因分析
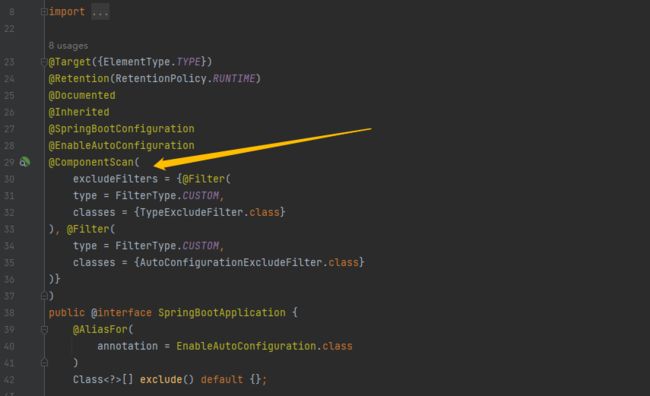
为什么不能直接获取其他工程的 Bean 呢?我们分析下原因,在我们的启动类上面有个 @SpringBootApplication 注解,点击去,可以看到它具体的定义,如下图:
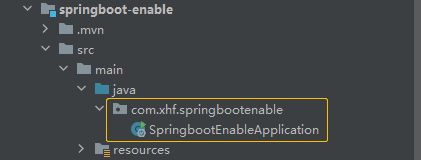
可以看到它上面有个 @ComponentScan 的注解,这个注解规定了扫描的范围为当前引导类所在包及其子包,如下图:
而我们的 User 类的 Bean 的所在包为 com.config,他们之间没有一个包含的关系,所以无法加载 User 类的 Bean。
3.3 问题解决
解决方式一:使用 @ComponentScan 扫描 User 类所在的路径,如下:
@SpringBootApplication
@ComponentScan("com.config")
public class SpringbootEnableApplication {
    public static void main(String[] args) {
        ConfigurableApplicationContext context = SpringApplication.run(SpringbootEnableApplication.class, args);
        // 获取 Bean
        Object user = context.getBean("user");
        System.out.println(user);
    }
}
解决方式二:可以使用 @Import 注解来加载类,这些类都会被 Spring 创建并放入 IOC 容器,如下:
@SpringBootApplication
@Import(UserConfig.class)
public class SpringbootEnableApplication {
    public static void main(String[] args) {
        ConfigurableApplicationContext context = SpringApplication.run(SpringbootEnableApplication.class, args);
        // 获取 Bean
        Object user = context.getBean("user");
        System.out.println(user);
    }
}
解决方式三:可以对 @Import 注解进行封装,在 springboot-enable-other 模块里面创建一个自定义注解 @EnableUser,内容如下:
package com.config;

import org.springframework.context.annotation.Import;

import java.lang.annotation.*;

@Target({ElementType.TYPE})
@Retention(RetentionPolicy.RUNTIME)
@Documented
// 导出自己的 UserConfig
@Import(UserConfig.class)
public @interface EnableUser {
}
将来在使用的时候只需要使用 @EnableUser 注解即可,如下:
@SpringBootApplication
@EnableUser
public class SpringbootEnableApplication {
    public static void main(String[] args) {
        ConfigurableApplicationContext context = SpringApplication.run(SpringbootEnableApplication.class, args);
        // 获取 Bean
        Object user = context.getBean("user");
        System.out.println(user);
    }
}
四、@Import注解
@Enable* 底层依赖于 @Import 注解导入一些类,使用 @Import 导入的类会被 Spring 加载到 IOC 容器中。而 @Import 提供四种用法,下面分别介绍下。
4.1 导入Bean
直接通过 @Import 注解,将我们所需要的 Bean 直接导入进去,代码如下:
@SpringBootApplication
@Import(User.class)
public class SpringbootEnableApplication {
    public static void main(String[] args) {
        ConfigurableApplicationContext context = SpringApplication.run(SpringbootEnableApplication.class, args);
        // 获取 Bean
        Object user = context.getBean("user");
        System.out.println(user);
    }
}
代码执行报错了,是因为 User 类 Bean 的名字不一定叫 user。
我们换一种方式来获取,通过类型来获取,如下,这下就没啥问题了
@SpringBootApplication
@Import(User.class)
public class SpringbootEnableApplication {
    public static void main(String[] args) {
        ConfigurableApplicationContext context = SpringApplication.run(SpringbootEnableApplication.class, args);
        // 获取 Bean
        User bean = context.getBean(User.class);
        System.out.println(bean);
    }
}
4.2 导入配置类
这个我们上面演示过,只需要导入 UserConfig 即可。且 UserConfig 上面的 @Configuration 注解可以不写,如下:
@SpringBootApplication
@Import(UserConfig.class)
public class SpringbootEnableApplication {
    public static void main(String[] args) {
        ConfigurableApplicationContext context = SpringApplication.run(SpringbootEnableApplication.class, args);
        // 获取 Bean
        Object user = context.getBean(User.class);
        System.out.println(user);

        Object role = context.getBean(Role.class);
        System.out.println(role);
    }
}
public class UserConfig {
@Bean
public User user(){
return new User();
}
@Bean
public Role role(){
return new Role();
}
}4.3 导入 ImportSelector 实现类
在 springboot-enable-other 模块下新建一个 MyImportSelector 类并实现 ImportSelector 接口,如下:
package com.config;

import org.springframework.context.annotation.ImportSelector;
import org.springframework.core.type.AnnotationMetadata;

public class MyImportSelector implements ImportSelector {
    @Override
    public String[] selectImports(AnnotationMetadata importingClassMetadata) {
        return new String[]{"com.domain.User","com.domain.Role"};
    }
}
然后在启动类上面使用 @Import 注解导入 MyImportSelector 类即可,如下:
@SpringBootApplication
@Import(MyImportSelector.class)
public class SpringbootEnableApplication {
    public static void main(String[] args) {
        ConfigurableApplicationContext context = SpringApplication.run(SpringbootEnableApplication.class, args);
        // 获取 Bean
        Object user = context.getBean(User.class);
        System.out.println(user);

        Object role = context.getBean(Role.class);
        System.out.println(role);
    }
}
4.4 导入 ImportBeanDefinitionRegistrar 实现类
在 springboot-enable-other 模块下新建一个 MyImportBeanDefinitionRegistrar 类并实现 ImportBeanDefinitionRegistrar 接口,如下:
package com.config;

import com.domain.User;
import org.springframework.beans.factory.support.AbstractBeanDefinition;
import org.springframework.beans.factory.support.BeanDefinitionBuilder;
import org.springframework.beans.factory.support.BeanDefinitionRegistry;
import org.springframework.context.annotation.ImportBeanDefinitionRegistrar;
import org.springframework.core.type.AnnotationMetadata;

public class MyImportBeanDefinitionRegistrar implements ImportBeanDefinitionRegistrar {

    @Override
    public void registerBeanDefinitions(AnnotationMetadata importingClassMetadata, BeanDefinitionRegistry registry) {

        AbstractBeanDefinition beanDefinition = BeanDefinitionBuilder.rootBeanDefinition(User.class).getBeanDefinition();
        registry.registerBeanDefinition("user",beanDefinition);
    }
}
然后在启动类上面使用 @Import 注解导入 MyImportBeanDefinitionRegistrar 类即可,如下:
@SpringBootApplication
@Import(MyImportBeanDefinitionRegistrar.class)
public class SpringbootEnableApplication {
    public static void main(String[] args) {
        ConfigurableApplicationContext context = SpringApplication.run(SpringbootEnableApplication.class, args);
        // 获取 Bean
        Object user = context.getBean(User.class);
        System.out.println(user);

        Object role = context.getBean(Role.class);
        System.out.println(role);
    }
}
五、@EnableAutoConfiguration 注解
1、@EnableAutoConfiguration 注解内部使用 @Import(AutoConfigurationImportSelector.class) 来加载配置类。
2、配置文件位置:META-INF/spring.factories,该配置文件中定义了大量的配置类,当 SpringBoot 应用启动时,会自动加载这些配置类,初始化 Bean
3、并不是所有的 Bean 都会被初始化,在配置类中使用 Condition 来加载满足条件的 Bean
六、实现自定义 redis-starter
6.1 需求描述
自定义实现一个 redis-starter,要求当导入 redis 坐标时,SpringBoot 自动创建 Jedis 的 Bean。
6.2 需求分析
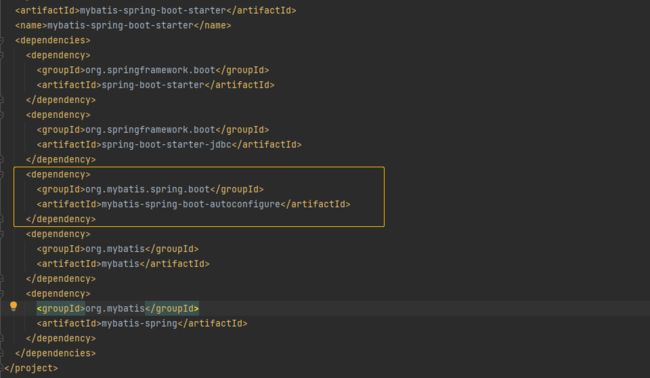
SpringBoot 提供了很多的 starter,但是有一些起步依赖 SpringBoot 并没有提供,而是由那些技术本身自己实现的,它期望和 SpringBoot 整合,所以它自己实现了起步依赖,比如说 mybatis 就是自己实现的,如下图:
springBoot 官方所提供的起步依赖它的功能名字都在最后面,比如说上面的 -test,而 mybatis 提供的起步依赖功能名字在最前面,比如说上面的 mybatis-。
总结起来说就是一般第三方自己实现的起步依赖功能名字都在前面, springBoot 官方所提供的起步依赖的功能名字都在最后面,以示区分。
此时我们可以点击 mybatis 的坐标,看看它涉及到的依赖,最重要的就是 mybatis-spring-boot-autoconfigure 这个依赖,从名字上就可以看出来这个是 mybatis 自动配置的坐标。只有引入了这个坐标,我们才可以加载 mybatis 的相关类。
同样的,我们也可以打开对应的 jar 包看下,我们可以看到,其实 mybatis-spring-boot-starter 它里面没有代码,只有一个 META-INF 文件夹,它只是将上图的那些坐标整合到一起对外提供一个依赖坐标,方标导入,仅此而已。
我们再来看下 mybatis-spring-boot-autoconfigure 的实现,如下,可以看到,他里面就有很多代码了,如下图。
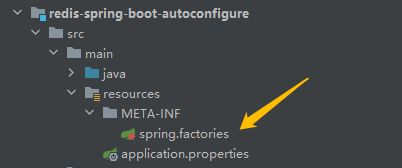
比如说,他里面有个 MybatisAutoConfiguration 的类,他就是一个 mybatis 的自动配置类,这个自动配置类将来如果想要被 Spring 所识别,从而加载配置类里面的 Bean,它的具体实现是定义一个 META-INF 文件夹,里面会有一个 spring.factories 文件,在这个文件里面配置一个 EnableAutoConfiguration 指向上面的 MybatisAutoConfiguration,内容如下:
SpringBoot 在启动的时候就加载 META-INF 文件夹里面的 spring.factories 文件,从而识别到这个自动配置类。
6.3 需求实现
1、创建 redis-spring-boot-autoconfigure 模块,如下图,把没用的文件都删除掉。
2、创建 redis-spring-boot-starter 模块,依赖 redis-spring-boot-autoconfigure 的模块,如下图,也是把没用的文件都删除掉,如下图
		org.springframework.boot
		spring-boot-starter


		com
		redis-spring-boot-autoconfigure
		0.0.1-SNAPSHOT
3、在 redis-spring-boot-autoconfigure 模块中初始化 Jedis 的 Bean。
	redis.clients
	jedis
接下来在 redis-spring-boot-autoconfigure 模块中编写一个核心的 redis 的自动配置类 RedisAutoConfiguration ,内容如下:
package com.redis.config;

import org.springframework.boot.context.properties.EnableConfigurationProperties;
import org.springframework.context.annotation.Bean;
import org.springframework.context.annotation.Configuration;
import redis.clients.jedis.Jedis;

@Configuration
// 启用 RedisProperties 类,让其受 Spring IOC 容器管理
@EnableConfigurationProperties(RedisProperties.class)
public class RedisAutoConfiguration {
    /**
     * 提供 Jedis 的bean
     */
    @Bean
    public Jedis jedis(RedisProperties redisProperties) {
        // 一般使用两个参数的构造方法
        return new Jedis(redisProperties.getHost(), redisProperties.getPort());
    }
}
创建一个 ConfigurationProperties 类让实体类和配置文件相绑定,动态的指定 redis 的 ip 地址和端口号,如下所示:
import org.springframework.boot.context.properties.ConfigurationProperties;
import org.springframework.stereotype.Component;

@Component
// 以后以 redis 开头的配置文件都会和 RedisProperties 实体类的属性相绑定
@ConfigurationProperties(prefix="redis")
public class RedisProperties {
    private String host = "localhost";

    private int port = 6379;

    public String getHost() {
        return host;
    }

    public void setHost(String host) {
        this.host = host;
    }

    public int getPort() {
        return port;
    }

    public void setPort(int port) {
        this.port = port;
    }
}
创建 META-INF/spring.factories 文件,结构如下所示:
并在 spring.factories 里面输入以下的内容:
org.springframework.boot.autoconfigure.EnableAutoConfiguration = com.redis.config.RedisAutoConfiguration4、在测试模块中引入自定义的 redis-starter 依赖,随便找一个模块,配置依赖,如下:
		org.springframework.boot
		spring-boot-starter


		com
		redis-spring-boot-starter
		0.0.1-SNAPSHOT
在测试类获取 Jedis 的 Bean ,如下所示:
@SpringBootApplication
public class RedisSpringBootTestApplication {
    public static void main(String[] args) {

        // 启动 springboot 应用,返回 Spring 的 IOC 容器
        ConfigurableApplicationContext context = SpringApplication.run(RedisSpringBootTestApplication.class, args);
        // 获取 bean
        Jedis jedis = context.getBean(Jedis.class);
        System.out.println(jedis);

        jedis.set("name","zhangsan");
        String name = jedis.get("name");
        System.out.println(name);
    }
}
可以看到,获取了 Jedis 的 Bean 了。
6.4 需求优化
6.4.1 验证配置文件
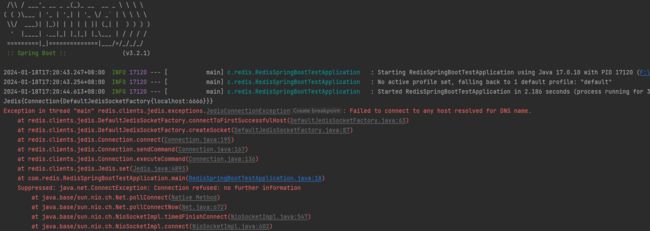
刚才我们创建一个 ConfigurationProperties 类让实体类和配置文件相绑定,接下来我们测试下,在 application.properties 里面配置 redis 的端口号,如下:
redis.port=6666启动工程,报错了,可以看到,我们的配置文件是生效了的。
当我们程序启动的时候 RedisAutoConfiguration 这个 Bean 就会被加载,我们可以给它加一些条件,当 Jedis 在的时候才会去加载这个 Bean,如下:
@Configuration
// 启用 RedisProperties 类,让其受 Spring IOC 容器管理
@EnableConfigurationProperties(RedisProperties.class)
@ConditionalOnClass(Jedis.class)
public class RedisAutoConfiguration {
    /**
     * 提供 Jedis 的bean
     */
    @Bean
    // 如果没有一个名字为 jedis 的Bean 才加载这个
    @ConditionalOnMissingBean(name="jedis")
    public Jedis jedis(RedisProperties redisProperties) {
        System.out.println("RedisAutoConfiguration......");
        // 一般使用两个参数的构造方法
        return new Jedis(redisProperties.getHost(), redisProperties.getPort());
    }
}