MvvmLight初尝试
首先,关于Mvvm的教程,网上很多都是零散的,我自己找的也很辛苦,学的也不是很全面很系统,不过还是要总结下。
我所理解的Mvvm,那就是把传统的.xaml.cs挪到了另一个地方(ViewModel)。View上的界面要么显示数据,要么接受用户的输入。显示数据就利用依赖属性Binding到View界面,接受用户输入就利用Binding把命令绑定到View界面。Model就是基本的基础数据,例如学生,那学生类就是一个Model,Model不用管要用学生做什么。而ViewModel就是用这些Model组装成我需要的数据,然后显示到View。
首先我们需要安装NuGet这个vs插件,这个东西可以方便的管理我们的引用,比如MvvmLight需要的一些引用啊,它可以自动帮你添加,不需要时,卸载也很方便。它的下载地址是http://nuget.codeplex.com/。
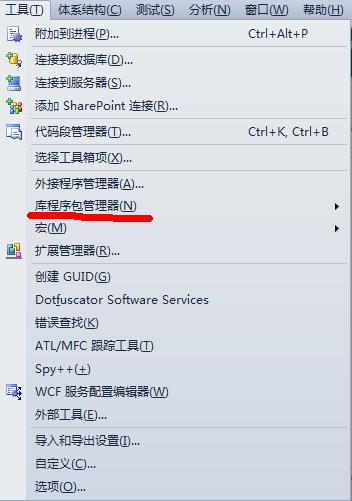
安装完之后,它会出现在这里

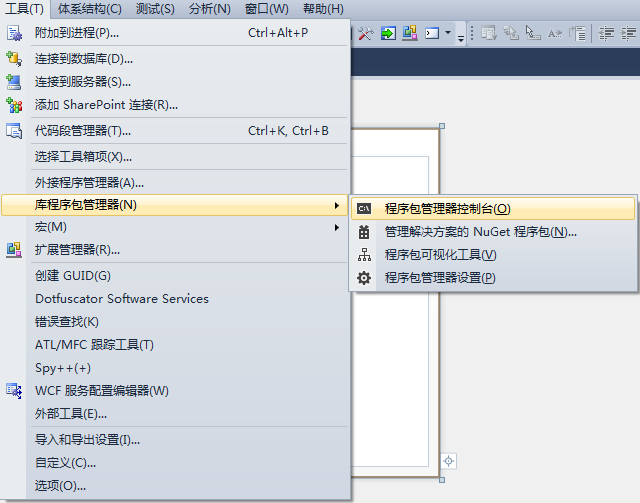
新建一个WPF项目,然后打开NuGet的控制台

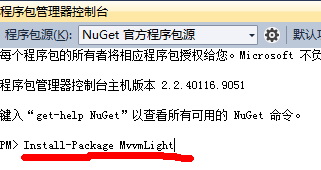
然后输入Install-Package MvvmLight

稍微等待下,它就会为你配置好MvvmLight所需要的引用。
默认NuGet为我们创建了ViewModel,View和Model文件夹我们需要自己创建。还有一点要注意,NuGet为我们创建了一个ViewModelLocator.cs,这个是用来控制我们应该使用哪个ViewModel的。Mvvm是怎么做到界面与后台代码分离的就是使用了DataContext这个属性,NuGet没有给我们加上使用MainViewModel,所以我们自己加上
<Window x:Class="MvvmStudentSample.MainWindow"

        xmlns="http://schemas.microsoft.com/winfx/2006/xaml/presentation"

        xmlns:x="http://schemas.microsoft.com/winfx/2006/xaml"

        DataContext="{Binding Main,Source={StaticResource Locator}}"

        Title="MainWindow" Height="350" Width="525">
如果这一段没有搞清楚,我希望读者回去看一下WPF Binding关于DataContext这一节,再看一下ViewModelLocator的源码。
创建一个学生类Stu.cs,它当然是Model了
class Stu

    {

        public int StuId { get; set; }

        public string Name { get; set; }

        public int Age { get; set; }

    }
我的界面上只想显示学生的Name和Age,并且属性Name和Age的值改变了需要能够放映到界面上,那么我们就需要在ViewModel中封装Stu的属性,我们就用MainViewModel吧
大家都看到了RaisePropertyChanged这个方法,其实我们的Stu是没有继承INotifyPropertyChanged接口的,没有继承该接口,就不具备通知界面修改的功能,这个如果不理解可以去研究下WPF的Binding。
所以这里对Name和Age的封装相当于将其封装成依赖属性。
public class MainViewModel : ViewModelBase

    {

        private Stu _stu = new Stu();


        public string StuName

        {

            get { return _stu.Name; }

            set

            {

                _stu.Name = value;

                RaisePropertyChanged("StuName");

            }

        }


        public int StuAge

        {

            get { return _stu.Age; }

            set

            {

                _stu.Age = value;

                RaisePropertyChanged("StuAge");

            }

        }

        public MainViewModel()

        {

            if (!IsInDesignMode)

            {

                _stu = new Stu();

                StuName = "HuangTao";

                StuAge = 22;

            }

        }

    }
MainWindow.xaml暂时设计成这样
<StackPanel TextElement.FontSize="20">

        <TextBlock Text="姓名:"></TextBlock>

        <TextBox Text="{Binding StuName}"></TextBox>

        <TextBlock Text="年龄:"></TextBlock>

        <TextBox Text="{Binding StuAge}"></TextBox>

    </StackPanel>
然后我们给Stu赋值。
public MainViewModel()

        {

            if (!IsInDesignMode)

            {

                _stu = new Stu();

                StuName = "HuangTao";

                StuAge = 22;

            }

        }
然后运行之,我们就能看到值。
我们加入一个按钮,按钮就是来接受用户点击的,点击事件我们将修改StuName和StuAge
public RelayCommand ChangeStuCommand

        {

            get;

            private set;

        }


        public MainViewModel()

        {

            if (!IsInDesignMode)

            {

                _stu = new Stu();

                StuName = "HuangTao";

                StuAge = 22;


                ChangeStuCommand = new RelayCommand(() =>

                    {

                        StuName = "Hello";

                        StuAge = 100;

                    });

            }

        }
然后将ChangeStuCommand绑定到界面上的按钮。
<StackPanel TextElement.FontSize="20">

        <TextBlock Text="姓名:"></TextBlock>

        <TextBox Text="{Binding StuName}"></TextBox>

        <TextBlock Text="年龄:"></TextBlock>

        <TextBox Text="{Binding StuAge}"></TextBox>

        <Button Width="150" Height="30" Content="ChangeStu" Command="{Binding ChangeStuCommand}"></Button>

    </StackPanel>
点击按钮,发现界面上的数据自动变更了。假如我们不是Click事件来触发按钮事件,而是MouseEnter时改变数据,这又要怎么做呢
先引入命名空间
xmlns:i="clr-namespace:System.Windows.Interactivity;assembly=System.Windows.Interactivity"

        xmlns:cmd="clr-namespace:GalaSoft.MvvmLight.Command;assembly=GalaSoft.MvvmLight.Extras.WPF4"
然后修改刚才的Button
<StackPanel TextElement.FontSize="20">

        <TextBlock Text="姓名:"></TextBlock>

        <TextBox Text="{Binding StuName}"></TextBox>

        <TextBlock Text="年龄:"></TextBlock>

        <TextBox Text="{Binding StuAge}"></TextBox>

        <Button Width="150" Height="30" Content="ChangeStu">

            <i:Interaction.Triggers>

                <i:EventTrigger EventName="MouseEnter">

                    <cmd:EventToCommand Command="{Binding ChangeStuCommand}"></cmd:EventToCommand>

                </i:EventTrigger>

            </i:Interaction.Triggers>

        </Button>

    </StackPanel>
暂时总结道这里。