Django从入门到精通(二)
目录
三、视图
3.1、文件or文件夹
3.2、相对和绝对导入urls
3.3、视图参数requests
3.4、返回值
3.5、响应头
3.6、FBV和CBV
FBV
四、静态资源
4.1、静态文件
4.2、媒体文件
五、模板
5.1、寻找html模板
5.2、模板处理的本质
5.3、常见模板语法
5.4、内置模板函数
5.5、自定义模板功能
filter
simple_tag
inclusion_tag
5.6、继承和母版
5.7、模板的导入
六、Django中间件
6.1、原始方式
6.2、MiddlewareMixin(建议)
6.3、MiddlewareMixin多个
三、视图
3.1、文件or文件夹
如果你是开发一个功能较少的小项目,一个views.py文件足够了。
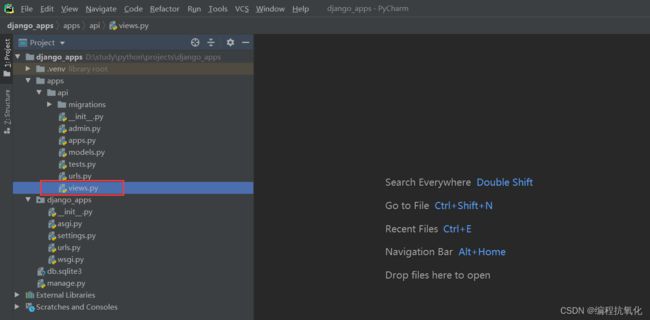
但如果你要开发的业务比较复杂,功能比较多,那你就要创建个文件夹来管理很多视图文件了。

3.2、相对和绝对导入urls
主urls.py
from django.urls import path,include

urlpatterns = [
    path('api/', include("apps.api.urls")),
]
app/urls.py
from django.contrib import admin
from django.urls import path
from apps.api.views import account # 绝对路径导入
from apps.api.views import auth # 绝对路径导入
from .views import order # 相对路径导入

urlpatterns = [
    path('login/', account.login),
    path('auth/', auth.auth),
    path('order/', order.selectOrder),
]
注意:不要在项目根目录做相对导入。
尽量我们就用绝对导入。
3.3、视图参数requests
requests是一个对象,存放了浏览器给咱们发过来的所有内容,所以含有:
- 请求相关所有的数据: 当前访问的url、请求方式、...
- django额外添加的数据
from django.shortcuts import HttpResponse


def login(request):
    # 1.当前URL  /api/login/
    print(request.path_info)

    # 2.URL传递的参数
    print(request.GET)
    print(request.GET.get("age"))

    # 3.请求方式  GET/POST
    print(request.method)

    # 4.如果post请求,传递请求体(原始数据)
    print(
        request.body)  # b'{"code":"083Sjmll2yla694F3bll2DguCM2SjmlG","unionId":"oP6QCsyT_9bk1dfSaVf0GEV5Y-yE"}'  b'v1=123&v2=456'

    # 4.1 请求体+请求头       b'v1=123&v2=456'  +  content-type:application/x-www-form-urlencoded
    # 当前端传的数据结构是b'v1=123&v2=456'并且content-type:application/x-www-form-urlencoded django才会自动为我们将body里的信息解析到POST中
    print(request.POST)
    print(request.POST.get("v1"))
    print(request.POST.get("v2"))

    # 4.2 请求体+请求头   文件
    print(request.FILES)  # 文件格式           + multipart/form-data
    print(request.FILES.get("n1"))
    print(request.FILES.get("n2"))

    # 5.请求头
    # {'Content-Length': '', 'Content-Type': 'text/plain', 'Host': '127.0.0.1:8000', 'Connection': 'keep-alive', 'Cache-Control': 'max-age=0', 'Sec-Ch-Ua': '" Not A;Brand";v="99", "Chromium";v="102", "Google Chrome";v="102"', 'Sec-Ch-Ua-Mobile': '?0', 'Sec-Ch-Ua-Platform': '"macOS"', 'Upgrade-Insecure-Requests': '1', 'User-Agent': 'Mozilla/5.0 (Macintosh; Intel Mac OS X 10_15_7) AppleWebKit/537.36 (KHTML, like Gecko) Chrome/102.0.0.0 Safari/537.36', 'Accept': 'text/html,application/xhtml+xml,application/xml;q=0.9,image/avif,image/webp,image/apng,*/*;q=0.8,application/signed-exchange;v=b3;q=0.9', 'Sec-Fetch-Site': 'none', 'Sec-Fetch-Mode': 'navigate', 'Sec-Fetch-User': '?1', 'Sec-Fetch-Dest': 'document', 'Accept-Encoding': 'gzip, deflate, br', 'Accept-Language': 'zh-CN,zh;q=0.9,en;q=0.8,zh-TW;q=0.7', 'Cookie': 'csrftoken=CdidpKSGbLxzmOXnbmlkvrZep1eJmKLAA81T73UjcjxEnMOa4YOZqtc849AkYfUy'}
    print(request.headers)

    # 5.1 请求头有个特殊的cookie
    # request.headers['cookie']  # 'csrftoken=CdidpKSGbLxzmOXnbmlkvrZep1eJmKLAA81T73UjcjxEnMOa4YOZqtc849AkYfUy;session=xxxx'
    # {'csrftoken': 'CdidpKSGbLxzmOXnbmlkvrZep1eJmKLAA81T73UjcjxEnMOa4YOZqtc849AkYfUy'}
    print(request.COOKIES)

    # 6.requests中其他值
    print(request.resolver_match)

    return HttpResponse("login")
3.4、返回值
-
HttpResponse
-
JsonResponse
-
render
-
redirect
from django.shortcuts import HttpResponse, redirect, render
from django.http import JsonResponse


def auth(request):
    pass


def login(request):
    # 1、字符串/字节/文本数据(图片验证码)
    # return HttpResponse("login")

    # 2、JSON格式(前后端分离、app小程序后端、ajax请求)
    # data_dict = {"status": True, 'data': [11, 22, 33]}
    # return JsonResponse(data_dict)

    # 3、重定向
    # return redirect("https://www.baidu.com")
    # return redirect("http://127.0.0.1:8000/api/auth/")
    # return redirect("http://127.0.0.1:8000/api/auth/")
    # return redirect("/api/auth/")
    # return redirect("/api/auth/")  # name
    #
    # from django.urls import reverse
    # url = reverse("auth")
    # return redirect(url)  # name
    # return redirect("auth")

    # 4、渲染
    # - a.找到 'login.html' 并读取的内容,问题:去哪里找?
    # -   默认先去settings.TEMPLATES.DIRS指定的路径找。(公共)
    # -   按注册顺序每个已注册的app中找他templates目录,去这个目录中寻找'login.html'
    # -   一般情况下,原则,哪个app中的模板,就去哪个app中寻找。
    # - b.渲染(替换)得到替换完成的字符串
    # - c.返回浏览器
    return render(request, 'api/login.html')  # 这里api代表是api模块下的templates/api文件夹,里面存放着login.html
一般这么配置,在根目录下创建templates文件夹,里面存放各种html文件。
3.5、响应头
from django.shortcuts import HttpResponse, redirect, render
from django.http import JsonResponse


def login(request):
    res = HttpResponse("login")
    res['xx1'] = "hahaha"
    res['xx2'] = "hahaha"
    res['xx3'] = "hahaha"

    res.set_cookie('k1',"aaaaaaaa")
    res.set_cookie('k2',"bbbbbb")

    return res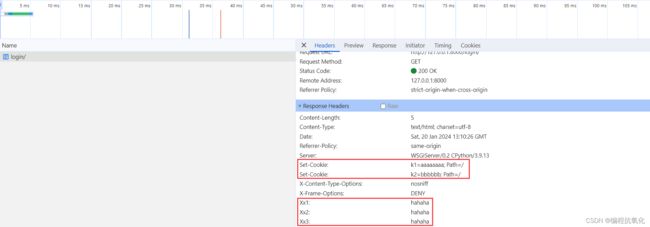
而响应体其实就是我们返回的字符串login,如果你返回html,那么请求体就是你html文件的代码。
3.6、FBV和CBV
-
FBV,视图用函数的形式编写。(目前主流)
-
CBV,视图用类的形式编写。
FBV
urls.py
urlpatterns = [
    path('users/', views.UserView.as_view())
]
views.py
from django.shortcuts import render, HttpResponse, redirect
from django.views import View


class UserView(View):

    # 请求方式GET形式
    def get(self, request):
        pass

    # 请求方式POST形式
    def post(self, request):
        pass
其实本质上这段代码和下面这段代码一模一样:
def users(request):
    if request.method == 'GET':
        res = HttpResponse("GET请求")
        return res
    else:
        res = HttpResponse("POST请求")
        return res
四、静态资源
静态资源:
-
开发需要:css、js、图片。
- 根目录的 /static/
- 已经app目录下载 /static/ 文件夹下
- 媒体文件:用户上传的数据(excel/pdf/video)
- 根目录的 /media/
4.1、静态文件
INSTALLED_APPS = [
    # 'django.contrib.admin',
    # 'django.contrib.auth',
    # 'django.contrib.contenttypes',
    # 'django.contrib.sessions',
    # 'django.contrib.messages',
    'django.contrib.staticfiles',
    "apps.api.apps.ApiConfig",
    "apps.web.apps.WebConfig",
]
...

STATIC_URL = '/static/'
STATICFILES_DIRS = (
    os.path.join(BASE_DIR, 'static'),
)-
顺序:先去项目根目录找static,如果没有再按注册组件的顺序去找,如上:先去api模块下找static,如果没有再去web模块下找。
-
多app开发:各自app的图片放在各自
/static/app名字/。。。例如api模块,就是apps/api/static/api/1.jpg,web模块就是apps/web/static/web/1.jpg -
在开发过程中
禁止:

建议:
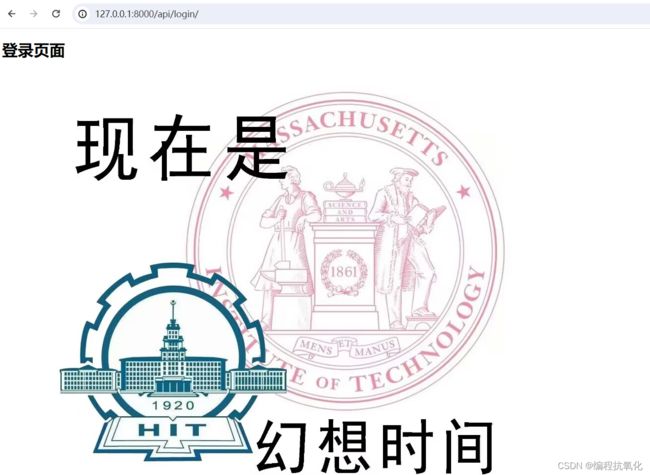
{% load static %}


    Title


登录页面
调换dao xx
跳转

4.2、媒体文件
主urls.py
from django.contrib import admin
from django.urls import path, re_path, include
from django.conf.urls.static import static
from django.conf import settings

from apps.api import views


# 很多功能,很多URL
urlpatterns = [
    path('api/', include('apps.api.urls')),
] + static(settings.MEDIA_URL, document_root=settings.MEDIA_ROOT)
五、模板
5.1、寻找html模板
先问大家一个问题

TEMPLATES = [
    {
        'BACKEND': 'django.template.backends.django.DjangoTemplates',
        'DIRS': [os.path.join(BASE_DIR, 'templates')],
        'APP_DIRS': True,
        'OPTIONS': {
            'context_processors': [
                'django.template.context_processors.debug',
                'django.template.context_processors.request',
                # 'django.contrib.auth.context_processors.auth',
                # 'django.contrib.messages.context_processors.messages',
            ],
        },
    },
]
当我们在settings.py文件配置了DIRS,那么就去哪里找,一般这么配置都是去项目根目录找templates文件夹。
如果配置的DIRS路径没有找到,那就继续去每一个注册的app下的templates找,顺序是按注册顺序。
优先去项目根目录 > 每个已注册的app的templates目录找。
如何选择:
-
简单的项目,模板都放在根目录。
-
复杂的项目,模板放在各自的app中,公共部分放在templates目录。

5.2、模板处理的本质
渲染完成后,生成了字符串,再返回给浏览器。
return render(request, 'app01/index.html') 的本质步骤:
- 打开app01/index.html文件,读取内容
- 渲染完成,得到一个渲染完成的文本
- 将文本返回给浏览器
其实html文件的作用就是展示,是我们django把渲染好的字符串一口气返回给html文件,然后进行展示,我们可以将index.html改为index.txt,发现也是好使的。
我们接下来分几段代码来验证模板处理的本质:
代码段1:


结果毫无疑问可以弹出100。
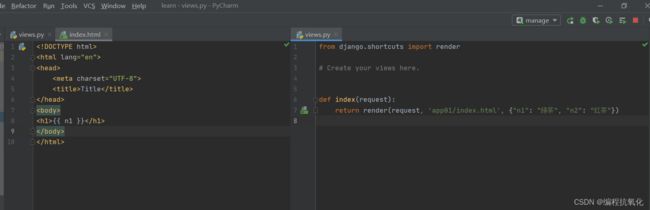
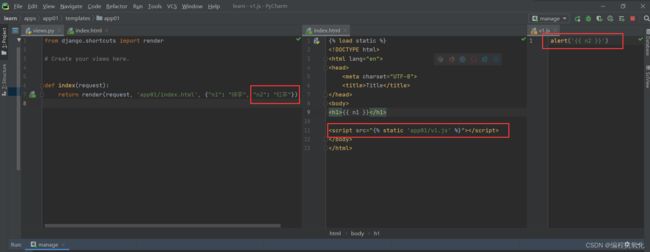
代码段2:

这时我们发现不但没有弹出理想的“红茶”,控制台还报错了。

我们打开网页源代码看一眼...

从这里就能看出,是django先读取html代码,将{{}}占位符都替换完后再返回到html页面的,这里我们加上引号即可。

代码段3:

这又表明了模板处理的本质,django先读取html页面代码,将所有的占位符都替换为真实的数据,它不管你外引的js文件,它只管当前页面的占位符。
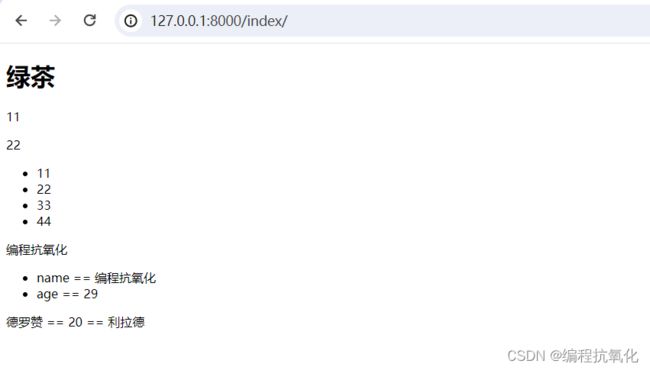
5.3、常见模板语法
class Person(object):
    def __init__(self, name, age):
        self.name = name
        self.age = age

    def getData(self):
        return "利拉德"

def index(request):
    context = {
        "n1": "绿茶",  # 字符串
        "n2": [11, 22, 33, 44],  # 列表
        "n3": {                  # 字典
            "name": "编程抗氧化",
            "age": 29
        },
        "n4": Person("德罗赞", 20)  # 对象
    }
    return render(request, 'app01/index.html', context)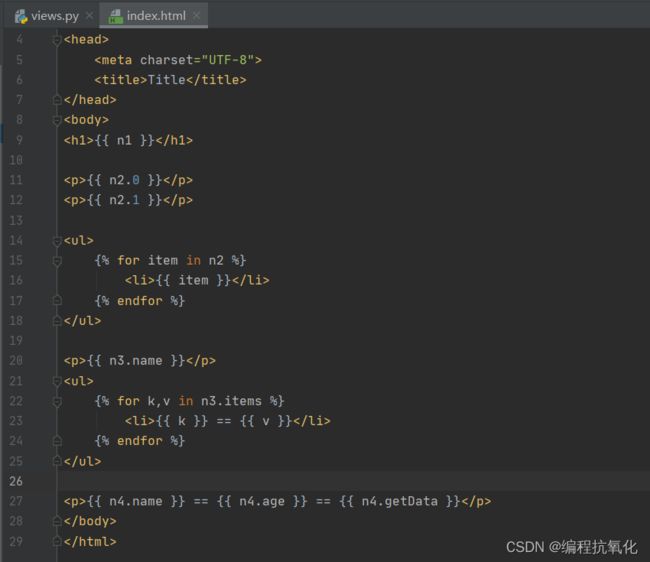
5.4、内置模板函数

5.5、自定义模板功能
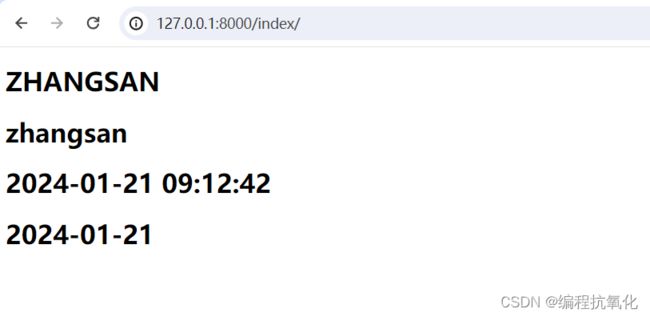
filter
第一步:确保你的app已经在settings.py中注册了

第二步:在你的app(这里是app01)创建templatetags文件夹
注意:只能叫templatetags。
第三步:在templatetags文件夹下创建py文件并编写自定义代码
from django import template
register = template.Library()
@register.filter()
def myfunc(value):
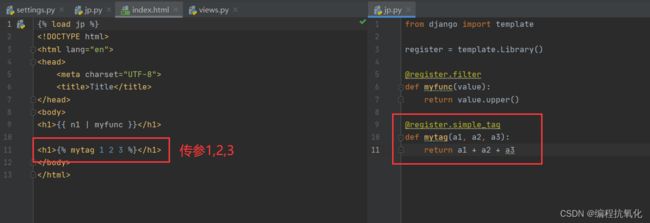
return value.upper()第四步:index.html使用你定义的函数


simple_tag

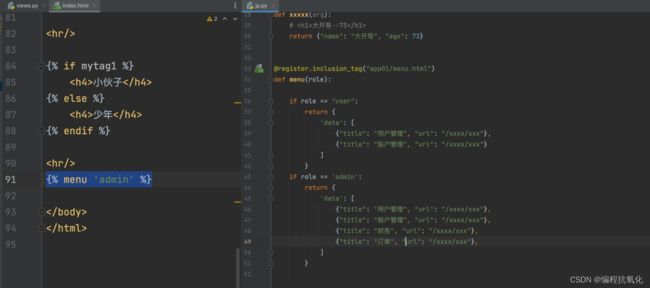
inclusion_tag
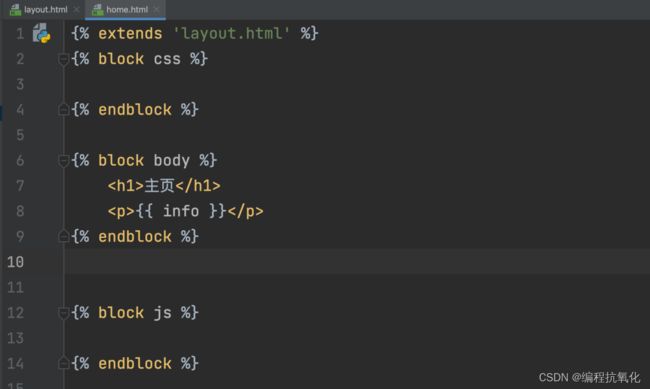
5.6、继承和母版

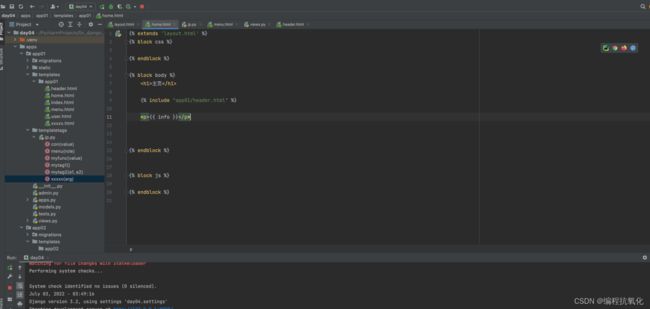
5.7、模板的导入
六、Django中间件
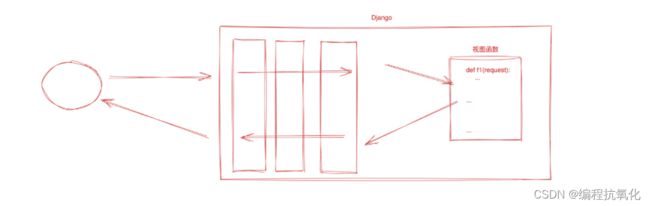
中间件说白了其实就是类,我们请求经过中间件(类)里的方法。
6.1、原始方式
第一步:根目录创建middlewares/md.py文件存放我们的中间件
class MyMd(object):
def __init__(self, get_response):
self.get_response = get_response
def __call__(self, request):
# 进来
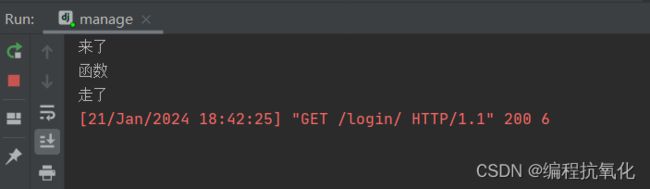
print('来了')
response = self.get_response(request)
# 出去
print('走了')
return response第二步:注册此中间件

第三步:在某个app下的views.py随便创建一个方法
def login(request):
    print('函数')
    return HttpResponse('登录')
第四步:测试并看打印信息


这倒有点像Java里的拦截器...
6.2、MiddlewareMixin(建议)
from django.utils.deprecation import MiddlewareMixin


class MyMd(MiddlewareMixin):

    def process_request(self, request):
        print('来了')

    def process_response(self, request, response):
        print('走了')
        return response
6.3、MiddlewareMixin多个
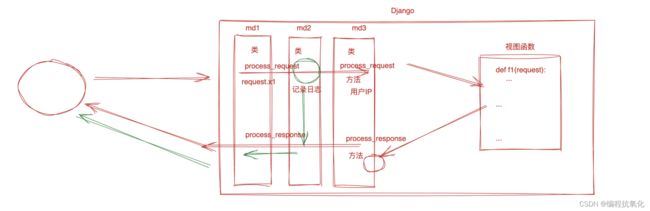


执行结果是:
md1来了
md2来了
md3来了
函数
md3走了
md2走了
md1走了