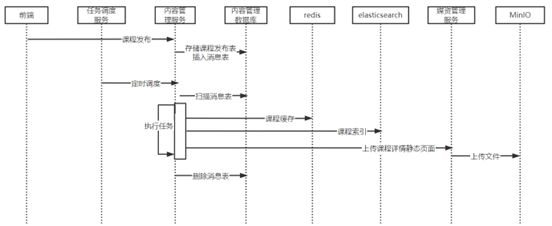
5.3 内容管理模块 - 课程发布、任务调度、页面静态化、熔断降级
内容管理模块 - 课程发布 - 任务调度、熔断降级、页面静态化
文章目录
- 内容管理模块 - 课程发布 - 任务调度、熔断降级、页面静态化
- 一、课程发布 - 任务调度
-
- 1.1 添加Maven依赖
- 1.2 XxlJobConfig配置文件
- 1.3 消息处理抽象类 MessageProcessAbstract
- 1.4 课程发布任务类 CoursePublishTask
- 1.5 执行器配置信息
- 1.6 添加任务管理
- 二、 课程发布 - 页面静态化
-
- 2.1 静态化测试
-
- 2.1.1 Maven依赖
- 2.1.2 静态化测试
- 2.2 上传文件测试
-
- 2.2.1 Feign 远程调用
- 2.2.2 扩充上传文件接口
- 2.2.3 远程调用测试
- 2.3 熔断 - 降级
-
- 2.3.1 介绍
- 2.3.2 熔断 - 降级处理
- 2.4 页面静态化任务
-
- 2.4.1 CoursePublishServiceImpl
- 2.4.2 课程发布任务类 CoursePublishTask
一、课程发布 - 任务调度
下面完成这几步,这几步在消息的SDK中已经给我们提供了

1.1 添加Maven依赖
content-service工程中添加xxl-job依赖
<dependency>
    <groupId>com.xuxueligroupId>
    <artifactId>xxl-job-coreartifactId>
dependency>
1.2 XxlJobConfig配置文件
content-service工程中添加XxlJobConfig配置文件
@Configuration
public class XxlJobConfig {
    private Logger logger = LoggerFactory.getLogger(XxlJobConfig.class);

    @Value("${xxl.job.admin.addresses}")
    private String adminAddresses;

    @Value("${xxl.job.accessToken}")
    private String accessToken;

    @Value("${xxl.job.executor.appname}")
    private String appname;

    @Value("${xxl.job.executor.address}")
    private String address;

    @Value("${xxl.job.executor.ip}")
    private String ip;

    @Value("${xxl.job.executor.port}")
    private int port;

    @Value("${xxl.job.executor.logpath}")
    private String logPath;

    @Value("${xxl.job.executor.logretentiondays}")
    private int logRetentionDays;


    @Bean
    public XxlJobSpringExecutor xxlJobExecutor() {
        logger.info(">>>>>>>>>>> xxl-job config init.");
        XxlJobSpringExecutor xxlJobSpringExecutor = new XxlJobSpringExecutor();
        xxlJobSpringExecutor.setAdminAddresses(adminAddresses);
        xxlJobSpringExecutor.setAppname(appname);
        xxlJobSpringExecutor.setAddress(address);
        xxlJobSpringExecutor.setIp(ip);
        xxlJobSpringExecutor.setPort(port);
        xxlJobSpringExecutor.setAccessToken(accessToken);
        xxlJobSpringExecutor.setLogPath(logPath);
        xxlJobSpringExecutor.setLogRetentionDays(logRetentionDays);

        return xxlJobSpringExecutor;
    }
}
1.3 消息处理抽象类 MessageProcessAbstract
消息SDK给我们提供的,也就是下面这几步

SDK中唯一没有的就是抽象方法execute,也就是执行任务的逻辑没有,我们需要的是写一个类继承MessageProcessAbstract并实现execute方法,编写任务的具体执行逻辑
/**
* @description 消息处理抽象类
*/
@Slf4j
@Data
public abstract class MessageProcessAbstract {
@Autowired
MqMessageService mqMessageService;
/**
* @param mqMessage 执行任务内容
* @return boolean true:处理成功,false处理失败
* @description 任务处理
* @author Mr.M
* @date 2022/9/21 19:47
*/
public abstract boolean execute(MqMessage mqMessage);
/**
* @description 扫描消息表多线程执行任务
* @param shardIndex 分片序号
* @param shardTotal 分片总数
* @param messageType 消息类型
* @param count 一次取出任务总数
* @param timeout 预估任务执行时间,到此时间如果任务还没有结束则强制结束 单位秒
* @return void
* @author Mr.M
* @date 2022/9/21 20:35
*/
public void process(int shardIndex, int shardTotal, String messageType,int count,long timeout) {
try {
//扫描消息表获取任务清单
List<MqMessage> messageList = mqMessageService.getMessageList(shardIndex, shardTotal,messageType, count);
//任务个数
int size = messageList.size();
log.debug("取出待处理消息"+size+"条");
if(size<=0){
return ;
}
//创建线程池
ExecutorService threadPool = Executors.newFixedThreadPool(size);
//计数器
CountDownLatch countDownLatch = new CountDownLatch(size);
messageList.forEach(message -> {
threadPool.execute(() -> {
log.debug("开始任务:{}",message);
//处理任务
try {
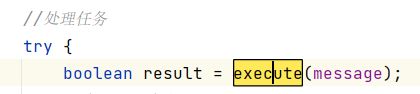
boolean result = execute(message);
if(result){
log.debug("任务执行成功:{})",message);
//更新任务状态,删除消息表记录,添加到历史表
int completed = mqMessageService.completed(message.getId());
if (completed>0){
log.debug("任务执行成功:{}",message);
}else{
log.debug("任务执行失败:{}",message);
}
}
} catch (Exception e) {
e.printStackTrace();
log.debug("任务出现异常:{},任务:{}",e.getMessage(),message);
}finally {
//计数
countDownLatch.countDown();
}
log.debug("结束任务:{}",message);
});
});
//等待,给一个充裕的超时时间,防止无限等待,到达超时时间还没有处理完成则结束任务
countDownLatch.await(timeout,TimeUnit.SECONDS);
System.out.println("结束....");
} catch (InterruptedException e) {
e.printStackTrace();
}
}
}
1.4 课程发布任务类 CoursePublishTask
粗略写出课程发布的任务类的大体框架,后面完善
/**
 * 课程发布的任务类
 */
@Slf4j
@Component
public class CoursePublishTask extends MessageProcessAbstract {

    //任务调度入口
    @XxlJob("CoursePublishJobHandler")
    public void coursePublishJobHandler() throws Exception {
        // 分片参数
        int shardIndex = XxlJobHelper.getShardIndex();//第几个分片
        int shardTotal = XxlJobHelper.getShardTotal();//分片总数
        log.debug("shardIndex="+shardIndex+",shardTotal="+shardTotal);
        //参数:分片序号、分片总数、消息类型、一次最多取到的任务数量、一次任务调度执行的超时时间
        //这个方法是MessageProcessAbstract抽象类的方法
        process(shardIndex,shardTotal,"course_publish",30,60);

    }

        /*
     * 执行课程发布的任务逻辑
     * MqMessage 数据库实体类
     * 如果此方法抛出异常说明任务执行失败
     */
    @Override
    public boolean execute(MqMessage mqMessage) {
        //后面补充这个方法,现在只是一个模板
    }
}
1.5 执行器配置信息
进入content-service的nacos配置执行器的配置信息
xxl:
  job:
    admin:
      addresses: http://192.168.101.65:8088/xxl-job-admin
    executor:
      appname: coursepublish-job
      address:
      ip:
      port: 8999
      logpath: /data/applogs/xxl-job/jobhandler
      logretentiondays: 30
    accessToken: default_token
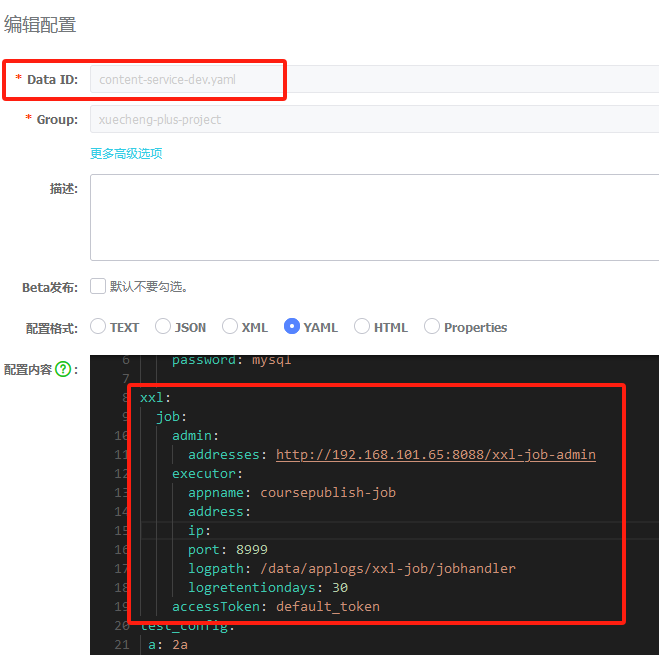
重新启动content-service项目,观察调度中心

1.6 添加任务管理


二、 课程发布 - 页面静态化
在这篇文章中有模板引擎技术framework
5.1 内容管理模块 - 课程预览、提交审核
模板引擎两个因素:模板、数据,只要有模板和数据,就能生成静态页面
执行课程发布后要将课程详情信息页面静态化,生成html页面上传至文件系统。
如果大量的请求访问课程发布完成的页面,然后再去查询数据库、拿到模板、生成页面响应,这样性能不是很好
下面的这个页面我们可以提前生成,然后再通过Nginx请求html。
因为Nginx的并发是非常高的,远远要大于Tomcat的性能

- 什么是页面静态化?
课程预览功能通过模板引擎技术在页面模板中填充数据,生成html页面,这个过程是当客户端请求服务器时服务器才开始渲染生成html页面,最后响应给浏览器,服务端渲染的并发能力是有限的。
页面静态化则强调将生成html页面的过程提前,提前使用模板引擎技术生成html页面,当客户端请求时直接请求html页面,由于是静态页面可以使用nginx、apache等高性能的web服务器,并发性能高。
强调的是提前生成Html页面,然后再把这个页面放到Nginx里面供用户进行访问
- 什么时候能用页面静态化技术?
当数据变化不频繁,一旦生成静态页面很长一段时间内很少变化,此时可以使用页面静态化。
因为如果数据变化频繁,一旦改变就需要重新生成静态页面,导致维护静态页面的工作量很大。
根据课程发布的业务需求,虽然课程发布后仍可以修改课程信息,但需要经过课程审核,且修改频度不大,所以适合使用页面静态化。
2.1 静态化测试
2.1.1 Maven依赖
在content-service工程中添加freemarker依赖
<dependency>
    <groupId>org.springframework.bootgroupId>
    <artifactId>spring-boot-starter-freemarkerartifactId>
dependency>
2.1.2 静态化测试
@SpringBootTest
public class FreemarkerTest {
    @Autowired
    CoursePublishService coursePublishService;

    @Test
    public void testGenerateHtmlByTemplate() throws Exception {

        //TODO 准备模板
        // import freemarker.template.Configuration
        // new Configuration 实例时输入传入一下Configuration当前的版本
        Configuration configuration = new Configuration(Configuration.getVersion());
        // 找到模板路径
        String classPath = this.getClass().getResource("/").getPath();
        // 指定模板目录 (从哪个目录加载模板)
        configuration.setDirectoryForTemplateLoading(new File(classPath + "/templates"));
        // 指定编码
        configuration.setDefaultEncoding("UTF-8");
        // 得到模板
        Template template = configuration.getTemplate("course_template.ftl");

        //TODO 准备数据
        CoursePreviewDto coursePreviewInfo = coursePublishService.getCoursePreviewInfo(120L);
        Map<String, Object> map = new HashMap<>();
        map.put("model", coursePreviewInfo);

        //TODO 将一个页面(源代码)转换成字符串
        // 参数1:模板  参数2:数据
        String html = FreeMarkerTemplateUtils.processTemplateIntoString(template, map);

        //TODO 使用流将静态化内容输出到文件中
        InputStream inputStream = IOUtils.toInputStream(html,"utf-8");
        //输出流
        FileOutputStream outputStream = new FileOutputStream("D:\\1.html");
        IOUtils.copy(inputStream, outputStream);

    }
}
2.2 上传文件测试
内容管理服务对页面静态化生成html文件需要调用媒资管理服务的上传文件接口
content-service模块会请求media模块然后上传静态化页面到Minio系统中
微服务之间难免会存在远程调用,在Spring Cloud中可以使用Feign进行远程调用
Feign是一个声明式的http客户端
官方地址:https://github.com/OpenFeign/feign
学习资料:HTTP客户端Feign
其作用就是帮助我们优雅的实现http请求的发送,解决上面提到的问题。
2.2.1 Feign 远程调用
- 内容管理content-service工程添加依赖
之前Feign远程调用发送的是数据,而现在发送的是文件,所以我们需要一个组件要支撑Multipart格式传参
<dependency>
    <groupId>com.alibaba.cloudgroupId>
    <artifactId>spring-cloud-starter-alibaba-nacos-discoveryartifactId>
dependency>

<dependency>
    <groupId>org.springframework.cloudgroupId>
    <artifactId>spring-cloud-starter-openfeignartifactId>
dependency>
<dependency>
    <groupId>io.github.openfeigngroupId>
    <artifactId>feign-httpclientartifactId>
dependency>

<dependency>
    <groupId>io.github.openfeign.formgroupId>
    <artifactId>feign-formartifactId>
    <version>3.8.0version>
dependency>
<dependency>
    <groupId>io.github.openfeign.formgroupId>
    <artifactId>feign-form-springartifactId>
    <version>3.8.0version>
dependency>
- 在nacos配置feign-dev.yaml公用配置文件
远程调用的时候可能会发生熔断,这里面要把熔断的开关打开
以免远程调用的时候对方可能网络慢、响应慢导致熔断
feign:
  # 这是一个框架
  hystrix:
    enabled: true
  # 开启熔断开关
  circuitbreaker:
    enabled: true
hystrix:
  command:
    default:
      execution:
        isolation:
          thread:
            timeoutInMilliseconds: 30000  #熔断超时时间
ribbon:
  ConnectTimeout: 60000 #连接超时时间
  ReadTimeout: 60000 #读超时时间
  MaxAutoRetries: 0 #重试次数
  MaxAutoRetriesNextServer: 1 #切换实例的重试次数
- 在内容管理service工程和内容管理api工程都引入此配置文件
添加公用配置
shared-configs:
  - data-id: feign-${spring.profiles.active}.yaml
    group: xuecheng-plus-common
    refresh: true
- 在内容管理service工程添加Reign配置文件
@Configuration
public class MultipartSupportConfig {

    @Autowired
    private ObjectFactory<HttpMessageConverters> messageConverters;

    /**
     * 让传参支持Multipart类型
     */
    @Bean
    @Primary//注入相同类型的bean时优先使用
    @Scope("prototype")
    public Encoder feignEncoder() {
        return new SpringFormEncoder(new SpringEncoder(messageConverters));
    }

    /**
     * 可以将普通文件转换成Multipart
     * @param file
     * @return
     */
    public static MultipartFile getMultipartFile(File file) {
        FileItem item = new DiskFileItemFactory().createItem("file", MediaType.MULTIPART_FORM_DATA_VALUE, true, file.getName());
        try (FileInputStream inputStream = new FileInputStream(file);
             OutputStream outputStream = item.getOutputStream();) {
            IOUtils.copy(inputStream, outputStream);

        } catch (Exception e) {
            e.printStackTrace();
        }
        return new CommonsMultipartFile(item);
    }
}
2.2.2 扩充上传文件接口
现在需要将课程的静态文件上传到minio,单独存储到course目录下,文件的objectname为"课程id.html",原有的上传文件接口需要增加一个参数 objectname
- 修改media-api工程中MediaFilesController类upload方法
因为html不算是大文件,我们就修改之前“上传图片”接口即可
添加参数objectName
如果调用接口时传入了“objectName”,那我们就往“course”目录下传,反之按照年月日实行的目录进行存储
@ApiOperation("上传图片")
@PostMapping(value = "/upload/coursefile", consumes = MediaType.MULTIPART_FORM_DATA_VALUE)
public UploadFileResultDto upload(@RequestPart("filedata") MultipartFile filedata,
                                  @RequestParam(value = "objectName", required = false) String objectName) throws IOException {
    ......
}
- 修改media-service工程中MediaFilesController类upload方法
/**
 * 上传文件
 *
 * @param companyId           机构id
 * @param uploadFileParamsDto 上传文件信息
 * @param localFilePath       文件磁盘路径
 * @return 文件信息
 */
public UploadFileResultDto uploadFile(Long companyId, UploadFileParamsDto uploadFileParamsDto, String localFilePath, String objectName);
//存储到minio中的对象名(带目录)
if(StringUtils.isEmpty(objectName)){
    objectName =  defaultFolderPath + fileMd5 + extension;
}

2.2.3 远程调用测试
- content-service下编写feign接口
内容管理服务中的content-service调用媒资管理服务中的media-api接口
/**
 * 远程调用媒资服务接口
 *  value:指定要调用的服务是media-api,也就是在配置文件中调用的spring.application.name的值
 *  configuration: 指定Feign的配置文件为MultipartSupportConfig.class
 * 原理:
 * 将来Spring会生成一个代理对象,在代理对象当中去实现远程调用
 */
@FeignClient(value = "media-api",configuration = {MultipartSupportConfig.class})
public interface MediaServiceClient {


    @PostMapping(value = "/media-api/upload/coursefile", consumes = MediaType.MULTIPART_FORM_DATA_VALUE)
    public String upload(@RequestPart("filedata") MultipartFile filedata,
                                      @RequestParam(value = "objectName", required = false) String objectName) ;
}
- 在启动类添加@EnableFeignClients注解
在哪里启动就在哪里添加这个注解即可,重要的是一定要扫描到feignclient包中的feign请求
@EnableFeignClients(basePackages={"com.xuecheng.content.feignclient"})

- 编写单元测试
/**
* 测试远程调用媒资服务
*
* @description 测试使用feign远程上传文件
*/
@SpringBootTest
public class FeignUploadTest {
@Autowired
MediaServiceClient mediaServiceClient;
//远程调用,上传文件
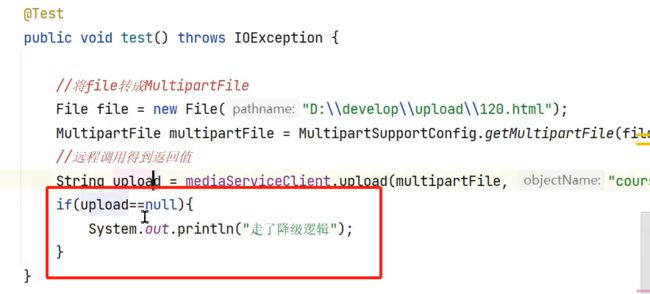
@Test
public void test() {
//将File类型转换成Multipart类型
//MultipartSupportConfig是我们自定义的config文件(getMultipartFile方法是我们一个工具类方法)
MultipartFile multipartFile = MultipartSupportConfig.getMultipartFile(new File("D:\\develop\\test.html"));
mediaServiceClient.upload(multipartFile, "course/1.html");
}
}
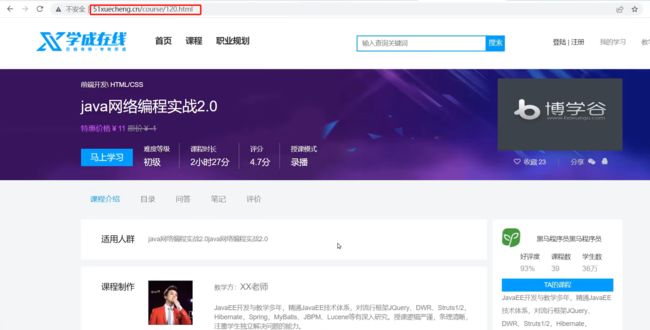
- 配置Nginx
在主栈中配置一下代理模式,凡是以/course打头的,都代理到fileserver,并请求fileserver下面的/mediafiles/course/
          location /course{
                proxy_pass    http://fileserver/mediafiles/course/;
        }
重启Nginx,如下访问方式即可
2.3 熔断 - 降级
2.3.1 介绍
当微服务运行不正常会导致无法正常调用微服务,此时会出现异常,如果这种异常不去处理可能导致雪崩效应
微服务的雪崩效应表现在服务与服务之间调用,当其中一个服务无法提供服务可能导致其它服务也死掉
比如:服务B调用服务A,由于A服务异常导致B服务响应缓慢,最后B、C等服务都不可用,像这样由一个服务所引起的一连串的多个服务无法提供服务即是微服务的雪崩效应
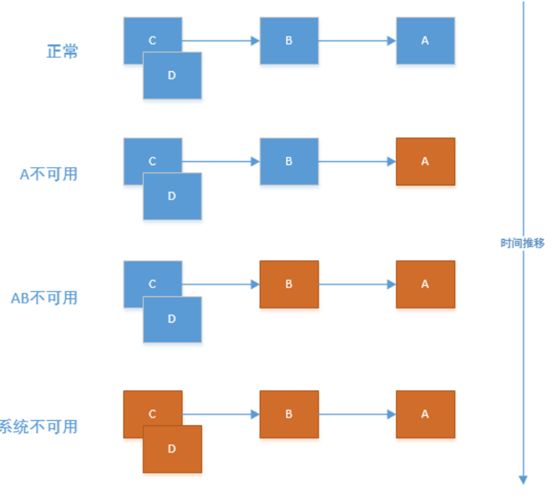
如何解决由于微服务异常引起的雪崩效应呢?
采用熔断、降级的方法去解决
熔断是当下游服务异常时一种保护系统的手段
降级是熔断后上游服务处理熔断的方法
所以先有的熔断再有的降级
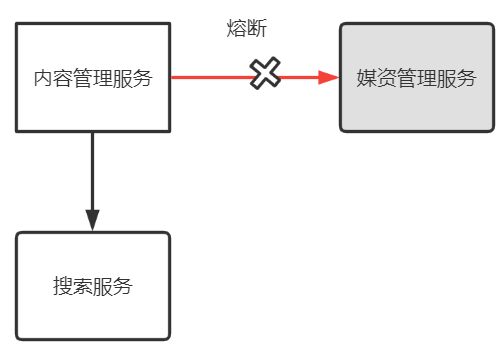
- 熔断
当下游服务异常而断开与上游服务的交互,它就相当于保险丝,下游服务异常触发了熔断,从而保证上游服务不受影响
调用方是上游服务
被调方式下游服务
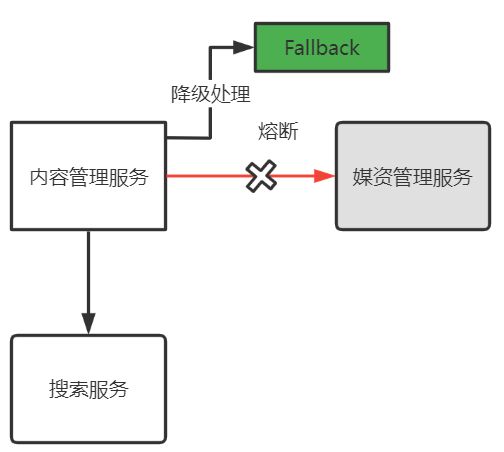
- 降级
当下游服务异常触发熔断后,上游服务就不再去调用异常的微服务而是执行了降级处理逻辑,这个降级处理逻辑可以是本地一个单独的方法
相当于媒资管理服务走不通了之后就再走另外一条线路,这就是降级的意思
因为发生熔断了,上游服务走了降级的路线来调用降级方法,不再调用原来有问题的服务
2.3.2 熔断 - 降级处理
项目使用Hystrix框架实现熔断、降级处理,在feign-dev.yaml中配置
- 熔断处理
- 开启Feign熔断保护
feign:
  hystrix:
    enabled: true
  circuitbreaker:
    enabled: true
- 设置熔断的超时时间,为了防止一次处理时间较长触发熔断这里还需要设置请求和连接的超时时间
hystrix:
  command:
    default:
      execution:
        isolation:
          thread:
            timeoutInMilliseconds: 30000  #熔断超时时间(30s)
ribbon:
  ConnectTimeout: 60000 #连接超时时间(60s)
  ReadTimeout: 60000 #读超时时间
  MaxAutoRetries: 0 #重试次数
  MaxAutoRetriesNextServer: 1 #切换实例的重试次数
- 降级处理
第一种方案:fallback
定义一个fallback类MediaServiceClientFallback,此类实现了MediaServiceClient接口
@FeignClient(value = "media-api",configuration = MultipartSupportConfig.class,fallback = MediaServiceClientFallback.class)
public interface MediaServiceClient{

   @PostMapping(value = "/media-api/upload/coursefile", consumes = MediaType.MULTIPART_FORM_DATA_VALUE)
    public String upload(@RequestPart("filedata") MultipartFile filedata,
                                      @RequestParam(value = "objectName", required = false) String objectName) ;

}
只要是熔断了,就走下面的降级流程
因为目标的服务器有问题了,才会调用这个方法
但是下面这种情况没法拿到熔断的异常,也就是为什么会导致熔断?什么导致了熔断?
说白了拿不到熔断发生的原因
public class MediaServiceClientFallback implements MediaServiceClient{

    // 重写upload方法
    @Override
    public String upload(@RequestPart("filedata") MultipartFile filedata,
                                      @RequestParam(value = "objectName", required = false) String objectName){

        return null;
    }

}
**第二种方案:fallbackFactory **
在FeignClient中指定fallbackFactory
@FeignClient(value = "media-api",configuration = MultipartSupportConfig.class,fallbackFactory  = MediaServiceClientFallbackFactory.class)
public interface MediaServiceClient{

   @PostMapping(value = "/media-api/upload/coursefile", consumes = MediaType.MULTIPART_FORM_DATA_VALUE)
    public String upload(@RequestPart("filedata") MultipartFile filedata,
                                      @RequestParam(value = "objectName", required = false) String objectName) ;

}
定义MediaServiceClientFallbackFactory
可以拿到熔断的异常信息
@Slf4j
@Component
public class MediaServiceClientFallbackFactory implements FallbackFactory<MediaServiceClient> {

    //可以拿到熔断的异常信息throwable
    @Override
    public MediaServiceClient create(Throwable throwable) {
        return new MediaServiceClient(){
            // 发生熔断,上游服务就会调用此方法来执行降级的逻辑
            @Override
            public String upload(MultipartFile upload, String objectName) {
                //降级方法
                log.debug("调用媒资管理服务上传文件时发生熔断,异常信息:{}",throwable.toString(),throwable);
                // 返回值由我们来确定,走这里就说明走了降级逻辑了
                return null;
            }
        };
    }

}
如果走了降级逻辑的话,我们就可以在调用的这里标注一下,然后降级的时候怎么个提示法,发出异常或者其他处理方式
2.4 页面静态化任务
课程页面静态化和静态页面远程上传测试通过,下一步开发课程静态化功能,最终使用消息处理SDK去调度执行
接下来就是完成这一步

其实主要完成两步
- 生成课程静态化页面
- 上传静态页面到文件系统
Feign参考2.2
2.4.1 CoursePublishServiceImpl
在content-service工程
/**
 * @description 课程静态化
 * @param courseId  课程id
 * @return File 静态化文件
 * @author Mr.M
 * @date 2022/9/23 16:59
 */
public File generateCourseHtml(Long courseId);
/**
 * @description 上传课程静态化页面
 * @param file  静态化文件
 * @return void
 * @author Mr.M
 * @date 2022/9/23 16:59
 */
public void  uploadCourseHtml(Long courseId,File file);
- 生成html页面
/**
 * 生成html页面
 *
 * @param courseId 课程id
 * @return File 静态化文件
 * @description 课程静态化
 */
@Override
public File generateCourseHtml(Long courseId) {
    //最终要返回的静态化文件
    File htmlFile = null;

    try {
        //TODO 准备模板
        // import freemarker.template.Configuration
        // new Configuration 实例时输入传入一下Configuration当前的版本
        Configuration configuration = new Configuration(Configuration.getVersion());
        // 找到模板路径
        String classPath = this.getClass().getResource("/").getPath();
        // 指定模板目录 (从哪个目录加载模板)
        configuration.setDirectoryForTemplateLoading(new File(classPath + "/templates"));
        // 指定编码
        configuration.setDefaultEncoding("UTF-8");
        // 得到模板
        Template template = configuration.getTemplate("course_template.ftl");

        //TODO 准备数据
        CoursePreviewDto coursePreviewInfo = this.getCoursePreviewInfo(courseId);
        Map<String, Object> map = new HashMap<>();
        map.put("model", coursePreviewInfo);

        //TODO 将一个页面(源代码)转换成字符串
        // 参数1:模板  参数2:数据
        String html = FreeMarkerTemplateUtils.processTemplateIntoString(template, map);

        //TODO 使用流将静态化内容输出到文件中
        InputStream inputStream = IOUtils.toInputStream(html, "utf-8");

        htmlFile = File.createTempFile("coursepublish"+courseId,".html");
        //输出流
        FileOutputStream outputStream = new FileOutputStream(htmlFile);
        IOUtils.copy(inputStream, outputStream);

    } catch (Exception e) {
        log.error("课程静态化异常:{},课程id:{}", e.toString(), courseId);
        XueChengPlusException.cast("课程静态化异常");
    }
    return htmlFile;
}
- 将静态html文件上传至minio
    /**
     * 将静态html文件上传至minio
     *
     * @param file 静态化文件
     * @return void
     * @description 上传课程静态化页面
     */
    @Override
    public void uploadCourseHtml(Long courseId, File file) {
        MultipartFile multipartFile = MultipartSupportConfig.getMultipartFile(file);
        // 发送Feign请求
        String upload = mediaServiceClient.upload(multipartFile, "course/" + courseId + ".html");
        if (upload == null) {
            log.debug("远程调用走降级逻辑,得到的结果为null,课程id:{}",courseId);
            XueChengPlusException.cast("上传静态文件异常");
        }
    }
2.4.2 课程发布任务类 CoursePublishTask
任务调度入口
//任务调度入口
@XxlJob("CoursePublishJobHandler")
public void coursePublishJobHandler() throws Exception {
    // 分片参数
    int shardIndex = XxlJobHelper.getShardIndex();//第几个分片
    int shardTotal = XxlJobHelper.getShardTotal();//分片总数
    log.debug("shardIndex="+shardIndex+",shardTotal="+shardTotal);
    //参数:分片序号、分片总数、消息类型、一次最多取到的任务数量、一次任务调度执行的超时时间
    //这个方法是MessageProcessAbstract抽象类的方法
    process(shardIndex,shardTotal,"course_publish",30,60);

}
会在此类的execute方法调用generateCourseHtml方法
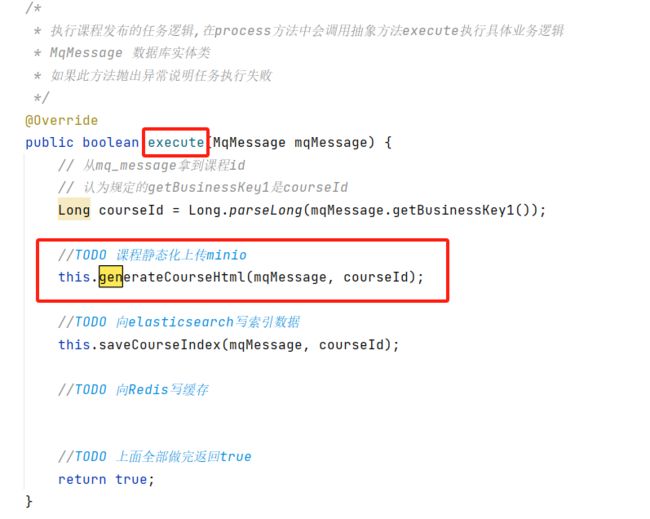
    // 实现课程静态化页面并上传至文件系统
    private void generateCourseHtml(MqMessage message, long courseId) {
        // 任务id(消息id)
        Long taskId = message.getId();
        // 通过get方法获取MqMessageService消息实体类
        MqMessageService mqMessageService = this.getMqMessageService();

        //TODO 做任务幂等性处理
        //查询数据库取出该阶段执行状态。每一个阶段的完成都会将相应的结果写入到相应的字段
        //这个地方其实就是取出的stageState1
        int stageOne = mqMessageService.getStageOne(taskId);
        if (stageOne > 0) {
            log.debug("课程静态化任务完成,无需处理");
            return;
        }

        //TODO 开始进行课程静态化
//        int i = 1 / 0;//制造一个异常表示任务执行中有问题
        // 1. 生成课程静态化页面
        File file = coursePublishService.generateCourseHtml(courseId);
        if (file == null){
            XueChengPlusException.cast("生成的静态页面为空");
        }
        // 2. 上传静态页面到文件系统
        coursePublishService.uploadCourseHtml(courseId,file);

        //TODO 任务处理完成写任务状态为完成
        //也就是stageState1字段的值是1
        mqMessageService.completedStageOne(taskId);
    }