tkinter绘制组件(19)——提示窗口
tkinter绘制组件(19)——提示窗口
- 引言
- 布局
-
- 函数结构
- 借鉴内容
- 创建新的TinUI窗口
- 添加文本并计算窗口大小
- 绘制圆角
- 绑定事件
- 计算窗口位置
- 完整代码函数
- 效果
-
- 测试代码
- 最终效果
- 2022-7-22新样式
- 2022-8-12新样式
- 2022-8-21新参数
- 2022-10-15新功能
- back元素控件
- github项目
- pip下载
- 结语
引言
同本专栏的气泡提示框一样,提示窗口组件可以用提示窗口显示帮助信息或拓展内容,但是相较于TinUI的气泡提示框(info),本篇文章所提示窗口(tooltip)还是有一定的区别的:
- 不受TinUI或BasicTinUI的尺寸限制
- 不受TinUI或BasicTinUI组件布局层次影响
唯一的缺点就是需要生成新的窗口,消耗一定的计算资源,但是对于现在的电脑而言,这点计算资源实在算不了什么。
布局
函数结构
def add_tooltip(self,uid,text='',fg='#3b3b3b',bg='#e7e7e7',font='微软雅黑 12',tran='#01FF11'):#绘制窗口提示框
    '''
    uid::画布对象
    text::提示文本
    fg::文本颜色
    bg::背景颜色
    font::字体
    tran::透明色
    '''
借鉴内容
说是借鉴内容,其实都是我写的TinUI里面的内容,只不过我自己可以直接copy一部分进行修改而已。
首先,就是上面提到的uid参数,目前,绝大多数TinUI组件最后一个返回值均为该组件整体的画布tag名称,可以直接用于这个参数。
其次,之所以设置tran参数,有以下两个考虑:
- 绘制圆角窗口,需要指定透明色
- TinUI菜单的圆角绘制功能没有在那篇文章中给出
创建新的TinUI窗口
在本专栏的很多文章中,我说过TinUI(或BasicTinUI)可以作为窗口的唯一组件:
toti=Toplevel()
toti.overrideredirect(True)
toti.withdraw()
bar=TinUI(toti,bg=tran)
bar.pack(fill='both',expand=True)
添加文本并计算窗口大小
如果一直在本专栏,这就是老生常谈的问题了:
info=bar.create_text((10,10),text=text,fill=fg,font=font,anchor='nw')
bbox=bar.bbox(info)
width=bbox[2]-bbox[0]+10
height=bbox[3]-bbox[1]+10
绘制圆角
这个在TinUI菜单的开发文章中没有给出,这里做一下说明:
#绘制圆角边框
#获取宽度
start=bbox[2]-bbox[0]
#获取描点坐标
'''bbox=(x1,y1,x2,y2)
bbox[0],bbox[1]---start,bbox[1]---bbox[2],bbox[1]
|                                               |
|                                               |
|                                               |
bbox[0],bbox[3]-------------------bbox[2],bbox[3]
'''
gomap=((start,bbox[1]),(bbox[2],bbox[1]),(bbox[2],bbox[3]),(bbox[0],bbox[3]),(bbox[0],bbox[1]),(start,bbox[1]))
#使用圆角拐弯绘制多边形,默认使用圆角拐弯,所以不需要改动
tback=bar.create_polygon(gomap,fill=bg,outline=bg,width=15)
#抬升文本
bar.lower(tback)
每一行操作在注释中已经说明地很清楚了。
这里再说明一下,start只是随意在上边中寻找一个点作为起点和终点。
绑定事件
过于简单:
#屏幕尺寸
maxx=self.winfo_screenwidth()
maxy=self.winfo_screenheight()
self.tag_bind(uid,'' ,show_toti)
self.tag_bind(uid,'' ,hide_toti)
toti.attributes('-transparent',tran)
toti.attributes('-alpha',0.9)#透明度90%
透明度是我个人习惯,不能够从参数中进行调节,如果实在不想让其有一定透明度,请从源码更改,注意开源协议。
计算窗口位置
借鉴TinUI菜单,可以得出以下两个函数:
def show_toti(event):#显示窗口
    sx,sy=event.x_root,event.y_root
    if sx+width>maxx:
        x=sx-width
    else:
        x=sx
    if sy+height>maxy:
        y=sy-height
    else:
        y=sy
    toti.geometry(f'{width+20}x{height+20}+{x}+{y}')
    toti.deiconify()
def hide_toti(event):#隐藏窗口
    toti.withdraw()
完整代码函数
def add_tooltip(self,uid,text='',fg='#3b3b3b',bg='#e7e7e7',font='微软雅黑 12',tran='#01FF11'):#绘制窗口提示框
def show_toti(event):
sx,sy=event.x_root,event.y_root
if sx+width>maxx:
x=sx-width
else:
x=sx
if sy+height>maxy:
y=sy-height
else:
y=sy
toti.geometry(f'{width+20}x{height+20}+{x}+{y}')
toti.deiconify()
def hide_toti(event):
toti.withdraw()
toti=Toplevel()
toti.overrideredirect(True)
toti.withdraw()
bar=TinUI(toti,bg=tran)
bar.pack(fill='both',expand=True)
info=bar.create_text((10,10),text=text,fill=fg,font=font,anchor='nw')
bbox=bar.bbox(info)
width=bbox[2]-bbox[0]+10
height=bbox[3]-bbox[1]+10
#绘制圆角边框
start=bbox[2]-bbox[0]
gomap=((start,bbox[1]),(bbox[2],bbox[1]),(bbox[2],bbox[3]),(bbox[0],bbox[3]),(bbox[0],bbox[1]),(start,bbox[1]))
tback=bar.create_polygon(gomap,fill=bg,outline=bg,width=15)
bar.lower(tback)
#屏幕尺寸
maxx=self.winfo_screenwidth()
maxy=self.winfo_screenheight()
self.tag_bind(uid,'' ,show_toti)
self.tag_bind(uid,'' ,hide_toti)
toti.attributes('-transparent',tran)
toti.attributes('-alpha',0.9)#透明度90%
return toti,bar
效果
测试代码
def test(event):
a.title('TinUI Test')
b.add_paragraph((50,150),'这是TinUI按钮触达的事件函数回显,此外,窗口标题也被改变、首行标题缩进减小')
b.coords(m,100,5)
def test1(word):
print(word)
def test2(event):
ok1()
def test3(event):
ok2()
def test4(event):
from time import sleep
for i in range(1,101):
sleep(0.02)
progressgoto(i)
def test5(result):
b.itemconfig(scale_text,text='当前选值:'+str(result))
if __name__=='__main__':
a=Tk()
a.geometry('700x700+5+5')
b=TinUI(a,bg='white')
b.pack(fill='both',expand=True)
m=b.add_title((600,0),'TinUI is a test project for futher tin using')
m1=b.add_title((0,680),'test TinUI scrolled',size=2,angle=24)
b.add_paragraph((20,290),''' TinUI是基于tkinter画布开发的界面UI布局方案,作为tkinter拓展和TinEngine的拓展而存在。目前,TinUI已可应用于项目。''',
angle=-18)
b.add_paragraph((20,100),'下面的段落是测试画布的非平行字体显示效果,也是TinUI的简单介绍')
b.add_button((250,450),'测试按钮',activefg='white',activebg='red',command=test,anchor='center')
b.add_checkbutton((80,430),'允许TinUI测试',command=test1)
b.add_label((10,220),'这是由画布TinUI绘制的Label组件')
b.add_entry((250,330),350,'这里用来输入')
b.add_separate((20,200),600)
b.add_radiobutton((50,480),300,'sky is blue, water is blue, too. So, what is your heart',('red','blue','black'),command=test1)
b.add_link((400,500),'TinGroup知识库','http://tinhome.baklib-free.com/')
_,ok1,_=b.add_waitbar1((500,220),bg='#CCCCCC')
b.add_button((500,270),'停止等待动画',activefg='cyan',activebg='black',command=test2)
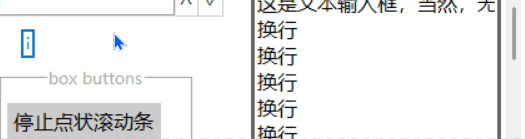
bu1=b.add_button((700,200),'停止点状滚动条',activefg='white',activebg='black',command=test3)[1]
bu2=b.add_button((700,250),'nothing button 2')[1]
bu3=b.add_button((700,300),'nothing button 3')[1]
b.add_labelframe((bu1,bu2,bu3),'box buttons')
_,_,ok2,_=b.add_waitbar2((600,400))
b.add_combobox((600,550),text='你有多大可能去珠穆朗玛峰',content=('20%','40%','60%','80%','100%','1000%'))
b.add_button((600,480),text='测试进度条(无事件版本)',command=test4)
_,_,_,progressgoto,_,_=b.add_progressbar((600,510))
b.add_table((180,630),data=(('a','space fans over the\nworld','c'),('you\ncan','2','3'),('I','II','have a dream, then try your best to get it!')))
b.add_paragraph((300,850),text='上面是一个表格')
b.add_onoff((600,100))
b.add_spinbox((680,100))
b.add_scalebar((680,50),command=test5)
scale_text,_=b.add_label((890,50),text='当前选值:2')
b.add_info((680,140),info_text='this is info widget in TinUI')
mtb=b.add_paragraph((0,720),'测试菜单(右键单击)')
b.add_menubar(mtb,cont=(('command',print),('menu',test1),'-',('TinUI文本移动',test)))
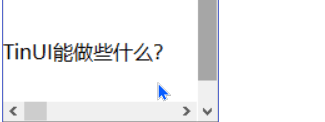
ttb=b.add_paragraph((0,800),'TinUI能做些什么?')
b.add_tooltip(ttb,'很多很多')
a.mainloop()
最终效果
2022-7-22新样式

添加边框,方便区分,增强视觉效果。
2022-8-12新样式
指定文本最大宽度,width参数(来自tooltip更改)
2022-8-21新参数

新增delay参数,指定延时显示
2022-10-15新功能
提示窗口不会直接初始化,而是在第一次使用的时候创建,减少资源耗费。
但这带来了破坏性更新,返回值是一个函数get_return,用来获取之前的toti和bar。
back元素控件
2022-8-29更新:圆角边框

github项目
TinUI的github项目地址
pip下载
pip install tinui
结语
现在你可以将TinUI运用到你自己的tkinter项目了,甚至可以将TinUI最为窗口的唯一部件。你也可以再次基础上开发现代化的Text部件。
我开通了我自己的个人博客,欢迎访问。
最新的TinUI支持使用xml编写界面了,使用pip更新最新的TinUI!!!
tkinter创新