Qt6入门教程 10:菜单栏、工具栏和状态栏
目录
一.菜单栏
1.Qt Designer
1.1添加菜单和菜单项
1.2添加二级菜单
1.3给菜单和菜单项添加图标
1.4给菜单项添加功能
2.纯手写
二.工具栏
1.Qt Designer
1.1添加工具栏按钮
1.2工具栏的几个重要属性
2.纯手写
三.状态栏
1.Qt Designer
2.纯手写
用Qt Creator新建基于QMainWindow的项目时,会自带菜单栏和状态栏。还是以前面的HelloWorld项目为例,通过Qt Designer和纯手写两种方式来添加或移除菜单栏、工具栏和状态栏。
一.菜单栏
1.Qt Designer
菜单栏、工具栏和状态栏都可以通过右键快捷菜单添加或移除。下面以工具栏为例。
添加一个工具栏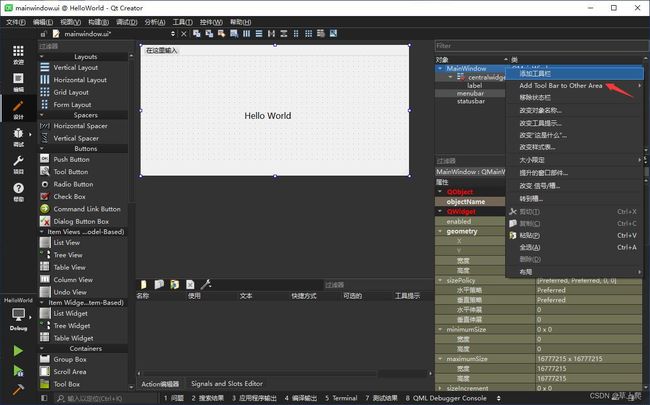
移除一个工具栏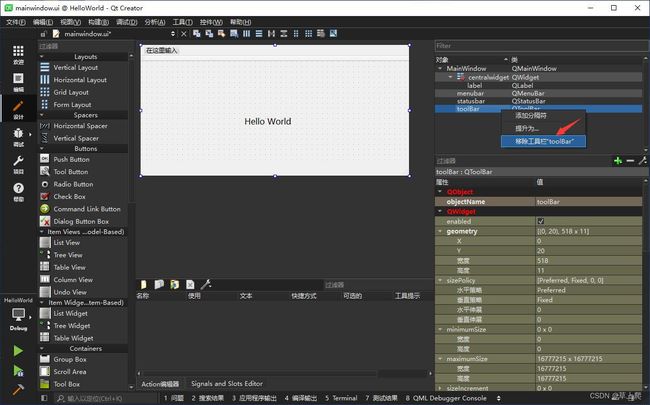
1.1添加菜单和菜单项
双击,输入,并回车,即可添加一个菜单。
这里先菜单Edit,点击菜单Edit可以添加菜单项和分隔符,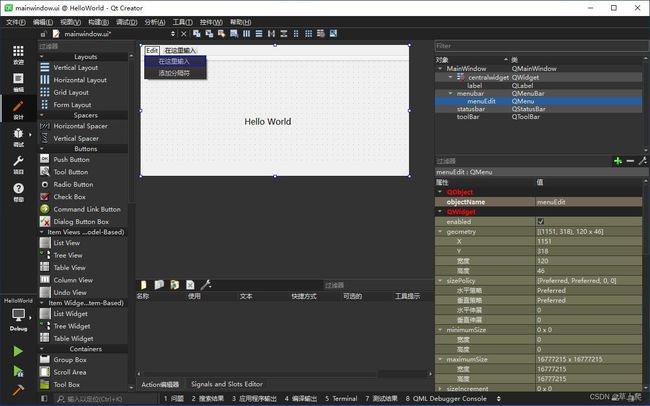
添加菜单项的方法也是双击,输入,并回车。这里添加了两个一级菜单项Color和Font。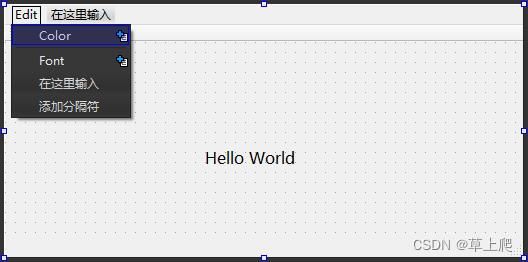
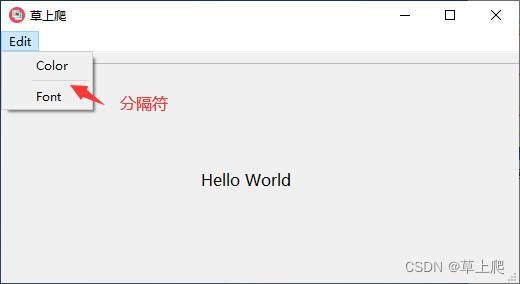
如果要在Color和Font之间添加一个分隔符,有两种方法,一是双击“添加分隔符”,此时分隔符默认添加到最后一个菜单项的后面,也就是font的后面,可以用鼠标选中这个分隔符并拖到color和font之间;二是选中Font,右键插入分隔符,此时分隔符插入到Font的前面面,也就是Color和Font之间。菜单项和分隔符都可以右键移除。
1.2添加二级菜单
点击一级菜单项右边的“+”可以添加二级菜单,重复操作能添加N级菜单。
添加好二级菜单后如下图所示。
1.3给菜单和菜单项添加图标
这里给Color菜单和Red菜单项添加图标。下图是给Color菜单添加图标的步骤,给Red菜单项添加图标的步骤一样。
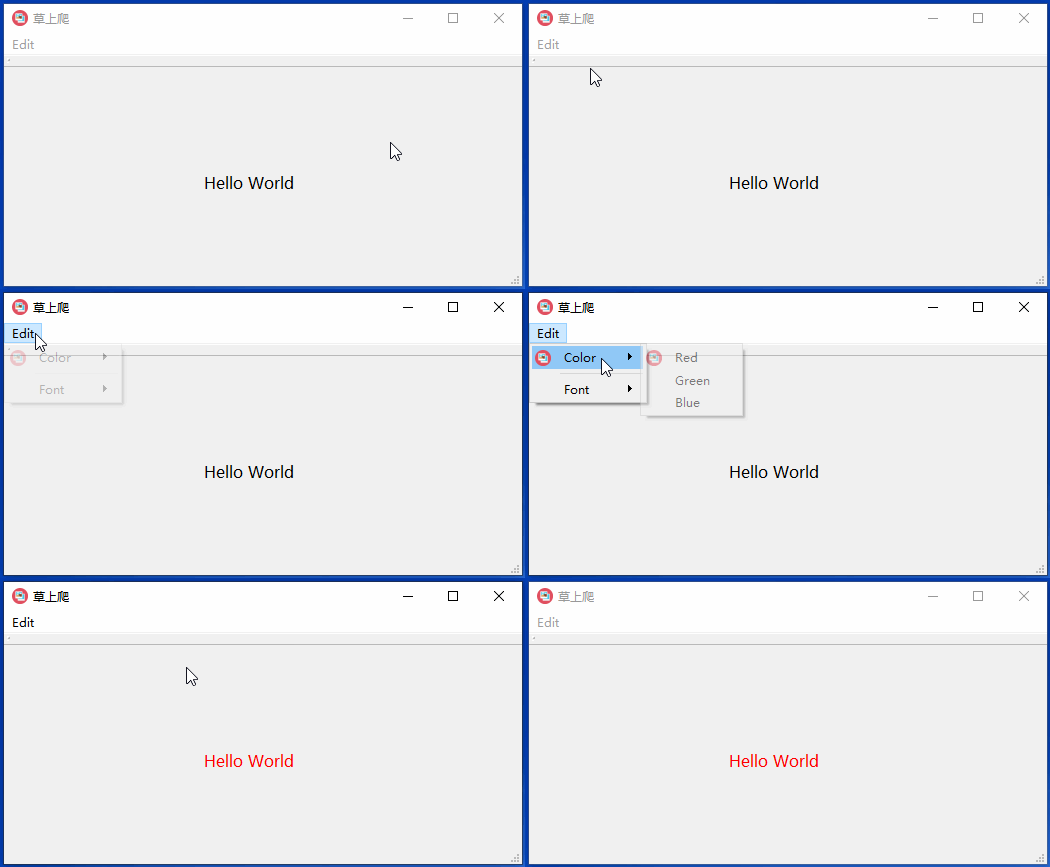
运行一下: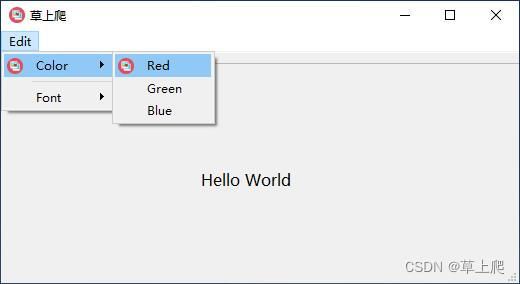
当然也可以双击“Action编辑器”中的某一行来编辑Action属性。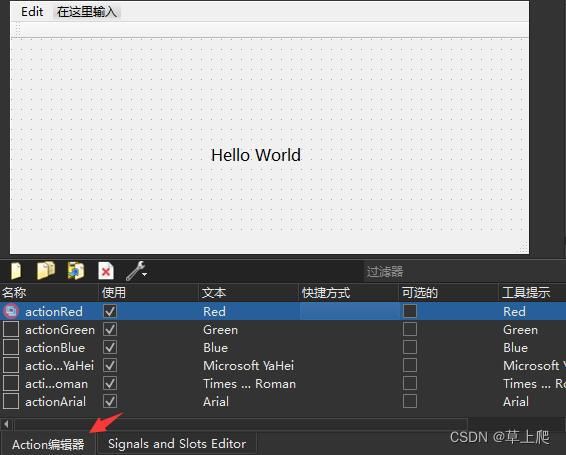
比如说双击actionRed所在行。
1.4给菜单项添加功能
在mainwindow.cpp的构造函数中添加:
#include
MainWindow::MainWindow(QWidget *parent)
    : QMainWindow(parent)
    , ui(new Ui::MainWindow)
{
    ui->setupUi(this);

    connect(ui->actionRed, &QAction::triggered, this, [this]{
        QPalette palette ;
        palette .setColor(QPalette::WindowText, Qt::red);
        ui->label->setAutoFillBackground(true);
        ui->label->setPalette(palette);
    });
} 2.纯手写
先右键移除菜单栏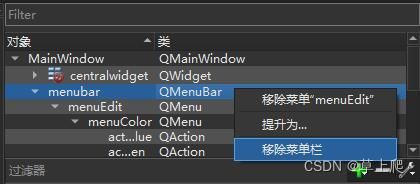
然后在mainwindow.cpp的构造函数中添加:
#include
#include
#include
MainWindow::MainWindow(QWidget *parent)
    : QMainWindow(parent)
    , ui(new Ui::MainWindow)
{
    ui->setupUi(this);
    // 添加菜单栏.
    QMenuBar *menuBar = new QMenuBar(this);
    setMenuBar(menuBar);
    // 添加Edit菜单.
    QMenu *editMenu = new QMenu("Edit", this);
    menuBar->addMenu(editMenu);
    // 添加Color二级菜单和菜单项.
    QMenu *colorMenu = new QMenu("Color", this);
    colorMenu->setIcon(QIcon(":/icons/AppIcon.ico"));
    QAction *redAction = new QAction(QIcon(":/icons/AppIcon.ico"), "Red", this);
    QAction *greenAction = new QAction("Green", this);
    QAction *blueAction = new QAction("Blue", this);
    colorMenu->addAction(redAction);
    colorMenu->addAction(greenAction);
    colorMenu->addAction(blueAction);
    editMenu->addMenu(colorMenu);
    // 添加分隔符.
    editMenu->addSeparator();
    // 添加Font二级菜单和菜单项.
    QMenu *fontMenu = new QMenu("Font", this);
    QAction *microsoftYaHeiAction = new QAction("Microsoft YaHei", this);
    QAction *timesNewRomanAction = new QAction("Times New Roman", this);
    QAction *arialAction = new QAction("Arial", this);
    fontMenu->addAction(microsoftYaHeiAction);
    fontMenu->addAction(timesNewRomanAction);
    fontMenu->addAction(arialAction);
    editMenu->addMenu(fontMenu);

    connect(redAction, &QAction::triggered, this, [this]{
        QPalette palette ;
        palette .setColor(QPalette::WindowText, Qt::red);
        ui->label->setAutoFillBackground(true);
        ui->label->setPalette(palette);
    });
}
运行效果一样。
二.工具栏
1.Qt Designer
1.1添加工具栏按钮
这里得先介绍一下QAction,Qt使用QAction类作为动作。顾名思义,这个类就是代表了窗口的一个“动作”,这个动作可能显示在菜单,作为一个菜单项,当用户点击该菜单项,对用户的点击做出响应;也可能在工具栏,作为一个工具栏按钮,用户点击这个按钮就可以执行相应的操作。有一点值得注意:无论是出现在菜单栏还是工具栏,用户选择之后,所执行的动作应该都是一样的。因此,Qt并没有专门的菜单项类,只是使用一个QAction类,抽象出公共的动作。当我们把QAction对象添加到菜单,就显示成一个菜单项,添加到工具栏,就显示成一个工具按钮。用户可以通过点击菜单项、点击工具栏按钮、点击快捷键来激活这个动作。
QAction包含了图标、菜单文字、快捷键、状态栏文字、悬浮提示等信息。当把一个QAction对象添加到程序中时,Qt自己选择使用哪个属性来显示,无需我们关心。同时,Qt能够保证把QAction对象添加到不同的菜单、工具栏时,显示内容是同步的。也就是说,如果我们在菜单中修改了QAction的图标,那么在工具栏上面这个QAction所对应的按钮的图标也会同步修改。
运行一下:
1.2工具栏的几个重要属性
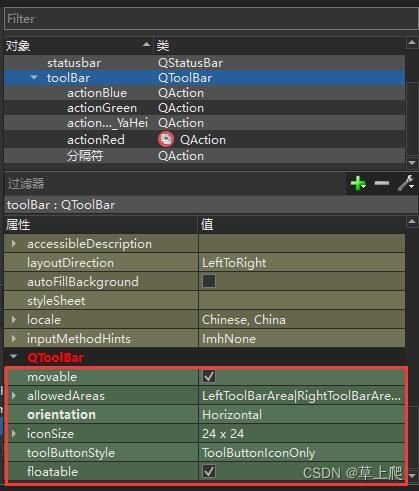
●moveable:标识工具栏是否可以移动,默认勾选,此时工具栏左侧有一列点点。如果取消勾选,那一列点点就没了,当然工具栏也无法移动。
●allowedAreas:标识工具栏能停靠的位置,默认上下左右都可以停靠,如下图所示:
●orientation:标识工具栏的方向,水平还是垂直,默认为Qt::Horizontal。需要注意的是当工具栏被QMainWIndow管理时,这个属性不起作用。如果你需要一个垂直的工具栏,可以调用QMainWindow::addToolBar(Qt::ToolBarArea area, QToolBar *toolbar),用第一个参数来指定停靠位置,停靠到窗口的左边或右边,就自动变成垂直的了。
●iconSize:标识工具栏按钮图片的大小,工具栏的高度会随着图片大小变化。
●toolButtonStyle:标识工具栏按钮的样式,默认为ToolButtonIconOnly,如果选择ToolButtonTextUnderIcon,就会在图标的下方显示按钮名字。

●floatable:是否允许工具条独立于窗口,默认勾选。如果取消勾选,工具栏拖出窗口后释放鼠标,它会自动回到窗口中。
2.纯手写
先右键移除工具栏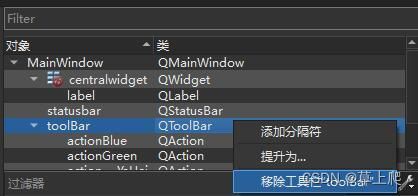
然后在mainwindow.cpp的构造函数中添加:
#include
#include
#include
#include
MainWindow::MainWindow(QWidget *parent)
    : QMainWindow(parent)
    , ui(new Ui::MainWindow)
{
    ui->setupUi(this);
    // 添加菜单栏.
    QMenuBar *menuBar = new QMenuBar(this);
    setMenuBar(menuBar);
    // 添加Edit菜单.
    QMenu *editMenu = new QMenu("Edit", this);
    menuBar->addMenu(editMenu);
    // 添加Color二级菜单和菜单项.
    QMenu *colorMenu = new QMenu("Color", this);
    colorMenu->setIcon(QIcon(":/icons/AppIcon.ico"));
    QAction *redAction = new QAction(QIcon(":/icons/AppIcon.ico"), "Red", this);
    QAction *greenAction = new QAction("Green", this);
    QAction *blueAction = new QAction("Blue", this);
    colorMenu->addAction(redAction);
    colorMenu->addAction(greenAction);
    colorMenu->addAction(blueAction);
    editMenu->addMenu(colorMenu);
    // 添加分隔符.
    editMenu->addSeparator();
    // 添加Font二级菜单和菜单项.
    QMenu *fontMenu = new QMenu("Font", this);
    QAction *microsoftYaHeiAction = new QAction("Microsoft YaHei", this);
    QAction *timesNewRomanAction = new QAction("Times New Roman", this);
    QAction *arialAction = new QAction("Arial", this);
    fontMenu->addAction(microsoftYaHeiAction);
    fontMenu->addAction(timesNewRomanAction);
    fontMenu->addAction(arialAction);
    editMenu->addMenu(fontMenu);

    // 添加工具栏.
    QToolBar *toolBar = new QToolBar(this);
    // 指定停靠位置,如果第一个参数为Qt::LeftToolBarArea,就是停靠在左边的垂直工具栏.
    addToolBar(Qt::TopToolBarArea, toolBar);
    toolBar->setFloatable(true);// 设置允许浮动.
    toolBar->setMovable(true);  // 设置允许移动.
    toolBar->setToolButtonStyle(Qt::ToolButtonIconOnly);// 设置工具栏按钮只有图片.
    // 添加工具栏按钮.
    toolBar->addAction(redAction);
    toolBar->addAction(greenAction);
    toolBar->addAction(blueAction);
    // 添加分隔符.
    toolBar->addSeparator();
    toolBar->addAction(microsoftYaHeiAction);

    connect(redAction, &QAction::triggered, this, [this]{
        QPalette palette ;
        palette .setColor(QPalette::WindowText, Qt::red);
        ui->label->setAutoFillBackground(true);
        ui->label->setPalette(palette);
    });
}
运行效果一样。
三.状态栏
1.Qt Designer
在Qt Designer能设置的状态栏属性只有sizeGripEnabled,关于sizeGrip在上一篇中已经介绍,这里不再赘述。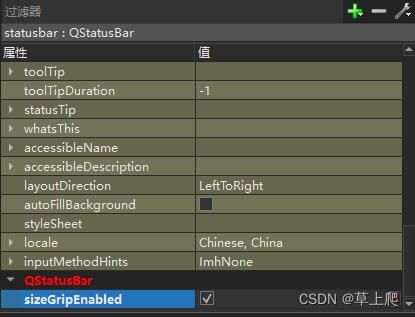
因此状态栏中显示的信息得用代码才能添加。
2.纯手写
状态栏显示信息的类型一般分为3种
●普通信息,文本显示在状态栏的最左边,会被临时信息覆盖,可用于显示页码、行数等信息。
void addWidget(QWidget *widget, int stretch = 0);
●永久信息,文本会一直显示在状态栏的最右边,可用于显示键盘是否大写锁定(Caps Lock)。
void addPermanentWidget(QWidget *widget, int stretch = 0);
●临时信息,文本显示在状态栏的最左边,指定信息显示多久,时间一到信息消失,以毫秒为单位。
void showMessage(const QString &text, int timeout = 0);
需要注意的是,timeout的默认值为0,此时消息会一直显示直到调用clearMesssage()或者再次调用showMessage()为止。
先右键移除状态栏
然后在mainwindow.cpp的构造函数中添加:
#include
#include
#include
#include
#include
MainWindow::MainWindow(QWidget *parent)
    : QMainWindow(parent)
    , ui(new Ui::MainWindow)
{
    ui->setupUi(this);
    // 添加菜单栏.
    QMenuBar *menuBar = new QMenuBar(this);
    setMenuBar(menuBar);
    // 添加Edit菜单.
    QMenu *editMenu = new QMenu("Edit", this);
    menuBar->addMenu(editMenu);
    // 添加Color二级菜单和菜单项.
    QMenu *colorMenu = new QMenu("Color", this);
    colorMenu->setIcon(QIcon(":/icons/AppIcon.ico"));
    QAction *redAction = new QAction(QIcon(":/icons/AppIcon.ico"), "Red", this);
    QAction *greenAction = new QAction("Green", this);
    QAction *blueAction = new QAction("Blue", this);
    colorMenu->addAction(redAction);
    colorMenu->addAction(greenAction);
    colorMenu->addAction(blueAction);
    editMenu->addMenu(colorMenu);
    // 添加分隔符.
    editMenu->addSeparator();
    // 添加Font二级菜单和菜单项.
    QMenu *fontMenu = new QMenu("Font", this);
    QAction *microsoftYaHeiAction = new QAction("Microsoft YaHei", this);
    QAction *timesNewRomanAction = new QAction("Times New Roman", this);
    QAction *arialAction = new QAction("Arial", this);
    fontMenu->addAction(microsoftYaHeiAction);
    fontMenu->addAction(timesNewRomanAction);
    fontMenu->addAction(arialAction);
    editMenu->addMenu(fontMenu);

    // 添加工具栏.
    QToolBar *toolBar = new QToolBar(this);
    // 指定停靠位置,如果第一个参数为Qt::LeftToolBarArea,就是停靠在左边的垂直工具栏.
    addToolBar(Qt::TopToolBarArea, toolBar);
    toolBar->setFloatable(true);// 设置允许浮动.
    toolBar->setMovable(true);  // 设置允许移动.
    toolBar->setToolButtonStyle(Qt::ToolButtonIconOnly);// 设置工具栏按钮只有图片.
    // 添加工具栏按钮.
    toolBar->addAction(redAction);
    toolBar->addAction(greenAction);
    toolBar->addAction(blueAction);
    // 添加分隔符.
    toolBar->addSeparator();
    toolBar->addAction(microsoftYaHeiAction);

    // 添加状态栏.
    QStatusBar *status = new QStatusBar(this);
    setStatusBar(status);
    QLabel *statusLabel = new QLabel("I am statusBar", this);
    // 状态栏添加信息.
    status->showMessage("I will disappear in 3 seconds", 3000);
    status->addPermanentWidget(statusLabel);// 添加到状态栏右侧(永久性).

    connect(redAction, &QAction::triggered, this, [this]{
        QPalette palette ;
        palette .setColor(QPalette::WindowText, Qt::red);
        ui->label->setAutoFillBackground(true);
        ui->label->setPalette(palette);
    });
}
运行一下:
本文并未介绍菜单栏的快捷键操作,后续将用一篇博客专门介绍快捷键。
有些人喜欢用Qt Designer,有些呢喜欢纯手写,那种方式更好就仁者见仁,智者见智了。个人觉得***.ui文件起到了界面设计和逻辑实现分离的作用,而且打字再快也没鼠标拖拽快吧,不过后续文章将以手写代码为主,因为截图太麻烦了。Qt小部件中能用代码设置的属性,在Qt Designer的属性编辑器中大多都能找到对应的设置项。
原文链接:Qt6入门教程 10:菜单栏、工具栏和状态栏-CSDN博客
