Flutter底部导航栏插件persistent_bottom_nav_bar的使用
flutter 框架中的 persistent_bottom_nav_bar 插件可以让我们快速实现页面底部导航栏(也就是 bottomNavigationBar )的布局且能拥有多样的切换效果(包括但不限于:动画切换效果、中间凸起按钮效果等)
插件网址:persistent_bottom_nav_bar
下面简单演示下该插件的使用步骤:
下载安装
官方网址中也有下载相关的介绍,推荐可以查看官方的。插件的下载可以通过终端直接命令行下载也可以在 pubspec.yaml 中添加上插件名称和版本保存自动下载
终端命令
flutter pub add persistent_bottom_nav_bar在 pubspec.yaml 中添加插件让IDE自动帮我们下载(注意版本号直接访问插件网址查看最新的下载使用)
dependencies:
  persistent_bottom_nav_bar: ^5.0.2
配置样式以及导航栏对应的页面
tip:推荐可以单独创建一个 .dart 文件来抽离配置底部导航栏样式以及每个导航栏点击要跳转的页面,比如创建一个 myTabbar.dart 的文件,然后贴入如下代码(注:这个代码是配置完整的示例代码,可以直接复制然后根据提示将引入的页面和路径进行修改即可)
import 'package:flutter/material.dart';
import 'package:persistent_bottom_nav_bar/persistent_tab_view.dart';

// 这里是导入底部每个 tabbar 项点击要跳转的页面(根据自己项目需要创建再按路径引入即可)
import './pages/home.dart';
import './pages/message.dart';
import './pages/setting.dart';
import './pages/user.dart';

class MyTabbar extends StatelessWidget {
  const MyTabbar({super.key});

  @override
  Widget build(BuildContext context) {
    final controller = PersistentTabController(initialIndex: 0);
    return PersistentTabView(
      context,
      controller: controller,
      screens: _buildScreens(),   // 列表 Widget 列表
      items: _navBarsItems(),     // tabbar 的 items 列表
      confineInSafeArea: true,
      backgroundColor: Colors.white, // Default is Colors.white.
      handleAndroidBackButtonPress: true, // Default is true.
      resizeToAvoidBottomInset:
          true, // This needs to be true if you want to move up the screen when keyboard appears. Default is true.
      stateManagement: true, // Default is true.
      hideNavigationBarWhenKeyboardShows:
          true, // Recommended to set 'resizeToAvoidBottomInset' as true while using this argument. Default is true.
      decoration: NavBarDecoration(
        borderRadius: BorderRadius.circular(10.0),
        colorBehindNavBar: Colors.white,
      ),
      popAllScreensOnTapOfSelectedTab: true,
      popActionScreens: PopActionScreensType.all,
      itemAnimationProperties: const ItemAnimationProperties(
        // Navigation Bar's items animation properties.
        duration: Duration(milliseconds: 200),
        curve: Curves.ease,
      ),
      screenTransitionAnimation: const ScreenTransitionAnimation(
        // Screen transition animation on change of selected tab.
        animateTabTransition: true,
        curve: Curves.ease,
        duration: Duration(milliseconds: 200),
      ),
      navBarStyle:
          NavBarStyle.style1, // style1 可改成 style1 到 style19 中的一个,每个效果不同可参考插件官方示例或自己修改查看效果
    );
  }

  List _buildScreens() {
    // 注意:这个列表里面的页面的放置顺序要和 _navBarsItems 配置的顺序保持一致
    return const [
      MyHomePage(), // 放 首页 的类名
      MessagePage(), // 放 消息页 的类名
      SettingPage(), // 放 设置页 的类名
      UserPage(), // 放 我的 的类名
    ];
  }

  List _navBarsItems() {
    Color activeColor = Colors.red;
    Color inactiveColor = Colors.grey;
    return [
      PersistentBottomNavBarItem(
        icon: const Icon(Icons.home),
        title: ("首页"),
        activeColorPrimary: activeColor,
        inactiveColorPrimary: inactiveColor,
      ),
      PersistentBottomNavBarItem(
        icon: const Icon(Icons.message),
        title: ("消息"),
        activeColorPrimary: activeColor,
        inactiveColorPrimary: inactiveColor,
      ),
      PersistentBottomNavBarItem(
        icon: const Icon(Icons.settings),
        title: ("设置"),
        activeColorPrimary: activeColor,
        inactiveColorPrimary: inactiveColor,
      ),
      PersistentBottomNavBarItem(
        icon: const Icon(Icons.person),
        title: ("我的"),
        activeColorPrimary: activeColor,
        inactiveColorPrimary: inactiveColor,
      ),
    ];
  }
}
使用配置好的文件
在本来要配置底部导航栏的页面引入我们配置好的 myTabbar.dart 文件(比如 main.dart 文件中)
// 引入我们配置好的 tabbar 文件(注意个人的路径)
import './mytabbar.dart';
把 MyTabbar() 组件放到 页面的 Scaffold 组件中与 bottomNavigationBar 属性相对应即可:
// ... 其他代码
return const Scaffold(
      bottomNavigationBar: MyTabbar(),      // 使用 MyTabbar 控件自定义 bottomNavigationBar 效果
    );
// ... 其他代码
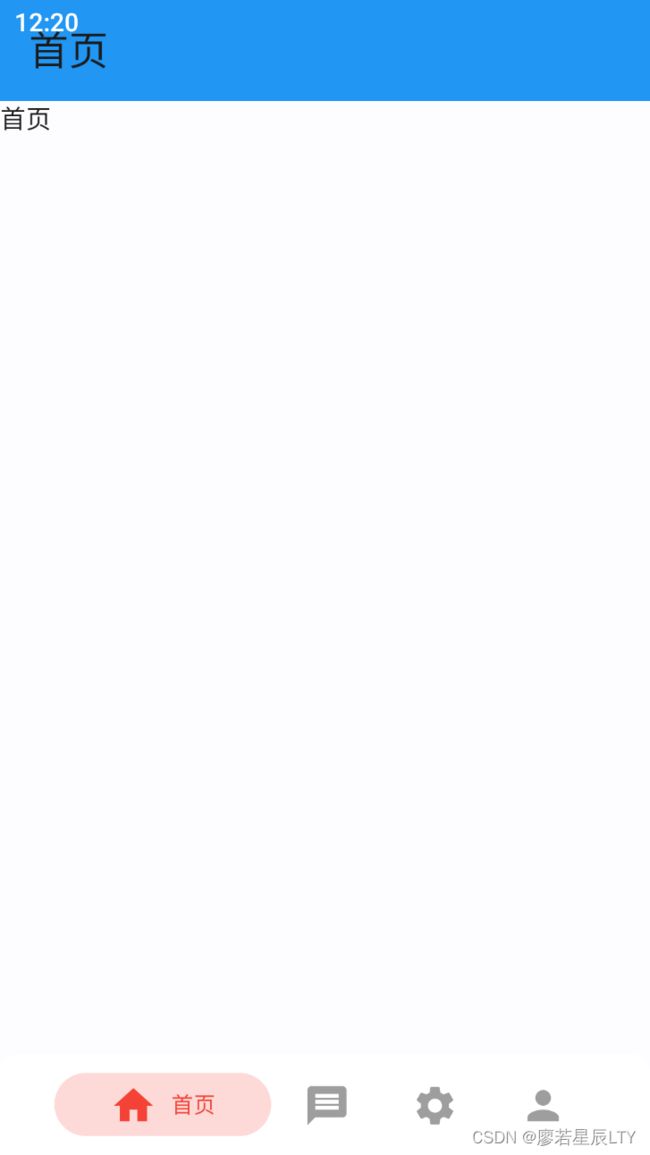
运行查看效果
最后就可以重新运行项目查看配置好的底部导航栏效果了,如图示例:

