Jetson Xavier NX设备上利用opencv进行多海康摄像头的捕获的部署方法
Gstreamer
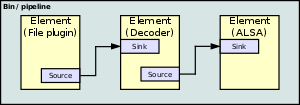
GStreamer的程序通过连接数字媒体处理的元素注入管道(pipeline)。每个元素是由一个插件提供 。 元素可组合为箱(bins),箱可以进一步聚合,从而形成架构图。下图是一个例子一个过滤器图表 。

元素沟通是透过垫(pads)。来源垫(source pad)上一个元素可以被连接到一个接收垫(sink pad)在另一个。当管道是在播放状态,数据缓冲流(data buffers flow)从来源垫(source pad)流向接收垫(sink pad)。
该图可以体现出如何使用GStreamer播放MP3文件。该文件的源读取 MP3文件从一台计算机的硬盘驱动程序,并将其发送到MP3解码器。解码器解码该MP3数据,并转换成PCM,然后传递到ALSA声音驱动。ALSA的声卡驱动程序发送 PCM声音样本,最后从电脑的扬声器播放。
前期准备
你需要得到摄像头的一些参数:
保证当前设备和摄像头在相同的ip地址下,打开直接输入摄像头的ip地址,即可进入摄像头设置界面,其中分辨率和编码方式我们需要注意,因为在使用GStreamer时,我们需要确定输入的格式与摄像头设备设置是一种的,不然会导致读取错误问题,从而打不开摄像头。
并且一般NX设备自带的GStreamer和Opencv是配套的,所以如果自己在虚拟环境中安装的opencv可能会导致和GStreamer版本不适配,也会导致打不开摄像头。我们可以卸载虚拟环境的opencv,然后通过如下代码手动建立与本地opencv的链接:
知识参考:NVIDIA AGX Xavier环境配置
sudo cp /usr/lib/python3.6/dist-packages/cv2/python-3.6/cv2.cpython-36m-aarch64-linux-gnu.so /home/nvidia/archiconda3/envs/torch/lib/python3.6/site-packages

包括如果摄像头不清楚,可以通过手动调节摄像头参数,在预览中观察是否清晰实现调节。
代码
程序读取视频帧并进行解码是一个很耗费CPU算力的工作,如果我们直接利用opencv接受rtsp视频流,在多摄像头的情况下,小功率的NX设备根本来不对所有的视频进行解码。即使单个摄像头,如此占算力的工作,也会导致CPU无法进行其他的任务。为此我们需要硬件的帮忙。并且这一切GStreamer会自动做完。 具体代码如下:
import sys
import cv2
import time
import multiprocessing as mp
import os


def image_put(name, pwd, ip, channel=1,show = False,write = False,save_W = 200,save_H =200):
    image_width = 1920  #摄像头视频分辨率中宽度参数
    image_height = 1080 #摄像头视频分辨率中高度参数
    rtsp_latency = 50
    uri = "rtsp://%s:%s@%s:554//Streaming/Channels/%d" % (name, pwd, ip, channel)
    gst_str = (
        "rtspsrc location={} latency={} ! rtph264depay ! h264parse ! omxh264dec ! nvvidconv ! video/x-raw, width=(int){}, height=(int){}, format=(string)BGRx ! videoconvert ! appsink sync=false")\
        .format(uri, rtsp_latency, image_width, image_height)  #开启硬件加速
    cap = cv2.VideoCapture(gst_str,cv2.CAP_GSTREAMER)

    if not cap.isOpened():
        sys.exit("Failed to open camera!")

    now_save = time.strftime("%m-%d_%H", time.localtime())
    if show == True:
        print('{} showing frames'.format(str(ip)))
    if write == True:
        print('{} saving video...'.format(str(ip)))
        fourcc = cv2.VideoWriter_fourcc(*'mp4v')
        fps = 20.0
        size = (save_W, save_H)
        out_file = f'.//det_videos//{str(ip)}.{now_save}.mp4'
        out = cv2.VideoWriter(out_file, fourcc, fps, size)

    while True:
        frame = cap.read()[1]
        if write == True:
            if time.strftime("%m-%d_%H", time.localtime()) != now_save:
                now_save = time.strftime("%m-%d_%H", time.localtime())
                fourcc = cv2.VideoWriter_fourcc(*'mp4v')
                fps = 20.0
                size = (save_W, save_H)
                out_file = f'.//det_videos//{str(ip)}.{now_save}.mp4'
                out = cv2.VideoWriter(out_file, fourcc, fps, size)

            try:
                save_img = cv2.resize(frame, (save_W, save_H))
                out.write(save_img)
            except Exception as e:
                print(e)
                print('frame lossing and pass')

        if show == True:
            frame = cv2.resize(frame, (400, 400))
            cv2.imshow(str(ip), frame)
            k = cv2.waitKey(25)
            if (k & 0xff == ord('q')):
                break

    print('camera {} over'.format(str(ip)))
    if write == True:
        out.release()
    cv2.destroyAllWindows()


def run_multi_camera():
    if os.path.exists('.//det_videos'):
        pass
    else:
        os.mkdir('.//det_videos')
    # user_name, user_pwd = "admin", "password"
    user_name, user_pwd = "admin", "admin"
    #多摄像头ip列表
    camera_ip_l = [
        "192.168.0.5",  # ipv4
         #"192.168.0.4",
        #"192.168.0.1",
         #"192.168.0.2",
    ]

    mp.set_start_method(method='spawn')  # init
    processes = []

    for camera_ip in camera_ip_l:
        processes.append(mp.Process(target=image_put, args=(user_name, user_pwd, camera_ip,1,True,True)))

    for process in processes:
        process.daemon = True
        process.start()

    for process in processes:
        process.join()

if __name__ == '__main__':
    run_multi_camera()