【RT-DETR有效改进】华为 | GhostnetV2移动端的特征提取网络效果完爆MobileNet系列
前言
大家好,这里是RT-DETR有效涨点专栏。
本专栏的内容为根据ultralytics版本的RT-DETR进行改进,内容持续更新,每周更新文章数量3-10篇。
专栏以ResNet18、ResNet50为基础修改版本,同时修改内容也支持ResNet32、ResNet101和PPHGNet版本,其中ResNet为RT-DETR官方版本1:1移植过来的,参数量基本保持一致(误差很小很小),不同于ultralytics仓库版本的ResNet官方版本,同时ultralytics仓库的一些参数是和RT-DETR相冲的所以我也是会教大家调好一些参数和代码,真正意义上的跑ultralytics的和RT-DETR官方版本的无区别
一、本文介绍
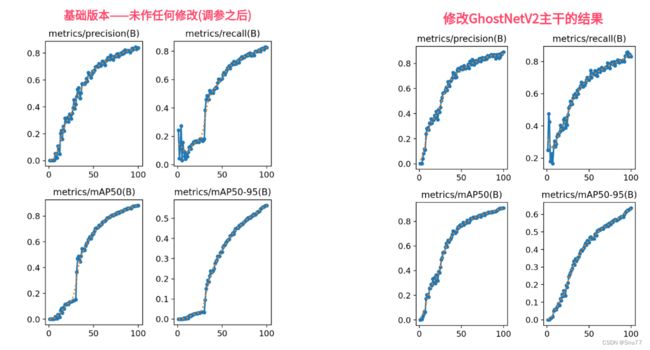
本文给大家带来的改进机制是华为移动端模型GhostNetV2,华为GhostNetV2是为移动应用设计的轻量级卷积神经网络(CNN),旨在提供更快的推理速度,其引入了一种硬件友好的注意力机制,称为DFC注意力。这个注意力机制是基于全连接层构建的,它的设计目的是在通用硬件上快速执行,并且能够捕捉像素之间的长距离依赖关系,其效果完爆MobileNet系列非常适合追求轻量化和高PFS的读者。欢迎大家订阅本专栏,本专栏每周更新3-5篇最新机制,更有包含我所有改进的文件和交流群提供给大家,该主干参数量下降百分之四十以上,能够提高三个点的精度!。
专栏链接:RT-DETR剑指论文专栏,持续复现各种顶会内容——论文收割机RT-DETR
目录
一、本文介绍
二、Ghostnetv2原理
2.1 Ghostnetv2的基本原理
2.2 DFC注意力机制
2.3 GhostNetV2架构
三、GhsetNetV2的核心代码
四、手把手教你添加GhsetNetV2
4.1 修改一
4.2 修改二
4.3 修改三
4.4 修改四
4.5 修改五
4.6 修改六
4.7 修改七
4.8 修改八
4.9 RT-DETR不能打印计算量问题的解决
4.10 可选修改
五、GhsetNetV2的yaml文件
5.1 yaml文件
5.2 运行文件
5.3 成功训练截图
六、全文总结
二、Ghostnetv2原理
论文地址:论文官方地址
代码地址: 代码官方地址

2.1 Ghostnetv2的基本原理
华为GhostNetV2是为移动应用设计的轻量级卷积神经网络(CNN),旨在提供更快的推理速度。
GhostNetV2的基本原理包括以下关键要点:
1. 硬件友好的DFC注意力机制:GhostNetV2引入了一种硬件友好的注意力机制,称为DFC注意力。这个注意力机制是基于全连接层构建的,它的设计目的是在通用硬件上快速执行,并且能够捕捉像素之间的长距离依赖关系。DFC注意力的引入有助于GhostNetV2更好地捕获全局信息,而不会显著降低推理速度。
2. GhostNetV2架构:GhostNetV2采用了一种新的网络架构,用于移动应用。这个架构重新审视了GhostNet中的表现能力瓶颈,并提出了一种方法,通过DFC注意力来增强由廉价操作生成的扩展特征。这使得GhostNetV2块能够同时整合本地和长距离信息,从而提高了特征表示的质量和性能。
总结:GhostNetV2的基本原理包括引入硬件友好的DFC注意力机制,重新设计的GhostNetV2架构,以及通过DFC注意力增强特征表示以提高性能。这使得GhostNetV2成为适用于移动设备的高性能轻量级CNN。
2.2 DFC注意力机制
DFC(Directional Feature Calibration)注意力机制是一种用于改善特征表示的注意力机制,特别适用于移动应用。
以下是总结的DFC注意力机制的主要特点和工作原理:
1. 方向性特征校准:DFC注意力机制旨在校准卷积神经网络中的特征,以更好地捕捉长距离的信息。它利用了方向性的特点,通过水平和垂直两个方向上的全连接层来捕获长程信息。
2. 全连接层:DFC注意力机制包含两个全连接层,一个用于水平方向,另一个用于垂直方向。这些全连接层充当了注意力调整的组件,它们负责处理像素之间的依赖关系。
3. 硬件友好:DFC注意力机制的设计考虑了硬件执行效率,因此可以在通用硬件上快速执行,而不会显著降低推理速度。
4. 捕捉长距离信息:DFC注意力机制通过全连接层捕获了图像中像素之间的长距离依赖关系。这有助于网络更好地理解图像中的全局信息,而不仅仅是局部信息。
5. 特征增强:DFC注意力机制通过调整特征映射中的权重来增强特征表示。这种调整使模型能够更好地适应任务需求,从而提高了性能。
下面为大家展示的是DFC注意力的信息流程:

水平和垂直的全连接层分别捕捉两个方向上的远程信息。在DFC注意力中,一个块是由其垂直/水平线上的块直接聚合的,而其他块参与了垂直/水平线上块的生成,与焦点标记存在间接关系。
下面为DFC注意力的一般公式:
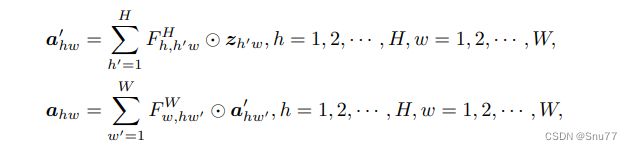
分别沿水平和垂直方向聚合像素。通过共享部分变换权重,可以方便地使用卷积来实现,省去了影响实际推理速度的耗时张量重塑和转置操作。
为了处理具有不同分辨率的输入图像,滤波器的大小可以与特征图的大小分离,即在输入特征上依次应用两个核大小为1×![]() 和
和![]() ×1的深度卷积。当使用卷积实现时,DFC注意力的理论复杂性表示为
×1的深度卷积。当使用卷积实现时,DFC注意力的理论复杂性表示为![]() 。这种策略在诸如TFLite和ONNX等工具中得到很好的支持,用于在移动设备上进行快速推理。
。这种策略在诸如TFLite和ONNX等工具中得到很好的支持,用于在移动设备上进行快速推理。
总结:GhostNetV2的DFC注意力机制是一种专为移动应用设计的硬件友好型注意力机制,旨在通过全连接层捕获图像中的长距离依赖关系,从而提高特征表示和模型性能。它是GhostNetV2架构的重要组成部分,有助于该网络在保持计算效率的同时实现更高的准确度。
2.3 GhostNetV2架构
GhostNetV2架构是GhostNetV2模型的网络结构,旨在提供高性能的轻量级卷积神经网络(CNN)解决方案,特别适用于移动设备。
GhostNetV2架构的主要特点包括以下要点:
1. Ghost Block:GhostNetV2的基本构建块是Ghost Block,它由两个Ghost模块堆叠而成。这个Ghost Block采用了反向瓶颈的结构,第一个Ghost模块充当扩展层,增加输出通道数,第二个Ghost模块减少通道数以匹配快捷路径。这种结构有助于提高特征的抽象能力和表示质量。
2. 移动设备适用:GhostNetV2架构专门设计用于移动应用,旨在提供更快的推理速度和更高的计算效率。它采用了轻量级设计,可以在计算资源有限的移动设备上高效运行。
下图展示了GhostNetV1和GhostNetV2中块的示意图。Ghost块是一个包含两个Ghost模块的反向残差瓶颈,在其中DFC注意力增强了扩展特征以提高表达能力。

图(a): GhostNet的一个块是由堆叠两个Ghost模块构建的。与MobileNetV2 类似,它也是一个反向瓶颈,即第一个Ghost模块充当扩展层以增加输出通道的数量,而第二个Ghost模块减少通道的数量以匹配快捷路径。
图(b):展示了GhostV2瓶颈的示意图。DFC注意力分支与第一个Ghost模块并行,用于增强扩展特征。然后,增强的特征被送到第二个Ghost模块以产生输出特征。它捕捉了不同空间位置中像素之间的长程依赖关系,并增强了模型的表达能力。这个结构有助于提高模型的性能和特征表示。
总结:GhostNetV2架构是GhostNetV2模型的核心组成部分,它的设计目标是在移动设备上实现高性能的轻量级图像分类解决方案。通过引入DFC注意力和优化的Ghost Block,GhostNetV2架构成功地提高了模型的性能和效率。
三、GhsetNetV2的核心代码
使用方式看章节四!
# 2020.11.06-Changed for building GhostNetV2
#            Huawei Technologies Co., Ltd.
"""
Creates a GhostNet Model as defined in:
GhostNet: More Features from Cheap Operations By Kai Han, Yunhe Wang, Qi Tian, Jianyuan Guo, Chunjing Xu, Chang Xu.
https://arxiv.org/abs/1911.11907
Modified from https://github.com/d-li14/mobilenetv3.pytorch and https://github.com/rwightman/pytorch-image-models
"""
import torch
import torch.nn as nn
import torch.nn.functional as F
import math
from timm.models import register_model


def _make_divisible(v, divisor, min_value=None):
    """
    This function is taken from the original tf repo.
    It ensures that all layers have a channel number that is divisible by 8
    It can be seen here:
    https://github.com/tensorflow/models/blob/master/research/slim/nets/mobilenet/mobilenet.py
    """
    if min_value is None:
        min_value = divisor
    new_v = max(min_value, int(v + divisor / 2) // divisor * divisor)
    # Make sure that round down does not go down by more than 10%.
    if new_v < 0.9 * v:
        new_v += divisor
    return new_v


def hard_sigmoid(x, inplace: bool = False):
    if inplace:
        return x.add_(3.).clamp_(0., 6.).div_(6.)
    else:
        return F.relu6(x + 3.) / 6.


class SqueezeExcite(nn.Module):
    def __init__(self, in_chs, se_ratio=0.25, reduced_base_chs=None,
                 act_layer=nn.ReLU, gate_fn=hard_sigmoid, divisor=4, **_):
        super(SqueezeExcite, self).__init__()
        self.gate_fn = gate_fn
        reduced_chs = _make_divisible((reduced_base_chs or in_chs) * se_ratio, divisor)
        self.avg_pool = nn.AdaptiveAvgPool2d(1)
        self.conv_reduce = nn.Conv2d(in_chs, reduced_chs, 1, bias=True)
        self.act1 = act_layer(inplace=True)
        self.conv_expand = nn.Conv2d(reduced_chs, in_chs, 1, bias=True)

    def forward(self, x):
        x_se = self.avg_pool(x)
        x_se = self.conv_reduce(x_se)
        x_se = self.act1(x_se)
        x_se = self.conv_expand(x_se)
        x = x * self.gate_fn(x_se)
        return x


class ConvBnAct(nn.Module):
    def __init__(self, in_chs, out_chs, kernel_size,
                 stride=1, act_layer=nn.ReLU):
        super(ConvBnAct, self).__init__()
        self.conv = nn.Conv2d(in_chs, out_chs, kernel_size, stride, kernel_size // 2, bias=False)
        self.bn1 = nn.BatchNorm2d(out_chs)
        self.act1 = act_layer(inplace=True)

    def forward(self, x):
        x = self.conv(x)
        x = self.bn1(x)
        x = self.act1(x)
        return x


class GhostModuleV2(nn.Module):
    def __init__(self, inp, oup, kernel_size=1, ratio=2, dw_size=3, stride=1, relu=True, mode=None, args=None):
        super(GhostModuleV2, self).__init__()
        self.mode = mode
        self.gate_fn = nn.Sigmoid()

        if self.mode in ['original']:
            self.oup = oup
            init_channels = math.ceil(oup / ratio)
            new_channels = init_channels * (ratio - 1)
            self.primary_conv = nn.Sequential(
                nn.Conv2d(inp, init_channels, kernel_size, stride, kernel_size // 2, bias=False),
                nn.BatchNorm2d(init_channels),
                nn.ReLU(inplace=True) if relu else nn.Sequential(),
            )
            self.cheap_operation = nn.Sequential(
                nn.Conv2d(init_channels, new_channels, dw_size, 1, dw_size // 2, groups=init_channels, bias=False),
                nn.BatchNorm2d(new_channels),
                nn.ReLU(inplace=True) if relu else nn.Sequential(),
            )
        elif self.mode in ['attn']:
            self.oup = oup
            init_channels = math.ceil(oup / ratio)
            new_channels = init_channels * (ratio - 1)
            self.primary_conv = nn.Sequential(
                nn.Conv2d(inp, init_channels, kernel_size, stride, kernel_size // 2, bias=False),
                nn.BatchNorm2d(init_channels),
                nn.ReLU(inplace=True) if relu else nn.Sequential(),
            )
            self.cheap_operation = nn.Sequential(
                nn.Conv2d(init_channels, new_channels, dw_size, 1, dw_size // 2, groups=init_channels, bias=False),
                nn.BatchNorm2d(new_channels),
                nn.ReLU(inplace=True) if relu else nn.Sequential(),
            )
            self.short_conv = nn.Sequential(
                nn.Conv2d(inp, oup, kernel_size, stride, kernel_size // 2, bias=False),
                nn.BatchNorm2d(oup),
                nn.Conv2d(oup, oup, kernel_size=(1, 5), stride=1, padding=(0, 2), groups=oup, bias=False),
                nn.BatchNorm2d(oup),
                nn.Conv2d(oup, oup, kernel_size=(5, 1), stride=1, padding=(2, 0), groups=oup, bias=False),
                nn.BatchNorm2d(oup),
            )

    def forward(self, x):
        if self.mode in ['original']:
            x1 = self.primary_conv(x)
            x2 = self.cheap_operation(x1)
            out = torch.cat([x1, x2], dim=1)
            return out[:, :self.oup, :, :]
        elif self.mode in ['attn']:
            res = self.short_conv(F.avg_pool2d(x, kernel_size=2, stride=2))
            x1 = self.primary_conv(x)
            x2 = self.cheap_operation(x1)
            out = torch.cat([x1, x2], dim=1)
            return out[:, :self.oup, :, :] * F.interpolate(self.gate_fn(res), size=(out.shape[-2], out.shape[-1]),
                                                           mode='nearest')


class GhostBottleneckV2(nn.Module):

    def __init__(self, in_chs, mid_chs, out_chs, dw_kernel_size=3,
                 stride=1, act_layer=nn.ReLU, se_ratio=0., layer_id=None, args=None):
        super(GhostBottleneckV2, self).__init__()
        has_se = se_ratio is not None and se_ratio > 0.
        self.stride = stride

        # Point-wise expansion
        if layer_id <= 1:
            self.ghost1 = GhostModuleV2(in_chs, mid_chs, relu=True, mode='original', args=args)
        else:
            self.ghost1 = GhostModuleV2(in_chs, mid_chs, relu=True, mode='attn', args=args)

            # Depth-wise convolution
        if self.stride > 1:
            self.conv_dw = nn.Conv2d(mid_chs, mid_chs, dw_kernel_size, stride=stride,
                                     padding=(dw_kernel_size - 1) // 2, groups=mid_chs, bias=False)
            self.bn_dw = nn.BatchNorm2d(mid_chs)

        # Squeeze-and-excitation
        if has_se:
            self.se = SqueezeExcite(mid_chs, se_ratio=se_ratio)
        else:
            self.se = None

        self.ghost2 = GhostModuleV2(mid_chs, out_chs, relu=False, mode='original', args=args)

        # shortcut
        if (in_chs == out_chs and self.stride == 1):
            self.shortcut = nn.Sequential()
        else:
            self.shortcut = nn.Sequential(
                nn.Conv2d(in_chs, in_chs, dw_kernel_size, stride=stride,
                          padding=(dw_kernel_size - 1) // 2, groups=in_chs, bias=False),
                nn.BatchNorm2d(in_chs),
                nn.Conv2d(in_chs, out_chs, 1, stride=1, padding=0, bias=False),
                nn.BatchNorm2d(out_chs),
            )

    def forward(self, x):
        residual = x
        x = self.ghost1(x)
        if self.stride > 1:
            x = self.conv_dw(x)
            x = self.bn_dw(x)
        if self.se is not None:
            x = self.se(x)
        x = self.ghost2(x)
        x += self.shortcut(residual)
        return x


class GhostNetV2(nn.Module):
    def __init__(self, cfgs, num_classes=1000, width=1.0, dropout=0.2, block=GhostBottleneckV2, args=None):
        super(GhostNetV2, self).__init__()
        self.cfgs = cfgs
        self.dropout = dropout
        self.num_classes = num_classes

        # building first layer
        output_channel = _make_divisible(16 * width, 4)
        self.conv_stem = nn.Conv2d(3, output_channel, 3, 2, 1, bias=False)
        self.bn1 = nn.BatchNorm2d(output_channel)
        self.act1 = nn.ReLU(inplace=True)
        input_channel = output_channel

        # building inverted residual blocks
        stages = []
        # block = block
        layer_id = 0
        for cfg in self.cfgs:
            layers = []
            for k, exp_size, c, se_ratio, s in cfg:
                output_channel = _make_divisible(c * width, 4)
                hidden_channel = _make_divisible(exp_size * width, 4)
                if block == GhostBottleneckV2:
                    layers.append(block(input_channel, hidden_channel, output_channel, k, s,
                                        se_ratio=se_ratio, layer_id=layer_id, args=args))
                input_channel = output_channel
                layer_id += 1
            stages.append(nn.Sequential(*layers))

        output_channel = _make_divisible(exp_size * width, 4)
        stages.append(nn.Sequential(ConvBnAct(input_channel, output_channel, 1)))
        input_channel = output_channel

        self.blocks = nn.Sequential(*stages)

        self.width_list = [i.size(1) for i in self.forward(torch.randn(1, 3, 640, 640))]

    def reset_classifier(self, num_classes, global_avg=''):
        self.num_classes = num_classes
        self.classifier = nn.Linear(1280, self.num_classes) if self.num_classes > 0 else nn.Identity()

    def forward(self, x):
        unique_tensors = {}
        x = self.conv_stem(x)
        x = self.bn1(x)
        x = self.act1(x)
        for model in self.blocks:
            x = model(x)
            if self.dropout > 0.:
                x = F.dropout(x, p=self.dropout, training=self.training)
            width, height = x.shape[2], x.shape[3]
            unique_tensors[(width, height)] = x
        result_list = list(unique_tensors.values())[-4:]
        return result_list


@register_model
def Ghostnetv2(pretrained=False, pretrained_cfg=None, pretrained_cfg_overlay=None, **kwargs):
    cfgs = [
        # k, t, c, SE, s
        [[3,  16,  16, 0, 1]],
        [[3,  48,  24, 0, 2]],
        [[3,  72,  24, 0, 1]],
        [[5,  72,  40, 0.25, 2]],
        [[5, 120,  40, 0.25, 1]],
        [[3, 240,  80, 0, 2]],
        [[3, 200,  80, 0, 1],
         [3, 184,  80, 0, 1],
         [3, 184,  80, 0, 1],
         [3, 480, 112, 0.25, 1],
         [3, 672, 112, 0.25, 1]
        ],
        [[5, 672, 160, 0.25, 2]],
        [[5, 960, 160, 0, 1],
         [5, 960, 160, 0.25, 1],
         [5, 960, 160, 0, 1],
         [5, 960, 160, 0.25, 1]
        ]
    ]


    return GhostNetV2(cfgs)

if __name__=='__main__':
    model = Ghostnetv2()
    model.eval()
    input = torch.randn(16,3,224,224)
    y = model(input)
    print(y.size())
四、手把手教你添加GhsetNetV2
4.1 修改一
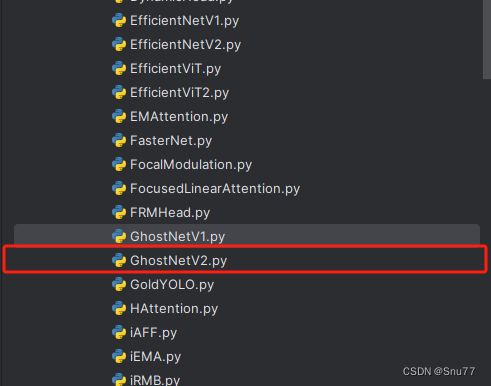
第一步还是建立文件,我们找到如下ultralytics/nn/modules文件夹下建立一个目录名字呢就是'Addmodules'文件夹(用群内的文件的话已经有了无需新建)!然后在其内部建立一个新的py文件将核心代码复制粘贴进去即可
4.2 修改二
第二步我们在该目录下创建一个新的py文件名字为'__init__.py'(用群内的文件的话已经有了无需新建),然后在其内部导入我们的检测头如下图所示。

4.3 修改三
第三步我门中到如下文件'ultralytics/nn/tasks.py'进行导入和注册我们的模块(用群内的文件的话已经有了无需重新导入直接开始第四步即可)!
从今天开始以后的教程就都统一成这个样子了,因为我默认大家用了我群内的文件来进行修改!!

4.4 修改四
添加如下两行代码!!!

4.5 修改五
找到七百多行大概把具体看图片,按照图片来修改就行,添加红框内的部分,注意没有()只是函数名。

        elif m in {自行添加对应的模型即可,下面都是一样的}:
            m = m(*args)
            c2 = m.width_list  # 返回通道列表
            backbone = True
4.6 修改六
用下面的代码替换红框内的内容。

if isinstance(c2, list):
    m_ = m
    m_.backbone = True
else:
    m_ = nn.Sequential(*(m(*args) for _ in range(n))) if n > 1 else m(*args)  # module
    t = str(m)[8:-2].replace('__main__.', '')  # module type
m.np = sum(x.numel() for x in m_.parameters())  # number params
m_.i, m_.f, m_.type = i + 4 if backbone else i, f, t  # attach index, 'from' index, type
if verbose:
    LOGGER.info(f'{i:>3}{str(f):>20}{n_:>3}{m.np:10.0f}  {t:<45}{str(args):<30}')  # print
save.extend(
    x % (i + 4 if backbone else i) for x in ([f] if isinstance(f, int) else f) if x != -1)  # append to savelist
layers.append(m_)
if i == 0:
    ch = []
if isinstance(c2, list):
    ch.extend(c2)
    if len(c2) != 5:
        ch.insert(0, 0)
else:
    ch.append(c2)
4.7 修改七
修改七这里非常要注意,不是文件开头YOLOv8的那predict,是400+行的RTDETR的predict!!!初始模型如下,用我给的代码替换即可!!!

代码如下->
 def predict(self, x, profile=False, visualize=False, batch=None, augment=False, embed=None):
        """
        Perform a forward pass through the model.

        Args:
            x (torch.Tensor): The input tensor.
            profile (bool, optional): If True, profile the computation time for each layer. Defaults to False.
            visualize (bool, optional): If True, save feature maps for visualization. Defaults to False.
            batch (dict, optional): Ground truth data for evaluation. Defaults to None.
            augment (bool, optional): If True, perform data augmentation during inference. Defaults to False.
            embed (list, optional): A list of feature vectors/embeddings to return.

        Returns:
            (torch.Tensor): Model's output tensor.
        """
        y, dt, embeddings = [], [], []  # outputs
        for m in self.model[:-1]:  # except the head part
            if m.f != -1:  # if not from previous layer
                x = y[m.f] if isinstance(m.f, int) else [x if j == -1 else y[j] for j in m.f]  # from earlier layers
            if profile:
                self._profile_one_layer(m, x, dt)
            if hasattr(m, 'backbone'):
                x = m(x)
                if len(x) != 5:  # 0 - 5
                    x.insert(0, None)
                for index, i in enumerate(x):
                    if index in self.save:
                        y.append(i)
                    else:
                        y.append(None)
                x = x[-1]  # 最后一个输出传给下一层
            else:
                x = m(x)  # run
                y.append(x if m.i in self.save else None)  # save output
            if visualize:
                feature_visualization(x, m.type, m.i, save_dir=visualize)
            if embed and m.i in embed:
                embeddings.append(nn.functional.adaptive_avg_pool2d(x, (1, 1)).squeeze(-1).squeeze(-1))  # flatten
                if m.i == max(embed):
                    return torch.unbind(torch.cat(embeddings, 1), dim=0)
        head = self.model[-1]
        x = head([y[j] for j in head.f], batch)  # head inference
        return x
4.8 修改八
我们将下面的s用640替换即可,这一步也是部分的主干可以不修改,但有的不修改就会报错,所以我们还是修改一下。

4.9 RT-DETR不能打印计算量问题的解决
计算的GFLOPs计算异常不打印,所以需要额外修改一处, 我们找到如下文件'ultralytics/utils/torch_utils.py'文件内有如下的代码按照如下的图片进行修改,大家看好函数就行,其中红框的640可能和你的不一样, 然后用我给的代码替换掉整个代码即可。

def get_flops(model, imgsz=640):
    """Return a YOLO model's FLOPs."""
    try:
        model = de_parallel(model)
        p = next(model.parameters())
        # stride = max(int(model.stride.max()), 32) if hasattr(model, 'stride') else 32  # max stride
        stride = 640
        im = torch.empty((1, 3, stride, stride), device=p.device)  # input image in BCHW format
        flops = thop.profile(deepcopy(model), inputs=[im], verbose=False)[0] / 1E9 * 2 if thop else 0  # stride GFLOPs
        imgsz = imgsz if isinstance(imgsz, list) else [imgsz, imgsz]  # expand if int/float
        return flops * imgsz[0] / stride * imgsz[1] / stride  # 640x640 GFLOPs
    except Exception:
        return 0
4.10 可选修改
有些读者的数据集部分图片比较特殊,在验证的时候会导致形状不匹配的报错,如果大家在验证的时候报错形状不匹配的错误可以固定验证集的图片尺寸,方法如下 ->
找到下面这个文件ultralytics/models/yolo/detect/train.py然后其中有一个类是DetectionTrainer class中的build_dataset函数中的一个参数rect=mode == 'val'改为rect=False

五、GhsetNetV2的yaml文件
5.1 yaml文件
大家复制下面的yaml文件,然后通过我给大家的运行代码运行即可,RT-DETR的调参部分需要后面的文章给大家讲,现在目前免费给大家看这一部分不开放。
# Ultralytics YOLO , AGPL-3.0 license
# RT-DETR-l object detection model with P3-P5 outputs. For details see https://docs.ultralytics.com/models/rtdetr

# Parameters
nc: 80  # number of classes
scales: # model compound scaling constants, i.e. 'model=yolov8n-cls.yaml' will call yolov8-cls.yaml with scale 'n'
  # [depth, width, max_channels]
  l: [1.00, 1.00, 1024]

backbone:
  # [from, repeats, module, args]
  - [-1, 1, Ghostnetv2, []]  # 4

head:
  - [-1, 1, Conv, [256, 1, 1, None, 1, 1, False]]  # 5 input_proj.2
  - [-1, 1, AIFI, [1024, 8]] # 6
  - [-1, 1, Conv, [256, 1, 1]]  # 7, Y5, lateral_convs.0

  - [-1, 1, nn.Upsample, [None, 2, 'nearest']] # 8
  - [3, 1, Conv, [256, 1, 1, None, 1, 1, False]]  # 9 input_proj.1
  - [[-2, -1], 1, Concat, [1]] # 10
  - [-1, 3, RepC3, [256, 0.5]]  # 11, fpn_blocks.0
  - [-1, 1, Conv, [256, 1, 1]]   # 12, Y4, lateral_convs.1

  - [-1, 1, nn.Upsample, [None, 2, 'nearest']] # 13
  - [2, 1, Conv, [256, 1, 1, None, 1, 1, False]]  # 14 input_proj.0
  - [[-2, -1], 1, Concat, [1]]  # 15 cat backbone P4
  - [-1, 3, RepC3, [256, 0.5]]    # X3 (16), fpn_blocks.1

  - [-1, 1, Conv, [256, 3, 2]]   # 17, downsample_convs.0
  - [[-1, 12], 1, Concat, [1]]  # 18 cat Y4
  - [-1, 3, RepC3, [256, 0.5]]    # F4 (19), pan_blocks.0

  - [-1, 1, Conv, [256, 3, 2]]   # 20, downsample_convs.1
  - [[-1, 7], 1, Concat, [1]]  # 21 cat Y5
  - [-1, 3, RepC3, [256, 0.5]]    # F5 (22), pan_blocks.1

  - [[16, 19, 22], 1, RTDETRDecoder, [nc, 256, 300, 4, 8, 3]]  # Detect(P3, P4, P5)
5.2 运行文件
大家可以创建一个train.py文件将下面的代码粘贴进去然后替换你的文件运行即可开始训练。
import warnings
from ultralytics import RTDETR
warnings.filterwarnings('ignore')

if __name__ == '__main__':
    model = RTDETR('替换你想要运行的yaml文件')
    # model.load('') # 可以加载你的版本预训练权重
    model.train(data=r'替换你的数据集地址即可',
                cache=False,
                imgsz=640,
                epochs=72,
                batch=4,
                workers=0,
                device='0',
                project='runs/RT-DETR-train',
                name='exp',
                # amp=True
                )
5.3 成功训练截图
下面是成功运行的截图(确保我的改进机制是可用的).

六、全文总结
从今天开始正式开始更新RT-DETR剑指论文专栏,本专栏的内容会迅速铺开,在短期呢大量更新,价格也会乘阶梯性上涨,所以想要和我一起学习RT-DETR改进,可以在前期直接关注,本文专栏旨在打造全网最好的RT-DETR专栏为想要发论文的家进行服务。
专栏链接:RT-DETR剑指论文专栏,持续复现各种顶会内容——论文收割机RT-DETR
