SpringBoot整合WebSocket
WebSocket协议概述
WebSocket是一种在单个TCP连接上进行全双工通信的协议,允许服务端主动的向客户端推送消息,使得服务端和客户端之间数据的传输变得简单。对于WebSocket协议的连接,只需要通过一次基于HTTP/1.1 协议的101状态码进行握手即可建立连接,并且这种连接是持久的。

简单聊天室实例
客户端代码
DOCTYPE html>
<html>
<head>
<meta charset="utf-8" />
<title>title>
<style type="text/css">
textarea{
resize: none;
}
#ChatPage{
text-align: center;
position: relative;
left: 30%;
top: 60px;
}
style>
head>
<body background="img/bg.jpg">
<div id="ChatPage" style="width: 500px;height: 600px; border: solid;background-color: darkgray; opacity: 0.6;">
<div style="height: 5%;width: 100%;margin-top: 10px;">
用户名:<input type="text" name="username" id="username" value=""/>
发送往:<input type="text" name="target" id="target" value=""/>
div>
<div style="width: 100%;height: 63%;border-top: solid;">
<ul id="cord" style="width: 92%;height: 100%;list-style-type: none;overflow: scroll; text-align: start;" >
ul>
div>
<div style="width: 100%;height: 30%;">
<textarea id="message" style="width: 99%;height: 60%;">textarea>
<button id="sendto" style="background-color: limegreen;height: 50px;width: 80px;">发送button>
<button id="connect" style="background-color: limegreen;height: 50px;width: 80px;">连接button>
<button id="close" style="background-color: limegreen;height: 50px;width: 80px;">断开button>
div>
div>
<script type="text/javascript">
var ip = '127.0.0.1' //服务端IP
var port = '8080' //端口号
var con = document.getElementById('connect')
var ws;
con.onclick = function(){
alert('建立连接中...')
//获取连接用户名
var username = document.getElementById('username').value
//创建WebSocket客户端对象
ws = new WebSocket("ws://"+ ip +":" + port + "/pointPoint/" + username);
//连接成功时调用该方法
ws.onopen = function(){
alert('连接到WebSocket服务端,IP:127.0.0.1,端口:8080')
}
//连接断开时调用该方法
ws.onclose = function(){
alert('与服务端断开连接')
}
//发生错误时调用该方法
ws.onerror = function(){
alert('发生错误')
}
//接收到客户端消息时调用该方法
ws.onmessage = function(ev){
//序列化接收到的JSON数据
var Obj = JSON.parse(ev.data)
//获取源用户
var usr = Obj['username']
//获取消息
var msg = Obj['msg']
//更新界面上的内容
var ul = document.getElementById('cord')
var li_1 = document.createElement('li')
var li_2 = document.createElement('li')
li_1.innerHTML = '' +usr+':\n'
li_2.innerHTML = '' +msg+'\n'
ul.appendChild(li_1)
ul.appendChild(li_2)
}
}
var sendto = document.getElementById('sendto')
//点击发送时调用该方法
sendto.onclick = function(){
var username = document.getElementById('username').value
//设置发送的消息
var msg = document.getElementById('message').value
//设置目标用户名
var target = document.getElementById('target').value
//将发送的数据封装成JSON
var json = '{"username":"'+target+'","msg":"'+msg+'"}'
var ul = document.getElementById('cord')
var li_1 = document.createElement('li')
var li_2 = document.createElement('li')
li_1.innerHTML = '' +username+':\n'
li_2.innerHTML = '' +msg+'\n'
ul.appendChild(li_1)
ul.appendChild(li_2)
//开始发送数据
ws.send(json)
}
var clo = document.getElementById('close')
//点击断开时调用该方法
clo.onclick = function(){
ws.close()
}
script>
body>
html>
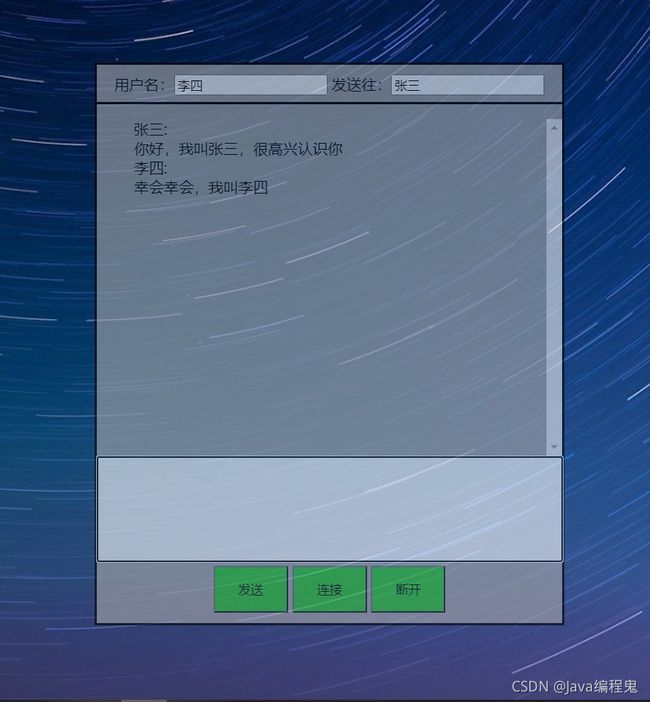
显示的界面如下:

服务端代码
1.首先导入Maven必要的依赖
- fastjson用来处理JSON数据
- spring-boot-starter-websocket是主要依赖
	<dependency>
		<groupId>com.alibabagroupId>
		<artifactId>fastjsonartifactId>
		<version>1.2.75version>
	dependency>

	<dependency>
		<groupId>org.springframework.bootgroupId>
		<artifactId>spring-boot-starter-websocketartifactId>
		<version>2.5.2version>
	dependency>
2.WebSocketConfig
用于开启WebSocket配置
package com.websocket_test.config;

import org.springframework.context.annotation.Bean;
import org.springframework.context.annotation.Configuration;
import org.springframework.web.socket.server.standard.ServerEndpointExporter;
/**
 * 添加WebSocket配置
 * @author Chenyl
 * */
@Configuration
public class WebSocketConfig {
    @Bean
    public ServerEndpointExporter serverEndpointExporter(){
        return new ServerEndpointExporter();
    }
}
3.WebSocketServer
- 注解@ServerEndpoint("/connect/{username}")中username是客户端的连接用户名
- 默认端口号是: 8080
- onlineCount 是当前在线的用户数量。对于onlineCount的更新操作,要考虑到并发的可能,必须上同步锁synchronized
- websocketMap用来保存在线用户的会话session,考虑到并发问题,因此采用的数据结构必须是线程安全的ConcurrentHashMap
- 对于其它的信息,请看代码的注释:
package com.websocket_test.server;

import com.alibaba.fastjson.JSON;
import org.springframework.stereotype.Component;
import javax.websocket.*;
import javax.websocket.server.PathParam;
import javax.websocket.server.ServerEndpoint;
import java.io.IOException;
import java.util.HashMap;
import java.util.Map;
import java.util.concurrent.ConcurrentHashMap;

/**
 * WebSocket服务类
 * @author Chenyl
 * */
@SuppressWarnings("all")
@ServerEndpoint("/pointPoint/{username}")
@Component
public class WebSocketServer {

    /**
     * 静态变量,Websocket服务端
     * */

    //当前在线用户数量
    public static int onlineCount = 0;

    //存放每个在线用户的WebSocket对象,采用线程安全的ConcurrentHashMap来存储
    public static Map<String,WebSocketServer> websocketMap = new ConcurrentHashMap<>();

    //用户连接时更新统计数据
    public synchronized void addOnlineCount(String username,Session session){
        onlineCount++;
        websocketMap.put(username,this);
        this.username = username;
        this.session = session;
    }

    //用户断开时更新统计数据
    public synchronized void decreaseOnlineCount(String username){
        onlineCount--;
        websocketMap.remove(username);
    }

    /**
     * 每个WebSocket对象特有的数据
     * */

    //用户名
    private String username = "";

    //用户的连接会话
    private Session session = null;

    /**
     * 用户成功连接到WebSocket服务端时调用该方法
     * */
    @OnOpen
    public void open(Session session, @PathParam("username")String username){
        addOnlineCount(username,session);
        System.out.println("用户" + username + "已接入服务器!");
    }

    /**
     * 用户与WebSocket服务端断开连接时调用该方法
     * */
    @OnClose
    public void close(){
        decreaseOnlineCount(username);
        System.out.println("用户" + username + "已断开服务器!");
    }

    /**
     * WebSocket服务端接收到用户的信息时,调用该方法
     * */
    @OnMessage
    public void onMessage(String message,Session session){
        //接收到json数据,并反序列化
        Map<String,String> map = JSON.parseObject(message, Map.class);
        //目标用户
        String target = map.get("username");
        //信息
        String msg = map.get("msg");
        //向目标用户推送信息
        sendTo(target,msg);
    }

    /**
     * 出现错误时调用该方法
     * */
    @OnError
    public void onError(Session session,Throwable error){
        System.out.println("用户"+ username +"出现错误");
        error.printStackTrace();
    }
    /**
     * 推送消息
     * */
    public void sendTo(String username,String msg){
        WebSocketServer webSocketServer = null;
        //确认目标用户是否在线
        webSocketServer = websocketMap.get(username);
        if(webSocketServer == null){
            return;
        }
        //将数据包装为JSON
        Map<String,String> map = new HashMap<>();
        //设置源用户
        map.put("username",this.username);
        //设置信息
        map.put("msg",msg);
        try {
            //开始向目标用户推送消息
            webSocketServer.session.getBasicRemote().sendText(JSON.toJSONString(map));
        } catch (IOException exception) {
            exception.printStackTrace();
        }
    }

}
运行结果如图所示