iOS绘制物理按钮 - 透明圆角渐变边框
需求是需要制作一个投票组件,支持边框是透明渐变,填充为渐变色背景的不规则按钮,并支持有点击之后的变化动画。
搜索了一圈内部技术论坛上文章,并没有类似的透明渐变边框的参考文章,遂起草对这一内容的总结。
(非透明的边框比较好处理,但是没法做到物理按钮的效果)
效果演示
方案对比
实现这种效果,能想到的至少有三种方法,其中主要部分就是投票项的底图的动画逻辑,文字主要是渐隐。
序列 |
实现方案 |
优势 |
劣势 |
1 |
gif |
方便 |
图占空间太大,定制性比较差 |
2 |
lottie |
更加灵活 |
需要设计师给到动画.json文件 |
3 |
代码绘制 |
灵活 |
麻烦,实现复杂动画更麻烦 |
最终折合包大小和多人协作成本问题以及动画的复杂程度,选择代码绘制的方式去实现。
轨迹路径分析
我们将边框加大宽度,将圆角加大半径,并绘制上轨迹,放大看下。
以左边投票选项为例子:
外圈黑线为内容GradientLayer渐变区域的可见内容mask区域的ShapeLayer的path,fill path(mask理解见下面的mask介绍)
里圈黄线为边框GradientLayer渐变区域的可见内容mask区域的ShapeLayer的path,stroke path
蓝线为半径,外圈半径比内圈的半径大borderWidth/2
这里需要讲解一个概念:边框绘制是stroke path,绘制出来的线是居中绘制在path上的,也就是在path上有内和外的概念。所以希望自己绘制的边框全部在我们想要的内部,需要做borderWidth/2的偏移(见下面的stroke边框和fill填充介绍)
黑线和黄线的转角圆的圆心都在一个点上
边框宽度12,左边圆半径为高度的一半36,右上右下的圆角半径8。所以边框的半径左边的是30,右边的为2。
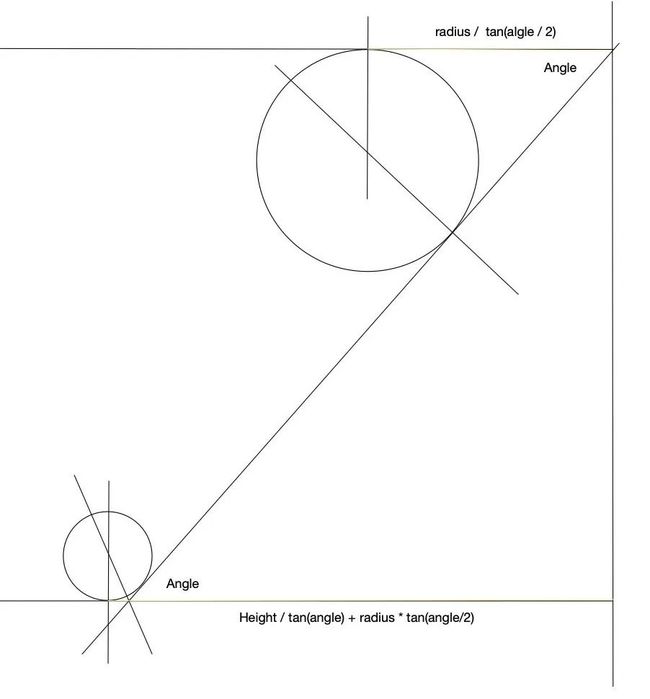
通过图分析,我们就很清楚了,我们需要算出三个圆圈的点,point
通过三角函数计算,三个点分别是:
左边 ( height / 2, height / 2 );
右上 ( width - radius / tan(angle / 2), radius );
右下 ( width - height / tan(angle) - radius * tan(angle / 2), height - radius ) ;
▐ 知识点
CALayer的mask介绍
在PS中,mask的理解就是遮罩。
不同于那些绘制在父图层中的子图层,mask图层定义了父图层的部分可见区域。
mask图层的Color属性是无关紧要的,真正重要的是图层的轮廓。mask属性就像是一个饼干切割机,mask图层实心的部分会被保留下来,其他的则会被抛弃。
如果mask图层比父图层要小,只有在mask图层里面的内容才是它关心的,除此以外的一切都会被隐藏起来。如下图:
所以在整个图层中,我们需要两个GradientLayer,一个是内容区域的,一个是边框区域的。并且分别添加mask遮罩,指定特定path区域的为可见。
其中需要注意的是,mask遮罩子图层的坐标系是相对父图层的,也就是说,左上角的(x, y)=(0, 0)其实就是父图层的左上角位置了
stroke边框和fill填充
红色线为path轨迹
填充Fill模式:以轨迹为边界向内填充颜色;
描边Stroke模式:以轨迹为lineWidth的中间,进行包裹描边。所以以stroke方式绘制渐变边框,需要做lineWidth/2的偏移。
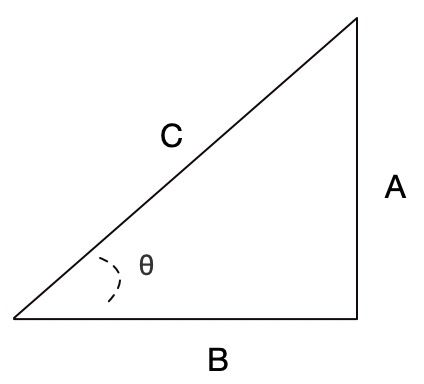
三角函数
tanθ = A / B、sinθ = A / C、conθ = B / C
开始绘制PATH
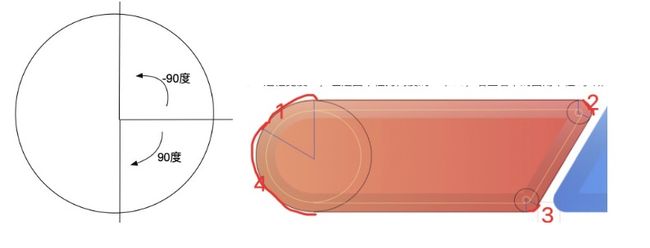
绘制出投票左边的选项底图,怎么都需要五笔轨迹绘制,包括最后的收尾一笔闭合整个形状,但是其实我们可以巧妙的利用半圆,四笔三点就能绘制出我们想要的形状了。
旋转角度从向右水平为0度开始。
private func drawBezierPath(rect: CGRect , smallAngle: CGFloat, shape: Bool) -> UIBezierPath {
  let bezierPath = UIBezierPath()
  /// 四个角的圆弧半径大小,左上,右上,右下,左下,需要考虑如果是100%比例情况的全椭圆情况
  let circleRadius = rect.height / 2
  let lefttop = state == .left ? circleRadius : bigRadius
  let righttop = state == .left ? smallRadius : circleRadius
  let rightbottom = state == .left ? bigRadius : circleRadius
  let leftbottom = state == .left ? circleRadius : smallRadius
  /// 绘制边框时候的path偏移量
  let radiusOffset = shape ? 0 : borderWidth / 2


  let leftTopPoint, leftBottomPoint, rightTopPoint, rightBottomPoint, leftTopEndPoint: CGPoint
  if state == .left {
    /// 左上角的圆心点
    let leftTopX = lefttop
    let leftTopY = lefttop
    leftTopPoint = CGPoint(x: leftTopX, y: leftTopY)
    leftBottomPoint = leftTopPoint


    /// 右上角的圆心点
    let rightTopX = rect.maxX - righttop /  tan(smallAngle / 2)
    let rightTopY = rect.minY + righttop
    rightTopPoint = CGPoint(x: rightTopX, y: rightTopY)
    /// 右下角的圆心点
    let rightBottomX = rect.maxX - rightbottom * tan(smallAngle / 2) - rect.height / tan(smallAngle)
    let rightBottomY = rect.maxY - rightbottom
    rightBottomPoint = CGPoint(x: rightBottomX, y: rightBottomY)


    ///左上角结束点
    leftTopEndPoint = CGPoint(x: 0, y: circleRadius) // 这一笔其实没画,因为lefttop和leftbottom的角画完已经重合了
  } else {
    /// 左上角的圆心点
    let leftTopX = rect.minX + rect.height / tan(smallAngle) + lefttop * tan(smallAngle / 2)
    let leftTopY = rect.minY + lefttop
    leftTopPoint = CGPoint(x: leftTopX, y: leftTopY)
    /// 左下角
    let leftBottomX = rect.minX + leftbottom / tan(smallAngle / 2)
    let leftBottomY = rect.maxY - leftbottom
    leftBottomPoint = CGPoint(x: leftBottomX, y: leftBottomY)


    /// 右上角的圆心点
    let rightTopX = rect.maxX - circleRadius
    let rightTopY = rect.minY + circleRadius
    rightTopPoint = CGPoint(x: rightTopX, y: rightTopY)
    rightBottomPoint = rightTopPoint


    ///左上角结束点
    let leftTopEndX = leftTopX - (lefttop - radiusOffset) * sin(smallAngle)
    let leftTopEndY = leftTopY - (lefttop - radiusOffset) * cos(smallAngle)
    leftTopEndPoint = CGPoint(x: leftTopEndX, y: leftTopEndY)
  }
  /// radius参数:因为区域已经偏移了,所以只需要改动圆弧的半径偏移就行
  bezierPath.addArc(withCenter: leftTopPoint, radius: lefttop - radiusOffset, startAngle: -.pi / 2.0 - smallAngle, endAngle: -.pi / 2.0, clockwise: true)
  bezierPath.addArc(withCenter: rightTopPoint, radius: righttop - radiusOffset, startAngle: -.pi / 2.0, endAngle: .pi / 2.0 - smallAngle, clockwise: true)
  bezierPath.addArc(withCenter: rightBottomPoint, radius: rightbottom - radiusOffset, startAngle: .pi / 2.0 - smallAngle, endAngle: .pi / 2.0, clockwise: true)
  bezierPath.addArc(withCenter: leftBottomPoint, radius: leftbottom - radiusOffset, startAngle: .pi / 2.0 , endAngle: 3 / 2 * .pi - smallAngle, clockwise: true)
  bezierPath.addLine(to: leftTopEndPoint)
  return bezierPath
}
绘制动画阶段的轨迹区域
动画部位主要是分为三个形状的变化,起始形状,中间变窄形状,最终确认比例的形状。
if state == .left {
  startFrame = .init(x: 0, y: 0, width: startLetfWidth, height: startHeight)


  startBounds = .init(x: 0, y: 0, width: startLetfWidth, height: startFrame.height)
  middleBounds = .init(x: 0, y: 0, width: middleWidth, height: completeHeight)
  endBounds = .init(x: 0, y: 0, width: caculateWidth(percent, height: completeHeight), height: completeHeight)
} else {
  startFrame = .init(x: startLetfWidth - (startHeight / CGFloat(tan(angle))) + space, y: 0, width: startRightWidth, height: startHeight)


  startBounds = .init(x: 0, y: 0, width: startRightWidth, height: startFrame.height)
  middleBounds = .init(x: 0, y: 0, width: middleWidth, height: completeHeight)
  endBounds = .init(x: 0, y: 0, width: caculateWidth(( 1 - percent ), height: completeHeight), height: completeHeight)
}
其中可以注意到,bounds的相关赋值,x y都为0的,只有frame有x y。
关键函数计算每个投票项通过的具体占比,得到实际宽度:
/// 最小宽度和最大宽度,除去百分百的情况下,宽度小于$0,就是$0,大于$1就是$1
private func widthRange(_ height: CGFloat) -> (CGFloat, CGFloat) {
  /// 最小宽度:半径加斜边的宽度加间距的一半
  let minWidth = height / CGFloat(tan(angle)) + height / 2 + space / 2
  /// 最大宽度:差不多意思就是父view宽度减去最小宽度
  let maxWidth = self.bounds.width - minWidth + (height / tan(angle)) / 2 - space / 2
  return ( minWidth, maxWidth )
}
/// 通过占比,和高度,计算投票选项的长度
private func caculateWidth(_ percent: CGFloat, height: CGFloat) -> CGFloat {
  /// 投票选项两边其实是有重叠部位的,因为接触部位是斜边,所以无间隔的情况是两边宽度为父容器一半宽度加上一半斜边的宽度
  /// 所以实际宽度就是再减去间距的一半
  let cWidth = self.bounds.width * percent + (height / tan(angle)) / 2 - space / 2
  let widthR = widthRange(height)
  if abs(percent) < 1e-8 { /// 极限情况 为0
    return 0
  } else if abs(percent - 1.0) < 1e-8 { /// 极限情况 为100
    return self.bounds.width
  } else if cWidth <= widthR.0 {/// 宽度小于$0,就是$0,大于$1就是$1
    return widthR.0
  } else if cWidth >= widthR.1 {
    return widthR.1
  } else {
    return cWidth
  }
}
最终,我们就得到了,动画三个阶段的变化大小
使用CAMediaTimingFunction就能实现我们需要的动画,其中需要注意的一点就是anchorPoint,左边选项的两个图层为(0, 0),右边选项的两个图层为(1, 0)。
/// 边框边框layer,使用的是shapreLayer,stroke
lazy var borderLayer: CAShapeLayer = {
  let layer =  CAShapeLayer()
  /// 设置锚点,用来控制动画,左边的就是向左收缩,右边的就是向右收缩
  layer.anchorPoint = .init(x: state == .left ? 0 : 1, y: 0)
  layer.lineWidth = borderWidth
  layer.fillColor = UIColor.clear.cgColor// 默认色
  layer.strokeColor = UIColor.red.cgColor
  layer.path = borderPath
  return layer
}()


/// 边框渐变色layer,添加边框渐变色的可见mask,mask表示mask的区域才是可见区域。borderLayer的mask代表的就是只会展示出borderLayer的区域,即边框
lazy var borderGradientLayer: CAGradientLayer = {
  let layer = CAGradientLayer()
  /// 设置锚点,用来控制动画,左边的就是向左收缩,右边的就是向右收缩
  layer.anchorPoint = .init(x: state == .left ? 0 : 1, y: 0)
  layer.frame = startFrame
  layer.startPoint = CGPoint(x: 0, y: 0)
  layer.endPoint = CGPoint(x:0, y:1)
  layer.colors = [UIColor.xscolor(withHex: 0xffffff, alpha: 0.3).cgColor, UIColor.xscolor(withHex: 0x000000, alpha: 0.06).cgColor]
  layer.mask = borderLayer
  return layer
}()


/// 内容layer,使用的是shapreLayer,fill
lazy var shaperLayer: CAShapeLayer = {
  let layer =  CAShapeLayer()
  layer.anchorPoint = .init(x: state == .left ? 0 : 1, y: 0)
  layer.path = shapePath
  return layer
}()
/// 内容渐变色layerr,添加内容渐变色的可见mask,mask表示mask的区域才是可见区域。shaperLayer的mask代表的就是只会展示出shaperLayer的区域,即整个椭圆
lazy var shapeGradientLayer : CAGradientLayer = {
  let layer = CAGradientLayer()
  layer.anchorPoint = .init(x: state == .left ? 0 : 1, y: 0)
  layer.frame = startFrame
  layer.startPoint = CGPoint(x: 0, y: 0)
  layer.endPoint = CGPoint(x:1, y:0)
  layer.colors = [colors.0.cgColor, colors.1.cgColor]
  layer.mask = shaperLayer
  return layer
}()
▐ 知识点
anchorPoint
All geometric manipulations to the view occur about the specified point
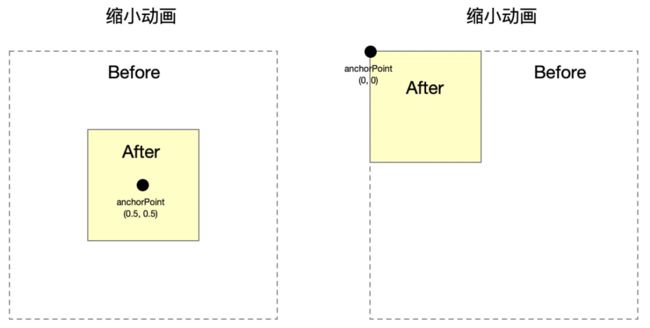
anchorPoint就是所有动画的参考点。默认值为(0.5, 0.5),表示中心点是锚点。(0, 0)为左上角,(0, 1)为右下角。
以缩小动画为例,默认(0.5, 0.5)的锚点缩小就是居中缩小效果,如下图。
感兴趣可以回忆一下frame和bounds的区别,anchorPoint和position的区别。
绘制动画
使用的CAAnimation的子类,CAKeyframeAnimation实现连续动画,变化的为path和bounds
public func startAnimate() {
  let timingFunctions = [CAMediaTimingFunction.init(name: .linear), CAMediaTimingFunction.init(name: .linear)]


  let shapeKeyFrameAnimation: CAKeyframeAnimation = .init(keyPath: "path")
  shapeKeyFrameAnimation.duration = 2
  shapeKeyFrameAnimation.fillMode = .forwards
  shapeKeyFrameAnimation.isRemovedOnCompletion = false
  shapeKeyFrameAnimation.values = [shapePath, middleShapePath, endShapePath]
  shapeKeyFrameAnimation.timingFunctions = timingFunctions
  shaperLayer.removeAllAnimations()
  shaperLayer.add(shapeKeyFrameAnimation, forKey: "shapeAnimation")


  let borderKeyFrameAnimation: CAKeyframeAnimation = .init(keyPath: "path")
  borderKeyFrameAnimation.duration = 2
  borderKeyFrameAnimation.fillMode = .forwards
  borderKeyFrameAnimation.isRemovedOnCompletion = false
  borderKeyFrameAnimation.values = [borderPath, middleBorderPath, endBorderPath]
  borderKeyFrameAnimation.timingFunctions = timingFunctions
  borderLayer.removeAllAnimations()
  borderLayer.add(borderKeyFrameAnimation, forKey: "borderAnimation")


  let shapeGradientKeyFrameAnimation: CAKeyframeAnimation = .init(keyPath: "bounds")
  shapeGradientKeyFrameAnimation.duration = 2
  shapeGradientKeyFrameAnimation.fillMode = .forwards
  shapeGradientKeyFrameAnimation.isRemovedOnCompletion = false
  shapeGradientKeyFrameAnimation.values = [startBounds, middleBounds, endBounds]
  shapeGradientKeyFrameAnimation.timingFunctions = timingFunctions
  shapeGradientLayer.removeAllAnimations()
  shapeGradientLayer.add(shapeGradientKeyFrameAnimation, forKey: "shapeGradientAnimation")
  borderGradientLayer.removeAllAnimations()
  borderGradientLayer.add(shapeGradientKeyFrameAnimation, forKey: "shapeGradientAnimation")
}
▐ 知识点
CoreGraphics和QuartzCore/CoreAnimation和UIBezierPath
CoreGraphics:
CoreGraphics是iOS的核心图形库。
CoreAnimation和UIBezierPath都用到了很多CoreGraphics的接口,是C语言实现的,可以在iOS和macOS上使用。
常用的CGPoint、CGRect、CGSize都是出至这个库。
其中UI库里面的UIImage封装至CGImage、UIFont封装至CGFont。
CoreGraphics是系统绘制界面、文字、图形等UI的基础库。
QuartzCore/CoreAnimation:
QuartzCore库的头文件只包含了CoreAnimation,所以QuartzCore其实就是CoreAnimation。
CoreAnimation基于CoreGraphics的OC语言的封装,是对一些列动画的封装。
动画是作用在CALayer上的,不是UIView上。
能够使用在iOS和macOS上。
常用的动画有CABasicAnimation、CAKeyFrameAnimation等,这两者区别是一个是一帧动画,一个是多帧动画。
UIBezierPath:
在UIKit库中,所以只能在iOS上使用。
是属于对CoreGraphics的CGPath的封装,使用他可以定义多种简单的形状,圆、椭圆、长方形、多点线等。
结语
path这种题,其实最终还是回归到数学题上了,如何画好辅助线是一个很有效加大开发效率的好方式。
我这里展示的是demo版本的源码,完整版还需要考虑
投票出现100:0的这种百分百情况,即绘图左右两边都是半圆。
以及99999:1这种一边极限小的情况下需要兼容最小宽度的情况。
以及贴文本和点击事件
▐ 工具推荐
辅助线绘制
可以使用ps或是OmniGraffle。其中OmniGraffle还能用来绘制流程图。
路径绘制
可以自己手动计算,也可以使用Sketch绘图导出SVG,然后再用PaintCode转换成所需的代码。或是直接通过PaintCode绘制路径图,导出代码。
团队介绍
我们是大淘宝技术搜索推荐移动端团队,负责集团核心电商搜索推荐,图像视频搜索业务研发、技术平台建设、新业务和前沿技术探索等工作,我们负责的业务拥有亿级流量,能为您提供巨大的机遇和成长空间,期待您的加入。
感兴趣的同学可将简历发送到 [email protected]
✿ 拓展阅读
作者|老球
编辑|橙子君


