Spring Security OAuth2.0 授权码模式和使用JWT例子
OAuth2.0概念:
https://www.ruanyifeng.com/blog/2019/04/oauth_design.html
关于Spring Security不多说明了,百度很多,这里只是实操一下。
OAuth 2.0 四种获得令牌的模式
- 授权码(authorization-code)
- 隐藏式(implicit)
- 密码式(password):
- 客户端凭证(client credentials)
这里演示就用授权码模式
授权码模式案例
创建maven工程oauth2-demo
pom.xml添加内容
	<dependencyManagement>
        <dependencies>

            <dependency>
                <groupId>org.springframework.bootgroupId>
                <artifactId>spring-boot-dependenciesartifactId>
                <version>2.2.2.RELEASEversion>
                <type>pomtype>
                <scope>importscope>
            dependency>

            <dependency>
                <groupId>org.springframework.cloudgroupId>
                <artifactId>spring-cloud-dependenciesartifactId>
                <version>Hoxton.SR1version>
                <type>pomtype>
                <scope>importscope>
            dependency>
        dependencies>
    dependencyManagement>
创建模块auth-service
pom.xml添加依赖
	<dependencies>
        <dependency>
            <groupId>org.springframework.bootgroupId>
            <artifactId>spring-boot-starter-webartifactId>
        dependency>
        <dependency>
            <groupId>org.springframework.cloudgroupId>
            <artifactId>spring-cloud-starter-oauth2artifactId>
            <version>2.1.2.RELEASEversion>
        dependency>
    dependencies>
创建application.yml
server:
  port: 8001

spring:
  application:
  #这个属性在例子里好像不重要,没有应该也行
    name: auth-server
创建启动类
@SpringBootApplication
public class AuthServiceApplication {
    public static void main(String[] args) {
        SpringApplication.run(AuthServiceApplication.class);
    }
}
创建MyUserDetail类
public class MyUserDetail implements UserDetails {
    private String username;
    private String password;
    private String perms;

    public MyUserDetail() {
    }

    public MyUserDetail(String username, String password, String perms) {
        this.username = username;
        this.password = password;
        this.perms = perms;
    }

    public Collection<? extends GrantedAuthority> getAuthorities() {
        return Stream.of(perms.split(",")).map(SimpleGrantedAuthority::new).collect(Collectors.toList());
    }

    public String getPassword() {
        return password;
    }

    public String getUsername() {
        return username;
    }

    public boolean isAccountNonExpired() {
        return true;
    }

    public boolean isAccountNonLocked() {
        return true;
    }

    public boolean isCredentialsNonExpired() {
        return true;
    }

    public boolean isEnabled() {
        return true;
    }
}
创建UserDetailsServiceImpl类
@Service
public class UserDetailsServiceImpl implements UserDetailsService {

    //假设username = admin   password = 123  角色ROLE_ADMIN
    public UserDetails loadUserByUsername(String username) throws UsernameNotFoundException {
        //实际情况,这里应该是要去数据库根据username查询用户,为了简单演示这里就写死数据
        //用户的角色也应该要去数据库查询,为了简便这里就写死数据
        String role = "ROLE_ADMIN";

        BCryptPasswordEncoder passwordEncoder = new BCryptPasswordEncoder();
        //数据库里的用户密码应该是加密后的,所以这里加密模拟一下
        String password = passwordEncoder.encode("123");
        //return new MyUserDetail(username,password,authorities);
        return new MyUserDetail(username,password,role);
    }
}
创建TokenConfig类
@Configuration
public class TokenConfig {

    @Bean
    public TokenStore tokenStore(){
        return new InMemoryTokenStore();
    }
}
创建OauthConfig类
@Configuration
@EnableAuthorizationServer
public class OauthConfig extends AuthorizationServerConfigurerAdapter {

    @Autowired
    private PasswordEncoder passwordEncoder;

    //密码模式才需要配置,认证管理器
    @Autowired
    private AuthenticationManager authenticationManager;

    @Autowired
    private AuthorizationCodeServices authorizationCodeServices;


    @Autowired
    private TokenStore tokenStore;

    @Autowired
    private ClientDetailsService clientDetailsService;

    //github
    @Override
    public void configure(AuthorizationServerEndpointsConfigurer endpoints) throws Exception {

        endpoints.authenticationManager(authenticationManager)  //调用此方法才能支持 password 模式。
                //.userDetailsService(userDetailsServiceImpl)     //设置用户验证服务
                .tokenStore(tokenStore)  //指定 token 的存储方式,这里使用JWT方式
                //.accessTokenConverter(jwtAccessTokenConverter);
                .authorizationCodeServices(authorizationCodeServices)//授权码模式才用
                .tokenServices(tokenServices())
                .allowedTokenEndpointRequestMethods(HttpMethod.POST);
    }

    @Override
    public void configure(ClientDetailsServiceConfigurer clients) throws Exception {
        //使用 inMemory 方式存储的,将配置保存到内存中,相当于硬编码了。正式环境下的做法是存到数据库
        clients.inMemory()
                .withClient("user-client")  //client-id
                .secret(passwordEncoder.encode("secret123"))
                .resourceIds("resource1")     //给client一个id,这个在client的配置里要用的
                .authorizedGrantTypes("authorization_code", "password", "client_credentials", "implicit", "refresh_token")
                .accessTokenValiditySeconds(3600)
                .scopes("all")     //授权的范围,每个resource会设置自己的范围
                .autoApprove(false)     //不要弹出确认授权页面
                .redirectUris("http://www.baidu.com");

    }

    @Override
    public void configure(AuthorizationServerSecurityConfigurer security) throws Exception {
        security.allowFormAuthenticationForClients()    //允许表单认证
                .checkTokenAccess("permitAll()")//    /oauth/check_token公开
                .tokenKeyAccess("permitAll()"); //   /oauth/token_key公开
    }

    //github
    @Bean
    public AuthorizationServerTokenServices tokenServices(){
        DefaultTokenServices defaultTokenServices = new DefaultTokenServices();
        defaultTokenServices.setClientDetailsService(clientDetailsService);
        defaultTokenServices.setSupportRefreshToken(true);

        //配置token的存储方法
        defaultTokenServices.setTokenStore(tokenStore);
        defaultTokenServices.setAccessTokenValiditySeconds(7200);    //令牌默认有效期2小时
        defaultTokenServices.setRefreshTokenValiditySeconds(259200);  // 刷新令牌默认有效期3天

        return defaultTokenServices;
    }

    @Bean
    public AuthorizationCodeServices authorizationCodeServices() {
        //设置授权码模式的授权码如何存取,暂时采用内存方式
        return new InMemoryAuthorizationCodeServices();
    }
}
创建WebSecurityConfig类
@Configuration
@EnableGlobalMethodSecurity(securedEnabled = true, prePostEnabled = true)
public class WebSecurityConfig extends WebSecurityConfigurerAdapter {


    @Bean
    public PasswordEncoder passwordEncoder(){
        return new BCryptPasswordEncoder();
    }

    @Autowired
    private UserDetailsService userDetailsServiceImpl;

    //在Oauth2里有4中授权模式,使用password模式就要有下面这个bean
    @Bean
    @Override
    public AuthenticationManager authenticationManagerBean() throws Exception{
        return super.authenticationManagerBean();
    }

    @Override
    protected void configure(HttpSecurity http) throws Exception {
        http.csrf().disable()
                .authorizeRequests()
                .anyRequest().permitAll()
                .and()
                .formLogin();

    }

    @Override
    protected void configure(AuthenticationManagerBuilder auth) throws Exception {
        BCryptPasswordEncoder encoder = new BCryptPasswordEncoder();
        auth.userDetailsService(userDetailsServiceImpl).passwordEncoder(encoder);
    }
}
创建user-service模块
pom.xml
	<dependencies>
        <dependency>
            <groupId>org.springframework.bootgroupId>
            <artifactId>spring-boot-starter-webartifactId>
        dependency>
        <dependency>
            <groupId>org.springframework.cloudgroupId>
            <artifactId>spring-cloud-starter-oauth2artifactId>
            <version>2.1.2.RELEASEversion>
        dependency>
    dependencies>
创建application.yml
server:
  port: 8002
spring:
  application:
    name: user-service

security:
  oauth2:
    client:
      #这里要和认证服务端里OauthConfig类里的withClient("user-client")的参数一致
      client-id: user-client
      #这里同上,也要和secret("secret123")的参数一致
      client-secret: secret123
      #user-authorization-uri 是授权码认证方式需要的
      #user-authorization-uri: http://localhost:8001/oauth/authorize
      #access-token-uri 是密码模式需要用到的获取 token 的接口
      access-token-uri: http://localhost:8002/oauth/token
    resource:
      id: user-lient
      user-info-uri: user-info
    authorization:
      #token 验证请求的接口
      check-token-access: http://localhost:8001/oauth/check_token
创建ResourceServerConfig类
@Configuration
@EnableResourceServer
@EnableGlobalMethodSecurity(prePostEnabled = true)
public class ResourceServerConfig extends ResourceServerConfigurerAdapter {

    @Override
    public void configure(ResourceServerSecurityConfigurer resource) throws Exception{
        resource.tokenServices(tokenService())
                .resourceId("resource1")
                .stateless(true);
    }

    @Override
    public void configure(HttpSecurity http) throws Exception {
        http.csrf().disable()
                .authorizeRequests()
                .antMatchers("/**").access("#oauth2.hasScope('all')")
                .and()
                .sessionManagement().sessionCreationPolicy(SessionCreationPolicy.STATELESS);
    }

    @Bean
    public ResourceServerTokenServices tokenService(){
        //远程token验证, 普通token必须远程校验
        RemoteTokenServices tokenServices = new RemoteTokenServices();
        //配置去哪里验证token
        tokenServices.setCheckTokenEndpointUrl("http://localhost:8001/oauth/check_token");

        //配置组件的client-id和secret,这个也是在auth中配置好的
        tokenServices.setClientId("user-client");
        tokenServices.setClientSecret("secret123");
        return tokenServices;
    }
}
创建SecurityConfig类
@Configuration
public class SecurityConfig extends WebSecurityConfigurerAdapter {

    @Override
    protected void configure(HttpSecurity http) throws Exception {
        http.csrf().disable()
                .authorizeRequests()
                .antMatchers("/api/**").authenticated()
                .anyRequest().permitAll();
    }
}
创建测试controller
@RestController
@RequestMapping("/api")
public class UserController {

    @GetMapping("/getTest")
    @PreAuthorize("hasRole('ROLE_ADMIN')")
    public String getTest(){
        return "访问资源1";
    }
}
启动类
@SpringBootApplication
public class UserServiceApplication {
    public static void main(String[] args) {
        SpringApplication.run(UserServiceApplication.class);
    }
}
启动
启动两个模块,浏览器访问
http://localhost:8001/oauth/authorize?client_id=user-client&response_type=code&scope=all&redirect_uri=http://www.baidu.com
会跳转到默认Spring Security 默认的登录界面

根据上面代码的设计,我已经在代码里写死账号和密码,所以这里我就直接用admin作为username,123作为密码登录
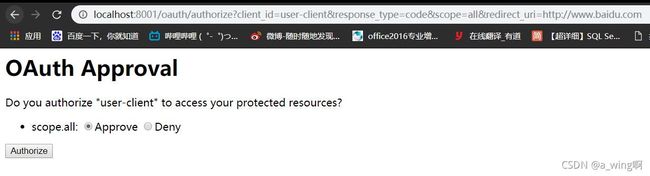
跳转到这里,选择Approve,点击Authorize按钮,就会跳转到百度,但注意地址栏

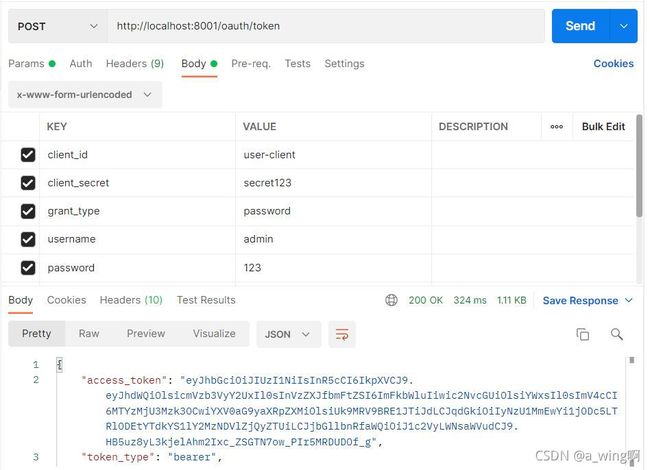
code就是授权码(这个码每次都不一样的),拿这这个授权码就可以去申请token了,这里我用postman测试

code就是刚才的授权码,发送这个post请求
返回结果
{
    "access_token": "780011e0-15c0-4320-8d38-d66779235ea2",
    "token_type": "bearer",
    "refresh_token": "36620112-33ec-4a9f-b7a4-9781767b6935",
    "expires_in": 3599,
    "scope": "all"
}
access_token就是我们想要的token了,拿着这个token去访问资源(或者叫地址)

把token放到请求头里,KEY为Authorization,VALUE为bearer+空格+刚才获取的access_token
发送请求

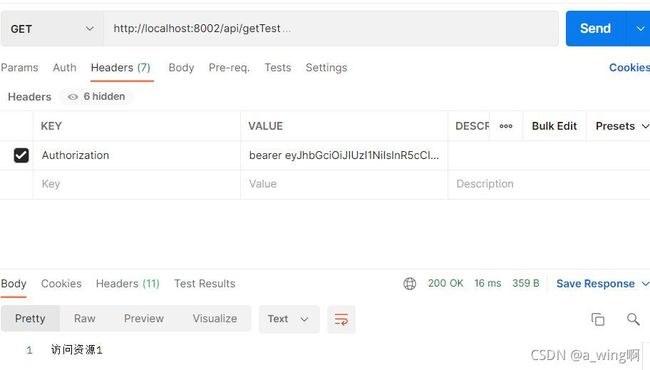
成功访问
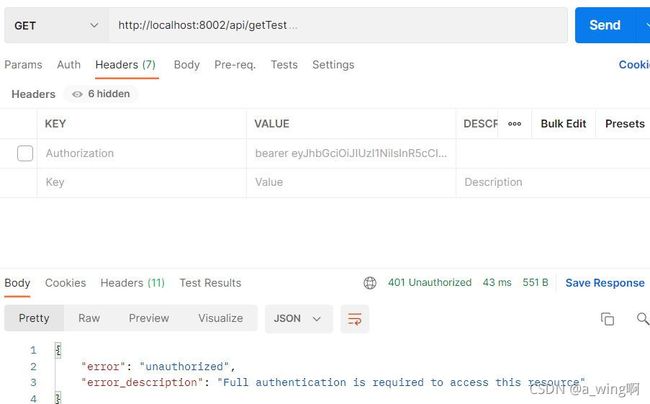
如果我们同样访问这个地址,但是请求头里没有Authorization参数(就是没有token),发送请求返回结果:

提示未授权
如果我们同样访问这个地址,请求头里有Authorization参数(就是有token),但是我们故意删除token的第1个字符(即对token进行了修改),发送请求返回结果:
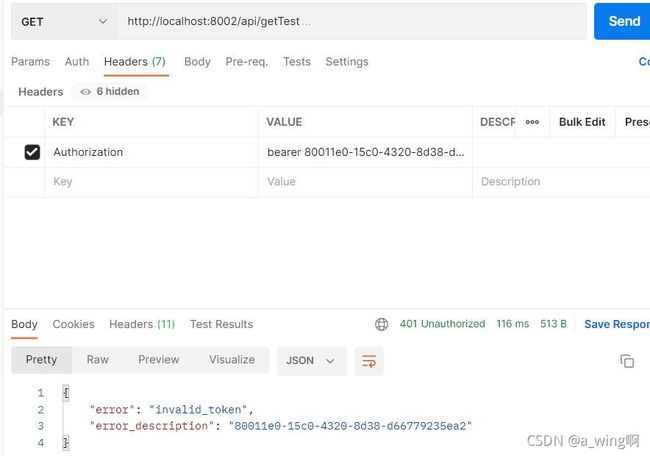
返回信息提示无效token,测试成功。上面的代码可能不是最精简的,有些与测试无关的可以自行删除。
使用JWT格式的token
通过上边的测试我们发现,当资源服务和授权服务不在一起时资源服务使用RemoteTokenServices 远程请求授权服务验证token,如果访问量较大将会影响系统的性能 。
解决上边问题:
令牌采用JWT格式即可解决上边的问题,用户认证通过会得到一个JWT令牌,JWT令牌中已经包括了用户相关的信息,只需要发送请求时带上JWT(一般放在请求头)访问资源服务,资源服务根据事先约定的算法自行完成令牌校验,无需每次都请求认证服务完成授权。
修改auth-service模块
修改OauthConfig类
@Configuration
@EnableAuthorizationServer
public class OauthConfig extends AuthorizationServerConfigurerAdapter {

    @Autowired
    private PasswordEncoder passwordEncoder;

    //密码模式才需要配置,认证管理器
    @Autowired
    private AuthenticationManager authenticationManager;

    @Autowired
    private AuthorizationCodeServices authorizationCodeServices;

    @Autowired
    private TokenStore tokenStore;

    @Autowired
    private JwtAccessTokenConverter jwtAccessTokenConverter;

    @Autowired
    private ClientDetailsService clientDetailsService;

    //github
    @Override
    public void configure(AuthorizationServerEndpointsConfigurer endpoints) throws Exception {

        endpoints.authenticationManager(authenticationManager)  //调用此方法才能支持 password 模式。

                .authorizationCodeServices(authorizationCodeServices)//授权码模式才用
                .tokenServices(tokenServices())
                .allowedTokenEndpointRequestMethods(HttpMethod.POST);
    }

    @Override
    public void configure(ClientDetailsServiceConfigurer clients) throws Exception {
        //使用 inMemory 方式存储的,将配置保存到内存中,相当于硬编码了。正式环境下的做法是存到数据库
        clients.inMemory()
                .withClient("user-client")  //client-id
                .secret(passwordEncoder.encode("secret123"))
                .resourceIds("resource1")     //给client一个id,这个在client的配置里要用的
                .authorizedGrantTypes("authorization_code", "password", "client_credentials", "implicit", "refresh_token")
                .accessTokenValiditySeconds(3600)
                .scopes("all")     //授权的范围,每个resource会设置自己的范围
                .autoApprove(false)     //不要弹出确认授权页面
                .redirectUris("http://www.baidu.com");

    }

    @Override
    public void configure(AuthorizationServerSecurityConfigurer security) throws Exception {
        security.allowFormAuthenticationForClients()    //允许表单认证
                .checkTokenAccess("permitAll()")//    /oauth/check_token公开
                .tokenKeyAccess("permitAll()"); //   /oauth/token_key公开
    }

    //github
    @Bean
    public AuthorizationServerTokenServices tokenServices(){
        DefaultTokenServices defaultTokenServices = new DefaultTokenServices();
        defaultTokenServices.setClientDetailsService(clientDetailsService);
        defaultTokenServices.setSupportRefreshToken(true);

        //配置token的存储方法
        defaultTokenServices.setTokenStore(tokenStore);

        TokenEnhancerChain tokenEnhancerChain = new TokenEnhancerChain();
        tokenEnhancerChain.setTokenEnhancers(Arrays.asList(jwtAccessTokenConverter));
        defaultTokenServices.setTokenEnhancer(tokenEnhancerChain);

        defaultTokenServices.setAccessTokenValiditySeconds(7200);    //令牌默认有效期2小时
        defaultTokenServices.setRefreshTokenValiditySeconds(259200);  // 刷新令牌默认有效期3天

        return defaultTokenServices;
    }

    @Bean
    public AuthorizationCodeServices authorizationCodeServices() {
        //设置授权码模式的授权码如何存取,暂时采用内存方式
        return new InMemoryAuthorizationCodeServices();
    }
}
修改TokenConfig类
@Configuration
public class TokenConfig {

    private String SIGNING_KEY = "abc123";

    @Bean
    public TokenStore tokenStore(){
        return new JwtTokenStore(jwtAccessTokenConverter());
    }
    @Bean
    public JwtAccessTokenConverter jwtAccessTokenConverter(){
        JwtAccessTokenConverter jwtAccessTokenConverter = new JwtAccessTokenConverter();
        jwtAccessTokenConverter.setSigningKey(SIGNING_KEY);     //对称秘钥,资源服务器使用该秘钥来验证
        return jwtAccessTokenConverter;
    }
}
WebSecurityConfig类
@Configuration
@EnableGlobalMethodSecurity(securedEnabled = true, prePostEnabled = true)
public class WebSecurityConfig extends WebSecurityConfigurerAdapter {

    @Bean
    public PasswordEncoder passwordEncoder(){
        return new BCryptPasswordEncoder();
    }

    @Autowired
    private UserDetailsService userDetailsServiceImpl;

    //在Oauth2里有4中授权模式,使用password模式就要有下面这个bean
    @Bean
    @Override
    public AuthenticationManager authenticationManagerBean() throws Exception{
        return super.authenticationManagerBean();
    }

    @Override
    protected void configure(HttpSecurity http) throws Exception {
        http.csrf().disable()
                .authorizeRequests()
                .anyRequest().permitAll()
                .and()
                .formLogin();

    }

    @Override
    protected void configure(AuthenticationManagerBuilder auth) throws Exception {
        BCryptPasswordEncoder encoder = new BCryptPasswordEncoder();
        auth.userDetailsService(userDetailsServiceImpl).passwordEncoder(encoder);
    }
}
修改user-service模块
application.yml
server:
  port: 8002
spring:
  application:
    name: user-service
ResourceServerConfig类
@Configuration
@EnableResourceServer
public class ResourceServerConfig extends ResourceServerConfigurerAdapter {

    @Autowired
    private TokenStore tokenStore;

    @Override
    public void configure(ResourceServerSecurityConfigurer resource) throws Exception{
       resource.tokenStore(tokenStore)
                .resourceId("resource1")
                .stateless(true);
    }

    @Override
    public void configure(HttpSecurity http) throws Exception {
        http.csrf().disable()
                .authorizeRequests()
                .antMatchers("/**").access("#oauth2.hasScope('all')")
                .and()
               .sessionManagement().sessionCreationPolicy(SessionCreationPolicy.STATELESS);
    }
}
SecurityConfig类
@Configuration
@EnableGlobalMethodSecurity(securedEnabled = true, prePostEnabled = true)
public class SecurityConfig extends WebSecurityConfigurerAdapter {

    @Override
    protected void configure(HttpSecurity http) throws Exception {
        http.csrf().disable()
                .authorizeRequests()
                //.antMatchers("/api/**").authenticated()
                .anyRequest().permitAll();
    }
}
TokenConfig类
@Configuration
public class TokenConfig {

    private String SIGNING_KEY = "abc123";

    @Bean
    public TokenStore tokenStore(){
        return new JwtTokenStore(jwtAccessTokenConverter());
    }
    @Bean
    public JwtAccessTokenConverter jwtAccessTokenConverter(){
        JwtAccessTokenConverter jwtAccessTokenConverter = new JwtAccessTokenConverter();
        jwtAccessTokenConverter.setSigningKey(SIGNING_KEY);
        return jwtAccessTokenConverter;
    }
}
测试
启动auth-service模块和user-service模块
这次为了方便就不用授权码模式,用了密码模式获取token
返回结果
{
    "access_token": "eyJhbGciOiJIUzI1NiIsInR5cCI6IkpXVCJ9.eyJhdWQiOlsicmVzb3VyY2UxIl0sInVzZXJfbmFtZSI6ImFkbWluIiwic2NvcGUiOlsiYWxsIl0sImV4cCI6MTYzMjU3Mzk3OCwiYXV0aG9yaXRpZXMiOlsiUk9MRV9BRE1JTiJdLCJqdGkiOiIyNzU1MmEwYi1jODc5LTRlODEtYTdkYS1lY2MzNDVlZjQyZTUiLCJjbGllbnRfaWQiOiJ1c2VyLWNsaWVudCJ9.HB5uz8yL3kjelAhm2Ixc_ZSGTN7ow_PIr5MRDUDOf_g",
    "token_type": "bearer",
    "refresh_token": "eyJhbGciOiJIUzI1NiIsInR5cCI6IkpXVCJ9.eyJhdWQiOlsicmVzb3VyY2UxIl0sInVzZXJfbmFtZSI6ImFkbWluIiwic2NvcGUiOlsiYWxsIl0sImF0aSI6IjI3NTUyYTBiLWM4NzktNGU4MS1hN2RhLWVjYzM0NWVmNDJlNSIsImV4cCI6MTYzMjgyOTU3OCwiYXV0aG9yaXRpZXMiOlsiUk9MRV9BRE1JTiJdLCJqdGkiOiIwZDNiYWVlMi02YmJiLTQ1ZjYtOGNiZi1hMzY0OGRlYTFhYzUiLCJjbGllbnRfaWQiOiJ1c2VyLWNsaWVudCJ9.WHTb4xPraK5jQW1nm3zDwr5coWr6sJxgnUMXcCD68sQ",
    "expires_in": 3599,
    "scope": "all",
    "jti": "27552a0b-c879-4e81-a7da-ecc345ef42e5"
}
可以看到access_token的格式变为JWT了。
检查token

返回结果
{
    "aud": [
        "resource1"
    ],
    "user_name": "admin",
    "scope": [
        "all"
    ],
    "active": true,
    "exp": 1632573978,
    "authorities": [
        "ROLE_ADMIN"
    ],
    "jti": "27552a0b-c879-4e81-a7da-ecc345ef42e5",
    "client_id": "user-client"
}
检查没问题。
带上token访问资源
成功访问。
如果不带上token:
如果随意修改token,这里我就删1个字符:

无法访问资源,测试成功。