基于ubuntu系统qt软件C++/Python混编
目录
1.安装qt软件
2. python解释器
3. 配置qt .pro文件
4.使用C++掉用python脚本
系统:Ubuntu16.04LTS
编译器:qt5.x
python: ubuntu系统自带3.x版本
1.安装qt软件
建议通过安装包方式安装,通过apt的方式安装会有一点问题
2. python解释器
不要使用anaconda,我使用anaconda环境创建的python,使用C++调用python时会出现一些问题,比如在python中无法导入第三方库,比如numpy, cv2, twnsorflow等等。
使用系统默认自带的,如果系统没有,则直接安装python,并将python默认安装在usr路径下
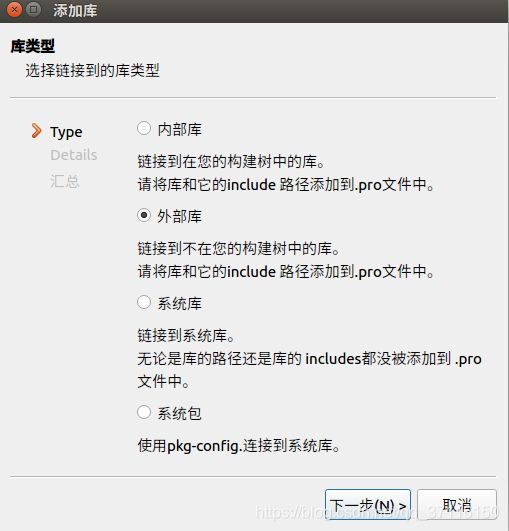
3. 配置qt .pro文件
1. 先创建一个qt C++工程,将头文件,源文件,python文件都加载进来
2. 将python头文件和路径加载进来

库文件: usr/lib/python3.5/config-3.5m-x86_64-linux-gnu 然后选择libpython3.5m.a

包含路径:/usr/include/python3.5
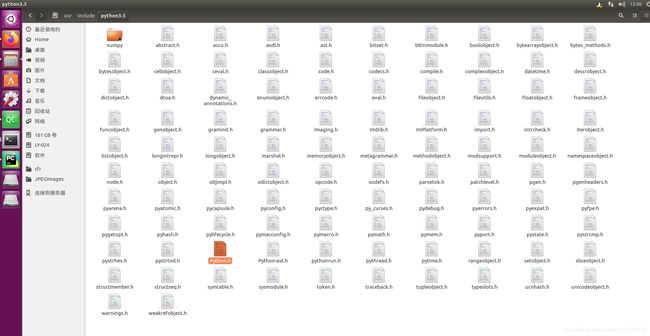
将这两个路径弄好后,后面还需要将两个库手动加入。
 python库路径图
可以看到上图第一行最后有三个库,第一个python3.5m是前面添加的,最后两个dl, util需要手动加上,手打加上就可以,不加也可以,主要为了防止可能出现的错误。
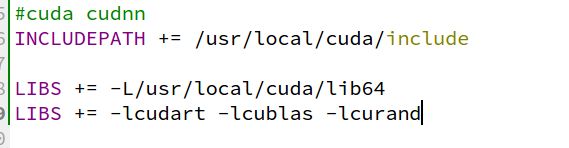
如果要使用tensorflow,或别的深度学习框架,需要调用cuda, 需要将cuda 的路径也加载进来
qt .pro整体配置如下:
QT -= gui

CONFIG += c++11 console
CONFIG -= app_bundle

# The following define makes your compiler emit warnings if you use
# any Qt feature that has been marked deprecated (the exact warnings
# depend on your compiler). Please consult the documentation of the
# deprecated API in order to know how to port your code away from it.
DEFINES += QT_DEPRECATED_WARNINGS

# You can also make your code fail to compile if it uses deprecated APIs.
# In order to do so, uncomment the following line.
# You can also select to disable deprecated APIs only up to a certain version of Qt.
#DEFINES += QT_DISABLE_DEPRECATED_BEFORE=0x060000    # disables all the APIs deprecated before Qt 6.0.0

SOURCES += \
        main.cpp

# Default rules for deployment.
qnx: target.path = /tmp/$${TARGET}/bin
else: unix:!android: target.path = /opt/$${TARGET}/bin
!isEmpty(target.path): INSTALLS += target

#cuda cudnn
INCLUDEPATH += /usr/local/cuda/include

LIBS += -L/usr/local/cuda/lib64
LIBS += -lcudart -lcublas -lcurand

DISTFILES += \
    obj.py \
    other.py

unix:!macx: LIBS += -L$$PWD/../../../../usr/lib/python3.5/config-3.5m-x86_64-linux-gnu/ -lpython3.5m  -ldl -lutil

INCLUDEPATH += $$PWD/../../../../usr/include/python3.5
DEPENDPATH += $$PWD/../../../../usr/include/python3.5

unix:!macx: PRE_TARGETDEPS += $$PWD/../../../../usr/lib/python3.5/config-3.5m-x86_64-linux-gnu/libpython3.5m.a
4.使用C++掉用python脚本
这部分代码网上比较多,我就不说了,我因为做深度学习,网络等东西都是使用python写的,后面项目集成需要在c++上,所以打算使用C++代码调用python
我的项目要求在C++文件中读取视频或相机,获取每一帧图像,将每帧mat 类数据图像发送到python脚本中,然后通过python运行神经网络,获取预测结果,最后将结果保存在一个列表中,返回列表。并且要循环调用python脚本,因为读取的是视频或相机,而不是一张图片。
具体代码如下:
//c_tf/main.cpp
#include
#include
#include
#include
#include
#include
#include
#include
using namespace std;
uchar *CArrays = nullptr;
PyObject *ArgArray = nullptr;
struct boxes{
    int x_min = 0;
    int y_min = 0;
    int x_max = 0;
    int y_max = 0;
    int label = 0;
};
vector object_detection(0);
clock_t start,finish;
int main()
{
    //初始化python文件,写在首行
    Py_Initialize();
    import_array();
    if(!Py_IsInitialized())
    {
        //print("initialize failed")
        cout<<"initialize failed"<> img;
        if (img.empty())
            break;
        resize(img, img, cv::Size(30,30));

        // 处理图片数据,传递给python脚本
        auto sz = img.size();
        int x = sz.width;
        int y = sz.height;
        int z = img.channels();
        cout<<"size:"<(i);
            // operates on each pixel
            for (int j = 0; j < iCols; j++)
            {
                CArrays[++id] = p[j];//连续空间
            }
        }

        npy_intp Dims[3] = {y, x, z}; //注意这个维度数据!
        PyObject *PyArray = PyArray_SimpleNewFromData(3, Dims, NPY_UBYTE, CArrays);
        delete[] CArrays;
        pDict = PyModule_GetDict(pModule);
        ArgArray = PyTuple_New(1);
        PyTuple_SetItem(ArgArray, 0, PyArray);
        PyObject *pFunc = PyDict_GetItemString(pDict, "recognize");
        // 没有返回数据
        // PyEval_CallObject(pFunc, ArgArray);
        // 有返回数据
        PyObject *pResult = PyObject_CallObject(pFunc, ArgArray);//调用函数,传入Numpy Array 对象。
        int size = PyList_Size(pResult);
        object_detection.clear();
        PyObject *list_item = nullptr;
        float upper_left_coord_x;
        float upper_left_coord_y;
        float lower_right_coord_x;
        float lower_right_coord_y;
        int label;
        int num_object = size / 5;
        for (int i = 0; i < num_object; i++)
        {
            boxes result_temp;
            list_item = PyList_GetItem(pResult, 5 * i + 0);
            PyArg_Parse(list_item, "d", &upper_left_coord_x);
            result_temp.x_min = static_cast(upper_left_coord_x);
            list_item = PyList_GetItem(pResult, 5 * i + 1);
            PyArg_Parse(list_item, "d", &upper_left_coord_y);
            result_temp.y_min = static_cast(upper_left_coord_y);
            list_item = PyList_GetItem(pResult, 5 * i + 2);
            PyArg_Parse(list_item, "d", &lower_right_coord_x);
            result_temp.x_max = static_cast(lower_right_coord_x);
            list_item = PyList_GetItem(pResult, 5 * i + 3);
            PyArg_Parse(list_item, "d", &lower_right_coord_y);
            result_temp.y_max = static_cast(lower_right_coord_y);
            list_item = PyList_GetItem(pResult, 5 * i + 4);
            PyArg_Parse(list_item, "i", &label);
            result_temp.label = label;
            object_detection.push_back(result_temp);
        }
        int num = object_detection.size();
        std::cout<<"得到的目标值数量:"<((finish - start)) / CLOCKS_PER_SEC;
        double time_ms = time_s * 1000.0;
        std::cout << "预测一次的时间:"<
python代码:
#import matplotlib.pyplot as plt
import tensorflow as tf
import  numpy as np
#import PIL.Image as Image
import cv2
import os
os.environ['TF_CPP_MIN_LOG_LEVEL'] = '2'
os.environ["TF_FORCE_GPU_ALLOW_GROWTH"] = "true"
#from skimage import transform
gpu_options = tf.GPUOptions(per_process_gpu_memory_fraction=0.1)
sess = tf.Session(config=tf.ConfigProto(gpu_options=gpu_options))
pb_file_path="/home/chen/CPython_project/default_python/model/catdog.pb"
W = 224
H = 224
list_results = []
# 将模型读取到默认的图中
with tf.gfile.GFile(pb_file_path, 'rb') as fd:
    _graph = tf.GraphDef()
    _graph.ParseFromString(fd.read())
    tf.import_graph_def(_graph, name='')

detection_graph = tf.get_default_graph()
sess = tf.Session(graph=detection_graph)

def recognize(img):
    del list_results[:]
    global x_min,x_max,y_min,y_max
    x_min = 16.0
    x_max = 39.0
    y_min = 56.7
    y_max = 73.4
    confidence_level = 4
    box1 = [x_min, y_min, x_max, y_max, confidence_level]
    box2 = [x_min+2, y_min-2, x_max+10, y_max+40, confidence_level + 5]
    box = [box1, box2]
    for i in range(2):
        list_results.append(box[i][0])
        list_results.append(box[i][1])
        list_results.append(box[i][2])
        list_results.append(box[i][3])
        list_results.append(box[i][4])
    img = cv2.resize(img, (H, W))
    img = img * (1.0 /255)
    input_x = detection_graph.get_tensor_by_name("input:0") ####这就是刚才取名的原因
    out_softmax = detection_graph.get_tensor_by_name("softmax:0")
    out_label = detection_graph.get_tensor_by_name("output:0")
    img_out_softmax = sess.run(out_softmax, feed_dict={input_x:np.reshape(img, [-1, H, W, 3])})
    print ("img_out_softmax:",img_out_softmax)
    prediction_labels = np.argmax(img_out_softmax, axis=1)
    print ("prediction_labels:",prediction_labels)

    print("list_results len:", len(list_results))
    return list_results
def close_session():
    print('close tf.session!')
    sess.close()
#def recognize(img):
#    with tf.Graph().as_default():
#        output_graph_def = tf.GraphDef()

#        with open(pb_file_path, "rb") as f:
#            output_graph_def.ParseFromString(f.read()) #rb
#            _ = tf.import_graph_def(output_graph_def, name="")

#        with tf.Session(config=tf.ConfigProto(gpu_options=gpu_options)) as sess:
#            tf.global_variables_initializer().run()

#            input_x = sess.graph.get_tensor_by_name("input:0") ####这就是刚才取名的原因
#            print (input_x)
#            out_softmax = sess.graph.get_tensor_by_name("softmax:0")
#            print (out_softmax)
#            out_label = sess.graph.get_tensor_by_name("output:0")
#            print (out_label)

#            #img = cv2.imread(jpg_path)
#            img = cv2.resize(img, (H, W))

#            #plt.figure("fig1")
#            #plt.imshow(img)
#            img = img * (1.0 /255)
#            img_out_softmax = sess.run(out_softmax, feed_dict={input_x:np.reshape(img, [-1, H, W, 3])})

#            print ("img_out_softmax:",img_out_softmax)
#            prediction_labels = np.argmax(img_out_softmax, axis=1)
#            print ("prediction_labels:",prediction_labels)

            #plt.show()

if __name__ == "__main__":
	img = cv2.imread("/home/chen/CPython_project/default_python/a/cat/cat.12.jpg")
	recognize(img)  ####修改成自己的图片路径
最后感谢xia_xia_mg的博客,给了我很大的帮助《https://blog.csdn.net/xia_xia_mg/article/details/80065284》