Redis基础
1.什么是Redis
Redis是一个基于内存的key-value结构数据库。Redis 是互联网技术领域使用最为广泛的存储中间件,它是「**Re**mote **Di**ctionary **S**ervice」的首字母缩写,也就是「远程字典服务」。
[1 ] 基于内存存储,读写性能高
[2 ]适合存储热点数据(热点商品、资讯、新闻)
[3 ]企业应用广泛
2.使用Redis能做什么
* 数据缓存
* 消息队列
* 注册中心
* 发布订阅
3.Redis简介
Redis is an open source (BSD licensed), in-memory data structure store, used as a database, cache, and message broker. 翻译为:Redis是一个开源的内存中的数据结构存储系统,它可以用作:数据库、缓存和消息中间件。
官网:[https://redis.io](https://redis.io/)
Redis是用C语言开发的一个开源的高性能键值对(key-value)数据库,官方提供的数据是可以达到100000+的QPS(每秒内查询次数)。它存储的value类型比较丰富,也被称为结构化的NoSql数据库。
NoSql(Not Only SQL),不仅仅是SQL,泛指**非关系型数据库**。NoSql数据库并不是要取代关系型数据库,而是关系型数据库的补充。
关系型数据库(RDBMS):
* Mysql
* Oracle
* DB2
* SQLServer
非关系型数据库(NoSql):
* Redis
* Mongo db
* MemCached
4.Redis下载
Redis安装包分为windows版和Linux版:
Windows版下载地址:https://github.com/microsoftarchive/redis/releases
Linux版下载地址: https://download.redis.io/releases/
5.Redis安装
在Linux中安装Redis
在Linux系统安装Redis步骤:
1. 将Redis安装包上传到Linux
2. 解压安装包,命令:==tar -zxvf redis-4.0.0.tar.gz -C /usr/local==
3. 安装Redis的依赖环境gcc,命令:==yum install gcc-c++==
4. 进入/usr/local/redis-4.0.0,进行编译,命令:==make==
5. 进入redis的src目录进行安装,命令:==make install==
安装后重点文件说明:
> /usr/local/redis-4.0.0/src/redis-server:Redis服务启动脚本
>
> /usr/local/redis-4.0.0/src/redis-cli:Redis客户端脚本
>
> /usr/local/redis-4.0.0/redis.conf:Redis配置文件
在Windows中安装Redis
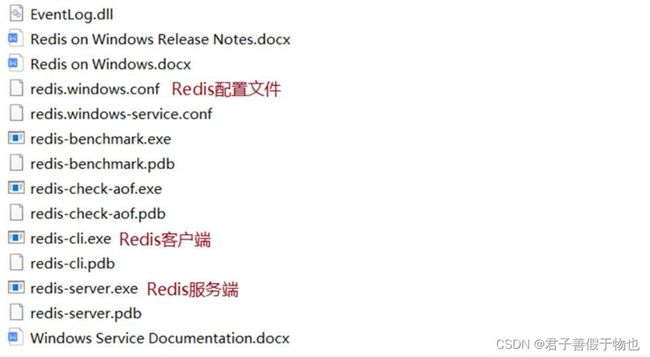
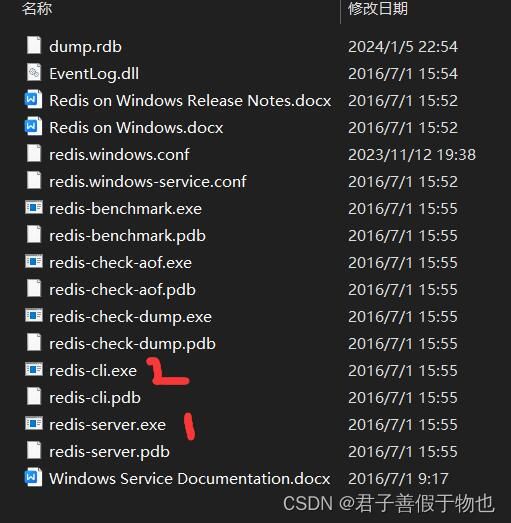
Redis的Windows版属于绿色软件,直接解压即可使用,解压后目录结构如下:
6.Redis服务启动与停止
7.Redis配置文件
8.Redis数据类型
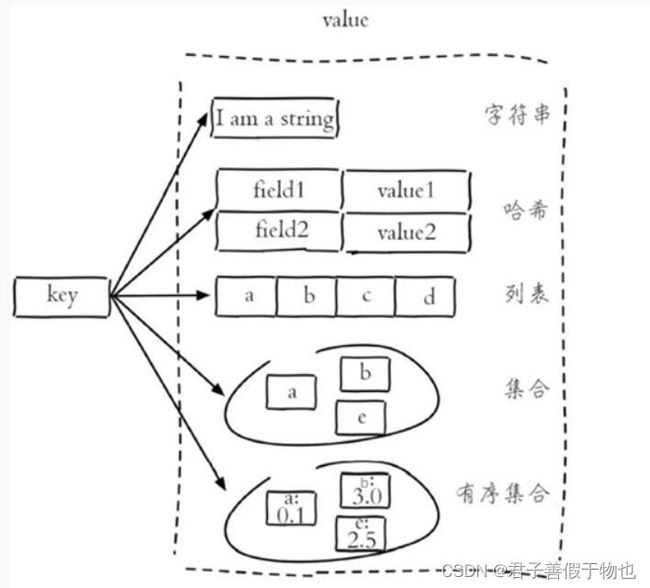
Redis存储的是key-value结构的数据,其中key是字符串类型,value有5种常用的数据类型:
* 字符串 string
* 哈希 hash
* 列表 list
* 集合 set
* 有序集合 sorted set / zset
| 字符串(string) | 普通字符串,常用 |
| 哈希(hash) | 适合存储对象 |
| 列表(list) | 按照插入顺序排序,可以有重复元素 |
| 集合(set) | 无序集合,没有重复元素 |
| 有序集合(sorted set / zset) | 集合中每个元素关联一个分数(score),根据分数升序排序,没有重复元素 |
9.字符串string操作命令
Redis 中字符串类型常用命令:
SET key value 设置指定key的值
GET key 获取指定key的值
SETEX key seconds value 设置指定key的值,并将 key 的过期时间设为 seconds 秒
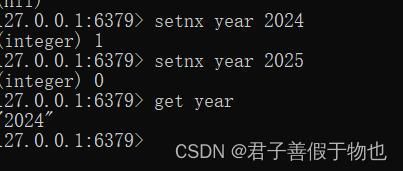
SETNX key value 只有在 key 不存在时设置 key 的值
更多命令可以参考Redis中文网:https://www.redis.net.cn
为了方便:使用Windows下的Redis
SET key value 设置指定key的值
GET key 获取指定key的值
GET key 获取指定key的值:当获取的key为空,就会返回空
SET key value 设置指定key的值,为数字时会转换为字符串
当给同一个key赋值时,会取后面赋值的
SETEX key seconds value 设置指定key的值,并将 key 的过期时间设为 seconds 秒
SETNX key value 只有在 key 不存在时设置 key 的值
获取所有(一个或多个)给定 key 的值。
在java中操作Redis
前面我们讲解了Redis的常用命令,这些命令是我们操作Redis的基础,那么我们在java程序中应该如何操作Redis呢?这就需要使用Redis的Java客户端,就如同我们使用JDBC操作MySQL数据库一样。
Redis 的 Java 客户端很多,官方推荐的有三种:
* Jedis
* Lettuce
* Redisson
Spring 对 Redis 客户端进行了整合,提供了 Spring Data Redis,在Spring Boot项目中还提供了对应的Starter,即 spring-boot-starter-data-redis。
Jedis来操作Redis(了解就行)
因为现在大部份就是spring
Jedis 是 Redis 的 Java 版本的客户端实现。
maven坐标:
    redis.clients
    jedis
    2.8.0
使用 Jedis 操作 Redis 的步骤:
1. 获取连接
2. 执行操作
3. 关闭连接
示例
 @Test
    public void testRedis(){
        //1 获取连接
        Jedis jedis = new Jedis("localhost",6379);

        //2 执行具体的操作
        jedis.set("username","xiaoming");

        String value = jedis.get("username");
        System.out.println(value);

        //jedis.del("username");

        jedis.hset("myhash","addr","bj");
        String hValue = jedis.hget("myhash", "addr");
        System.out.println(hValue);

        Set keys = jedis.keys("*");
        for (String key : keys) {
            System.out.println(key);
        }

        //3 关闭连接
        jedis.close();
    }
Spring Data Redis
Spring Data Redis 是 Spring 的一部分,提供了在 Spring 应用中通过简单的配置就可以访问 Redis 服务,对 Redis 底层开发包进行了高度封装。在 Spring 项目中,可以使用Spring Data Redis来简化 Redis 操作。
网址:https://spring.io/projects/spring-data-redis
maven坐标:
    org.springframework.data
    spring-data-redis
    2.4.8
Spring Boot提供了对应的Starter,maven坐标:
    org.springframework.boot
    spring-boot-starter-data-redis
Spring Data Redis中提供了一个高度封装的类:**RedisTemplate**,针对 Jedis 客户端中大量api进行了归类封装,将同一类型操作封装为operation接口,具体分类如下:
* ValueOperations:简单K-V操作
* SetOperations:set类型数据操作
* ZSetOperations:zset类型数据操作
* HashOperations:针对hash类型的数据操作
* ListOperations:针对list类型的数据操作
使用方式
第一步:创建maven项目springdataredis_demo,配置pom.xml文件
    4.0.0

        org.springframework.boot
        spring-boot-starter-parent
        2.4.5


    com.itheima
    springdataredis_demo
    1.0-SNAPSHOT

        1.8


            org.springframework.boot
            spring-boot-starter-test
            test


            junit
            junit


            org.springframework.boot
            spring-boot-starter-data-redis


                org.springframework.boot
                spring-boot-maven-plugin
                2.4.5
第二步:编写启动类
package com.itheima;

import org.springframework.boot.SpringApplication;
import org.springframework.boot.autoconfigure.SpringBootApplication;

@SpringBootApplication
public class App {

    public static void main(String[] args) {
        SpringApplication.run(App.class,args);
    }

}
第三步:配置application.yml
spring:
  application:
    name: springdataredis_demo
  #Redis相关配置
  redis:
    host: localhost
    port: 6379
    #password: 123456
    database: 0 #操作的是0号数据库
    jedis:
      #Redis连接池配置
      pool:
        max-active: 8 #最大连接数
        max-wait: 1ms #连接池最大阻塞等待时间
        max-idle: 4 #连接池中的最大空闲连接
        min-idle: 0 #连接池中的最小空闲连接
解释说明:
spring.redis.database:指定使用Redis的哪个数据库,Redis服务启动后默认有16个数据库,编号分别是从0到15。
可以通过修改Redis配置文件来指定数据库的数量。
第四步:提供配置类
package com.itheima.config;

import org.springframework.cache.annotation.CachingConfigurerSupport;
import org.springframework.context.annotation.Bean;
import org.springframework.context.annotation.Configuration;
import org.springframework.data.redis.connection.RedisConnectionFactory;
import org.springframework.data.redis.core.RedisTemplate;
import org.springframework.data.redis.serializer.StringRedisSerializer;

/**
 * Redis配置类
 */

@Configuration
public class RedisConfig extends CachingConfigurerSupport {

    @Bean
    public RedisTemplate redisTemplate(RedisConnectionFactory connectionFactory) {

        RedisTemplate redisTemplate = new RedisTemplate<>();

        //默认的Key序列化器为:JdkSerializationRedisSerializer

        //设置新的y序列化器
        redisTemplate.setKeySerializer(new StringRedisSerializer());
        redisTemplate.setHashKeySerializer(new StringRedisSerializer());

        redisTemplate.setConnectionFactory(connectionFactory);

        return redisTemplate;
    }

}
解释说明:
当前配置类不是必须的,因为 Spring Boot 框架会自动装配 RedisTemplate 对象,但是默认的key序列化器为JdkSerializationRedisSerializer,导致我们存到Redis中后的数据和原始数据有差别
第五步:提供测试类
package com.itheima.test;

import org.junit.runner.RunWith;
import org.springframework.beans.factory.annotation.Autowired;
import org.springframework.boot.test.context.SpringBootTest;
import org.springframework.test.context.junit4.SpringRunner;

@SpringBootTest
@RunWith(SpringRunner.class)
public class SpringDataRedisTest {

    @Autowired
    private RedisTemplate redisTemplate;

}
操作字符串类型数据
/**
 * 操作String类型数据
*/
@Test
public void testString(){
    //存值
    redisTemplate.opsForValue().set("city123","beijing");

    //取值
    String value = (String) redisTemplate.opsForValue().get("city123");
    System.out.println(value);

    //存值,同时设置过期时间
    redisTemplate.opsForValue().set("key1","value1",10l, TimeUnit.SECONDS);

    //存值,如果存在则不执行任何操作
    Boolean aBoolean = redisTemplate.opsForValue().setIfAbsent("city1234", "nanjing");
    System.out.println(aBoolean);
}


