通用缓存SpringCache
概述
在项目中,我们通常会把高频的查询进行缓存。如资讯网站首页的文章列表、电商网站首页的商品列表、微博等社交媒体热搜的文章等等,当大量的用户发起查询时,借助缓存提高查询效率,同时减轻数据库压力。
目前的缓存框架有很多:比如Redis、Memcached、Guava、Caffeine等等
介绍
Spring Cache是Spring提供的通用缓存框架。它利用了AOP,实现了基于注解的缓存功能,使开发者不用关心底层使用了什么缓存框架,只需要简单地加一个注解,就能实现缓存功能了。用户使用Spring Cache,可以快速开发一个很不错的缓存功能。
入门案例
1.依赖
            org.springframework.boot
            spring-boot-starter-cache
2.开启缓存
package com.itheima.cache;

import org.springframework.boot.SpringApplication;
import org.springframework.boot.autoconfigure.SpringBootApplication;
import org.springframework.cache.annotation.EnableCaching;

@SpringBootApplication
@EnableCaching//开启缓存
public class CachingApplication {

	public static void main(String[] args) {
		SpringApplication.run(CachingApplication.class, args);
	}

}
3.配置注解
@Cacheable("user")
public User findById(Long id) {
 return userDao.findById(id);
}
注:通过这三步就基本实现操作缓存了
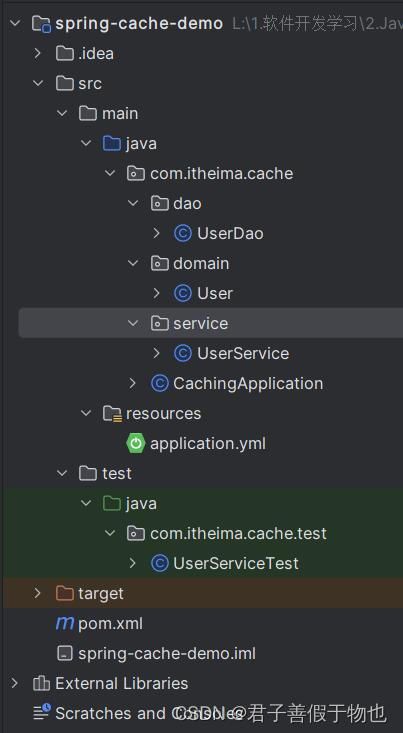
完整测试代码
pom.xml
    4.0.0

    com.itheima
    spring-cache-demo
    1.0-SNAPSHOT


        8
        8


        org.springframework.boot
        spring-boot-starter-parent
        2.3.9.RELEASE


            org.projectlombok
            lombok


            org.springframework.boot
            spring-boot-starter-cache


            org.springframework.boot
            spring-boot-starter-test
CachingApplication启动类
package com.itheima.cache;

import org.springframework.boot.SpringApplication;
import org.springframework.boot.autoconfigure.SpringBootApplication;
import org.springframework.cache.annotation.EnableCaching;

@SpringBootApplication
@EnableCaching
public class CachingApplication {

	public static void main(String[] args) {
		SpringApplication.run(CachingApplication.class, args);
	}

}
实体类
package com.itheima.cache.domain;

import lombok.AllArgsConstructor;
import lombok.Data;
import lombok.NoArgsConstructor;

import java.io.Serializable;

@Data
@AllArgsConstructor
@NoArgsConstructor
public class User implements Serializable {

    private Long id;
    private String username;
}
UserDao
package com.itheima.cache.dao;

import com.itheima.cache.domain.User;
import org.springframework.stereotype.Repository;

import java.util.Collections;
import java.util.List;

/**
 * 模拟数据库
 */
@Repository
public class UserDao {

    public User findById(Long id){
        System.out.println("查询数据库");
        try {
            Thread.sleep(2000l);
        } catch (InterruptedException e) {
            e.printStackTrace();
        }
        return new User(id,"张三");
    }

    public List findAll() {
        List list = Collections.EMPTY_LIST;
        list.add(new User(1l,"张三"));
        list.add(new User(2l,"李四"));
        list.add(new User(3l,"王五"));
        return list;
    }

    public void update(Long id) {
        System.out.println("根据id更新");
    }
}
UserService
package com.itheima.cache.service;

import com.itheima.cache.dao.UserDao;
import com.itheima.cache.domain.User;
import org.springframework.beans.factory.annotation.Autowired;
import org.springframework.stereotype.Service;

@Service
public class UserService {

    @Autowired
    private UserDao userDao;


    public User findById(Long id) {
        return userDao.findById(id);
    }


    public void update(Long id) {
        userDao.update(id);
    }
}
UserServiceTest
package com.itheima.cache.test;

import com.itheima.cache.domain.User;
import com.itheima.cache.service.UserService;
import org.junit.Test;
import org.junit.runner.RunWith;
import org.springframework.beans.factory.annotation.Autowired;
import org.springframework.boot.test.context.SpringBootTest;
import org.springframework.test.context.junit4.SpringRunner;

@RunWith(SpringRunner.class)
@SpringBootTest
public class UserServiceTest {

    @Autowired
    private UserService userService;


    /**
     * 根据id查询用户
     */
    @Test
    public void testFindById() {
        for (int i = 0; i < 5; i++) {
            User user = userService.findById(1l);
            System.out.println(user);
        }
    }

}
测试结果
这是没有加通用缓存的结果,都是从数据库中查询出来的
在UserService里面给他加注解缓存
package com.itheima.cache.service;

import com.itheima.cache.dao.UserDao;
import com.itheima.cache.domain.User;
import org.springframework.beans.factory.annotation.Autowired;
import org.springframework.stereotype.Service;

@Service
public class UserService {

    @Autowired
    private UserDao userDao;

    @Cacheable(value="user")//指定key为user
    public User findById(Long id) {
        return userDao.findById(id);
    }


    public void update(Long id) {
        userDao.update(id);
    }
}
可以看见第一个从数据库中查询出来存到缓存中后,后面的都是从缓存中查询出来的
我们用了SpringCache做缓存后,我们如何将它用其他缓存框架来更换SpringCache呢?
默认情况下,SpringCache使用concurrentHashMap作为本地缓存存储数据。如果要使用其它的缓存框架,我们只需要做简单的配置即可。
所有意思就是如果我们之前使用的是SpringCache,那么我们就很容易的用其他缓存框架来代替
用Redis来替换SpringCache
做简单配置即可:
依赖
            org.springframework.boot
            spring-boot-starter-data-redis
application.yml
spring:
  redis:
    port: 6379
    host: localhost
就这样后进行测试:
成功


