RabbitMQ快速上手(二)发布订阅、路由、通配模式
在上篇文章中我们提到了RabbitMQ的几种交换器模式,我们之前的HelloWord和Work模式都是采用的默认的Exchange即Directexchange ,接下来我们这章说一下剩下的几种模式源码
发布/订阅(fanout)

发布订阅模式就像消费者订阅(监听)生产者一样,只要生产者产生消息,消费者都可以消费
/**
 * 订阅模式
 */
public class EmitLog {

    private static final String EXCHANGE_NAME = "logs";
    public static void main(String[] args) throws Exception {
        ConnectionFactory factory = new ConnectionFactory();
        factory.setHost("localhost");
        Connection connection = factory.newConnection();
        Channel channel = connection.createChannel();

        /*
         * 声明exchange(交换机)
         * 参数1:交换机名称
         * 参数2:交换机类型
         * 参数3:交换机持久性,如果为true则服务器重启时不会丢失
         * 参数4:交换机在不被使用时是否删除
         * 参数5:交换机的其他属性
         */
        channel.exchangeDeclare(EXCHANGE_NAME, "fanout");
        // 与前面不同, 生产者将消息发送给exchange, 而非队列. 若发消息时还没消费者绑定queue与该exchange, 消息将丢失

        for(int i=0;i<5;i++){
            String message = "Hello"+i;
            channel.basicPublish(EXCHANGE_NAME, "", null, message.getBytes());
            System.out.println(" [x] Sent '" + message + "'");
            Thread.sleep(1000);
        }

        channel.close();
        connection.close();
    }
}
public class ReceiveLogs1 {

    private static final String EXCHANGE_NAME = "logs";

    public static void main(String[] args) throws Exception {
        ConnectionFactory factory = new ConnectionFactory();
        factory.setHost("localhost");
        Connection connection = factory.newConnection();
        final Channel channel = connection.createChannel();

        channel.exchangeDeclare(EXCHANGE_NAME, "fanout");
        String queueName = channel.queueDeclare().getQueue();
        /*
         * 绑定队列到交换机(这个交换机的名称一定要和上面的生产者交换机名称相同)
         * 参数1:队列的名称
         * 参数2:交换机的名称
         * 参数3:Routing Key
         */
        channel.queueBind(queueName, EXCHANGE_NAME, "");
        //注意:消息发送到没有队列绑定的交换机时,消息将丢失,因为,交换机没有存储消息的能力,消息只能存在在队列中。

        System.out.println(" [*] Waiting for messages. To exit press CTRL+C");

        Consumer consumer = new DefaultConsumer(channel) {
            @Override
            public void handleDelivery(String consumerTag, Envelope envelope,
                                       AMQP.BasicProperties properties, byte[] body) throws IOException {
                String message = new String(body, "UTF-8");
                System.out.println(" [x] Received '" + message + "'");
            }
        };
        channel.basicConsume(queueName, true, consumer);
    }

}
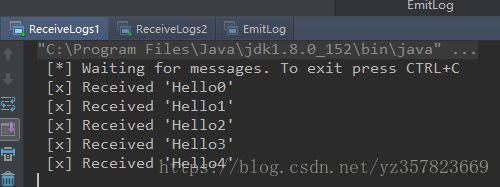
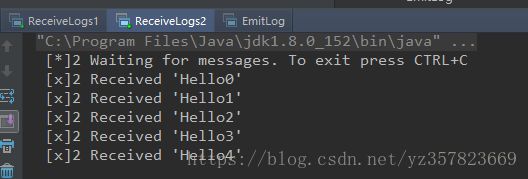
另一个消费者代码一样 我就不贴了,接下来我们运行消费者程序

消费者处在监听状态,接下里运行生产者生产消息

Routing(direct)
我们采用路由的方式对不同的消息进行过滤,可以通过此种方式指定消息被哪些消费者消费
在生产者把消息传递给exchange时,需要说明消息的routing key,然后exchange根据消息的routing key匹配队列。在说明队列时也要说明队列的routing key
/**
 * 路由模式
 */
public class RoutingSendDirect {

    private static final String EXCHANGE_NAME = "direct_logs";
    // 路由关键字
    private static final String[] routingKeys = new String[]{"info" ,"warning", "error"};
    public static void main(String[] args) throws Exception {
        ConnectionFactory factory = new ConnectionFactory();
        factory.setHost("localhost");
        Connection connection = factory.newConnection();
        Channel channel = connection.createChannel();
        //声明交换机
        channel.exchangeDeclare(EXCHANGE_NAME,"direct");//注意是direct
        //发送信息
        for (String routingKey:routingKeys){
            String message = "RoutingSendDirect Send the message level:" + routingKey;
            channel.basicPublish(EXCHANGE_NAME,routingKey,null,message.getBytes());
            System.out.println("RoutingSendDirect Send"+routingKey +"':'" + message);
        }
        channel.close();
        connection.close();
    }
}
public class ReceiveLogsDirect1 {
    // 交换器名称
    private static final String EXCHANGE_NAME = "direct_logs";
    // 路由关键字
    private static final String[] routingKeys = new String[]{"info" ,"warning"};

    public static void main(String[] args) throws Exception {
        ConnectionFactory factory = new ConnectionFactory();
        factory.setHost("localhost");
        Connection connection = factory.newConnection();
        Channel channel = connection.createChannel();
        //声明交换器
        channel.exchangeDeclare(EXCHANGE_NAME, "direct");
        //获取匿名队列名称
        String queueName=channel.queueDeclare().getQueue();

        //根据路由关键字进行绑定
        for (String routingKey:routingKeys){
            channel.queueBind(queueName,EXCHANGE_NAME,routingKey);
            //如果想让消费者2同时接受routingKey为A 和为B的消息,只要在下面在此添加一个Bing就可以了
            System.out.println("ReceiveLogsDirect1 exchange:"+EXCHANGE_NAME+"," +
                    " queue:"+queueName+", BindRoutingKey:" + routingKey);
        }
        System.out.println("ReceiveLogsDirect1  Waiting for messages");
        Consumer consumer = new DefaultConsumer(channel) {
            @Override
            public void handleDelivery(String consumerTag, Envelope envelope, AMQP.BasicProperties properties, byte[] body) throws IOException {
                String message = new String(body, "UTF-8");
                System.out.println("ReceiveLogsDirect1 Received '" + envelope.getRoutingKey() + "':'" + message + "'");
            }
        };
        channel.basicConsume(queueName, true, consumer);
    }
}
public class ReceiveLogsDirect2 {
// 交换器名称
private static final String EXCHANGE_NAME = "direct_logs";
// 路由关键字
private static final String[] routingKeys = new String[]{"error"};
public static void main(String[] argv) throws Exception {
ConnectionFactory factory = new ConnectionFactory();
factory.setHost("localhost");
Connection connection = factory.newConnection();
Channel channel = connection.createChannel();
//声明交换器
channel.exchangeDeclare(EXCHANGE_NAME, "direct");
//获取匿名队列名称
String queueName = channel.queueDeclare().getQueue();
//根据路由关键字进行多重绑定
for (String severity : routingKeys) {
channel.queueBind(queueName, EXCHANGE_NAME, severity);
System.out.println("ReceiveLogsDirect2 exchange:"+EXCHANGE_NAME+", queue:"+queueName+", BindRoutingKey:" + severity);
}
System.out.println("ReceiveLogsDirect2 Waiting for messages");
Consumer consumer = new DefaultConsumer(channel) {
@Override
public void handleDelivery(String consumerTag, Envelope envelope, AMQP.BasicProperties properties, byte[] body) throws IOException {
String message = new String(body, "UTF-8");
System.out.println("ReceiveLogsDirect2 Received '" + envelope.getRoutingKey() + "':'" + message + "'");
}
};
channel.basicConsume(queueName, true, consumer);
}
}运行消费者程序


消费者分别监听了routingKey 为info,warning和error的消息
启动生产者生产消息


可以看到三种routingKey消息分别被路由到了不同消费者
Topics(topic)

Topics模式和Routing相类似,都是通过Routing Key来做消息如队列的匹配,RabbitMQ提供两种匹配符:
- *(星号)匹配一个
- #(井号)匹配0个或多个
/**
 * 通配模式
 */
public class TopicSend {
    private static final String EXCHANGE_NAME = "topic_logs";

    public static void main(String[] args) throws Exception {
        Connection connection = null;
        Channel channel = null;
        try{
            ConnectionFactory factory=new ConnectionFactory();
            factory.setHost("localhost");
            connection=factory.newConnection();
            channel=connection.createChannel();

            //声明一个匹配模式的交换机
            channel.exchangeDeclare(EXCHANGE_NAME,"topic");
            //待发送的消息
            String[] routingKeys=new String[]{
                    "quick.orange.rabbit",
                    "lazy.orange.elephant",
                    "quick.orange.fox",
                    "lazy.brown.fox",
                    "quick.brown.fox",
                    "quick.orange.male.rabbit",
                    "lazy.orange.male.rabbit"
            };
            //发送消息
            for(String severity :routingKeys){
                String message = "From "+severity+" routingKey' s message!";
                channel.basicPublish(EXCHANGE_NAME, severity, null, message.getBytes());
                System.out.println("TopicSend Sent '" + severity + "':'" + message + "'");
            }
        }catch (Exception e){
            e.printStackTrace();
            if (connection!=null){
                channel.close();
                connection.close();
            }
        }finally {
            if (connection!=null){
                channel.close();
                connection.close();
            }
        }
    }
}
public class ReceiveLogsTopic1 {
private static final String EXCHANGE_NAME = "topic_logs";
public static void main(String[] args) throws Exception {
ConnectionFactory factory = new ConnectionFactory();
factory.setHost("localhost");
Connection connection = factory.newConnection();
Channel channel = connection.createChannel();
//声明一个匹配模式的交换机
channel.exchangeDeclare(EXCHANGE_NAME, "topic");
String queueName = channel.queueDeclare().getQueue();
//路由关键字
String[] routingKeys = new String[]{"*.orange.*"};
//绑定路由
for (String routingKey : routingKeys) {
channel.queueBind(queueName, EXCHANGE_NAME, routingKey);
System.out.println("ReceiveLogsTopic1 exchange:" + EXCHANGE_NAME + ", queue:" + queueName + ", BindRoutingKey:" + routingKey);
}
System.out.println("ReceiveLogsTopic1 Waiting for messages");
Consumer consumer = new DefaultConsumer(channel) {
@Override
public void handleDelivery(String consumerTag, Envelope envelope, AMQP.BasicProperties properties, byte[] body) throws IOException {
String message = new String(body, "UTF-8");
System.out.println("ReceiveLogsTopic1 Received '" + envelope.getRoutingKey() + "':'" + message + "'");
}
};
channel.basicConsume(queueName, true, consumer);
}
}public class ReceiveLogsTopic2 {
private static final String EXCHANGE_NAME = "topic_logs";
public static void main(String[] argv) throws Exception {
ConnectionFactory factory = new ConnectionFactory();
factory.setHost("localhost");
Connection connection = factory.newConnection();
Channel channel = connection.createChannel();
// 声明一个匹配模式的交换器
channel.exchangeDeclare(EXCHANGE_NAME, "topic");
String queueName = channel.queueDeclare().getQueue();
// 路由关键字
String[] routingKeys = new String[]{"*.*.rabbit", "lazy.#"};
// 绑定路由关键字
for (String bindingKey : routingKeys) {
channel.queueBind(queueName, EXCHANGE_NAME, bindingKey);
System.out.println("ReceiveLogsTopic2 exchange:"+EXCHANGE_NAME+", queue:"+queueName+", BindRoutingKey:" + bindingKey);
}
System.out.println("ReceiveLogsTopic2 Waiting for messages");
Consumer consumer = new DefaultConsumer(channel) {
@Override
public void handleDelivery(String consumerTag, Envelope envelope, AMQP.BasicProperties properties, byte[] body) throws IOException {
String message = new String(body, "UTF-8");
System.out.println("ReceiveLogsTopic2 Received '" + envelope.getRoutingKey() + "':'" + message + "'");
}
};
channel.basicConsume(queueName, true, consumer);
}
}运行我们的消费者程序


消费者已经通过匹配的routingKey监听,运行生产着生产消息


可以看到消费者已经根据routingKey 消费到对应通配的消息
小结
我们上面的三种模式具有以下特点
- 生产者声明了
exchange的类型,生产者种并没有生命队列,而是在消费者中由服务器随机生成的 - 我们的队列都是在消费者中声明的,所以要先启动消费者进行监听
文章参考
https://javaduqing.github.io
http://www.cnblogs.com/LipeiNet/p/5978276.html


