【思科】GRE Over IPsec 实验配置
【思科】GRE Over IPsec 实验配置
- 前言
-
- 报文格式
- 实验需求
- 配置
-
- 拓扑
- GRE配置步骤
- IPsec 配置步骤
-
- R1
-
- 基础配置
- GRE 配置
- IPSec 配置
- ISP_R2
-
- 基础配置
- R3
-
- 基础配置
- GRE 配置
- IPSec 配置
- PC
-
- PC1
- PC2
- 抓包检查
-
- OSPF建立
- IPsec 隧道建立
- Ping
- 配置文档
前言
GRE over IPSec可利用GRE和IPSec的优势,通过GRE将组播、广播和非IP报文封装成普通的IP报文,通过IPSec为封装后的IP报文提供安全地通信,进而可以提供在总部和分支之间安全地传送广播、组播的业务,例如动态路由协议消息等。
就是将GRE的优点和IPsec的优点相结合
因为GRE能够传输组播、广播等数据,但对数据的传输是不进行加密的,在不安全的公网上面相当于裸奔啦。而咱们的IPsec 是可以对数据进行加密和认证的,但是不支持传输组播、广播等数据,就是会有一些弊端。
现在就是将二者结合在一起,形成为GRE Over IPsec的隧道嵌套技术,这个原理是IPsec 保护 GRE隧道的流量,就可以将GRE的流量进行加密,GRE又可以将私网流量进行封装,报文格式可以看的很清楚哦,就在下面啦
当网关之间采用GRE over IPSec连接时,先进行GRE封装,再进行IPSec封装。 GRE over IPSec使用的封装模式为可以是隧道模式也可以是传输模式。
因为隧道模式跟传输模式相比增加了IPSec头,导致报文长度更长,更容易导致分片,所以传输模式的GRE over IPSec会好很多。
报文格式
实验需求
R1为企业总部网关,R3为企业分部网关,分部与总部通过公网建立通信。
企业希望对分部与总部之间相互访问的流量(包括组播数据)进行安全保护。由于组播数据无法直接应用IPSec,所以基于虚拟隧道接口方式建立GRE over IPSec,对流量进行保护
![]()
注意
此时的IPSec VPN我用的是AH的报文头部
AH协议它是不会对数据进行加密的,只是需要认证一下再接收。
那为什么要用AH协议当报文头呢?
为了更清晰的看清楚咱们报文里面的结构啦。
等后面抓报文的时候,就能够很好的去理解啦~
现网中的话,通常都是用ESP来封装,这个安全性就更强啦
配置
拓扑
![]()
GRE配置步骤
① 创建虚拟Tunnel接口
② 设置Tunnel接口的网络地址和掩码
③ 指定Tunnel的源端IP地址
③ 指定Tunnel的目的端IP地址
IPsec 配置步骤
-
第一阶段 IKE SA
① 设置IKE的策略,里面包含开启预共享密钥的认证、加密算法、DH组等内容
② 配置预共享密钥和对等体地址 -
第二阶段 IPsec SA
① 转换集
② ACL : 匹配保护的流量,即定义需要IPSec保护的数据流
③ 配置安全策略组map,并引用ACL、IPSec转换集和对等体IP地址,确定对何种数据流采取何种保护方法 -
在接口上应用安全策略组map,使接口具有IPSec的保护功能
R1
基础配置
R1(config)#int e0/0
R1(config-if)#no shutdown
R1(config-if)#ip address 202.101.12.1 255.255.255.0
R1(config-if)#ex

R1(config)#int e0/1
R1(config-if)#no shutdown
R1(config-if)#ip address 192.168.10.254 255.255.255.0
R1(config-if)#ex

##配置默认路由指向ISP运营商,实现公网可达
R1(config)#ip route 0.0.0.0 0.0.0.0 202.101.12.2
GRE 配置
R1(config)#int tunnel 13      ## 创建GRE隧道,命名为13,两边隧道名字要同名,不然建立不起来
R1(config-if)#ip address 13.13.13.1 255.255.255.0   ## 配置隧道地址
R1(config-if)#tunnel source 202.101.12.1            ## GRE隧道的源IP
R1(config-if)#tunnel destination 202.101.23.3       ## GRE隧道的目的IP
R1(config-if)#ex

## 动态路由 OSPF
R1(config)#int range e0/1,tunnel 13                ## 进入接口
R1(config-if-range)#ip ospf 110 area 0             ## 接口通告
R1(config-if-range)#ex

## 静态路由
[ R1(config)#ip route 192.168.20.0 255.255.255.0 tunnel 13  ]
IPSec 配置
## 创建IKE的策略,优先级为10
R1(config)#crypto isakmp policy 10
R1(config-isakmp)#encryption 3des                  ## 用3des加密
R1(config-isakmp)#authentication pre-share         ## 身份认证用预共享密钥
R1(config-isakmp)#hash md5                         ## 配置完整性校验方式为 md5
R1(config-isakmp)#group 5                          ## 设置 DH 组 5
R1(config-isakmp)#ex

## 配置与共享密钥为 520,对方的密钥也要是一致才能匹配成功,才能协商IKE SA
R1(config)#crypto isakmp key 520 address 202.101.23.3


## 创建转换集 myset(命名)
## 封装协议(AH-md5-hamc完整性校验 无 加密 )
R1(config)#crypto ipsec transform-set myset ah-md5-hmac
R1(cfg-crypto-trans)#mode tunnel          ## 传输方式用隧道传输
R1(cfg-crypto-trans)#exit

## 协商感兴趣流量,也就是需要保护的流量
R1(config)#access-list 100 permit ip 192.168.10.0 0.0.0.255 192.168.20.0 0.0.0.255

## 将配置的内容都引用在安全策略map里面 ,使用ike自动协商
R1(config)#crypto map mymap 10 ipsec-isakmp
R1(config-crypto-map)#match address 100         ## 匹配ACL 100
R1(config-crypto-map)#set peer 202.101.23.3     ## 设置对端对等体地址
R1(config-crypto-map)#set transform-set myset   ## 绑定转换集 myset
R1(config-crypto-map)#ex

## 在出接口上调用
R1(config)#int e0/0
R1(config-if)#crypto map mymap               ##进入接口,调用其安全策略mymap
R1(config-if)#ex
ISP_R2
基础配置
ISP_R2(config)#int e0/0
ISP_R2(config-if)#no shutdown
ISP_R2(config-if)#ip address 202.101.12.2 255.255.255.0
ISP_R2(config-if)#ex

ISP_R2(config)#int e0/1
ISP_R2(config-if)#no shutdown
ISP_R2(config-if)#ip address 202.101.23.2 255.255.255.0
ISP_R2(config-if)#ex
R3
基础配置
R3(config)#int e0/0
R3(config-if)#no shut
R3(config-if)#ip address 202.101.23.3 255.255.255.0
R3(config-if)#ex

R3(config)#int e0/1
R3(config-if)#no shut
R3(config-if)#ip address 192.168.20.254 255.255.255.0
R3(config-if)#ex

##配置默认路由指向ISP运营商,实现公网可达
R3(config)#ip route 0.0.0.0 0.0.0.0 202.101.23.2
GRE 配置
R3(config)#int tunnel 13
R3(config-if)#ip address 13.13.13.3 255.255.255.0
R3(config-if)#tunnel source 202.101.23.3
R3(config-if)#tunnel destination 202.101.12.1
R3(config-if)#ex

## 动态路由 OSPF
R3(config)#int range e0/1,tunnel 13
R3(config-if-range)#ip ospf 110 area 0
R3(config-if-range)#ex

## 静态路由
[ R3(config)#ip route 192.168.10.0 255.255.255.0 tunnel 13  ]
IPSec 配置
R3(config)#crypto isakmp policy 10
R3(config-isakmp)#encryption 3des
R3(config-isakmp)#hash sha256
R3(config-isakmp)#authentication pre-share
R3(config-isakmp)#group 5
R3(config-isakmp)#ex

R3(config)#crypto isakmp key 520 address 202.101.12.1

R3(config)#access-list 100 permit ip 202.101.23.3 0.0.0.0 202.101.12.1 0.0.0.0

R3(config)#crypto ipsec transform-set myset ah-md5-hmac
R3(cfg-crypto-trans)#mode tunnel
R3(cfg-crypto-trans)#ex

R3(config)#crypto map mymap 10 ipsec-isakmp
R3(config-crypto-map)#match address 100
R3(config-crypto-map)#set peer 202.101.12.1
R3(config-crypto-map)#set transform-set myset
R3(config-crypto-map)#ex

R3(config)#int e0/0
R3(config-if)#crypto map mymap
R3(config-if)#ex
PC
因为我是在EVE中来操作思科模拟器,所以我就用路由器来模拟PC电脑,就需要关闭路由功能
PC1
PC1(config)#no ip routing                            ## 关闭路由功能
PC1(config)#ip default-gateway 192.168.10.254        ## 配置网关

PC1(config)#int e0/0
PC1(config-if)#no shutdown
PC1(config-if)#ip address 192.168.10.1 255.255.255.0
PC1(config-if)#ex
PC2
PC2(config)#no ip routing                            ## 关闭路由功能
PC2(config)#ip default-gateway 192.168.20.254        ## 配置网关

PC2(config)#int e0/0
PC2(config-if)#no shutdown
PC2(config-if)#ip address 192.168.20.1 255.255.255.0
PC2(config-if)#ex
抓包检查
OSPF建立
查看邻居的建立情况
IPsec 隧道建立
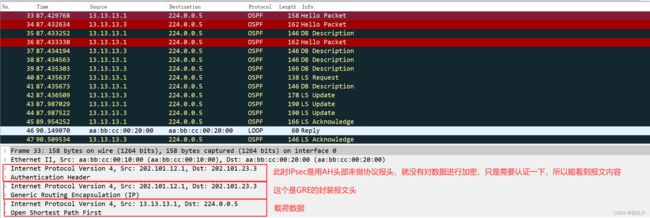
此时的IPsec VPN是自动建立的
这是因为私网中,我是用OSPF实现的全互通,GRE的隧道口也是被我宣告进去了,这个时候,这个时候的Hello包会经过GRE封装,携带公网头部从e0/0接口出去,触发到了IPsec的ACL感兴趣流量,这个时候就会自动建立IPsec VPN

Ping

这边也可以看到GRE隧道也建立成功啦,而且还是明文传输
因为我的 IPSec 用AH头部数据封装进行传输,是不会对流量包进行加密的,所以可以清楚地看到报文结构

而这个抓包内容的话,就是有加密的
因为我的 IPsec 就是用ESP头部进行封装数据,这个时候,抓包的时候就看不到数据包里面的内容了,这个安全性会更高

配置文档
R1
hostname R1

int e0/0
no shut
ip address 202.101.12.1 255.255.255.0
ex

int e0/1
no shut
ip address 192.168.10.254 255.255.255.0
ex

ip route 0.0.0.0 0.0.0.0 202.101.12.2

int tunnel 13
ip address 13.13.13.1 255.255.255.0
tunnel source 202.101.12.1
tunnel destination 202.101.23.3
ex

int range e0/1,tunnel 13
ip ospf 110 area 0
ex

crypto isakmp policy 10
encryption 3des
hash sha256
authentication pre-share
group 5
ex

crypto isakmp key 520 address 202.101.23.3

access-list 100 permit ip 202.101.12.1 0.0.0.0 202.101.23.3 0.0.0.0

crypto ipsec transform-set myset ah-md5-hmac
mode tunnel
ex

crypto map mymap 10 ipsec-isakmp
match address 100
set peer 202.101.23.3
set transform-set myset
ex

int e0/0
crypto map mymap
ex
R3
hostname R3

int e0/0
no shutdown
ip address 202.101.23.3 255.255.255.0
ex

int e0/1
no shutdown
ip address 192.168.20.254 255.255.255.0
ex

ip route 0.0.0.0 0.0.0.0 202.101.23.2

int tunnel 13
ip address 13.13.13.3 255.255.255.0
tunnel source 202.101.23.3
tunnel destination 202.101.12.1
ex

int range e0/1,tunnel 13
ip ospf 110 area 0
ex

crypto isakmp policy 10
encryption 3des
hash sha256
authentication pre-share
group 5
ex

crypto isakmp key 520 address 202.101.12.1

access-list 100 permit ip 202.101.23.3 0.0.0.0 202.101.12.1 0.0.0.0

crypto ipsec transform-set myset ah-md5-hmac
mode tunnel
ex

crypto map mymap 10 ipsec-isakmp
match address 100
set peer 202.101.12.1
set transform-set myset
ex

int e0/0
crypto map mymap
ex


