Terraform
Terraform 官网常用链接
| Terraform 官网 | https://www.terraform.io/ |
| Terraform Doc | https://developer.hashicorp.com/terraform Terraform AWS Provider:https://registry.terraform.io/providers/hashicorp/aws/latest/docs Terraform Standard Module Structure: https://developer.hashicorp.com/terraform/language/modules/develop/structure |
| Terraform CLI | https://developer.hashicorp.com/terraform/cli Basic CLI: https://developer.hashicorp.com/terraform/cli/commandsC CLI configuration: https://developer.hashicorp.com/terraform/cli/config |
| Github | https://github.com/hashicorp/terraform |
| Book | 《Terraform Up and Running, 2th Edition》Yevgeniy Brikman著 (中文版:Terraform:多云、混合云环境下实现基础设施即代码:第2 版) |
HCL Basic:
terraform init
terraform validate
terraform plan
terraform apply
terraform show
terraform destroy
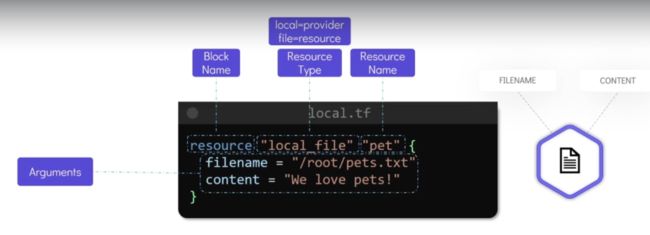
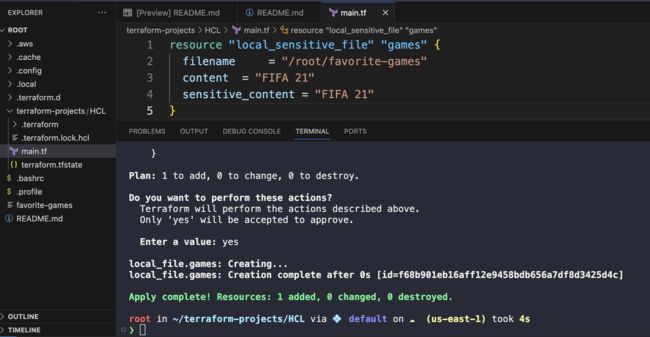
local_file & local_sensitive_file (don't output the content):

local provider:
hostname/organizational namespace/type
eg: registry.terraform.io/hashicorp/local
以下是书里的代码笔记:
/* $ export AWS_ACCESS_KEY_ID =(访问 ID)
$ export AWS_SECRET_ACCESS_KEY =(密钥) */
provider "aws" {
region = "us-east-2"
}
/* resource " _ "" " */
resource "aws_instance" "beth_example" {
/* [CONFIG...] */
ami = "ami-0c55b159cbfafe1f0" # AMI ID,代表了位于 us-east-2 区域的 Ubuntu 18.04 免费映像
instance_type = "t2.micro"
vpc_security_group_ids = [aws_security_group.beth_instance.id]
/* << - EOF 和 EOF 是 Terraform 的 heredoc 语法,它可以让用户在无须插入换行符的情况下,创建多行字符串。 */
/* busybox工具默认已经在 Ubuntu 上安装,并会在端口 8080 上启动 Web 服务器。 */
user_data = <<-EOF
#!/bin/bash
echo "Hello,World" >index.html
nohup busybox httpd -f -p 8080&
EOF
/* 没加这个的话,EC2实例没有名称 */
tags = {
Name = "terraform-example"
}
}
/* terraform init */ # 幂等性,可被重复执行
/* terraform plan */
/* plan 命令的输出,类似于 UNIX、Linux 和 Git 中用过的 diff 命令:加号(+)代表任何新添加的内容,减号(-)代表删除的内容,波浪号(〜)代表所有将被修改的内容 */
/* terraform apply */
/* yes and then enter */
/* .gitignore */
/* .terraform 文件夹是Terraform临时目录 */
/* *.tfstate 文件是Terraform用来存储状态的文件 */
/* 还有忽略 *.tfstate.backup */
/* git init
git add .
git commit -m "initial commit" */
/* git remote add origin [email protected] xxx.git */
/* git push origin master */
/* security group */
resource "aws_security_group" "beth_instance" {
name = "terraform-example-instance"
ingress {
from_port = 8080
to_port = 8080
protocol = "TCP"
cidr_blocks = ["0.0.0.0/0"]
}
}
/* terraform graph 显示依赖关系图,默认为DOT图形描述语言,可通过使用桌面应用 Graphviz 或 Web应用 GraphvizOnline等工具,自动生成一个依赖关系图 */
/* curl http://:8080 */
variable "number_example" {
description = "An example of a number variable in Terraform"
type = number
default = 42
}
variable "list_example" {
description = "An example of a list variable in Terraform"
type = list
default = ["a", "b"]
}
variable "list_number_example" {
description = "An example of a number list variable in Terraform"
type = list(number)
default = [1, 2]
}
variable "map_string_example" {
description = "An example of a string map variable in Terraform"
type = map(string)
default = {
key1 = "value1"
key2 = "value2"
}
}
variable "object_example" {
description = "An example of a structural type in Terraform"
type = object({
name = string
age = number
tags = list(string)
enabled = bool
})
default = {
name = "value1"
age = 42
tags = [ "a", "b" ]
enabled = true
}
}
variable "server_port" {
description = "The port the server will use for HTTP requests"
type = number
/* default = 8080 */
}
/* 没有default值,option 1: 可交互式提示输入设置初始化值 */
/* 变量引用 var. */
/* var.server_port */
/* option 2 */
/* terraform plan -var "server_port = 8080" */
/* option 3 */
/* 命名规范
export TF_VAR_server_port = 8080 */
/* terraform plan */
/* security group */
resource "aws_security_group" "beth_instance" {
name = "terraform-example-instance"
ingress {
from_port = var.server_port
to_port = var.server_port
protocol = "tcp"
cidr_blocks = ["0.0.0.0/0"]
}
}
/* 在字符串文字中使用变量引用 */
user_data = <<-EOF
#!/bin/bash
echo "Hello,World" >index.html
nohup busybox httpd -f -p ${var.server_port} &
EOF
/* 输出变量 */
output "public_ip" {
value = aws_instance.beth_example.public_ip
description = "The public ip address of the web server"
}
/* $ terraform apply
Outpus:
public_ip = 54.174.13.5 */
/* $ terraform output
public_ip = 54.174.13.5 */
/* $ terraform output public_ip
54.174.13.5 */
/* 使用 ASG(Auto Scaling Group)进行Web服务器集群来代替单个Web服务器 */
/* ASG 可以完全自动地处理许多任务,包括启动 EC2 实例集群,监视每个实例的运行状况,替换故障实例,以及根据负载调整集群大小 */
/* 创建 ASG 的第一步是创建启动配置(launch configuration),启动配置将定义如何设置 ASG中的每个 EC2 实例。aws_launch_configuration 资源使用了与 aws_instance 资源几乎一模一样的两个参数,只是名称略有不同:ami 参数在这里被称为 image_id,vpc_security_ group_ids 参数现在是 security_groups */
resource "aws_launch_configuration" "beth_example" {
image_id = "ami-0c55b159cbfafe1f0"
instance_type = "t2.micro"
security_groups = [aws_security_group.instance.id]
user_data = <<-EOF
#!/bin/bash
echo "Hello, World" > index.html
nohup busybox httpd -f -p ${var.server_port} &
EOF
}
resource "aws_autoscaling_group" "beth_example" {
launch_configuration = aws_launch_configuration.beth_example.name
min_size = 2
max_size = 10
tag {
key = "Name"
value = "terraform-asg-example"
propagate_at_launch = true
}
}
/* 新创建的 ASG 将包括 2 到 10 个 EC2 实例(初始化时的默认值为 2),每个 EC2 实例都拥有一个名称为 terraform-asg-example 的标签。请注意,ASG 的启动配置(launch_configuration)参数,被定义为一个资源引用。这会导致一个问题:因为启动配置是不可变的对象,所以如果更改启动配置中的任何参数,Terraform 将尝试替换它。在替换资源时,Terraform 会先删除旧资源,然后创建新资源,但是由于你的 ASG 正在引用旧资源,因此 Terraform将无法删除启动配置。 可以通过使用生命周期设置来解决这个问题。每个 Terraform 资源都支持生命周期设置,这些生命周期设置用于定义如何创建、更新和删除该资源。一个特别有用的生命周期设置是 create_before_destroy。如果将 create_before_destroy 设置为 true,那么 Terraform将反转其替换资源的顺序,首先创建替换资源(包括将指向旧资源的所有外部引用,更新为指向替换资源),然后删除旧资源。将 lifecycle 代码块添加到 aws_launch_configuration资源定义中 */
resource "aws_launch_configuration" "beth_example" {
image_id = "ami-0c55b159cbfafe1f0"
instance_type = "t2.micro"
security_groups = [aws_security_group.beth_instance.id]
user_data = <<-EOF
#!/bin/bash
echo "Hello, World" > index.html
nohup busybox httpd -f -p ${var.server_port} &
EOF
# 当 ASG 中使用启动配置时,必须使用以下生命周期设置 # https://www.terraform.io/docs/providers/aws/r/launch_configuration.html
lifecycle {
create_before_destroy = true
}
}
/* 为了使 ASG 正常工作,还有另一个需要添加的参数:subnet_ids。这个参数定义 ASG 部署 EC2 实例时的 VPC 子网信息 */
/* 每个子网都位于相互隔离的 AWS AZ(即隔离的数据中心)中,因此,跨子网部署实例可以确保即使某些数据中心发生故障,服务也可以保持运行。直接使用静态子网列表会使维护或移植更加困难,一个更好的选择是使用数据源(data source)获取 AWS 账户中可用的子网列表。 */
/* 一个数据源代表在每次运行 Terraform 时,从服务提供商(在本例中为 AWS)获取的只读信息。将数据源添加到 Terraform 配置中,并不会创建任何新内容。这只是提供一种手段,通过服务提供商的 API,读取数据并使该数据对于其余 Terraform 代码可见、可用。每个Terraform 服务提供商都会公开各种数据源。例如,AWS 提供的数据源可以读取 VPC 数据、子网数据、AMI ID、IP 地址范围、当前用户身份等 */
/* 使用 aws_vpc 数据源读取默认 VPC 信息 */
data "aws_vpc" "default" {
default = true # 指示 Terraform在 AWS 账户中查找默认的 VPC
}
/* data._.. */
/* 将其与 aws_subnet_ids 数据源组合在一起使用,以读取该 VPC 中的子网信息。 */
data " aws_subnet_ids" "default" {
vpc_id = data.aws_vpc.default.id
}
/* 最后,你可以从 aws_subnet_ids 数据源中获得子网号,赋值给 ASG 的 vpc_zone_identifer参数。 */
resource "aws_autoscaling_group" "beth_example" {
launch_configuration = aws_launch_configuration.beth_example.name
vpc_zone_identifier = data.aws_subnet_ids.default.ids
min_size = 2
max_size = 10
tag {
key = "Name"
value = "terraform-asg-example"
propagate_at_launch = true
}
}
resource "aws_lb" "beth_example" {
name = "terraform_asg_example"
load_balancer_type = "application"
subnets = data.aws_subnet_ids.default.ids # subnets 参数通过引用 aws_subnet_ids 数据源的结果,将负载均衡器配置为可以使用默认 VPC 中的所有子网。
}
/* 使用 aws_lb_listener 资源为这个 ALB 定义一个侦听器 */
resource "aws_lb_listener" "http" {
load_balancer_arn = aws_lb.beth_example.arn
port = 80
protocol = "HTTP"
default_action {
type = "fixed-response"
fixed-response {
content_type = "text/plain"
message_body = "404: page not found"
status_code = 404
}
}
}
resource "aws_security_group" "alb" {
name = "terraform-example-alb"
# 允许入站的 HTTP 请求
ingress {
from_port = 80
to_port = 80
protocol = "tcp"
cidr_blocks = ["0.0.0.0/0"]
}
# 允许所有出站请求
egress {
from_port = 0
to_port = 0
protocol = "-1"
cidr_blocks = ["0.0.0.0/0"]
}
}
resource "aws_lb" "beth_example" {
name = "terraform_asg_example"
load_balancer_type = "application"
subnets = data.aws_subnet_ids.default.ids # subnets 参数通过引用 aws_subnet_ids 数据源的结果,将负载均衡器配置为可以使用默认 VPC 中的所有子网。
security_groups = [aws_security_goup.alb.id] # 通过 security_groups 参数配置 aws_lb 资源来使用这个安全组
}
/* 使用 aws_lb_target_group 资源为 ASG 创建目标组。 */
resource "aws_lb_target_group" "asg" {
name = "terraform_asg_example"
port = var.server_port
protocol = "HTTP"
vpc_id = data.aws_vpc.default.id
/* 目标组将通过定期向每个实例发送 HTTP 请求,进行健康检查,并且仅当实例返回与配置的 matcher 值匹配的响应时,才会被认为是“健康”的(例如,你可以配置 matcher 来查找响应中的 200 OK 字段)。如果某个实例由于停机或过载而无法返回匹配的响应,那么它将被标记为“运行状况不佳”,目标组将自动停止向其发送流量,以避免对用户产生影响。 */
health_check {
path = "/"
protocol = "HTTP"
matcher = "200"
interval = 15
timeout = 3
healthy_threshold = 2
unhealthy_threshold = 2
}
}
/* 目标组如何知道应该向哪个 EC2 实例发送请求呢?你可以通过 aws_lb_target_group_ attachment 资源,将一组 EC2 实例的静态列表提供给目标组使用。但是由于使用了 ASG,实例可以随时启动或终止,所以静态列表在这种情况下并不适用。相反,你可以利用 ASG和 ALB 之间的一类集成,将 aws_autoscaling_group 资源的 target_group_arns 参数指向新创建的目标组。 */
resource "aws_autoscaling_group" "beth_example" {
launch_configuration = aws_launch_configuration.beth_example.name
vpc_zone_identifier = data.aws_subnet_ids.default.ids
target_group_arns = [aws_lb_target_group.asg.arn]
health_check_type = "ELB"
min_size = 2
max_size = 10
tag {
key = "Name"
value = "terraform-asg-example"
propagate_at_launch = true
}
}
/* 最后,通过使用 aws_lb_listener_rule 资源,创建侦听器规则,将所有这些部分联系在一起 */
resource "aws_lb_listener_rule" "asg" {
listener_arn = aws_lb_listener.http.arn
priority = 100
condition {
field = "path-pattern"
values = ["*"] }
action {
type = "forward"
target_group_arn = aws_lb_target_group.asg.arn
}
}
}
output "alb_dns_name" {
value = aws_lb.beth_example.dns_name
description = "The domain name of the load balancer"
}
/* $ curl http://
Hello,World */
/* ALB 成功地将流量路由到新创建的 EC2 实例。每次访问这个 URL 时,它会选择一个不同的实例来处理请求。现在,一个 Web 服务器集群可以正常运行了 */
/* $ terraform destroy */
/*************************************************************** Terraform state *************************************************************/
/* 需要注意的是,用户应该避免手动编辑 Terraform 状态文件或通过代码直接读取文件内容。如果由于某种原因需要改写状态文件(这种情况很少见),请使用 terraform import 或 terraform state 命令 */
/* 默认后端是将状态文件存储在本地磁盘上的本地后端(local backend)。而另一种远程后端(remote backend)允许你在远程共享存储系统中保存状态文件。Terraform 支持许多种远程后端,包括 Amazon S3(Simple Storage Service,简单存储服务)、Azure 存储、Google 云存储,以及 HashiCorp 自营的 Terraform Cloud、Terraform 专业版和 Terraform 企业版 */
/* 使用 Amazon S3 远程存储状态文件,解决敏感信息加密等问题 */
resource "aws_s3_bucket" "terraform_state" {
bucket = "beth-terraform-up-and-running-state"
/* 防止意外删除此 S3 bucket */
lifecycle {
prevent_destroy = true
}
/* 启用版本控制,以便查看状态文件的所有历史记录 */
versioning {
enabled = true
}
/* 默认情况下启用服务器端加密 */
server_side_encryption_configuration {
rule {
apply_server_side_encryption_by_default {
sse_algorithm = "AES256"
}
}
}
}
/* 使用 DynamoDB 实现锁定功能,创建一个具有主键名为LockID(确切的拼写和大小写)的 DynamoDB 表 */
resource "aws_dynamodb_table" "terraform_locks" {
name = "beth-terraform-up-and-running-locks"
bill_mode = "PAY_PER_REQUEST"
hash_key = "LockID"
attribute {
name = "LockID"
type = "S"
}
}
/* 此时你的 Terraform 状态文件仍存储在本地。你需要在Terraform 代码中添加一个 backend 配置,将状态存储在 S3 bucket 中(具有加密和锁定功能)。这是关于 Terraform 自身的配置,因此它位于 terraform 代码块中 */
/* 启用此后端后,Terraform 将在运行命令之前自动从 S3 bucket 中读取最新状态;并在运行命令后自动将最新状态更新到 S3 bucket 中。 */
terraform {
/* backend "" */
backend "s3" {
bucket = "beth-terraform-up-and-running-state"
key = "global/s3/terraform.tfstate" # S3 bucket 中 Terraform 状态文件写入的文件路径
region = "us-east-2"
dynamodb_table = "beth-terraform-up-and-running-locks"
encrypt = true
}
}
/* 要检验实际效果,可添加以下输出变量。 */
output "s3_bucket_arn" {
value = aws_s3_bucket.terraform_state.arn
description = "The ARN of the S3 bucket"
}
output "dynamodb_table_name" {
value = aws_dynamodb_table.terraform_locks.name
description = "The name of the DynamoDB table"
}
/* $ terraform apply
Acquiring state lock. This may take a few moments...
aws_dynamodb_table.terraform_locks: Refreshing state...
aws_s3_bucket.terraform_state: Refreshing state...
Apply complete!
Resources: 0 added, 0 changed, 0 destroyed.
Releasing state lock. This may take a few moments...
Outputs:
dynamodb_table_name = beth-terraform-up-and-running-locks
s3_bucket_arn = arn:aws:s3:::beth-terraform-up-and-running-state */
/* Terraform 的 backend 代码块中不允许使用任何变量或引用 */
/* backend.hcl */
# backend.hcl
bucket = "terraform-up-and-running-state"
region = "us-east-2"
dynamodb_table = "terraform-up-and-running-locks"
encrypt = true
/* 每一个 Terraform 模块都拥有唯一的 key 值 */
/* 在 Terraform 代码中,只继续保留了 key 参数,因为不同的模块需要设置不同的 key 值。 */
# 部分配置项。其他设置(例如 bucket、region 等参数)将在运行 terraform init 命令时
# 通过-backend-config 参数从文件中传入
terraform {
backend "s3" {
key = "example/terraform.tfstate"
}
}
/* 要将所有配置结合在一起使用,请在运行 terraform init 命令时,使用-backend-config参数。
$ terraform init -backend-config = backend.hcl */
/* 隔离状态文件 */
/* $ terraform workspace show
default */
/*
$ terraform workspace new example1
$ terraform workspace list
$ terraform workspace select example1
在 env:文件夹内,每个工作区各自对应一个文件夹,如图 3-6 所示。 在每个工作区中,Terraform 使用你在 backend 配置中的 key 参数作为路径,可以找到各自的状态文件:example1/workspaces-example/terra-form.tfstate 和 example2/workspaces- example/terraform.tfstate。换句话说,切换到其他工作区等效于更改状态文件的存储路径
*/
/* 使用三元语法(ternary syntax),根据 terraform.workspace 的取值,有条件地将 INSTANCE_TYPE 设定为 t2.medium 或 t2.micro。 */
resource "aws_instance" "example" {
ami = "ami-0c55b159cbfafe1f0"
instance_type = terraform.workspace == "default" ? "t2.medium" : "t2.micro"
}
/* 如果单个 Terraform 文件变得越来越大(尤其是 main.tf),可以将某些功能分解为单独的文件(如 iam.tf、s3.tf、database.tf),但这也可能表明你应该将代码分成较小的模块 */
/* 将应用程序代码和数据库代码存放在不同的文件夹中,则无法使用属性引用。幸运的是,Terraform 的 terraform_remote_state 数据源为这个问题提供了一个解决方案 */
/* 处理机密信息的第一种方法是,使用 Terraform 数据源从机密信息存储库中读取机密信息。例如,你可以在 AWS Secrets Manager 中存储机密信息(例如数据库密码) */
resource "aws_db_instance" "example" {
identifier_prefix = "terraform-up-and-running"
engine = "mysql"
allocated_storage = 10
instance_class = "db.t2.micro"
name = "example_database"
username = "admin"
password = data.aws_secretsmanager_secret_version.db_password.secret_string
data "aws_secretsmanager_secret_version" "db_password" {
secret_id = "mysql-master-password-dev"
}
}
/* 一些机密信息存储服务和数据源的组合。
AWS Secrets Manager 和 aws_secretsmanager_secret_version 数据源(如以上代码所示)
AWS Systems Manager Parameter Store 和 aws_ssm_parameter 数据源
AWS Key Management Service(AWS KMS)和 aws_kms_secrets 数据源
Google Cloud KMS 和 google_kms_secret 数据源
Azure Key Vault 和 azurerm_key_vault_secret 数据源
HashiCorp Vault 和 vault_generic_secret 数据源 */
/* 处理机密信息的第二个方法是,使用 Terraform 范围之外的系统(如 1Password、LastPass或 OS X 钥匙串之类的密码管理器)管理机密信息,然后将机密信息通过环境变量传递到Terraform 中。为此,请在 stage/data-stores/mysql/variables.tf 中,定义一个名为 db_password的输入变量。 */
variable "db_password" {
description = "The password for the database"
type = string
}
/* 注意,该变量故意没有设置默认值。因为你不应以纯文本格式存储数据库密码或任何敏感信息。你将使用环境变量来进行赋值。 */
/* 输入变量 db_password 可以通过环境变量 TF_VAR_db_ password 来设置 */
/* $ export TF_VAR_db_password ="(YOUR_DB_PASSWORD)" */
output "address" {
value = aws_db_instance.example.address
description = "Connect to the database at this endpoint"
}
output "port" {
value = aws_db_instance.example.port
description = "The port the database is listening on"
}
user_data = <> index.html
echo "${data.terraform_remote_state.db.outputs.address}" >> index.html
echo "${data.terraform_remote_state.db.outputs.port}" >> index.html
nohup busybox httpd -f -p ${var.server_port} &
EOF
/* 通过使用Terraform内置函数file将shell和Terraform代码分开,优化:
file(" user-data.sh") */
/* 难点是,在 Web 服务器集群的用户数据脚本中,需要 Terraform 的一些动态数据,包括服务器端口、数据库地址和数据库端口。之前你可以使用 Terraform 插值,将引用嵌入到Terraform 代码的用户数据脚本中。但是这不适用于 file 函数,你必须通过 template_file数据源一起工作 */
/* 将以下 template_file 数据源代码添加到stage/services/ webserver-cluster/main.tf 文件中。 */
data "template_file" "user_data" {
template = file("user-data.sh")
vars = {
server_port = var.server_port
db_address = data.terraform_remote_state.db.outputs.address
db_port = data.terraform_remote_state.db.outputs.port
}
}
/* 需要按以下方式更新 stage/services/webserver-cluster/user-data.sh 脚本。
它使用 Terraform 的标准插值语法识别变量,但是唯一可用的变量是,template_file数据源中的 vars 参数定义过的变量映射。请注意,访问这些变量不需要任何前缀修饰,例如,应该使用 server_port,而不是 var.server_port
*/
/*
#!/bin/bash
cat > index.html <Hello, World
DB address: ${db_address}
DB port: ${db_port}
EOF
nohup busybox httpd -f -p ${server_port} &
测试:
export db_address=12.34.56.78
export db_port=5555
export server_port=8888
./user-data.sh
output=$(curl "http://localhost:$server_port")
if [[ $output == *"Hello, World"* ]]; then
echo "Success! Got expected text from server."
else
echo "Error. Did not get back expected text 'Hello, World'."
fi
*/
/* 最后一步是更新 aws_launch_configuration 资源的 user_data 参数,使其指向 template_file 数据源的 rendered 输出变量。 */
resource "aws_launch_configuration" "example" {
image_id = "ami-0c55b159cbfafe1f0"
instance_type = "t2.micro"
security_groups = [aws_security_group.instance.id]
user_data = data.template_file.user_data.rendered
# 在使用带有自动伸缩群启动配置时是必需的
# https://www.terraform.io/docs/providers/aws/r/launch_configuration.html
lifecycle {
create_before_destroy = true
}
}
/*************************************************************** Terraform module *************************************************************/
/* 模块是组织和重用 Terraform 代码的重要方式,在现实世界中 Terraform 代码通常是由许多小模块组成的)。 */
/* 将代码放入模块中可以在多个环境中重复使用该代码。模块化是编写可重用、可维护和可测试的 Terraform 代码的关键要素。 */
module "" {
source = ""
[CONFIG ...]
}
/* main.tf 调用webserver-cluster 模块 */
module "webserver_cluster" {
source = "../../../modules/services/webserver-cluster"
}
/* 除了使用输入变量,你还可以将它们定义为局部变量,放在 locals 模块中。 */
locals {
http_port = 80
any_port = 0
any_protocol = "-1"
tcp_protocol = "tcp"
all_ips = ["0.0.0.0/0"]
}
/* 访问本地变量:
local. */
/* 访问模块输出变量:
module.. */
/*************************************************************** Terraform loop & if *************************************************************/
/* 使用 count 循环 */
resource "aws_iam_user" "example" {
count = 3
name = "neo.${count.index}"
}
variable "user_names" {
description = "Create IAM users with these names"
type = list(string)
default = ["neo", "trinity", "morpheus"]
}
resource "aws_iam_user" "example" {
count = length(var.user_names)
name = var.user_names[count.index]
}
/* 使用 for_each 循环 */
/* for_each 表达式可以循环遍历列表、集合和映射,用于创建整个资源的多个副本,或资源内的内联块的多个副本 */
resource "aws_iam_user" "example" {
for_each = toset(var.user_names)
name = each.value
}
output "all_users" {
value = aws_iam_user.example
}
output "all_arns" {
value = values(aws_iam_user.example)[*].arn
}
/* 使用 for 循环 */
/* [for - in
:
