Elastic Stack 7.5 X-Pack 安全功能部署
微信公众号:运维开发故事,作者:double冬
场景
elasticsearch kibana 基本上是多人使用的, 所以进行权限控制是必然,以提高安全保障
在2019年5月21日,Elastic官方发布消息:Elastic Stack 新版本6.8.0 和7.1.0的核心安全功能现免费提供。
这意味着用户现在能够对网络流量进行加密、创建和管理用户、定义能够保护索引和集群级别访问权限的角色,并且使用 Spaces 为 Kibana提供全面保护。免费提供的核心安全功能如下:
1)TLS 功能。可对通信进行加密;
2)文件和原生 Realm。可用于创建和管理用户;
3)基于角色的访问控制。可用于控制用户对集群 API 和索引的访问权限;
通过针对 Kibana Spaces 的安全功能,还可允许在Kibana 中实现多租户。
官网权威指南
https://www.elastic.co/guide/en/elasticsearch/reference/7.5/encrypting-communications-hosts.html
1、x-pack演变
1,5.X版本之前:没有x-pack,是独立的:security安全,watch查看,alert警告等独立单元。
2,5.X版本:对原本的安全,警告,监视,图形和报告做了一个封装,形成了x-pack。
3,6.3 版本之前:需要额外安装。
4,6.3版本及之后:已经集成在一起发布,无需额外安装,基础安全属于付费黄金版内容。7 .1版本:基础安全免费。
2、安全部分免费之前,大家怎么保证基础安全?
场景一:全部“裸奔”,相信这在国内占据了非常大的比重。
内网部署,不对外提供服务。或者ES作为业务基础支撑,不公网开放9200等常用端口,开放的是业务的服务端口。
可能暴露问题:公司或团队内部开放9200、5601端口,基本head插件、kibana都能连接,极易导致线上索引或数据可能被误删。
场景二:加了简单防护。
一般使用Nginx身份认证+防火墙策略控制。
场景三:整合使用了第三方安全认证方案。
比如:SearchGuard、ReadonlyREST。
场景四:付费购买了Elastic-Xpack黄金版或白金版服务。
一般是银行等土豪大客户,对安全、预警、机器学习等付费功能需求迫切,如:宁波银行付费购买白金服务。
以上内容摘自:https://blog.csdn.net/laoyang360/article/details/90554761
本次配置的ELK软件版本
[root@elk-master ~]# rpm -qa elasticsearch  logstash  kibana
elasticsearch-7.5.0-1.x86_64
logstash-7.5.0-1.noarch
kibana-7.5.0-1.x86_64
环境
192.168.73.133 主节点 安装:elasticsearch、logstash、Kibana、java
192.168.73.135 node节点安装: elasticsearch、logstash
首先在Elasticsearch主节点进行配置
配置TLS和身份验证
创建证书
/usr/share/elasticsearch/bin/elasticsearch-certutil ca
/usr/share/elasticsearch/bin/elasticsearch-certutil cert --ca elastic-stack-ca.p12
#两条命令均一路回车即可,不需要给秘钥再添加密码。
#证书创建完成之后,默认在es的数据目录,这里统一放到etc下:
ls elastic-*
elastic-certificates.p12  elastic-stack-ca.p12
mv elastic-* /etc/elasticsearch/
#添加elasticsearch组权限
chown elasticsearch.elasticsearch elastic*
chgrp elasticsearch /etc/elasticsearch/elastic-certificates.p12 /etc/elasticsearch/elastic-stack-ca.p12
#修改文件权限640
chmod 640 /etc/elasticsearch/elastic-certificates.p12 /etc/elasticsearch/elastic-stack-ca.p12
同样,将如上命令生成的两个证书文件拷贝到另外两台机器作为通信依据
elasticserch主节点配置文件如下
[root@elk-master ~]# egrep -v "*#|^$" /etc/elasticsearch/elasticsearch.yml
cluster.name: elk-cluster
node.name: elk-1
node.master: true
node.data: true
path.data: /var/lib/elasticsearch
path.logs: /var/log/elasticsearch
bootstrap.memory_lock: false
network.host: 192.168.73.133
http.port: 9200
discovery.zen.ping.unicast.hosts: ["192.168.73.133", "192.168.73.135"]
discovery.zen.minimum_master_nodes: 1
http.cors.enabled: true
http.cors.allow-origin: "*"
http.cors.allow-credentials: true
http.cors.allow-methods: OPTIONS, HEAD, GET, POST, PUT, DELETE
http.cors.allow-headers: Authorization,X-Requested-With,Content-Length,Content-Type
xpack.security.enabled: true
xpack.security.transport.ssl.enabled: true
xpack.security.transport.ssl.verification_mode: certificate
xpack.security.transport.ssl.keystore.path: /etc/elasticsearch/elastic-certificates.p12
xpack.security.transport.ssl.truststore.path: /etc/elasticsearch/elastic-certificates.p12
重启elasticsearch 服务
systemctl restart elasticsearch
配置身份验证
elastic 提供两种方式创建身份验证
#系统自动生成密码
/usr/share/elasticsearch/bin/elasticsearch-setup-passwords auto
#自定义密码
usr/share/elasticsearch/bin/elasticsearch-setup-passwords interactive
将elasticsearch 密码添加至elasticsearch-keystore文件
/usr/share/elasticsearch/bin/elasticsearch-keystore  add xpack.security.transport.ssl.keystore.secure_password
/usr/share/elasticsearch/bin/elasticsearch-keystore  add xpack.security.transport.ssl.truststore.secure_password
验证节点状态
[root@elk-master ~]# curl -u elastic:Goldwind@2019 http://192.168.73.133:9200/_cat/nodes?v
ip             heap.percent ram.percent cpu load_1m load_5m load_15m node.role master name
192.168.73.133           44          96   3    0.39    0.35     0.33 dilm      *      elk-1
其他Elasticsearch节点配置
elastic 节点之间交互需要通过证书,证书不一致会导致节点无法加入到集群,直接scp拷贝过去即可,节点加入到集群后用户验证是通过elasticsearch-keystore文件进行身份验证
拷贝证书文件和身份认证文件到其他elastic节点
[root@elk-node1 elasticsearch]# scp elastic-certificates.p12  elastic-stack-ca.p12  elasticsearch.keystore  [email protected]:/etc/elasticsearch/
[email protected]'s password:
elastic 配置文件
[root@elk-node1 elasticsearch]# egrep -v "*#|^$" /etc/elasticsearch/elasticsearch.yml
cluster.name: elk-cluster
node.name: elk-2
path.data: /var/lib/elasticsearch
path.logs: /var/log/elasticsearch
network.host: 192.168.73.135
http.port: 9200
discovery.zen.ping.unicast.hosts: ["192.168.73.133", "192.168.73.135"]
discovery.zen.minimum_master_nodes: 1
http.cors.enabled: true
http.cors.allow-origin: "*"
http.cors.allow-methods: OPTIONS, HEAD, GET, POST, PUT, DELETE
http.cors.allow-headers: "X-Requested-With, Content-Type, Content-Length, X-User"
xpack.security.enabled: true
xpack.security.transport.ssl.enabled: true
xpack.security.transport.ssl.verification_mode: certificate
xpack.security.transport.ssl.keystore.path: /etc/elasticsearch/elastic-certificates.p12
xpack.security.transport.ssl.truststore.path: /etc/elasticsearch/elastic-certificates.p12
重启elasticsearch 服务
systemctl restart elasticsearch
查看elasticsearch集群状态
[root@elk-master ~]# curl -u elastic:Goldwind@2019 http://192.168.73.133:9200/_cat/nodes?v
ip             heap.percent ram.percent cpu load_1m load_5m load_15m node.role master name
192.168.73.133           44          96   3    0.39    0.35     0.33 dilm      *      elk-1
192.168.73.135           25          96   2    0.02    0.08     0.09 dilm      -      elk-2
**Kibana 配置文件如下
**
[root@elk-master ~]# egrep  -v "*#|^$" /etc/kibana/kibana.yml
server.port: 5601
server.host: "192.168.73.133"
server.name: "192.168.73.133"
elasticsearch.hosts: ["http://192.168.73.133:9200"]
kibana.index: ".kibana"
elasticsearch.username: "kibana"
elasticsearch.password: "Goldwind@2019"
logging.quiet: true
i18n.locale: "zh-CN"
**Logstash采集日志的配置(与之前没有变化)
**
[root@elk-master ~]# cat /etc/logstash/conf.d/elk.conf
input {
    file {
        path => "/var/log/messages"
        type => "system"
        start_position => "beginning"
    }

    file {
        path => "/var/log/secure"
        type => "secure"
        start_position => "beginning"
    }

    file {
        path => "/var/log/httpd/access_log"
        type => "http"
        start_position => "beginning"
    }

    file {
        path => "/usr/local/nginx/logs/elk.access.log"
        type => "nginx"
        start_position => "beginning"
    }
}

output {
    if [type] == "http" {
        redis {
            host => "192.168.73.133"
            password => 'root123'
            port => "6379"
            db => "2"
            data_type => "list"
            key => 'nagios_http'
        }
    }

    if [type] == "nginx" {
        redis {
            host => "192.168.73.133"
            password => 'root123'
            port => "6379"
            db => "2"
            data_type => "list"
            key => 'nagios_nginx'
        }
    }

    if [type] == "secure" {
        redis {
            host => "192.168.73.133"
            password => 'root123'
            port => "6379"
            db => "2"
            data_type => "list"
            key => 'nagios_secure'
        }
    }

    if [type] == "system" {
        redis {
            host => "192.168.73.133"
            password => 'root123'
            port => "6379"
            db => "2"
            data_type => "list"
            key => 'nagios_system'
        }
    }
}
Logstash传输日志的配置(需要新增加es的认证账号密码)
[root@elk-logstash ~]# cat /etc/logstash/conf.d/redis-out.conf
input {
    redis {
        type => "system"
        host => "192.168.73.133"
        password => 'root123'
        port => "6379"
        db => "2"
        data_type => "list"
        key => 'nagios_system'
    batch_count => 1
     }

    redis {
        type => "http"
        host => "192.168.73.133"
        password => 'root123'
        port => "6379"
        db => "2"
        data_type => "list"
        key => 'nagios_http'
    batch_count => 1
     }

    redis {
        type => "nginx"
        host => "192.168.73.133"
        password => 'root123'
        port => "6379"
        db => "2"
        data_type => "list"
        key => 'nagios_nginx'
    batch_count => 1
     }

    redis {
        type => "secure"
        host => "192.168.73.133"
        password => 'root123'
        port => "6379"
        db => "2"
        data_type => "list"
        key => 'nagios_secure'
    batch_count => 1
    }
}
output {
    if [type] == "system" {
        elasticsearch {
            hosts => ["192.168.73.133:9200"]
            index => "nagios-system-%{+YYYY.MM.dd}"
            user => "elastic"
            password => "Goldwind@2019"
            sniffing => false
        }
    }
    if [type] == "secure" {
        elasticsearch {
            hosts => ["192.168.73.133:9200"]
            index => "nagios-secure-%{+YYYY.MM.dd}"
            user => "elastic"
            password => "Goldwind@2019"
            sniffing => false
        }
    }
    if [type] == "http" {
        elasticsearch {
            hosts => ["192.168.73.133:9200"]
            index => "nagios-http-%{+YYYY.MM.dd}"
            user => "elastic"
            password => "Goldwind@2019"
            sniffing => false
        }
    }
    if [type] == "nginx" {
        elasticsearch {
            hosts => ["192.168.73.133:9200"]
            index => "nagios-nginx-%{+YYYY.MM.dd}"
            user => "elastic"
            password => "Goldwind@2019"
            sniffing => false
        }
    }
}
配置head插件
elasticsearch安装x-pack插件之后,head插件就无法使用了,因为x-pack中加入了安全模块(security机制),这个时候需要在elasticseach.yml中再增加下面一行配置即可解决
elasticsearch配置文件
http.cors.enabled: true
http.cors.allow-origin: "*"
http.cors.allow-headers: Authorization,X-Requested-With,Content-Length,Content-Type
然后在每次使用head插件的时候,按照如下的格式输入,其中auth_user是es的用户名,auth_password是es的密码:
http://192.168.73.133:9100/?auth_user=elastic&auth_password=Goldwind@2019
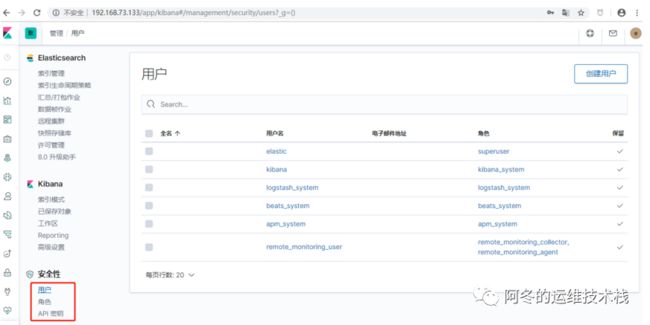
Kibana Web


新建用户, 分配角色
2