Web前端入门 - HTML JavaScript Vue
ps:刚开始学习web前端开发,有什么不正确、不标准的内容,欢迎大家指出~
Web简介
- 90年代初期,Web1.0,静态页面,不和服务器交互,网页三剑客指Dreamweaver、Fireworks、Flash
- 2000年代中期,Web2.0,动态页面,HTML是网页的结构,CSS是网页的外观,JavaScript是网页的行为。Ajax、jQuery等技术。
- 2010年代,移动互联网,响应式设计、单页面应用、前后端分离、TypeScript 、ECMA标准。React、Angular、Vue等MVVM前端框架。
框架(web framework) :提供了整套的开发和部署网站的方式
模板引擎(template engine) :专注于将静态模板与动态数据结合生成最终的视图文件
学习顺序:HTML → CSS → JavaScript → jQuery → CSS3 → HTML5 → Vue等框架
web技术统计:https://w3techs.com/
HTML
DOCTYPE html>
<html>
<head>
    <title>这是网页的标题title>
head>
<body>
    <p>这是网页的内容p>

body>
html>
head标签:
- title标签 标题
- meta标签 搜索 编码 自动跳转等
- link标签 外部css
- style标签 内部CSS
- script标签 JavaScript
- base标签 相对链接默认URL
body标签:
- 文本 h1 p br div
- 列表 ol li ul li dl dt dd
- 表格 table tr td caption th
- 图片 img
- 超链接 a href
- 表单 form input textarea select option
- 框架 iframe
CSS
- 外部样式表
- 内部样式表
- 行内样式表
选择器
{
    属性1 : 取值1;
    属性n : 取值n;
}
JavaScript
- 外部JavaScript
- 内部JavaScript
- 元素事件JavaScript
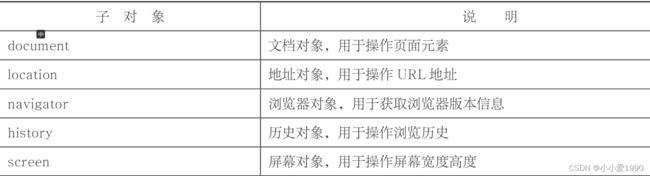
一个浏览器窗口就是一个window对象:
变量:
var a = 10;
常量:
var DEBUG = 1;
控制:
if else  switch   while  do while   for
函数:
function myFunction()
{
    alert("Hello World!");
}
数组:
var arr = ["HTML","CSS", "JavaScript"];
对象:
var person = {
    name:"John",
    age:50,
};
person.age = 51;
时间:
var d = new Date();

DOM:
当网页被加载时,浏览器会创建页面的文档对象模型(Document Object Model),为页面元素的树形结构。
•  元素节点  nodeType=1
•  属性节点  nodeType=2
•  文本节点  nodeType=3

获取元素:
•  getElementById()  只支持document
•  getElementsByTagName() 可操作动态DOM
•  getElementsByClassName()
•  querySelector()和querySelectorAll()  CSS选择器
•  getElementsByName() 只用于表单元素
•  document.title和document.body
示例:
var oDiv=document.getElementById("div1");
oDiv.style.color = "red";

创建元素节点 var e1 = document.createElement("元素名");
删除元素 A.removeChild(B);
复制元素 obj.cloneNode(bool)
替换元素 A.replaceChild(new,old);

事件:
•  鼠标事件
•  键盘事件
•  表单事件
•  编辑事件
•  页面事件

在页面输出内容:document.write()
弹出对话框:alert()
打开新窗口:window.open(url, target)
定时器:setTimeout(code, time);
周期执行:setInterval(code, time);
jQuery
轻量级JavaScript库,用于简化页面元素操作、事件处理、Ajax网络请求等。
jQuery 库包含以下特性:
- HTML 元素选取
- HTML 元素操作
- CSS 操作
- HTML 事件函数
- JavaScript 特效和动画
- HTML DOM 遍历和修改
- AJAX
- Utilities
基础语法:$(selector).action()
//隐藏 id="test" 的元素。
$("#test").hide()
//文档就绪回调
$(document).ready(function(){
  // jQuery functions go here
});
网络请求
form标签的submit
早期提交请求的方式,会导致整个页面重新加载。
<form action="https://httpbin.org/post" method="post">
    <label for="name">Name:label>
    <input type="text" id="name" name="name" required>
    <label for="email">Age:label>
    <input type="number" id="age" name="age" required>
    <input type="submit" value="Submit">
form>
AJAX
在不重载整个网页的情况下发起请求,更新页面的部分内容。
AJAX使用了浏览器提供的 XMLHttpRequest(xhr),而XMLHttpRequest是基于XML的HTTP请求。
var URL = 'https://httpbin.org/get?name=Ming&age=18';
var xhr = new XMLHttpRequest();
xhr.open('GET', URL, true);
xhr.onreadystatechange = function () {
    if (xhr.readyState === 4) {
        if (xhr.status === 200) {
            console.log(JSON.parse(xhr.responseText));
        } else {
            console.error('Error:', xhr.statusText);
        }
    }
};
xhr.send();
jQuery 封装 AJAX
jQuery对AJAX请求进行了封装:
// 从服务器加载数据,并把返回的数据放入被选元素中
$("#div1").load("demo.txt");
// 通过 HTTP GET 请求从服务器上请求数据
$("button_get").click(function(){
  $.get("demo_get",function(data,status){
    alert("Data: " + data + "\nStatus: " + status);
  });
});
// 通过 HTTP POST 请求从服务器上请求数据
$("button_post").click(function(){
  $.post("demo_post",
  {
    name:"Donald Duck",
    city:"Duckburg"
  },
  function(data,status){
    alert("Data: " + data + "\nStatus: " + status);
  });
});
Axios
Axios是一个独立的基于Promise的HTTP客户端,同时支持浏览器和node.js:在浏览器中使用XMLHttpRequest,在node.js中直接发送http请求。
而Promise是ES6中异步编程的新解决方案。
引入Axios:
const URL = 'https://httpbin.org/get';
axios.get(URL, {
    params: {
        name: 'Ming',
        age: '18'
    },
}).then(response => {
    console.log(response.data);
}).catch(error => {
    console.error('Error:', error);
});
Fetch API
Fetch 是现代浏览器提供的原生API,代替了XMLHttpRequest。同样基于Promise。
const URL = 'https://httpbin.org/get?name=Ming&age=18';
fetch(URL)
    .then(response => response.json())
    .then(data => console.log(data))
    .catch(error => console.error('Error:', error));
Vue.js
Vue简介
Vue是一款 MVVM(Model-View-ViewModel)框架。

- View(视图层):DOM层,用户看到的界面。
- Model(模型层):数据层,是来自服务器的或固定的数据
- ViewModel(视图模型层):实现了数据绑定(Data Bindings),可以在Model层数据发生变化时将变化反映到View上。用户与View进行交互时,ViewModel层又可以通过监听DOM事件的变化,将监听到的变化反映给Model。
组件化:将MVVM中的VVM封装成一个组件,可重用。
采用虚拟DOM技术解决性能问题。
响应式:当数据改变后,会通知使用该数据的代码,从而改变使用到该数据的其他数据,进而使关联对应数据的视图自动更新。
API风格:
- 选项式API:通过props、data、methods等相关配置来组织功能逻辑,不同功能代码混合在一起。适合不使用构建工具或低复杂度场景。
- 组合式API:同一个功能代码放到一起,不同功能分开,通过setup方法统一调用。适合使用Vue构建完整单页应用,并使用单文件组件。
使用Vue
推荐IDE:
VSCode + Volar
WebStorm
使用Vue有两种方式:
直接引入:
创建Vue应用:创建的项目使用基于 Vite 的构建设置,并允许使用 Vue 的单文件组件 (SFC)
#安装并执行 create-vue,它是 Vue 官方的项目脚手架工具
npm create vue@latest
cd <your-project-name>
#安装依赖
npm install
#启动开发服务器
npm run dev
#打包
npm run build
工程目录:
+dist  打包生成的文件目录
+node_modules  安装的依赖包
+public 公共资源
  -favicon.ico  网站图标
+src  开发目录
  +assets  静态资源,图片、CSS等
  +components  所有Vue组件
  -App.vue  Vue根组件
  -main.js  入口js文件
-index.html  网站入口
-jsconfig.json  js相关配置
-package.json  项目配置和项目依赖
-vite.config.ts  构建相关配置
单文件组件(SFC):
即 *.vue 文件,将一个 Vue 组件的逻辑(JavaScript)、模板(HTML)与样式(CSS)封装在单个文件中。
<script setup>
import { ref } from 'vue'
const greeting = ref('Hello World!')
script>

<template>
  <p class="greeting">{{ greeting }}p>
template>

<style>
.greeting {
  color: red;
  font-weight: bold;
}
style>
Vue语法基础
html:
<div id="app">
  <button @click="count++">{{ count }}button>
  <span>{{ myCount }}span>
div>
js:
import { createApp } from 'vue'
const app = createApp({
  data() {
    return {
      count: 0
    }
  }
  mounted() {
    console.log(this.count)
    this.count = 2
  }
  computed: {
    myCount() {
      return count + 5
    }
  }
})
app.mount('#app')
- createApp()传入根组件,组件可以有子组件。
- mount()挂载到DOM元素中,将组件中的内容渲染出来。
当根组件没有设置 template 选项时,Vue 将自动使用容器的 innerHTML 作为模板。 - data() 选项声明组件的响应式状态,返回对象的属性会被代理到组件实例(即this)上。
- mounted()为挂载时的回调。
- computed声明了计算属性,myCount的值会随着count的改变同步更新。
- @click 是Vue的事件处理,等价于 v-on:click
数据绑定:
-
文本插值:
{{ count }},将count解释为纯文本 -
插入HTML:
-
绑定attribute:
v-bind支持简写,:id="dynamicId"等价于v-bind:id="dynamicId"
若绑定的名字相同,可进一步简写,:id等价于:id="id"
绑定多个attribute:
const objectOfAttrs = {
  id: 'container',
  class: 'wrapper'
}
<div v-bind="objectOfAttrs">div>
条件渲染:
v-if 指令用于条件性地渲染一块内容。指令的表达式返回真值时才被渲染。
<div v-if="type === 'A'">
  A
div>
<div v-else-if="type === 'B'">
  B
div>
<div v-else>
  Not A/B
div>
v-show 则仅切换元素的 display 属性。
<h1 v-show="ok">Hello!h1>
列表渲染:
v-for 指令基于一个数组来渲染一个列表。
<li v-for="(item, index) in items">
  {{ index }} - {{ item.message }}
li>
其中 items 是源数据的数组,而 item 是迭代项的别名。index是位置索引,可省略。
v-for 可以遍历对象的属性。也可以渲染范围值,初始值为1。
<li v-for="(value, key) in myObject">
  {{ key }}: {{ value }}
li>
<span v-for="n in 10">{{ n }}span>
表单输入绑定:
将表单输入的值同步给 JavaScript 中的变量。
<input v-model="userName">
Element UI
Element是基于Vue的UI组件库。其中Element Plus基于Vue3,使用了TypeScript+组合式API。
Element提供按钮、表单、表格、导航菜单等一系列组件,易于使用、风格统一、交互性良好。
安装:npm install element-plus --save
Vue3 + Element Plus 实现动态表格

首先创建Vue应用并安装Element Plus。
使用Vue单文件组件、组合式API。
Element还可以方便的实现表格排序、筛选、展开等功能。
main.js
import {createApp} from 'vue';
import ElementPlus from 'element-plus';
import 'element-plus/dist/index.css';
import App from './App.vue';

const app = createApp(App);
app.use(ElementPlus);
app.mount('#app');
App.vue
<template>
  <el-button @click="showDialog = true">添加用户</el-button>

  <el-dialog title="用户信息" v-model="showDialog">
    <el-form :model="userForm">
      <el-form-item label="名字">
        <el-input v-model="userForm.name"></el-input>
      </el-form-item>
      <el-form-item label="年龄">
        <el-input v-model.number="userForm.age"></el-input>
      </el-form-item>
      <el-form-item label="性别">
        <el-select v-model="userForm.gender">
          <el-option label="男" value="男"></el-option>
          <el-option label="女" value="女"></el-option>
        </el-select>
      </el-form-item>
    </el-form>
    <template #footer>
      <el-button @click="showDialog = false">取消</el-button>
      <el-button type="primary" @click="submitUser">提交</el-button>
    </template>
  </el-dialog>

  <el-table :data="users" style="width: 100%">
    <el-table-column prop="id" label="ID"></el-table-column>
    <el-table-column prop="name" label="名字"></el-table-column>
    <el-table-column prop="age" label="年龄"></el-table-column>
    <el-table-column prop="gender" label="性别"></el-table-column>
    <el-table-column label="操作">
      <template #default="scope">
        <el-button @click="editUser(scope.row)">修改</el-button>
        <el-button type="danger" @click="deleteUser(scope.$index)">删除</el-button>
      </template>
    </el-table-column>
  </el-table>
</template>

<script setup lang="ts">
import {ref} from 'vue';
import {ElButton, ElDialog, ElForm, ElFormItem, ElInput, ElSelect, ElOption, ElMessage} from 'element-plus';

const showDialog = ref(false);
const userForm = ref({
  id: 0,
  name: '',
  age: 0,
  gender: '男',
});
const users = ref([]);
const currentId = ref(0);
const editingIndex = ref(0);

function clearForm() {
  userForm.value = {id: null, name: '', age: 0, gender: '男'};
  editingIndex.value = null;
}

function submitUser() {
  if (!userForm.value.name || !userForm.value.age) {
    ElMessage.error('请填写完整的用户信息!');
    return;
  }
  if (editingIndex.value !== null) {
    // Update existing user
    users.value[editingIndex.value] = {...userForm.value};
  } else {
    // Add new user
    currentId.value += 1;
    userForm.value.id = currentId.value;
    users.value.push({...userForm.value});
  }
  showDialog.value = false;
  clearForm();
}

function deleteUser(index) {
  users.value.splice(index, 1);
  ElMessage.success('用户已删除!');
}

function editUser(user) {
  editingIndex.value = users.value.indexOf(user);
  userForm.value = {...user};
  showDialog.value = true;
}
</script>
其他常用js、css库
- Bootstrap:提供了丰富的预定义样式和组件,便于开发响应式布局、移动端优先的项目
- React:与Vue类似,是一个MVVM框架,用于构建大型、高效的Web应用
- Underscore / Lodash:两者都提供了大量的JavaScript工具函数(如map、reduce、filter等)
- Popper.js:用于处理定位问题(如工具提示、弹出框的定位)
- Moment.js:用于处理日期和时间
- Animate.css:包含一系列动画效果的CSS库 (如弹跳、闪烁、渐变、淡入淡出等)
- Modernizr:用于检测浏览器的HTML5和CSS3支持情况
- Polyfill.io:使旧浏览器支持现代网页特性
其他
- Electron:利用Web前端技术进行桌面应用开发,支持Windows、Linux、Max平台。2023新版QQ就是用的Electron。
- React Native:使用JavaScript并借助React库进行移动应用开发,支持安卓、iOS、微信小程序等。使用React Native开发的应用有Facebook、Instagram等。
- H5游戏:渲染技术使用Canvas或WebGL(Three.js是基于WebGL的3D渲染库),网络通信使用WebSocket。可使用Egret、Cocos2d-js、Phaser、Babylon等H5游戏引擎。