cmu自主探索局部规划器+habitat+matterport语义数据集,实现仿真环境下的实时语义分割
0.cmu自主探索交流群二维码,为了方便大家学习交流,楼主建了一个群,大家有需要可以点击链接扫码进入
cmu自主探索交流群 https://bbs.csdn.net/topics/607481475?utm_medium=notify.im.community_cloud.a&username=ws107845f
一、结果展示
该篇文章是在cmu的几个大佬开源的算法上做的一定程度上的延伸,首先感谢大佬们的开源让我等菜鸡能够得到进一步的学习。
废话不多说,我们先来看看最终能实现的效果。以下是发布在b站上的视频,大家可以自行前往观看。(大家记得一键三连噢)cmu自主探索局部规划器+habitat+matterport语义数据集https://www.bilibili.com/video/BV16t4y147wB?vd_source=6b61c5366e2afec5099793eed993388b#reply121334070848
二、前期准备
1.cmu自主探索开源环境及代码(这个环境下包括了全局、局部规划器,以及大佬们自行建立的部分仿真环境),以下我贴出这个环境的下载链接,大佬们也很贴心的写了下载安装教程,大家不会的话可以留言。注意:这个环境需要在18.04或者20.04的ubuntu系统下才能运行。
cmu自主探索开源环境下载https://www.cmu-exploration.com/
如下图,按照链接里的教程去下载安装即可,如果无法访问,准备一个,科学上网。
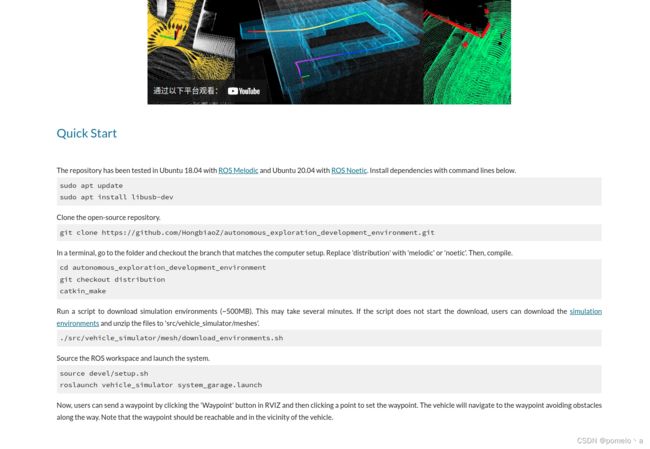
现在如果能顺利下载安装,并运行出演示视频中的效果的话,我们的第一步就算完成了。
这里我贴一个别人写的下载安装链接(如果官网无法访问,可以查看下面这个链接)
机器人自主导航从零开始第五步———CMU自主探索开发环境的介绍、安装与使用https://blog.csdn.net/qq_59475883/article/details/122658575
2、matterport3d仿真环境的下载和导入。(这步很坑,需要联系matterport官方索要下载链接,而且需要准备梯子,我把我收到的邮件内容中的下载脚本贴出来,看大家能否下载,这样就不用给官方发邮件了)
①:这是别人写的一个下载教程,但是不够详细,我结合这位大佬的再写一个详细的版本。
cmu自主探索matterport3d环境导入https://blog.csdn.net/weixin_39977764/article/details/124210235
②:我们进入第一步中下载好的cmu开源环境,这里我们需要切换到noetic-matterport分支编译、因为我使用的是noetic。
cd autonomous_exploration_development_environment
git checkout noetic-matterport && catkin_make
这时便切换到了matterport分支,现在我们来下载matterport3d仿真环境并将其导入。
在别的地方新建一个matterpord3d文件夹,该文件夹里面新建src文件夹、和一个python程序matterport3d.py,用于存放下载数据及脚本代码,并将以下代码复制进matterport3d.py。我们将通过该py文件来下载数据。
#!/usr/bin/env python
# Downloads MP public data release
# Run with ./download_mp.py (or python download_mp.py on Windows)
# -*- coding: utf-8 -*-
import argparse
import collections
import os
import tempfile
import urllib

BASE_URL = 'http://kaldir.vc.in.tum.de/matterport/'
RELEASE = 'v1/scans'
RELEASE_TASKS = 'v1/tasks/'
RELEASE_SIZE = '1.3TB'
TOS_URL = BASE_URL + 'MP_TOS.pdf'
FILETYPES = [
    'cameras',
    'matterport_camera_intrinsics',
    'matterport_camera_poses',
    'matterport_color_images',
    'matterport_depth_images',
    'matterport_hdr_images',
    'matterport_mesh',
    'matterport_skybox_images',
    'undistorted_camera_parameters',
    'undistorted_color_images',
    'undistorted_depth_images',
    'undistorted_normal_images',
    'house_segmentations',
    'region_segmentations',
    'image_overlap_data',
    'poisson_meshes',
    'sens'
]
TASK_FILES = {
    'keypoint_matching_data': ['keypoint_matching/data.zip'],
    'keypoint_matching_models': ['keypoint_matching/models.zip'],
    'surface_normal_data': ['surface_normal/data_list.zip'],
    'surface_normal_models': ['surface_normal/models.zip'],
    'region_classification_data': ['region_classification/data.zip'],
    'region_classification_models': ['region_classification/models.zip'],
    'semantic_voxel_label_data': ['semantic_voxel_label/data.zip'],
    'semantic_voxel_label_models': ['semantic_voxel_label/models.zip'],
    'minos': ['mp3d_minos.zip'],
    'gibson': ['mp3d_for_gibson.tar.gz'],
    'habitat': ['mp3d_habitat.zip'],
    'pixelsynth': ['mp3d_pixelsynth.zip'],
    'igibson': ['mp3d_for_igibson.zip'],
    'mp360': ['mp3d_360/data_00.zip', 'mp3d_360/data_01.zip', 'mp3d_360/data_02.zip', 'mp3d_360/data_03.zip', 'mp3d_360/data_04.zip', 'mp3d_360/data_05.zip', 'mp3d_360/data_06.zip']
}


def get_release_scans(release_file):
    scan_lines = urllib.urlopen(release_file)
    scans = []
    for scan_line in scan_lines:
        scan_id = scan_line.rstrip('\n')
        scans.append(scan_id)
    return scans


def download_release(release_scans, out_dir, file_types):
    print('Downloading MP release to ' + out_dir + '...')
    for scan_id in release_scans:
        scan_out_dir = os.path.join(out_dir, scan_id)
        download_scan(scan_id, scan_out_dir, file_types)
    print('Downloaded MP release.')


def download_file(url, out_file):
    out_dir = os.path.dirname(out_file)
    if not os.path.isfile(out_file):
        print '\t' + url + ' > ' + out_file
        fh, out_file_tmp = tempfile.mkstemp(dir=out_dir)
        f = os.fdopen(fh, 'w')
        f.close()
        urllib.urlretrieve(url, out_file_tmp)
        os.rename(out_file_tmp, out_file)
    else:
        print('WARNING: skipping download of existing file ' + out_file)

def download_scan(scan_id, out_dir, file_types):
    print('Downloading MP scan ' + scan_id + ' ...')
    if not os.path.isdir(out_dir):
        os.makedirs(out_dir)
    for ft in file_types:
        url = BASE_URL + RELEASE + '/' + scan_id + '/' + ft + '.zip'
        out_file = out_dir + '/' + ft + '.zip'
        download_file(url, out_file)
    print('Downloaded scan ' + scan_id)


def download_task_data(task_data, out_dir):
    print('Downloading MP task data for ' + str(task_data) + ' ...')
    for task_data_id in task_data:
        if task_data_id in TASK_FILES:
            file = TASK_FILES[task_data_id]
            for filepart in file:
                url = BASE_URL + RELEASE_TASKS + '/' + filepart
                localpath = os.path.join(out_dir, filepart)
                localdir = os.path.dirname(localpath)
                if not os.path.isdir(localdir):
                    os.makedirs(localdir)
                    download_file(url, localpath)
                    print('Downloaded task data ' + task_data_id)


def main():
    parser = argparse.ArgumentParser(description=
        '''
        Downloads MP public data release.
        Example invocation:
          python download_mp.py -o base_dir --id ALL --type object_segmentations --task_data semantic_voxel_label_data semantic_voxel_label_models
        The -o argument is required and specifies the base_dir local directory.
        After download base_dir/v1/scans is populated with scan data, and base_dir/v1/tasks is populated with task data.
        Unzip scan files from base_dir/v1/scans and task files from base_dir/v1/tasks/task_name.
        The --type argument is optional (all data types are downloaded if unspecified).
        The --id ALL argument will download all house data. Use --id house_id to download specific house data.
        The --task_data argument is optional and will download task data and model files.
        ''',
        formatter_class=argparse.RawTextHelpFormatter)
    parser.add_argument('-o', '--out_dir', required=True, help='directory in which to download')
    parser.add_argument('--task_data', default=[], nargs='+', help='task data files to download. Any of: ' + ','.join(TASK_FILES.keys()))
    parser.add_argument('--id', default='ALL', help='specific scan id to download or ALL to download entire dataset')
    parser.add_argument('--type', nargs='+', help='specific file types to download. Any of: ' + ','.join(FILETYPES))
    args = parser.parse_args()

    print('By pressing any key to continue you confirm that you have agreed to the MP terms of use as described at:')
    print(TOS_URL)
    print('***')
    print('Press any key to continue, or CTRL-C to exit.')
    key = raw_input('')

    release_file = BASE_URL + RELEASE + '.txt'
    release_scans = get_release_scans(release_file)
    file_types = FILETYPES

    # download task data
    if args.task_data:
        if set(args.task_data) & set(TASK_FILES.keys()):  # download task data
            out_dir = os.path.join(args.out_dir, RELEASE_TASKS)
            download_task_data(args.task_data, out_dir)
        else:
            print('ERROR: Unrecognized task data id: ' + args.task_data)
        print('Done downloading task_data for ' + str(args.task_data))
        key = raw_input('Press any key to continue on to main dataset download, or CTRL-C to exit.')

    # download specific file types?
    if args.type:
        if not set(args.type) & set(FILETYPES):
            print('ERROR: Invalid file type: ' + file_type)
            return
        file_types = args.type

    if args.id and args.id != 'ALL':  # download single scan
        scan_id = args.id
        if scan_id not in release_scans:
            print('ERROR: Invalid scan id: ' + scan_id)
        else:
            out_dir = os.path.join(args.out_dir, RELEASE, scan_id)
            download_scan(scan_id, out_dir, file_types)
    elif 'minos' not in args.task_data and args.id == 'ALL' or args.id == 'all':  # download entire release
        if len(file_types) == len(FILETYPES):
            print('WARNING: You are downloading the entire MP release which requires ' + RELEASE_SIZE + ' of space.')
        else:
            print('WARNING: You are downloading all MP scans of type ' + file_types[0])
        print('Note that existing scan directories will be skipped. Delete partially downloaded directories to re-download.')
        print('***')
        print('Press any key to continue, or CTRL-C to exit.')
        key = raw_input('')
        out_dir = os.path.join(args.out_dir, RELEASE)
        download_release(release_scans, out_dir, file_types)

if __name__ == "__main__": main()

建好的文件夹如上。这个代码主要是用python2编写的,python3运行会报错,所以我们最好用conda建立一个新环境。(没有anaconda的话安装一个,我们之后也会用到,安装链接)
Ubuntu下安装Anaconda的步骤https://zhuanlan.zhihu.com/p/426655323安装好后直接建立一个新环境。按照下面命令
conda create -n python2 python=2.7
然后
conda activate python2
接下来运行matterport3d.py,以ID:17DRP5sb8fy为例,我们需要下载它的house_segmentations.zip和matterport_mesh.zip。按照以下命令下载即可。
python matterport3d.py -o src --id 17DRP5sb8fy --type house_segmentations matterport_mesh
下载结束后,得到两个zip,解压,如下图。

提示:我们需要做点云转换,所以需要Meshlab,我们进入ubuntu软件中心下载安装即可,如下图。
之后打开meshlab,并选择file->Import Mesh,将matterport_mesh下的obj文件打开。之后在file->export_mesh_as,将文件保存matterport.dae,如下图
点击导出以后会有一堆文件,将这些文件一起copy到'src/vehicle_simulator/mesh/matterport/meshes',如图
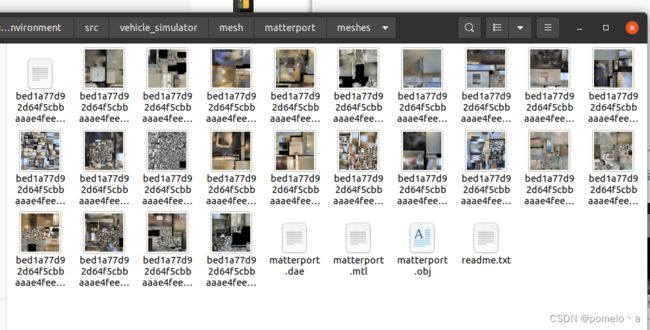
然后解压house_segmentations.zip,把里面的.ply文件重命名为pointcloud.ply,放到'src/vehicle_simulator/mesh/matterport/preview'下。把里面的.house文件重命名为matterport.house,并放在 'src/vehicle_simulator/mesh/matterport/
segmentations'下,如下图。

最后我们
cd autonomous_exploration_development_environment
source /devel/setup.bash
roslaunch vehicle_simulator system_matterport.launch
即可打开在rviz里打开导入的matterport仿真环境,至此第二步就完成了。 效果如图所示。
三、ai habitat下载安装
1.首先利用conda创建一个habitat的环境,按如下命令。
conda create -n habitat python=3.8 cmake=3.14.0
conda activate habitat
2.接下来我们安装0.2.1版本的habitat-sim,按照如下命令。(这步需要科学上网,科学上网不行的话就连手机热点,多尝试)
conda install habitat-sim=0.2.1 -c conda-forge -c aihabitat
安装好habitat-sim后,我们需要再从matterport.py中下载该仿真环境下对应的语义数据集。
3.新建一个终端,激活python2环境。
conda activate python2
然后运行
python matterport3d.py --task habitat -o dir
下载结束后会得到一个mp3d_habitat.zip,这个zip有点大,需要下载很久,我这边提供了其中一个17DRP5sb8fy放进了百度网盘,供大家下载解压,17DRP5sb8fy场景语义下载http://xn--gzu811i//pan.baidu.com/s/1VFLp_8r8AuQkV1V7m8mGrQ%20%E6%8F%90%E5%8F%96%E7%A0%81:%20po5i
下载解压后将该文件夹中的所有文件复制进auto_exploration/autonomous_exploration_development_environment/src/segmentation_proc/scripts/extracted_mp3d_habitat_dir,需要在scripts新建一个extracted_mp3d_habitat_dir文件夹。
4.接下来需要在habitat环境中安装ros-noetic,以运行例程。激活habitat,使用如下命令安装
conda activate habitat
conda install -c conda-forge -c robostack ros-noetic-desktop
安装完毕后我们即可运行下一步,以得到视频中的效果。
5.现在打开两个终端,如下图,分别进入到/autonomous_exploration_development_environment和autonomous_exploration_development_environment/src/segmentation_proc/scripts路径下,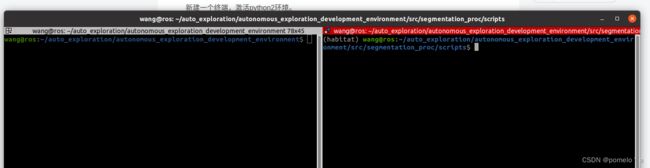
左边在基础环境下,输入以下命令,打开第二步中的环境
source /devel/setup.bash
roslaunch vehicle_simulator system_matterport.launch
右边进入habitat环境,输入以下命令,打开habitat代码处理后并发布的语义图像。
python habitat_online_v0.2.1.py --scene extracted_mp3d_habitat_dir/17DRP5sb8fy.glb
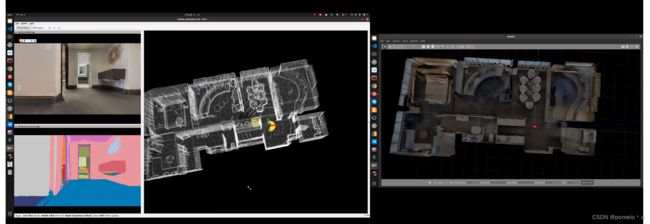
这时可以看到如下图所示的界面,
在左上角。display里勾选HabitatSemanticImage和HabitatRGBImage即可显示语义图像和RGB图像。
最后,我们需要通过添加一段代码,来知道在每帧图像下,都存在哪些物体以及这些物体与空间的所属关系,如下我终端里输出的信息。

6.现在我们找autonomous_exploration_development_environment/src/segmentation_proc/scripts路径下的habitat_online_v0.2.1.py文件,找到第231行observations = self._sim.step("move_forward")。在这之后插入以下代码
            scene = self._sim.semantic_scene #获取语义场景信息
            semantic_obs = observations["semantic_sensor"]#获取语义值
            counts = np.bincount(semantic_obs.flatten())# 使用flatten()函数将图像二维矩阵转化为一维数组,然后使用np.bincount计算某个值在整个数组中的次数
            total_count = np.sum(counts)
            print("该帧图像语义数据信息如下")
            for object_i, count in enumerate(counts): #输出某帧语义图像包含物体的id
                sem_obj = scene.objects[object_i]
                cat = sem_obj.category.name()
                center = sem_obj.aabb.center
                size = sem_obj.aabb.sizes
                pixel_ratio = round(count / total_count , 3)
                if pixel_ratio > 0.01 :
                    print(f"obj_id:{sem_obj.id},category:{cat}, pixel_ratio:{pixel_ratio},center:{center},size:{size}")
并将255行的print("Publishing at time: " + str(self.time))注释掉(影响显示)
保存之后重新运行第5步,即可得到视频里的效果。
四、结尾
差不多就是这些内容了,有关habitat的处理以及代码这里我就不解释了,大家可以自行百度ai habitat教程去进行学习,如果有兴趣我之后再出单独的使用habitat的教程。