macOS-appium2.x 安装全流程(ios/android--python)
目录
共同安装
一 . (android)前提:
二 . (ios)前提
三 . appium安装
四 . 配置webdriveragent(连接ios真机设备)
五 . 连接iOS设备
六 . 开启(ios)自动化脚本调试
有关设备信息的常用命令如下:
七 . 完整的启动应用代码(ios真机)
八 . 查看ios/android设备列表
九 . ios真机和虚拟机的区别
有关 appium2.x的官方文档
共同安装
0. 安装 python( 如果pycharm版本是 2019 的话,python版本最好小于 3.10)
1.安装 java(我的是 11) ,安装 jdk
2.安装homebrew / 安装git
3.安装 xcode(根据 macOS版本)
4. 安装 node和npm
brew install node
brew install npm
5. selenium和ChromeDriver安装
(1) 安装 selenium
pip3 install selenium(2)安装chrome浏览器驱动
chromedriver与chrome最新版本对应表
(mac)无法打开“chromedriver”,因为无法验证开发者
(3)测试驱动是否正常,如果打开浏览器网页,则正常
from selenium import webdriver
browser = webdriver.Chrome()
browser.get('https://www.baidu.com')
一 . (android)前提:
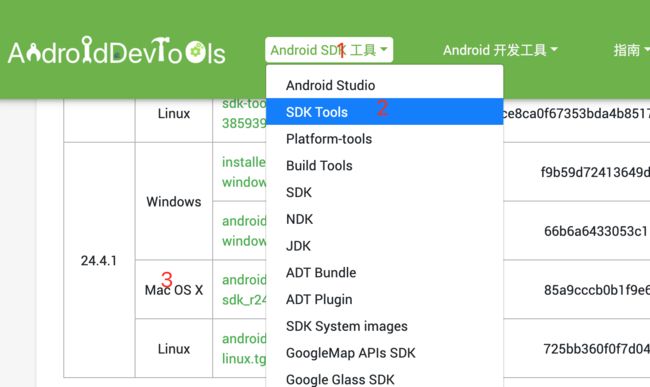
1.安装android sdk
官网
将下载的 Android SDK 解压,将得到如下目录。(具体安装步骤可以阅读 SDK Readme.txt)
阅读 SDK Readme.txt文档得知:
In order to start developing applications, you must install the Platform-tools
and at least one version of the Android platform, using the SDK Manager.
安装platform-tools和至少一个Android platform
先cd到android-sdk-macosx文件夹下:
再输入命令:
tools/android update sdk --no-ui安装完成
2. 配置环境变量:(编辑及保存方法)
vim ./.bash_profile(或者vim ./.zshrc)--根据 shell类型。进入到vim编辑器,添加以下部分
export ANDROID_HOME='/Users/mac/Documents/android-sdk-macosx'
export PATH=${PATH}:$ANDROID_HOME/tools:$ANDROID_HOME/platform-tools
export AAPT_HOME=${PATH}:$ANDROID_HOME/build-tools/30.0.0-preview
export PATH=${AAPT_HOME}
保存: source ~/.bash_profile
或者保存:source ~/.zshrc
验证是否配置成功
adb version
3. 安装 UiAutomator2 驱动程序
npm install appium-uiautomator2-driver二 . (ios)前提
1.以下相当于 android 的 adb,是 Appium 底层用到的工具之一,用于获取 iOS 设备信息
(1)安装libimobiledevice.使用文档链接:https://zhuanlan.zhihu.com/p/347635173
brew install libimobiledevice --HEADbrew reinstall libimobiledevice # 重新安装
(2)安装ideviceinstaller
主要用于获取设备udid、安装app、卸载app、获取bundleid
brew install ideviceinstaller # 用于查看bundleid
brew reinstall ideviceinstaller # 重新安装
更多 ideviceinstaller信息
2.安装carthage:类似于 java 的 maven,项目依赖管理,主要是 WebDriverAgent 使用
brew install carthage如果要卸载
brew reinstall ideviceinstaller
3.安装ios-deploy:查看设备应用
ios-deploy 不依赖于XCODE,进行安装和调试IOS应用程序
npm install ios-deploy
brew install ios-deploy # 安装命令
brew reinstall ios-deploy # 重新安装
brew upgrade ios-deploy # 更新命令
常用命令如下:
ios-deploy -c # 查看当前链接的设备
ios-deploy --[xxx.app] # 安装APP
ios-deploy --id [udid] --uninstall_only --bundle_id [bundleId] # 卸载应用
ios-deploy --id [udid] --list_bundle_id # 查看所有应用
ios-deploy --id [udid] --exists --bundle_id # 查看应用是否安装
4.安装ios_webkit_debug_proxy(选)
Appium使用ios_webkit_debug_proxy这个工具在真机上访问web view。即混合应用的测试 ;在终端中,运行以下命令:
brew install ios-webkit-debug-proxy # 安装命令
brew reinstall ios-webkit-debug-proxy # 重新安装
附:
iOS WebKit Debug Proxy的原理是在本地起了一个代理做WebInspector到WebKit远程调试的协议转发。
5.安装authroize-ios(选)
iOS 授权工具,主要用于模拟器中一些权限的授权;
sudo cnpm install -g authroze-iossudo authroze-iosnpm install -g authroze-iossudo authroze-ios sudo authroze-ios
6.安装Command Line Tools(正常安装了新版的xcode,都会安装Command Line Tools)
安装方法:
xcode-select --install检验 Command Line Tools 是否安装成功
方法一:
方法二:
打开Xcode,创建一个新的项目,在OSX下面选择Application,如果右侧出现Command line tool图 标,表示已经安装成功。
方法三:
打开XCode 新建工程,如果安装了,在新建窗口可以看到
![]()
(3)安装完成后,在终端中输入以下命令来查看安装版本:
xcodebuild -version
附录:
xcrun simctl list | grep '(Booted)'  # 查看已启动的模拟器udid
instruments -s devices      # 列出所有设备,包括真机、模拟器、mac
# 录像功能xrecord --quicktime --list xrecord --quicktime --name="iPhone" --out="/Users/yong/video/iphone.mp4" --force
三 . appium安装
参考:ios appium安装
1. 安装Appium
如果已安装要更新(appium1.x升级到2.x版本)
sudo cnpm install -g appium@next如果要卸载
npm uninstall -g appium
新安装:先用
npm -g install appium@1.22.2/appium@2.0.1如果不行,再用以下安装
sudo cnpm -g install appium@1.22.2/appium@2.0.1- 先安装cnpm,如果已安装,查看版本cnpm -v
安装:需要安装权限
sudo npm install -g cnpm --registry=https://registry.npm.taobao.org2.安装驱动
安装xcuitest驱动 和uiautomator2驱动
appium driver install uiautomator2     #安装最新版uiautomator驱动
appium driver install xcuitest@4.12.2  #安装特定版本4.12.2的xcuitest驱动或者 4.11.1
appium driver install --source=npm appium-xcuitest-driver[@]   #从npm安装xcuitest驱动
appium driver install --source=local /Users/me/sources/appium-xcuitest-driver  #安装本地的xcuitest驱动
appium driver install --source=github --package=appium-xcuitest-driver appium/appium-xcuitest-driver #安装来自github来源的xcuitest驱动
appium driver list --installed #查询已经安装的驱动
appium driver update xcuitest #更新升级驱动
appium driver uninstall xcuitest #卸载xcuitest驱动 appium driver install xcuitest@4.11.1或者
npm install appium-xcuitest-driver@4.11.1或者
sudo cnpm install appium-xcuitest-driver@4.11.13. (1)安装appium-doctor,安装Appium Client
appium-doctor用于验证appium环境是否OK(以下两者之一即可)
npm install appium-doctornpm install -g appium-doctorpip3 install Appium-Python-Client安装指定版本
pip3 install Appium-Python-Client==2.8.0(2) 安装Appium Desktop
访问地址https://github.com/appium/appium-desktop/releases/tag/v1.22.0选择下载
或者直接克隆
git clone https://github.com/appium/appium-inspector 查看位置/Users/mac/appium-inspector
(3) 验证appium环境
appium-doctor如果报错:zsh: command not found: appium-doctor
可能是权限的问题,使用以下指令安装 appium-doctor
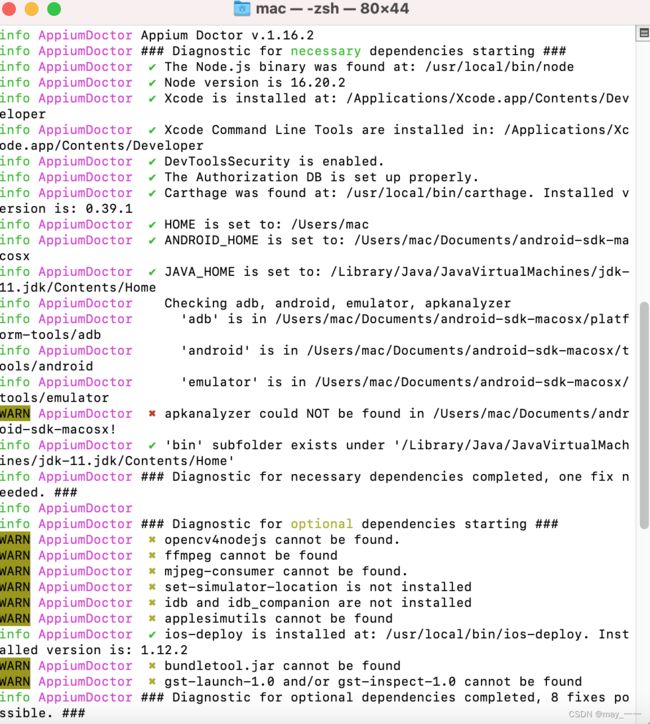
sudo cnpm install -g appium-doctor如果报错
![]()
WARN AppiumDoctor ✖ apkanalyzer could NOT be found in /Users/mac/Documents/android-sdk-macosx!
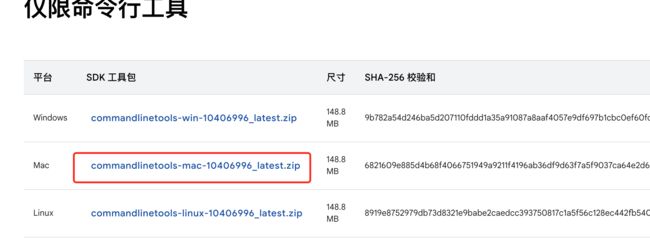
安装commandlinetools
从Download Android Studio & App Tools - Android Developers 拉到下面找到仅限命令行工具
解压后存放到android-sdk-macosx下面(/Users/mac/Documents/android-sdk-macosx)
再次运行appium-doctor,还是有报错(不管了!)
4. 检查appium ios环境
appium-doctor --ios执行结果中没有error即可
验证版本:
appium -v
-
启动appium
四 . 配置webdriveragent(连接ios真机设备)
1. 进入appium的appium-webdriveragent
(1)安装目录
不同的版本路径各不相同
命令行的安装1.x路径
/usr/local/lib/node_modules/appium/node_modules/appium-webdriveragentappium2.x版本
/Users/mac/.appium/node_modules/appium-xcuitest-driver/node_modules/appium-webdriveragent(2)重新下载最新的appium-WebDriverAgent,替换appium自带的WebDriverAgent
WebDriverAgent使用appium修改版,这样能满足iOS高版本测试需求
有三种获取方式:
- 获取后替换原来的WebDriverAgent
法1.直接克隆
git clone https://github.com/appium/WebDriverAgent或者
git clone https://github.com/facebook/WebDriverAgent.git克隆后一般在本地的位置是 /Users/mac/WebDriverAgent
法2.下载地址:https://github.com/appium/WebDriverAgent/releases/tag/v4.9.1
法3.网盘链接: https://pan.baidu.com/s/1vTczVLvLy9-USb1LuWkwrw?pwd=w7ee 提取码: w7ee
(3)进入WebDriverAgent路径,执行下面指令(有的版本不需要)
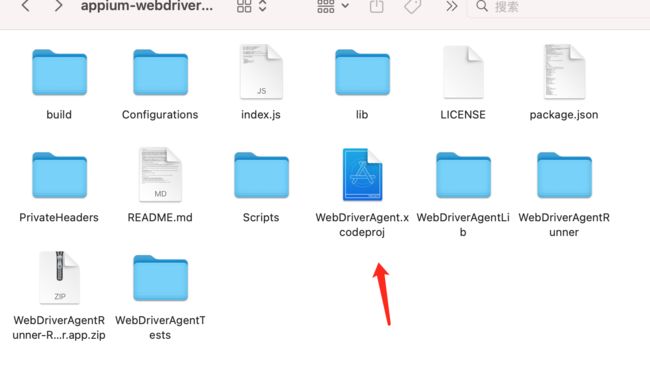
./Scripts/bootstrap.sh2.使用xcode方式打开WebDriverAgent.xcodeproj文件
双击打开
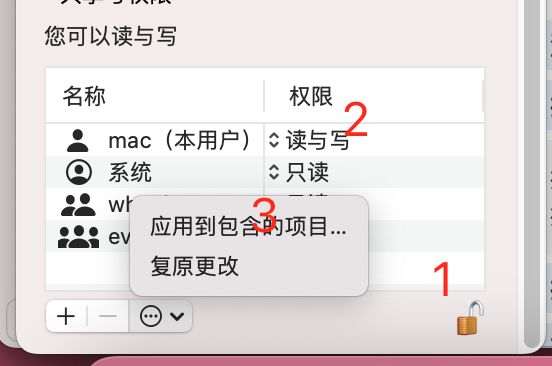
如果提示权限问题,可以操作如下
a.修改xcode的权限 b.修改打开文件所在文件夹的权限(增加读写,且应用到包含的项目)
3. 配置webdriveragent信息
(1)在WebDdriverAgentLib->Signing & Capabilities 配置Team 和 Bundle Identifier
Team:需要认证一个apple ID 账号即可,bundle id 相当于一个App的唯一识别号,可以随意更改,只要确认不会有重复即可
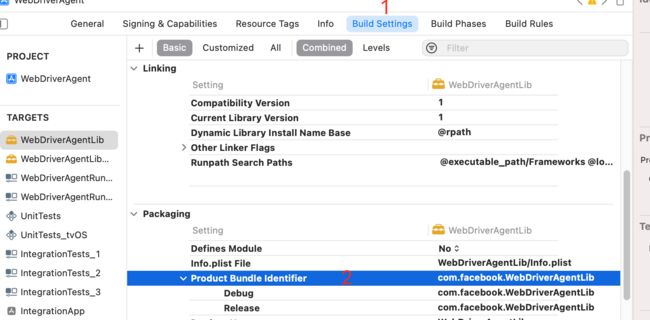
(2) WebDdriverAgentLib-->Build settings 这里也需要更改bundle id
(3)在WebDdriverAgentRunner->Signing & Capabilities 配置Team 和 Bundle Identifier和上面一致即可
(4) WebDdriverAgentRunner-->Build settings 这里也需要更改bundle id
五 . 连接iOS设备
(1) 首先需要将Product的Scheme选择为:WebDriverAgentRunner
(2)这里需要将连接iOS设备的版本号填入此处
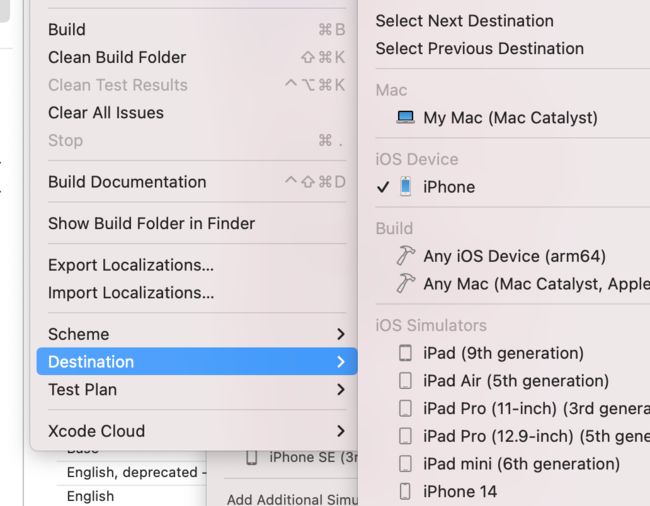
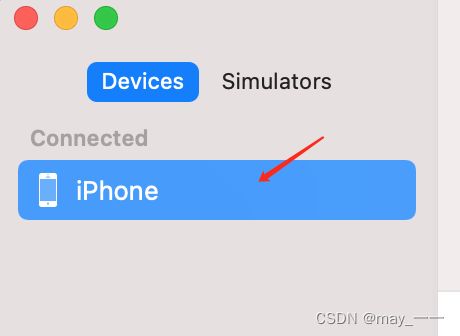
(3)连接设备后,Product的Destination下可以看到连接的设备
a . 如果提示Unsupported OS version或者could not locate device support files或者faile to prepare the device for development
下载DeviceSupport 。放到目录
/Applications/Xcode.app/Contents/Developer/Platforms/iPhoneOS.platform/DeviceSupport
各版本 DeviceSupport 下载地址1 下载地址 2 下载地址 3 下载地址 4
如果还不行的话,添加后,可以配置Deployment Target
b . 如果提示Developer Mode DIsabled,表示设备的开发者模式没有打开
IOS开发之——Developer Mode DIsabled
(4) iproxy是usbmuxd附带的一个小工具,它的作用是将设备的某个端口映射到电脑的某个端口。
mac下可以通过brew安装
brew install usbmuxdiproxy 8100 8100 意思就是将手机的8100端口,映射到电脑的8100端口上。这样我们就能通过访问电脑的8100端口来访问到手机了。
或者安装 tidevice
pip3 install -U tidevice步骤参考:iOS真机安装WebDriverAgent图文详解-腾讯云开发者社区-腾讯云
(5)构建WebDriverAgentRunner,点击product ->Test方式运行
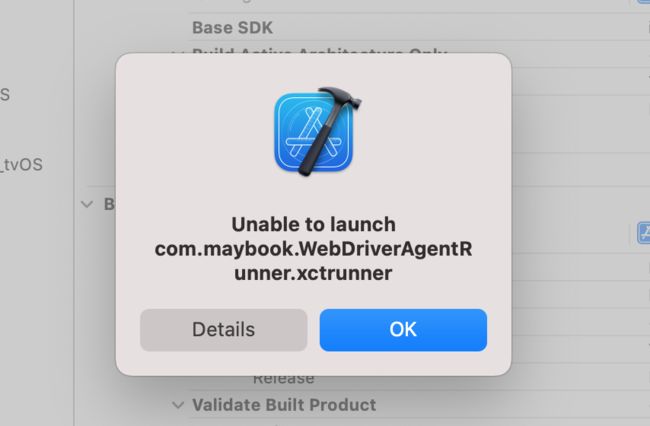
(6)第一次进行构建后,会报如下错误,需要在连接的ios设备中:设置->通用->描述文件与设备管理->信任当前的开发者APP(WebDriverAgent),然后再重新Test即可
如果再次报错:Lost connection to DTServiceHub
可能手机连接掉线了,确认设备连接正常
(7)编译构建成功:Build Succeeded
一切正常的话,手机/模拟器上会出现一个无图标的 WebDriverAgent 应用,启动之后,马上又返回到桌面
控制台输出:
(8)启动代理(这只是为了查看设备信息,查看后,记得关闭终端窗口后再运行脚本)
终端运行命令
iproxy 8100 8100
或者
tidevice relay 8100 8100
有些国产的iPhone机器通过手机的IP和端口还不能访问,此时需要将手机的端口转发到Mac上。
将手机的8100端口,映射到电脑的8100端口上。这样我们就能通过访问电脑的8100端口来访问到手机了。
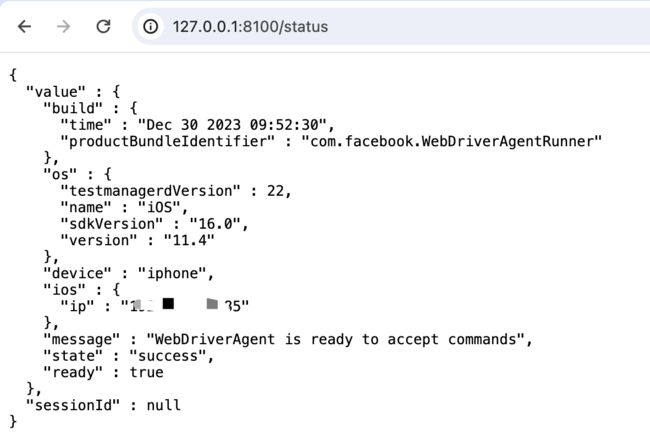
(9)查看iOS设备连接状态
浏览器输入url:http://127.0.0.1:8100/status
http://127.0.0.1:8100/inspector
可以查看图层
(10)通过AirtestIDE连接设备(应用安装)。该步骤也可不操作,不影响!!!
(11)ios设备端的“设置”--“开发者”,记得打开UI Automation
六 . 开启(ios)自动化脚本调试
有关设备信息的常用命令如下:
查看当前所连接的设备
idevice_id -l # 显示当前所连接设备的 udid
instruments -s devices # 列出所有设备,包括真机、模拟器、mac
安装应用
ideviceinstaller -u [udid] -i [xxx.ipa] # xxx.ipa 为应用在本地的路径
卸载应用
ideviceinstaller -u [udid] -U [bundleId]
查看设备已安装的应用
ideviceinstaller -u [udid] -l # 查看设备安装的第三方应用
ideviceinstaller -u [udid] -l -o list_user # 同上,查看设备安装的第三方应用
ideviceinstaller -u [udid] -l -o list_system # 查看设备安装的系统应用
ideviceinstaller -u [udid] -l -o list_all # 查看设备安装的所有应用
获取设备信息
ideviceinfo -u [udid] # 获取设备信息
ideviceinfo -u [udid] -k DeviceName # 获取设备名称 同命令
idevicenameidevicename # 同上
ideviceinfo -u [udid] -k ProductVersion # 获取设备版本 10.3.3
ideviceinfo -u [udid] -k ProductType # 获取设备类型 iPhone 8,1
ideviceinfo -u [udid] -k ProductName # 获取设备系统名称
查看手机实时日志
idevicesyslog #屏幕上即可看见手机上所有的日志
idevicesyslog >> iphone.log & #重定向日志到文件中
获取手机端崩溃报告
idevicecrashreport # 参数可设置具体文件存放位置
截屏
idevicescreenshot #获取当前截屏,效率比appium截屏高10倍
其他系统文件信息
ideviceinfo # 获取设备所有信息
idevicesyslog # 获取设备日志
idevicecrashreport -e test # 获取设备
crashlog,test 是文件夹需新建
idevicediagnostics # 管理设备状态 - 重启、关机、睡眠等
重启
idevicediagnostics restart
作为测试,我选择的是学科网ipa(也可以选择其他的应用ipa,法一 ,法二,用Apple Configurator下载)
步骤一:学科网ipa下载
链接: https://pan.baidu.com/s/16IhnLi1Yff6JKMTfVALh9Q?pwd=5njf 提取码: 5njf
步骤二:签名(我用的是爱思助手)
1. 获取IOS设备的UDID
idevice_id2. 获取APP的bundleId,类似于Android端应用程序的包名
ideviceinstaller --list-apps | grep 关键字3. 配置iOS设备参数(安装IDE,我安装的是pycharm)
各参数
(1)以下是在 ios真机上运行:
"xcodeOrgId": "
", # xcodeOrgld是一个由Apple生成的唯一的10个字符的字符串,类似 6387P24J3L "xcodeSigningId": "iPhone Developer"
4. 执行脚本,成功打开被测APP
appium自动开启和关闭(win/mac)
运行脚本
(1)脚本内含有启动appium代码
appium -a 127.0.0.1 -p 4723启动webdirveragent服务的命令变化:
- appium2.0是:appium -p {port} --driver-xcuitest-webdriveragent-port {agent_port}
- appium1.x是:appium -p {port} --webdriveragent-port {agent_port}
port是appium服务器的端口号,–webdriveragent-port 就是webdriveragent的端口转发的指定端口,在iOS端上的webdriveragent启动服务后默认是手机ip:8100
(2)连接服务器配置:
appium1.x
webdriver.Remote(http://127.0.0.1:4723/wd/hub)appium2.x
webdriver.Remote(http://127.0.0.1:4723)该步骤常见报错:
(1)如果报错TypeError: __init__() got an unexpected keyword argument 'desired_capabilities'
(2)如果运行时报错:提示 /bin/sh: appium: command not found(终端运行appium正常)
PyCharm 中执行命令提示 command not found
(3)如果报错
selenium.common.exceptions.WebDriverException: Message: An unknown server-side error occurred while processing the command. Original error: Could not load a driver for automationName 'xcuitest' and platformName 'ios'. Please verify your Appium installation
查找了各种情况,可以保证安装和配置都没有问题,最后问题竟然出现在下面设置的网址上。。。
webdriver.Remote(command_executor='http://127.0.0.1:4723/wd/hub', options=option)
改为
webdriver.Remote(command_executor='http://127.0.0.1:4723', options=option) # 2.x==============================
运行后成功!!!!!!!!!!!!且自动启动应用!!!!!!
七 . 完整的启动应用代码(ios真机)
# coding=utf-8
import unittest
import warnings

from appium import webdriver
import time
# import os
import subprocess
# import sys
# from appium.options.common import AppiumOptions
from appium.options.ios import XCUITestOptions


class IosSimpleTest(unittest.TestCase):

    def setUp(self):
        # sys.path.append('/usr/local/bin/appium')
        # print('\n'.join((sys.path)))
        warnings.simplefilter('ignore', ResourceWarning)
        # appium_cmd = 'appium -a 127.0.0.1 -p 4723 --webdriveragent-port 8100'  # 1.x
        # appium_cmd = 'appium -a 127.0.0.1 -p 4723 --driver-xcuitest-webdriveragent-port 8100'  # 2.x
        appium_cmd = 'appium -a 127.0.0.1 -p 4723'
        # os.system('appium -a 127.0.0.1 -p 4723')
        process = subprocess.Popen(appium_cmd, shell=True)
        print("Appium服务已经启动,进程ID为:", process.pid)  # 进程ID
        time.sleep(10)  # 等待appium启动
        options = XCUITestOptions()
        options.load_capabilities({
            'platformName': 'iOS',
            'deviceName': 'iPhone 6 Plus',
            'platformVersion': '12.5',
            'antomationName': 'XCUITest',
            # 'app': '/Users/mac/Documents/ipa/xkw_3.0.13.ipa',  # 安装包路径。用app安装以后,不更新应用的话就可以不再执行该指令
            'bundleId': 'com.xkw.client.63FQ8475MG',  # 第一次用 app安装用应用以后,就可以用bundleId进行识别
            'udid': '13e29c07168273224cb5f9b3ca972c8a4612f52a',
            'xcodeOrgId': '73****R9U9',
            'xcodeSigningId': 'iPhone Developer',
            # 'useNewWDA': True,  # 只在第1次搭建环境时运行即可,以后运行自动化脚本,就会直接启动WebDriverAgent
            'noReset': True
         })
        self.driver = webdriver.Remote(
            'http://127.0.0.1:4723',
            options=options,
            direct_connection=True
        )

    def tearDown(self):
        # self.driver.quit()
        end_cmd = 'killall -9 node'
        subprocess.Popen(end_cmd, shell=True)

    def test001(self):
        time.sleep(2)
        # self.a == 1
        print("ceshi")


if __name__ == '__main__':
    unittest.main()
备注:
通常来说为了持续集成,自动化会比较好一些,我们不必每次都通过这种方式来启动xcode、WebDriverAgent,这种方式只在第1次搭建环境时运行即可,我们可以在自动化脚本中加入如下代码,这样只要在以后启动appium后,运行自动化脚本,就会直接启动WebDriverAgent
desiredCapabilities.setCapability(“useNewWDA”, true);
如果xcode在先启动wda,而代码中又用此行代码,运行时xcode中会显示执行失败,报 出冲突的错误哦,所以后期只在代码中启动WebDriverAgent即可,不再需要用xcode启动
每次测试应用都需要启动 WebDriverAgent , 修改使用脚本方式自动运行
# 解锁keychain,以便可以正常的签名应用,
PASSWORD="YourPassword"
security unlock-keychain -p $PASSWORD ~/Library/Keychains/login.keychain

# 获取设备的UDID,用到了之前的 libimobiledevice
UDID=$(idevice_id -l | head -n1)

# 真机运行测试
xcodebuild -project WebDriverAgent.xcodeproj -scheme WebDriverAgentRunner -destination "id=$UDID" test

# 模拟器运行测试
#xcodebuild -project WebDriverAgent.xcodeproj -scheme WebDriverAgentRunner -destination "platform=iOS Simulator,name=iPhone X" test
八 . 查看ios/android设备列表
# 查看设备名(deviceName)
adb devices
# 查看模拟器版本号(platformVersion)
adb shell getprop ro.build.version.release
# 查看appPackage、appActivity,运行命令时要确保打开了应用
# 例如:首先打开计算器,然后运行命令即可获取到(以 / 隔开,前边appPackage,后边 appActivity )
# 如果是Windows,则把 grep 换成 findstr
adb shell dumpsys window windows | grep "Current"# **********iOS************
# 安装 app
xcrun simctl install booted /Users/XXXX/Downloads/TestApp.app/
# 获取名称和udid(先启动模拟器,再运行命令)
xcrun simctl list | grep "(Booted)"
mac端口占用情况
lsof -i :80808080 为端口
mac杀进程
killall -9 node 九 . ios真机和虚拟机的区别
ios 真机:
1)可以运行.ipa包和.app包;
2).app包必须是在真机环境下编译才可在真机运行;
ios simulator:
1)只能运行.app包;
2).app包必须是在simulator环境下编译才可在simulator运行;
