netcore使用EFcore(第一个实例)
说明:搭建netcore 使用efcore入门教程,跟着这个教程,傻瓜都可以成功!O(∩_∩)O哈哈~,咱们开始吧;
首先介绍下环境:
vs2017,
netcore2.2,
EntityFramework6
测试场景:Mysql,SqlServer
一、创建netcore模板项目

这个就不用多说了,创建完成看下版本:

二、引用EF Core
有的博主写的这样引用:Install-Package Microsoft.EntityFrameworkCore.Sqlite –Pre
但是,遗憾的是,报错了:

然后我自己引用了以包,OK
为了方便复制,我直接复制出来:
1.Microsoft.EntityFrameworkCore
2.Install-Package Microsoft.EntityFrameworkCore.Sqlite
3.Install-Package Microsoft.EntityFrameworkCore.Design
4.Install-Package Microsoft.EntityFrameworkCore.Tools
项目结构如下:

三、创新测试的实体类
我这边创建了一个DBModel文件夹,然后分别创建了三个类:
OrderInfo.cs,
Passenger.cs,
Address.cs
为什么要创建这么几个呢:因为后续会设计到表之间关联关系,主键,外键,引用等等,当然,本文主要是入门,后面的文章会详细讲解;
(PS:关系:一个OrderInfo有一个Passenger和一个Address,一个Passenger又可以有多个OrderInfo和一个Address);
强调:需要引用MySql.Data.EntityFrameworkCore
OrderInfo.cs

[MySqlCharset("utf8mb4")] //字符集,需要引用MySql.Data.EntityFrameworkCore
[MySqlCollation("utf8mb4_general_ci")] //排序规则
[Table("orderinfo", Schema = "manager")]
public class OrderInfo {

[JsonProperty("id")]
[Required]
[Column("id", TypeName = "int(11)")]
public int Id { get; set; }

///
/// 订单Id
///
[JsonProperty("order_id")]
[Required]
[Column("order_id", TypeName = "int(11)")]
public int OrderId { get; set; }

[JsonProperty("passengerid")]
[Column("passenger_id",TypeName ="int(11)")]
public int PassengerId { get; set; }


[JsonProperty("addressid")]
[Column("address_id", TypeName = "int(11)")]
public int AddressId { get; set; }

///
/// 订单价格
///
[StringLength(maximumLength: 100)]
[Column("price")]
public string Price { get; set; }

///
/// 订单客人信息
///
[ForeignKey("PassengerId")]
public Passenger OrderForPassenger { get; set; }

/
/ 订单地址信息
/
//[InverseProperty("OrderInfos")]
//public Address OrderForAddress { get; set; }
Passenger.cs
 [MySqlCharset("utf8mb4")] //字符集,需要引用MySql.Data.EntityFrameworkCore
    [MySqlCollation("utf8mb4_general_ci")] //排序规则
    [Table("passenger", Schema = "manager")]
    public class Passenger {

        [JsonProperty("id")]
        [Column("id", TypeName = "int(10)")]
        public int Id { get; set; }

        [JsonProperty("passenger_id")]
        [Column("passengerid",TypeName ="int(11)")]
        public int PassengerId { get; set; }

        [JsonProperty("passengername")]
        public string PassengerName { get; set; }

        [InverseProperty("OrderForPassenger")]
        public List OrderInfos { get; set; }

        //[InverseProperty("Passengers")]
        //public Address PssengerForAddress { get; set; }
    }
Address.cs
 [MySqlCharset("utf8mb4")] //字符集,需要引用MySql.Data.EntityFrameworkCore
    [MySqlCollation("utf8mb4_general_ci")] //排序规则
    [Table("address", Schema = "manager")]
    public class Address {

        [JsonProperty("id")]
        [Required]
        public int Id { get; set; }

        [JsonProperty("province")]
        [StringLength(maximumLength: 256)]
        public string Province { get; set; }

        [JsonProperty("city")]
        [StringLength(maximumLength: 256)]
        public string City { get; set; }

        [JsonProperty("area")]
        [StringLength(maximumLength: 256)]
        public string Area { get; set; }

        [JsonProperty("street")]
        [StringLength(maximumLength:256)]
        public string Street { get; set; }
    }
四、创建一个DataDBContext.cs类,代码如下
| 1 2 3 4 5 6 7 8 9 10 11 12 13 14 15 16 17 18 19 |
|
五、创建数据库初始化和连接
为了方便测试,将数据库连接配置放在了appsettings.json文件中了。配置文件内容如下:
{
  "Logging": {
    "LogLevel": {
      "Default": "Warning"
    }
  },
  "AllowedHosts": "*",
  "ConnectionSetting": {
    "UserConnectionString": "server=localhost;userid=root;pwd=123456;port=3306;database=manager",
    "ReadConnectionString": "server=localhost;userid=root;pwd=123456;port=3306;database=manager",
    "DbType": 0 //数据库类型
  }
}
在StartUp.cs中注册连接:
services.AddDbContext(optionsBuilder => { var dataAppSetting = Configuration.GetSection("ConnectionSetting").Get (); if (dataAppSetting == null) { throw new Exception("未配置数据库连接"); } switch (dataAppSetting.DbType) { case 1: //server连接,EnableRetryOnFailure表示失败支持重试; optionsBuilder.UseSqlServer(dataAppSetting.UserConnectionString, option => option.EnableRetryOnFailure()); break; default: optionsBuilder.UseMySQL(dataAppSetting.UserConnectionString); break; } });

这里可能有朋友会问一下,万一数据库没有创建怎么办?
所以,这里Configure方法加一下内容

context.Database.EnsureCreated();//数据库不存在的话,会自动创建
六、打开对应文件目录,执行
打开文件夹的命令行,
输入
dotnet ef migrations add MyFirstMigration
dotnet ef database update
这样我们就创建好了数据库。更多命令请 dotnet ef -h

可以看到,里面其实是执行了创建数据库表的sql语句!
那我,我们来看一下我数据库,结果如下:
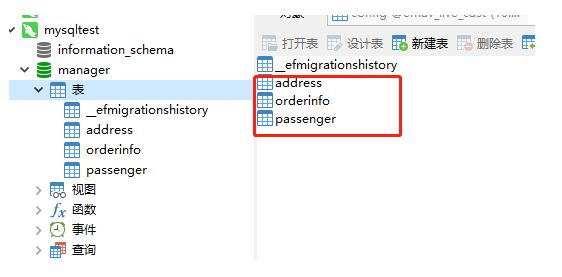
有的朋友可能会问,为啥多了一个表:“_efmigrationshistory”,故名思义,这个表示执行操作的记录,因为可能对表增加字段,修改字段,删除字段等等;
当然只是一个记录:

运行完成之后,我们会发现,我们会多一个Migrations文件夹

里面的内容是什么呢,大家可以打开看看,下面是我的部分截图:
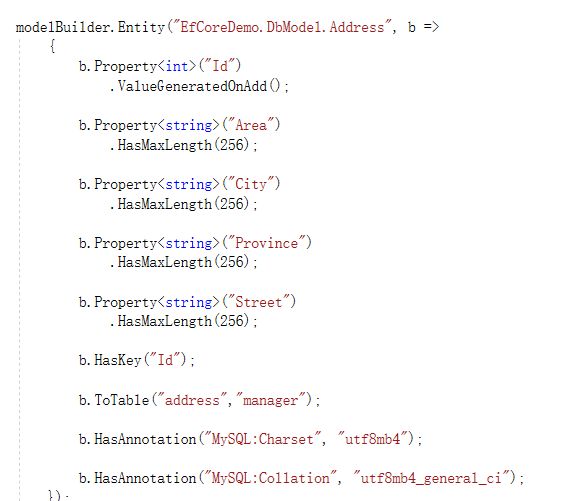
可以看到,这些都是我们之前创建实体时的一些属性,如果是第一次尝试的朋友也没有必要设置这么多。
七、测试效果
简单写了个demo测试效果
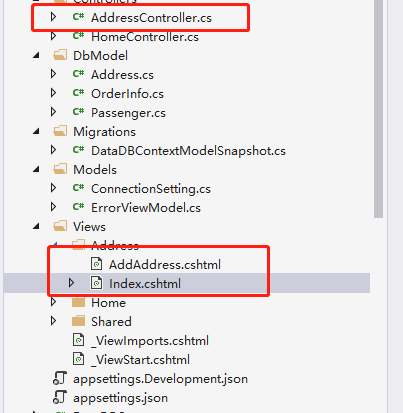
话不多说,直接上代码:
Index.cshtml
@model IEnumerable@{ ViewBag.Title = "地址"; }
@foreach (var item in Model) { Id 省 市 区 街道详细地址 } @Html.DisplayFor(modelItem => item.Id) @Html.DisplayFor(modelItem => item.Province) @Html.DisplayFor(modelItem => item.City) @Html.DisplayFor(modelItem => item.Area) @Html.DisplayFor(modelItem => item.Street)
AddAddress.cshtml
@model EfCoreDemo.DbModel.Address
@{
    ViewData["Title"] = "Address";
}
AddressController.cs
 public class AddressController : Controller
    {
        private DataDBContext _context;

        public AddressController(DataDBContext context) {
            _context = context;
        }
        public IActionResult Index()
        {
            return View(_context.Addresses.ToList());
        }


        public IActionResult AddAddress() {
            return View();
        }

        [HttpPost]
        [ValidateAntiForgeryToken]
        public IActionResult AddAddress(Address address) {
            if (ModelState.IsValid) {
                _context.Addresses.Add(address);
                _context.SaveChanges();

                return RedirectToAction("Index");
            }

            return View(address);
        }
运行效果:
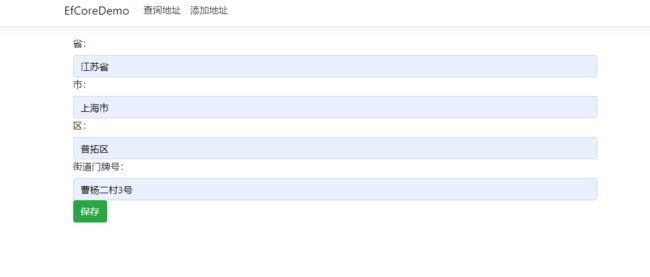

至此,初级版本搭建成功,且运行成功;
后记:本文主要是记录一下netcore怎么搭建efcore,只属于基础,自己学习的过程中也方便跟大家一起探讨,我们使用数据库的时候,不可能只有单独的几张表,
一般都会有主键,外键,索引,组合索引等等,
或者对表的操作,删除,修改,新增字段等等;
后续会继续更新更多的efcore的东西,如有问题,欢迎一起讨论。
感谢以下文章提供的启发:
参考博客:https://www.cnblogs.com/liangxiaofeng/p/5806347.html
参考文档:https://docs.microsoft.com/zh-cn/ef/core/get-started/netcore/new-db-sqlite