Django3项目部署到Ubuntu使用Apache服务器和MySQL数据库
Django3项目部署到Ubuntu使用Apache服务器和MySQL数据库
- 简述
- 查看Python版本
- 升级软件
- 创建网站目录
- 安装pip3
- 使用pip3安装Python虚拟环境
- 创建虚拟环境并进入
- 在虚拟环境中安装django
- 创建Django工程
- 测试Django是否有问题
- 安装Mysql
- 创建数据库
- 链接Mysql和Django
- 安装并设置Apache2
- 加入静态文件目录
简述
在将Django3部署在阿里云Ubuntu18.04服务器上的时候遇到了无数个坑,这里记录一下过程,有坑的地方会标注出来。
我这里使用的是Ubuntu18.04LTS版本,基本没装什么软件,比较干净
教程较长,阅读并操作时间大概50分钟,建议直接看本人视频教程
链接: Django3项目部署到Apache服务器并使用MySQL数据库.
查看Python版本
在阿里云服务器上默认安装了python2,所以只需要安装python3就可以了,如果你是LTS版可以全部安装,下面把两个版本的安装方式都贴上
sudo apt install python3
sudo apt install python
升级软件
拿到新系统的基本操作
sudo apt update && apt upgrade
创建网站目录
在/目录下创建目录
cd /
mkdir testdjangoproject
cd testdjangoproject
mkdir site
mkdir django
mkdir auth
cd site
mkdir logs
mkdir public
目录结构如下
-testdjangoproject
	-site
		-logs
		-public
	-django
	-auth
安装pip3
安装pip3
sudo apt install python3-pip
使用pip3安装Python虚拟环境
sudo pip3 install virtualenv
安装完成后可以使用
pip3 freeze
查看安装的包
创建虚拟环境并进入
cd /testdjangoproject/
virtualenv venv
source venv/bin/activate
进入成功则会发现在命令行前面有一个(venv)的标志,如果不成功检查pip版本是否为最新版(如果不是请升级)
![]()
在虚拟环境中安装django
pip install django
创建Django工程
进入testdjangoproject/django目录下
cd /testdjangoproject/django/
django-admin startproject tutorial
然后修改工程下的setting文件中的ALLOWED_HOSTS参数
ALLOWED_HOSTS=['你的服务器IP地址']
测试Django是否有问题
进入django工程目录的文件目录下(testdjangoproject/django/tutorial/)启动django自带的服务器
此时访问浏览器能够看到django的界面说明Django工程没有问题
python manage.py runserver 0.0.0.0:8000
安装Mysql
sudo apt install mysql-server
sudo mysql_secure_installation
第二个安装过程中会出现很多选项,下面是翻译
–为root用户设置密码 自己设置
–删除匿名账号 y
–取消root用户远程登录 y
–删除test库和对test库的访问权限 y
–刷新授权表使修改生效 y
创建数据库
进入mysql命令行
mysql
下面是sql语句,作用是创建tutorial数据库,创建admin用户,给admin用户赋权,刷新
SHOW DATABASES;
CREATE DATABASE tutorial;
CREATE USER 'admin'@'localhost' IDENTIFIED BY 'admin123!@#ADMIN';
GRANT ALL PRIVILEGES ON tutorial.* to 'admin'@'localhost';
FLUSH PRIVILEGES;
链接Mysql和Django
很多人这里直接安装mysqlclient,是一定会报错的,因为没有安装python的dev,下面是正确安装顺序
sudo apt install python3-dev
sudo apt install libmysqlclient-dev
pip install mysqlclient
检查是否安装成功
pip freeze
进入testdjangoproject/auth/文件夹下创建mysql.cnf文件
这里写的是Mysql的链接参数
[client]
database = 'tutorial'
user = 'admin'
password = 'admin123!@#ADMIN'
default-character-set='utf8'
重启mysql
sudo systemctl restart mysql
进入django的工程目录,找到setting
修改DATAVASES属性
这里是将上面我们创建的文件引用过来,并且使用Django自带的mysql数据库引擎
DATAVASES = {
	'default':{
		'ENGINE':'django.db.backends.mysql',
		'OPTIONS':{
			'read_default_file':'/testdjangoproject/auth/mysql.cnf',
		},
	}
}
检查下是否正常
python manage.py check
迁移数据库
python manage.py migrate
创建超级管理员
python manage.py createsuperuser
用户名:admin 密码:root
启动自带服务器查看后台是否正常
python manage.py runserver 0.0.0.0:8000
到浏览器输入网址后面加上/admin
例如 127.0.0.1:8000/admin
安装并设置Apache2
sudo apt install apache2 libapache2-mod-wsgi-py3
在浏览器直接输入ip出现apache界面说明正常启动了apache
进入cd /etc/apache2/sites-available/下
备份一下初始文件(这一步无所谓的)
cp 000-default.config 000-default.config.bak
编辑000-default.config文件
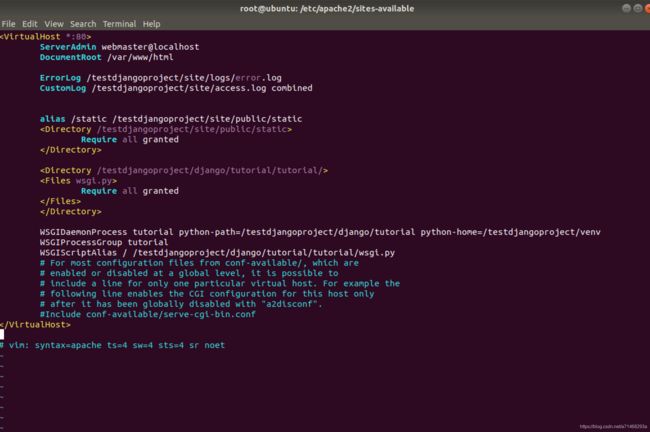
在其中添加下面的代码,使用WSGI来链接Apache和Django的Python脚本
本文后面有该文件的完整截图,请继续翻阅
ErrorLog /testdjangoproject/site/logs/error.log
CustomLog /testdjangoproject/site/access.log combined

/testdjangoproject/django/tutorial/tutorial/>
	.py>
		Require all granted
	</Files>
</Directory>

WSGIDaemonProcess tutorial python-path=/testdjangoproject/django/tutorial python-home=/testdjangoproject/venv
WSGIProcessGroup tutorial
WSGIScriptAlias / /testdjangoproject/django/tutorial/tutorial/wsgi.py
检查是否有错误
sudo apachectl configtest
这里可能出现的问题有几种,一种是路径写错了,一种是apache的配置有问题,这里解决一下apache设置问题(阿里云的基本不存在这个问题)
打开配置文件
sudo vim /etc/apache2/apache2.conf
最后加入一句
ServerName localhost:80
即可
重启apache服务器
sudo service apache2 restart
在浏览器直接输入服务器IP即可正常显示Django的欢迎界面
加入静态文件目录
创建静态文件目录
cd /testdjangoproject/site/public
mkdir static
进入Django项目的Setting中,在结尾添加静态文件路径
STATIC_ROOT='/testdjangoproject/site/public/static'
回到Django目录,收集静态文件
python manage.py collectstatic
还需要再次更改apache的设置,让其识别到静态文件的文件夹
cd /etc/apache2/sites-available/
vim 000-default.config
将文件中间部分修改为(这里包含了之前修改的部分)
ErrorLog /testdjangoproject/site/logs/error.log
CustomLog /testdjangoproject/siti/access.log combined

alias /static /testdjangoproject/site/public/static
/testdjangoproject/site/public/static>
	Require all granted
</Directory>

/testdjangoproject/django/tutorial/tutorial/>
	.py>
		Require all granted
	</Files>
</Directory>

WSGIDaemonProcess tutorial python-path=/testdjangoproject/django/tutorial python-home=/tutorial/venv
WSGIProcessGroup tutorial
WSGIScriptAlias / /testdjangoproject/django/tutorial/tutorial/wsgi.py
sudo apachectl configtest
重启apache服务器
sudo service apache2 restart
重新进入admin界面
例如 127.0.0.1/admin
所有css正常显示,说明静态目录添加完毕
