flannel网络模式---vxlan介绍
微信公众号:运维开发故事,作者:华仔
说明
本文主要包括以下内容:
- vxlan简单介绍
- 为什么要使用vxlan
- k8s使用flannel(vxlan)如何进行pod之间的通信
vxlan简单介绍
VXLAN(Virtual eXtensible LAN,虚拟可扩展的局域网),是一种虚拟化隧道通信技术。它是一种overlay(覆盖网络)技术,通过三层的网络搭建虚拟的二层网络。
简单来讲,VXLAN是在底层物理网络(underlay)之上使用隧道技术,依托UDP层构建的overlay的逻辑网络,使逻辑网络与物理网络解耦,实现灵活的组网需求。它不仅能适配虚拟机环境,还能用于容器环境。
为什么要使用vxlan
- vxlan支持更多的子网(vlan只支持2的12次方个子网,vxlan支持2的24次方个子网),并通过VNI(Virtual Network Identifier)区分不同的子网,相当于VLAN中的LAN ID
- 多租网络隔离。不同用户之间需要独立地分配IP和MAC地址
- 云计算业务对业务灵活性要求很高,虚拟机可能会大规模迁移,并保证网络一直可用。解决这个问题同时保证二层的广播域不会过分扩大,这也是云计算网络的要求
k8s中使用flannel(vxlan)
说明:我这里使用kubeadm安装的k8s,version为1.19,flannel的网络模式为vxlan,可以根据需要自己修改。
[root@master huazai]# kubectl version
Client Version: version.Info{Major:"1", Minor:"19", GitVersion:"v1.19.0", GitCommit:"e19964183377d0ec2052d1f1fa930c4d7575bd50", GitTreeState:"clean", BuildDate:"2020-08-26T14:30:33Z", GoVersion:"go1.15", Compiler:"gc", Platform:"linux/amd64"}
Server Version: version.Info{Major:"1", Minor:"19", GitVersion:"v1.19.0", GitCommit:"e19964183377d0ec2052d1f1fa930c4d7575bd50", GitTreeState:"clean", BuildDate:"2020-08-26T14:23:04Z", GoVersion:"go1.15", Compiler:"gc", Platform:"linux/amd64"}
参考:https://kubernetes.io/docs/concepts/cluster-administration/networking/#how-to-implement-the-kubernetes-networking-model
下载flannel.yml
wget https://raw.githubusercontent.com/coreos/flannel/master/Documentation/kube-flannel.yml
安装flannel
kubectl apply -f kube-flannel.yml
查看安装结果
[root@master huazai]# kubectl  get po -A |grep flannel
kube-system            kube-flannel-ds-f4x7m                        1/1     Running   0          15h
kube-system            kube-flannel-ds-ltr8h                          1/1     Running   0          15h
kube-system            kube-flannel-ds-mp76x                        1/1     Running   0          15h
看看安装flannel之后,它对主机做了什么
- 创建一个名为flannel.1的VXLAN网卡
[root@master huazai]# ip -d link show flannel.1
4: flannel.1:  mtu 1450 qdisc noqueue state UNKNOWN mode DEFAULT group default
    link/ether fe:be:87:93:06:e2 brd ff:ff:ff:ff:ff:ff promiscuity 0
    vxlan id 1 local 192.168.0.39 dev eth0 srcport 0 0 dstport 8472 nolearning ageing 300 noudpcsum
可以看到mtu为1450(IP头、UDP头、MAC头、vxlan协议共占了50)。dstport为8472,local IP为节点IP,查看flannel.1的信息如下
[root@master huazai]# ifconfig flannel.1
flannel.1: flags=4163  mtu 1450
        inet 10.244.0.0  netmask 255.255.255.255  broadcast 10.244.0.0
        inet6 fe80::fcbe:87ff:fe93:6e2  prefixlen 64  scopeid 0x20
        ether fe:be:87:93:06:e2  txqueuelen 0  (Ethernet)
        RX packets 2622  bytes 465577 (454.6 KiB)
        RX errors 0  dropped 0  overruns 0  frame 0
        TX packets 4765  bytes 1081070 (1.0 MiB)
        TX errors 0  dropped 8 overruns 0  carrier 0  collisions 0
- 创建到其他节点pod cidrs(可通过kubectl get node master -o yaml得知)的路由表,主要是能让Pod中的流量路由到flannel.1接口
[root@master huazai]# route -n
10.244.1.0      10.244.1.0      255.255.255.0   UG    0      0        0 flannel.1
10.244.2.0      10.244.2.0      255.255.255.0   UG    0      0        0 flannel.1
- 在节点中添加一条该节点的IP及VTEP设备的静态ARP缓存
[root@master huazai]# arp -n
10.244.1.0               ether   0e:61:06:ff:7a:73   CM                    flannel.1
10.244.2.0               ether   0a:72:bf:3f:cd:40   CM                    flannel.1
[root@master huazai]# bridge  fdb
0a:72:bf:3f:cd:40 dev flannel.1 dst 192.168.0.8 self permanent
0e:61:06:ff:7a:73 dev flannel.1 dst 192.168.0.22 self permanent
以上的mac地址均为对应节点上flannel.1设备的mac
pod之间如何进行访问
- 同一个节点的pod如何访问
以下面两个pod为例,两个pod都在node1,ip分别为10.244.1.8、10.244.1.9,假设在ip为10.244.1.8的pod中去ping ip为10.244.1.9的pod
[root@master huazai]# kubectl get  po -o wide
nginx-deployment-66b6c48dd5-nzjgd   1/1     Running   0          35m   10.244.1.8   node1
nginx-deployment-66b6c48dd5-jcwc9   1/1     Running   0          35m   10.244.1.9   node1
进入pod ip为10.244.1.8的pod中
[root@master huazai]# kubectl exec -it  nginx-deployment-66b6c48dd5-jcwc9  -- /bin/bash
root@nginx-deployment-66b6c48dd5-jcwc9:/#
查看其路由
root@nginx-deployment-66b6c48dd5-jcwc9:/# route -n
Kernel IP routing table
Destination     Gateway         Genmask         Flags Metric Ref    Use Iface
0.0.0.0         10.244.1.1      0.0.0.0         UG    0      0        0 eth0
10.244.0.0      10.244.1.1      255.255.0.0     UG    0      0        0 eth0
10.244.1.0      0.0.0.0         255.255.255.0   U     0      0        0 eth0
可以发现在同一个节点上的pod,直接进行访问了(在同一个网络段),没有经过转发。
进入另外一个pod中查看路由,发现也是一样的
[root@master ~]# kubectl exec -it nginx-deployment-66b6c48dd5-nzjgd  -- /bin/bash
root@nginx-deployment-66b6c48dd5-nzjgd:/#
Kernel IP routing table
Destination     Gateway         Genmask         Flags Metric Ref    Use Iface
0.0.0.0         10.244.1.1      0.0.0.0         UG    0      0        0 eth0
10.244.0.0      10.244.1.1      255.255.0.0     UG    0      0        0 eth0
10.244.1.0      0.0.0.0         255.255.255.0   U     0      0        0 eth0
- 不同节点的pod如何访问
以下面两个pod为例,其中一个pod在node1上,IP为10.244.1.8,另外一个pod在node2,IP为10.244.2.4
[root@master ~]# kubectl get po -o wide
nginx-deployment-66b6c48dd5-f7v9q   1/1     Running   0          60m   10.244.2.4   node2
nginx-deployment-66b6c48dd5-nzjgd   1/1     Running   0          60m   10.244.1.8   node1
进入pod ip为10.244.1.8的pod中
[root@master huazai]# kubectl exec -it  nginx-deployment-66b6c48dd5-jcwc9  -- /bin/bash
root@nginx-deployment-66b6c48dd5-jcwc9:/#
查看其路由
root@nginx-deployment-66b6c48dd5-jcwc9:/# route -n
Kernel IP routing table
Destination Gateway Genmask Flags Metric Ref Use Iface
0.0.0.0 10.244.1.1 0.0.0.0 UG 0 0 0 eth0
10.244.0.0 10.244.1.1 255.255.0.0 UG 0 0 0 eth0
10.244.1.0 0.0.0.0 255.255.255.0 U 0 0 0 eth0
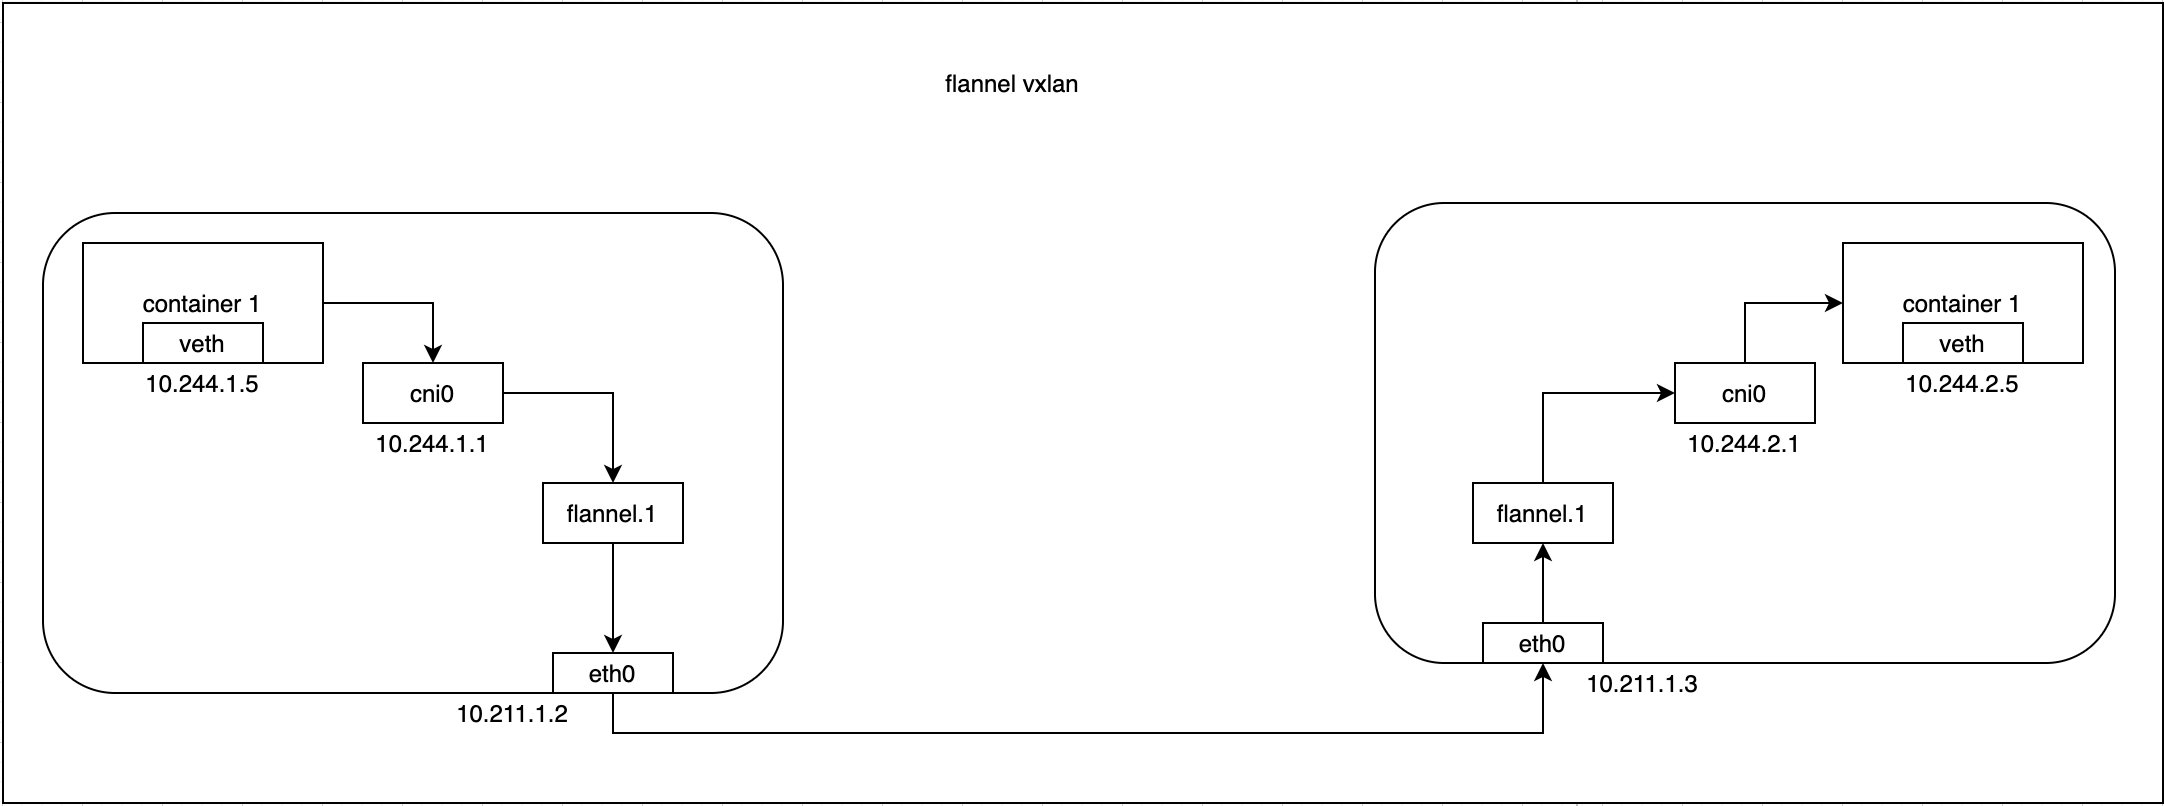
可以发现如果是执行ping 10.244.2.4则需要经过10.244.1.1,而10.244.1.1为node1上cn0的IP,cni0为flannel自己创建的网桥
[root@node1 net.d]# ifconfig
 cni0: flags=4163  mtu 1450
      inet 10.244.1.1  netmask 255.255.255.0  broadcast 10.244.1.255
再查看node1上的路由
[root@node1 net.d]# route -n
Kernel IP routing table
Destination     Gateway         Genmask         Flags Metric Ref    Use Iface
0.0.0.0         192.168.0.1     0.0.0.0         UG    0      0        0 eth0
10.244.0.0      10.244.0.0      255.255.255.0   UG    0      0        0 flannel.1
10.244.1.0      0.0.0.0         255.255.255.0   U     0      0        0 cni0
10.244.2.0      10.244.2.0      255.255.255.0   UG    0      0        0 flannel.1
172.17.0.0      0.0.0.0         255.255.0.0     U     0      0        0 docker0
192.168.0.0     0.0.0.0         255.255.255.192 U     0      0        0 eth0
由路由发现,目标地址为10.244.2.0的数据包的下一跳为10.244.2.0,且要通过flannel.1,flannel.1作为一个VTEP设备,收到报文后将按照VTEP的配置进行封包。
查看node1上的arp和fdb
[root@node1 net.d]# arp -n
10.244.0.0               ether   fe:be:87:93:06:e2   CM                    flannel.1
10.244.2.0               ether   0a:72:bf:3f:cd:40   CM                    flannel.1
[root@node1 net.d]# bridge  fdb
0a:72:bf:3f:cd:40 dev flannel.1 dst 192.168.0.8 self permanent
fe:be:87:93:06:e2 dev flannel.1 dst 192.168.0.39 self permanent
这里的话,通过etcd可以得知10.244.2.4在node2上,并且可以得到node2的IP,并且通过node1上转发表,可以知道node2上对应的VTEP的mac,然后根据flannel.1设备创建时的设置参数(VNI、local IP、Port)进行VXLAN封包。
然后数据包通过node1跟node2之间的网络连接,VXLAN包到达node2,通过端口8472,VXLAN包被转发给VTEP设备flannel.1进行解包,解封装后的IP包匹配node2中的路由表(10.244.2.0),内核将IP包转发给cni0。
[root@node2 ~]# route -n
Kernel IP routing table
Destination     Gateway         Genmask         Flags Metric Ref    Use Iface
0.0.0.0         192.168.0.1       0.0.0.0             UG    0      0        0 eth0
10.244.0.0      10.244.0.0      255.255.255.0   UG    0      0        0 flannel.1
10.244.1.0      10.244.1.0      255.255.255.0    UG    0      0        0 flannel.1
10.244.2.0      0.0.0.0         255.255.255.0     U     0      0        0 cni0
cni0将IP包转发给连接在cni0上的pod
总结
通过以上发现,不同节点上的pod要互相进行访问时,需要通过主机路由,需要经过内核的封包解包操作,整个过程如下所示:

因此,在后续发现相关网络时,可通过tcpdump对节点上的cn0、flannel.1、eth0以及veth pair抓包进行判断和处理。同时,也要查看节点上的arp和fdb。