Ubuntu22.04 搭建自己的镜像及软件仓库
目录
- 前言
- 1 使用Nginx 搭建 apt源
-
- 1.1 nginx下载安装
- 1.2 软件存放目录的创建和配置
- 1.3 验证
-
- 1、上传文件
- 2、配置apt源
- 2 使用Nexus3部署
-
- 2.1 docker-compose安装
-
- 1、docker安装
- 2、添加阿里镜像加速
- 3、安装Docker-compose
- 2.2 Nexus3安装
- 2.3 获取Nexus3管理员初始密码
- 2.4 Ubuntu的apt镜像仓库配置
-
- 1、创建存储
- 2、创建仓库
- 3、验证
- 2.5 Docker本地镜像代理源的搭建
-
-
- 1、创建blob
- 2、创建docker proxy
- 3、创建docker group
- 4、启用docker realms
- 5、暴露8082端口
- 6、修改/etc/docker/daemon.json 文件
- 7、测试
-
- 3 源地址配置方式
- 总结
前言
搭建自己的镜像仓库,目前使用过的有两种方式:
- 使用nginx来搭建私有仓库,这种方式搭建的仓库需要自己手动上传所有的软件包,目前测试过用来做apt源和yum源

- 使用nexus3来做缓存加速。其原理主要是通过在本地仓库进行缓存,来做的仓库,有点类似常用的阿里云镜像加速。使用nexus3可以做yum、apt、docker、pip等的源。既可以自建本地仓库,又可以创建为代理其他源的代理仓库。较为灵活。

1 使用Nginx 搭建 apt源
1.1 nginx下载安装
# Ubuntu
sudo useradd -s /sbin/nologin www -M
sudo apt update
# 通过以下命令安装编译器和调试器
sudo apt install build-essential
sudo apt-get install manpages-dev
gcc --version
# 安装依赖
sudo apt install openssl libssl-dev -y
sudo apt install libpcre3 libpcre3-dev -y
sudo apt install zlib1g-dev -y
sudo apt -y install make

cd /usr/local/src
sudo wget https://nginx.org/download/nginx-1.22.1.tar.gz
sudo tar -zxf nginx-1.22.1.tar.gz
cd /usr/local/src/nginx-1.22.1
sudo ./configure --prefix=/usr/local/nginx/ --user=www --group=www --with-http_stub_status_module --with-http_ssl_module

sudo make
sudo make install

sudo vim /etc/profile
export PATH=$PATH:/usr/local/nginx/sbin/

# 刷新
sudo source /etc/profile
1.2 软件存放目录的创建和配置
# 新建软件存放的目录
mkdir /mirrors/{windows,ubuntu,centos}
mkdir /mirrors/ubuntu/22.04

# 修改nginx配置文件
# 把该目录暴露出去,以列表的形式显示
worker_processes  1;
events {
    worker_connections  1024;
}
http {
    include       mime.types;
    default_type  application/octet-stream;
    sendfile        on;
    keepalive_timeout  65;
    server {
        listen       9009;
        server_name  192.168.92.100;
        root /mirrors/;    # 此处直接指定到simple的父级目录,这样我们可以使用http://example.com/simple来作为源的链接
        location / {
            # root   /mirrors/;
            autoindex on;
            autoindex_exact_size off;    #显示文件的大小
            autoindex_localtime on;    #显示文件时间
            # limit_rate_after 5m; #5分钟后下载速度限制为200k
            # limit_rate 200k;
            #index  index.html index.htm;
        }
        error_page   500 502 503 504  /50x.html;
        location = /50x.html {
            root   html;
        }
    }
}

# 重启nginx
nginx -s stop
nginx

# 登录前台查看

1.3 验证
1、上传文件
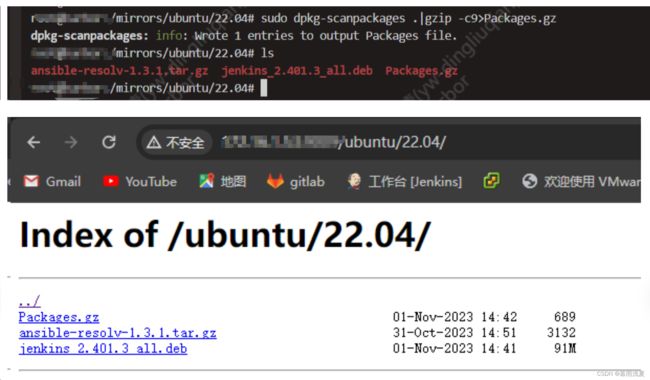
上传文件到/mirrors/ubuntu/22.04目录下
# 在自己的Ubuntu目录下执行该命令:
# 一定要执行该命令,否则apt源不识别,配置会出错
sudo dpkg-scanpackages .|gzip -c9>Packages.gz
2、配置apt源
echo "deb [trusted=yes] http://172.16.1.53:9009/ubuntu/ 22.04/" | sudo tee -a /etc/apt/sources.list > /dev/null
# 因为是我们自建的源,不被信任,所以需要添加参数:trusted=yes,否则会报错

apt update
查看输出已经加载到:

2 使用Nexus3部署
参考地址:https://help.sonatype.com/repomanager3/product-information/download
2.1 docker-compose安装
1、docker安装
# 更新
sudo apt update

# 安装必要的证书并允许 apt 包管理器使用以下命令通过 HTTPS 使用存储库:
sudo apt install apt-transport-https ca-certificates curl software-properties-common gnupg lsb-release

# 运行下列命令添加 Docker 的官方 GPG 密钥:
curl -fsSL https://download.docker.com/linux/ubuntu/gpg | sudo gpg --dearmor -o /usr/share/keyrings/docker-archive-keyring.gpg

# 添加 Docker 官方库:
echo "deb [arch=$(dpkg --print-architecture) signed-by=/usr/share/keyrings/docker-archive-keyring.gpg] https://download.docker.com/linux/ubuntu $(lsb_release -cs) stable" | sudo tee /etc/apt/sources.list.d/docker.list > /dev/null

# 更新 Ubuntu 源列表:
sudo apt update

# 安装指定版本的docker
# 检查可以安装的docker版本库
apt-cache madison docker-ce

# 挑选上面列表中的任何版本进行安装
sudo apt install docker-ce=5:20.10.16~3-0~ubuntu-jammy docker-ce-cli=5:20.10.16~3-0~ubuntu-jammy containerd.io

# 查看docker是否运行
systemctl status docker

# 查看版本
docker version

# 测试
 docker run -it ubuntu bash
2、添加阿里镜像加速
cat > /etc/docker/daemon.json <<EOF
{
  "exec-opts": ["native.cgroupdriver=systemd"],
  "log-driver": "json-file",
  "log-opts": {
    "max-size": "100m"
  },
  "storage-driver": "overlay2",
  "storage-opts": [
    "overlay2.override_kernel_check=true"
  ],
  "registry-mirrors": ["https://uyah70su.mirror.aliyuncs.com"]
}
EOF


systemctl restart docker
systemctl status docker
3、安装Docker-compose
地址:https://github.com/docker/compose/releases
sudo curl -L "https://github.com/docker/compose/releases/download/v2.6.1/docker-compose-$(uname -s)-$(uname -m)" -o /usr/local/bin/docker-compose

sudo chmod +x /usr/local/bin/docker-compose

docker-compose version
2.2 Nexus3安装
mkdir nexus3 && cd nexus3

#  sonatype/nexus3 此处版本一定要注意
# 我之前测试时,如果此处默认为latest版本,很可能会出现Nexus3无法缓存软件包的情况,暂时不知道原因
# 创建yml文件
vim docker-compose.yml
version: '3.1'

services:
  nexus3:
    image: sonatype/nexus3:3.38.1
    ports:
      - 8081:8081
    volumes:
      - nexus-data:/nexus-data
    restart: always

volumes:
  nexus-data:
      driver: local


# 启动
docker-compose up -d
从浏览器访问:http://192.168.172.10:8081/
2.3 获取Nexus3管理员初始密码
# 进入容器
docker-compose exec nexus3 /bin/bash

# 获取密码
cat /opt/sonatype/sonatype-work/nexus3/admin.password
481852a2-be4f-4daf-857b-4b24cd180149
# 默认用户名是admin
# 修改后的用户名密码admin/admin123
2.4 Ubuntu的apt镜像仓库配置
1、创建存储


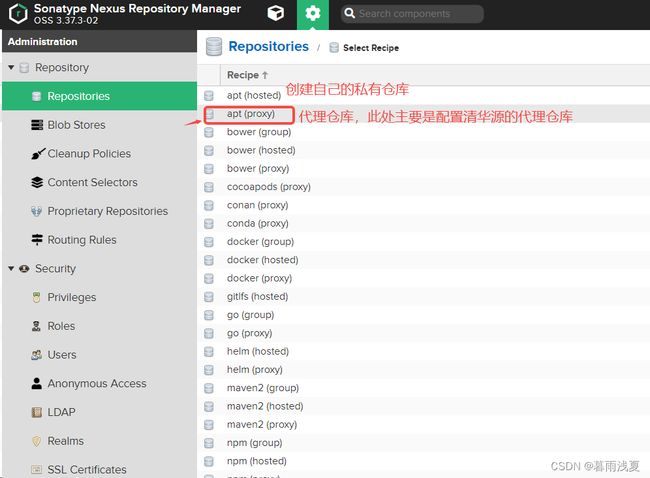
2、创建仓库
bionic,focal,jammy

注意:
- bionic:18.04
- focal:20.04
- jammy:22.04
创建完成可以看到

下方是该仓库的url

在首页的Browse中查看对应仓库,是空的

3、验证
vim Dockerfile
FROM ubuntu:22.04

RUN sed -i 's/archive.ubuntu.com/192.168.172.10:8081\/repository\/ubuntu/g' /etc/apt/sources.list && sed -i 's/security.ubuntu.com/192.168.172.10:8081\/repository\/ubuntu/g' /etc/apt/sources.list

RUN apt-get update -yq \
        && apt-get install -yq build-essential


vim Makefile
build:
        docker build -t mirroris-demo:apt .

# 执行构建
make build
# 再次执行速度会比之前快很多
构建完成后,仓库中则可以看到镜像:

# 删除镜像后再次构建
docker rmi mirroris-demo:apt
# 把不需要的镜像清理掉
docker image prune -f
# 再次执行构建
make build
# 可以看到执行速度很快
2.5 Docker本地镜像代理源的搭建
1、创建blob
2、创建docker proxy

3、创建docker group

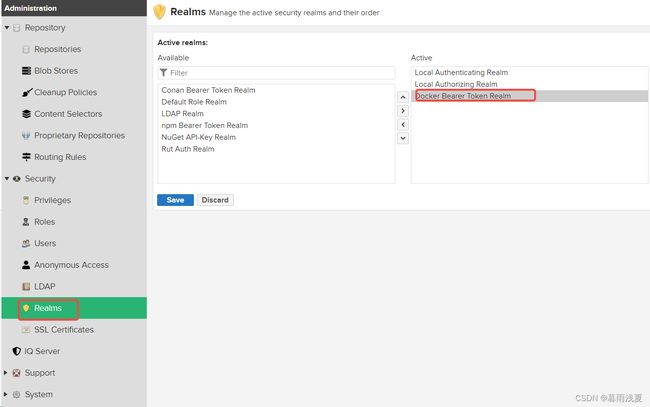
4、启用docker realms
5、暴露8082端口
vim docker-compose.yml

version: '3.1'

services:
  nexus3:
    image: sonatype/nexus3:3.38.1
    ports:
      - 8081:8081
      - 8082:8082
    volumes:
      - nexus-data:/nexus-data
    restart: always

volumes:
  nexus-data:
      driver: local

docker-compose up -d;docker-compose ps
# 查看是否有8082端口映射
6、修改/etc/docker/daemon.json 文件
cat /etc/docker/daemon.json
{

  "registry-mirrors": ["http://192.168.172.10:8082"],
  "insecure-registries": ["192.168.172.10:8082"]
}


systemctl daemon-reload
systemctl restart docker.service
systemctl status docker
7、测试
docker pull nginx:1.16.0
docker pull busybox
docker pull 192.168.172.10:8082/openstack.kolla/mariadb-server:zed-ubuntu-jammy
docker pull 192.168.172.10:8082/ceph/ceph:v17
docker pull 192.168.172.10:8082/ceph/ceph:v17
查看docker-registory有缓存

3 源地址配置方式
# docker源,需要配置daemon.json
cat /etc/docker/daemon.json
{
  "registry-mirrors": ["http://192.168.172.10:8082"],
  "insecure-registries": ["192.168.172.10:8082"]
}

在下载镜像时,地址换成我们的192.168.172.10:8082
例子:
docker pull 192.168.172.10:8082/openstack.kolla/mariadb-server:zed-ubuntu-jammy
docker pull 192.168.172.10:8082/ceph/ceph:v17

# ubuntu源
http://192.168.172.10:8081/repository/ubuntu-qinghua/
把 archive.ubuntu.com 换成 192.168.172.10:8081/repository/ubuntu-qinghua


# yum源
[nexusrepo]
name=Nexus Repository
baseurl=http://mirrors.local/repository/yum/$releasever/os/$basearch/
enabled=1
gpgcheck=1
gpgkey=file:///etc/pki/rpm-gpg/RPM-GPG-KEY-Cent0S-7
repo_gpgcheck=0
priority=1
总结
Nginx仓库:
- 目前我测试过的只有Windows、yum、apt
- 所有软件包都需要手动下载,手动上传,略麻烦
- 不同版本的软件需要重新上传
Nexus仓库:
- 目前我测过的有apt、yum、docker,另外没有测过的还有pip。maven等,均可以使用
- 只要配置成功,所有通过该仓库下载的软件,或者镜像都会有缓存
- 每次下载都会默认访问源地址,下载最新软件或镜像。例如:quay的openstack镜像的zed-ubuntu-jammy版本,现在还在持续更新,你一个月之前安装的版本和一个月后装的版本是不完全一样的,但是如果你就是需要一个月前的版本这个是不支持的,除非把源地址改错。这样的话,其他软件也没法继续更新了
所以在使用时根据自己的需要进行选择。