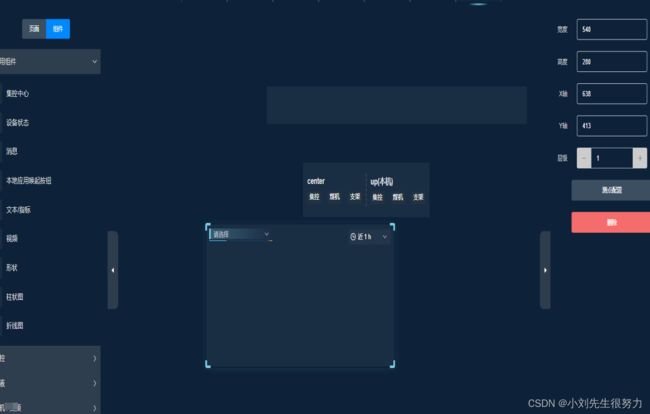
实现 组件: 拖拽、缩放、 生成辅助线 以及吸附功能。
主要介绍实现拖拽时生成辅助线 以及吸附功能。
注意的是 鼠标按下的mousedown 鼠标移动时事件处理 document.onmousemove 和 鼠标抬起document.onmouseup事件处理
生成辅助线和实现吸附功能
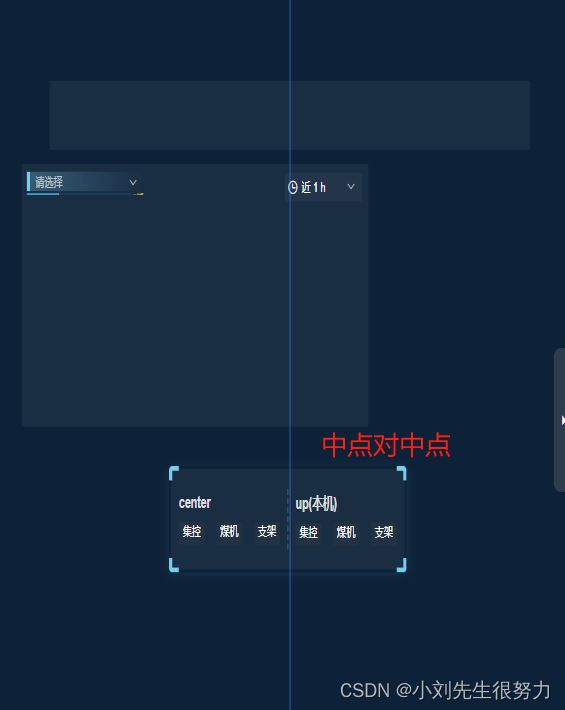
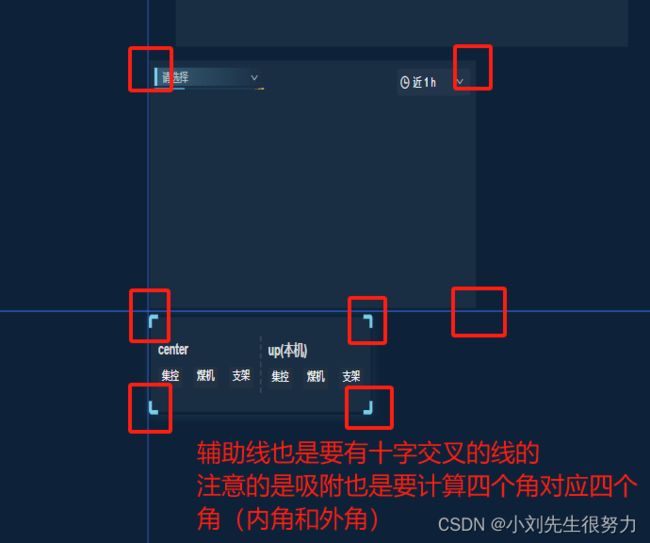
当拖拽元素时,通过比较拖拽元素与画布上其他元素的位置,当某个元素与拖拽元素的距离接近时,显示辅助线
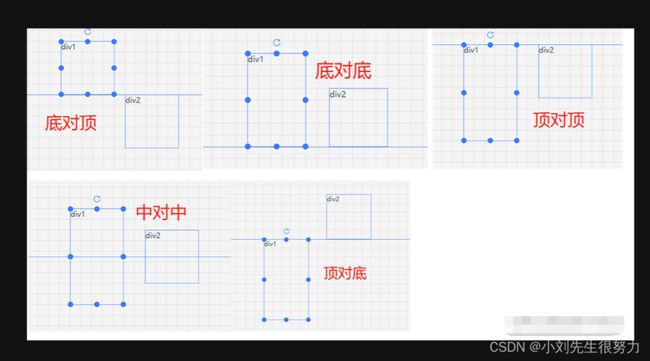
拖拽元素在垂直方向上不同对齐方式 5种
底对顶:拖拽元素的底部与对比元素的顶部对齐
底对底:拖拽元素的底部与对比元素的底部对齐
中对中:拖拽元素的中部与对比元素的中部对齐
顶对顶:拖拽元素的顶部与对比元素的顶部对齐
顶对底:拖拽元素的顶部与对比元素的底部对齐
右对左:拖拽元素的右侧与对比元素的左侧对齐
右对右:拖拽元素的右侧与对比元素的右侧对齐
中对中:拖拽元素的水平中心与对比元素的水平中心对齐
左对左:拖拽元素的左侧与对比元素的左侧对齐
左对右:拖拽元素的左侧与对比元素的右侧对齐
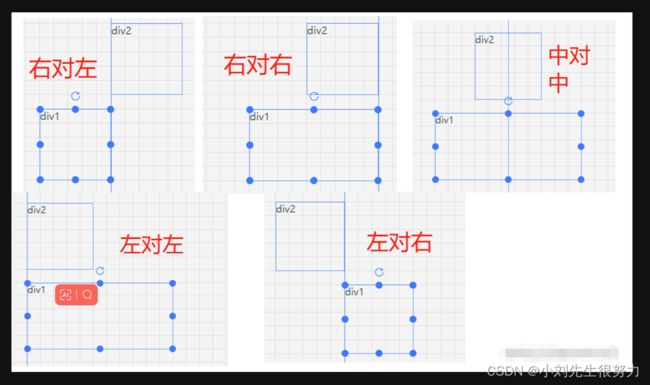
当前拖拽元素除外,保存其他所有元素的位置信息和判断条件用于生成辅助线。
在拖拽过程中,监听 drag 事件,并将拖拽元素的位置与之前保存的数据进行比较。如果满足生成辅助线的条件,则显示相应的辅助线。
解析:函数中使用了一个 lines 对象来保存辅助线的位置信息。遍历画布上的所有元素(除了当前拖拽元素),并为每个元素计算并保存辅助线的位置。
对于垂直方向(y 轴),生成了五种辅助线的位置信息:
顶对顶:拖拽元素的顶部与对比元素的顶部对齐
顶对底:拖拽元素的顶部与对比元素的底部对齐
中:拖拽元素的中部与对比元素的中部对齐
底对顶:拖拽元素的底部与对比元素的顶部对齐
底对底:拖拽元素的底部与对比元素的底部对齐
对于每种对齐方式,lines 对象保存了两个位置信息:
showTop:用于显示辅助线的位置
top:用于计算对齐位置的参考位置
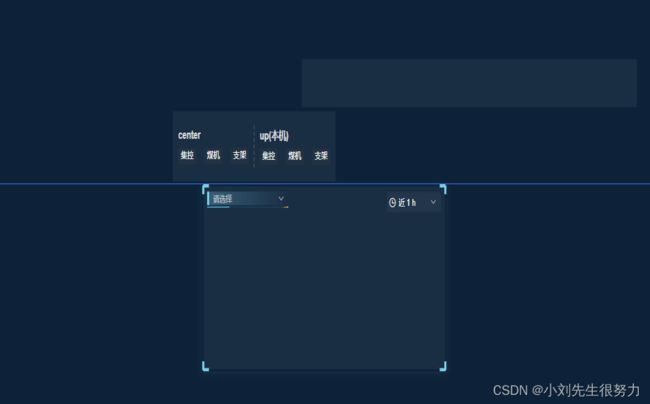

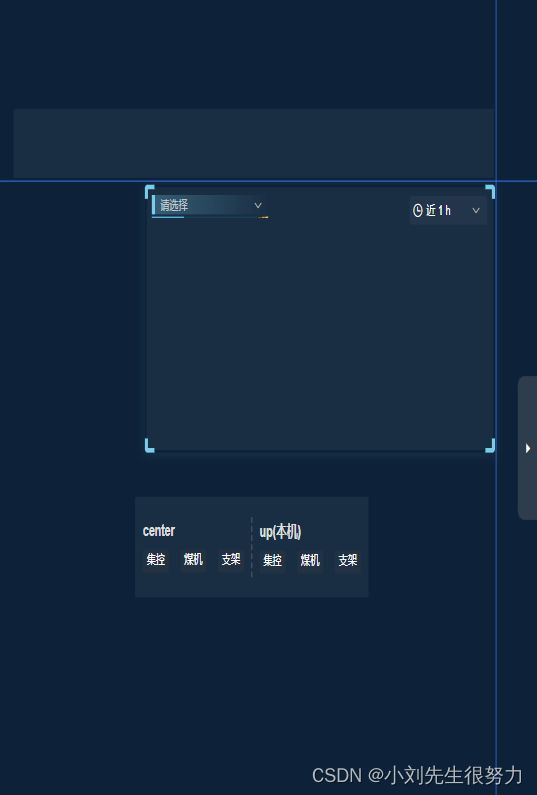
代码 如下。主要展示辅助线和吸附功能。如果在编辑的时候需要加方格遮罩,就需要加样式
.es-container {
  border: 1px solid #ccc;
  background:
        -webkit-linear-gradient(top, transparent calc(var(--es-grid-height) - 1px), #ccc var(--es-grid-height)),
        -webkit-linear-gradient(left, transparent calc(var(--es-grid-width) - 1px), #ccc var(--es-grid-width))
        ;
    background-size: var(--es-grid-width) var(--es-grid-height);
  width: 800px;
  height: 600px;
  position: absolute;
  left: 50%;
  top: 50%;
  transform: translate(-50%, -50%);
我这里去除了,因为不好看。
具体代码如下:
布局线的代码在这里,可以直接搬去用,记得拿样式
这里是样式。
    // 辅助线样式
		#es-container {
		  position: relative;
		  width: 100%;
		  height: 100%;
		  left: 50%;
		  top: 50%;
		  transform: translate(-50%, -50%);

		  [class^="es-markline"] {
		    position: absolute;
		    z-index: 9999;
		    background-color: #3a7afe;
		  }

		  .es-markline-left {
		    height: 100%;
		    width: 1px;
		    top: 0;
		  }

		  .es-markline-top {
		    width: 100%;
		    height: 1px;
		    left: 0;
		  }
		}
辅助线和吸附的事件处理代码在这里
    handleMouseDown (item, i) {
      window.$eventBus.$emit('activeElement', item)
      this.activeEle = window.$utils.cloneDeep(item)
      // 设置辅助线
      this.esContainer = true
      this.currentIndex = i
      let items = item // 选中的组件
      // 获取当前页面的所有对比值
      this.lines = this.calcLines()
      // console.log(this.lines, 'xy数组')
      // 鼠标移动时事件处理
      document.onmousemove = (event) => {
        this.markLine.top = null
        this.markLine.left = null
        for (let i = 0; i < this.lines.y.length; i++) {
          const { top, showTop } = this.lines.y[i]
          if (Math.abs(top - items.y) < 5) {
            this.markLine.top = showTop
            // console.log(this.markLine.top, 'this.markLine.top')
            break
          }
        }
        for (let i = 0; i < this.lines.x.length; i++) {
          const { left, showLeft } = this.lines.x[i]
          if (Math.abs(left - items.x) < 5) {
            this.markLine.left = showLeft
            // console.log(this.markLine.left, 'this.markLine.left')
            break
          }
        }
      }
      // 鼠标抬起时结束
      document.onmouseup = (event) => {
        // 吸附功能
        this.adsorb(event, items, this.markLine.left, this.markLine.top)
        document.onmousemove = document.onmouseup = null
        this.markLine.top = null
        this.markLine.left = null
      }
    },
    adsorb (event, items, left, top) {
      let DISTANCE = 5 // 距离
      const target = event.target
      // console.log(event, '选中的组件items', items, '上边线top', top, '左侧边线', left)
      if (top && left) { // 同时存在两条边线
        // 完成: 左上对右下, 左上对右上, 左上对左上, 左上对左下
        if (Math.abs(items.y - top) <= DISTANCE && Math.abs(items.x - left) <= DISTANCE) {
          this.setPos({ target, x: left, y: top })
          return
        }
        // 完成: 右下对右上, 右下对左上, 右下对左下, 右下对右下
        else if (Math.abs((items.x + items.w) - left) <= DISTANCE && Math.abs((items.y + items.h) - top) <= DISTANCE) {
          this.setPos({ target, x: (left - (items.x + items.w)) + items.x, y: (top - (items.y + items.h)) + items.y })
          return
        }
        // 完成: 左下对左上, 左下对右上, 左下对左下, 左下对右下
        else if (Math.abs((items.y + items.h) - top) <= DISTANCE && Math.abs(items.x - left) <= DISTANCE) {
          this.setPos({ target, x: left, y: top - items.h })
        }
        // 完成: 右上对左下, 右上对右上, 右上对左下, 右上对做上
        else if (Math.abs((items.x + items.w) - left) <= DISTANCE && Math.abs((items.y) - top <= DISTANCE)) {
          this.setPos({ target, x: (left - (items.x + items.w)) + items.x, y: top })
        } else if (items.x === left && items.y === top) {
          this.setPos({ target, x: left, y: top })
        }
      } else {
        if (top) { // 只有top值变化 则 x 赋值 移动的 items.x, Y轴需要计算
          console.log('选中的组件items', items, '上边线top', top)
          // 上 对 下
          if (Math.abs(items.y - top) <= DISTANCE) {
            this.setPos({ target, x: items.x, y: top })
            return
          }
          // 下边框 对 上边框
          else if (Math.abs((items.y + items.h) - top) <= DISTANCE) {
            this.setPos({ target, x: items.x, y: (top - (items.y + items.h)) + items.y })
            return
          }
        }

        if (left) { // 只有left值变化 Y轴赋值 items.y, x轴需要计算
          console.log('选中的组件items', items, '左侧边线', left)
          // 左对左,左对右
          if (Math.abs(items.x - left) <= DISTANCE) {
            this.setPos({ target, x: left, y: items.y })
            return
          }
          // 右对左,右对右
          else if (Math.abs((items.x + items.w) - left) <= DISTANCE) {
            this.setPos({ target, x: (left - (items.x + items.w)) + items.x, y: items.y })
            return
          }
        }
      }
    },

    calcLines () {
      const lines = { x: [], y: [] } // w:[], h:[]
      // 当前选中要拖拽元素大小
      const { w, h, x, y } = this.componentsList[this.currentIndex]
      // console.log("当前组件宽", w, "当前组件高", h, "当前组件x轴", x, "当前组件y轴", y)
      // 循环遍历画布所有元素,将除当前拖拽元素外所有其它元素生成辅助线的位置保存,每个元素x和y都会有5种
      this.componentsList.forEach((item, i) => {
        if (this.currentIndex === i) { return }
        // 非当前元素
        const { y: ATop, x: ALeft, w: AWidth, h: AHeight } = item
        // console.log(
        //   '点击时获取非当前组件其他y轴高度', ATop,
        //   '点击时获取非当前组件其他x轴宽', ALeft,
        //   '点击时获取非当前组件其他width', AWidth,
        //   '点击时获取非当前组件其他height',  AHeight
        // )
        lines.x.push({ left: ALeft, showLeft: ALeft })
        lines.x.push({ left: ALeft + parseInt(AWidth), showLeft: ALeft + parseInt(AWidth) })
        lines.x.push({ left: ALeft + parseInt(AWidth) / 2 - parseInt(w) / 2, showLeft: ALeft + parseInt(AWidth) / 2 })
        lines.x.push({ left: ALeft + parseInt(AWidth) - parseInt(w), showLeft: ALeft + parseInt(AWidth) })
        lines.x.push({ left: ALeft - parseInt(w), showLeft: ALeft })

        lines.y.push({ showTop: ATop, top: ATop })
        lines.y.push({ showTop: ATop, top: ATop - parseInt(h) })
        lines.y.push({ showTop: ATop + parseInt(AHeight) / 2, top: ATop + parseInt(AHeight) / 2 - parseInt(h) / 2 })
        lines.y.push({ showTop: ATop + parseInt(AHeight), top: ATop + parseInt(AHeight) })
        lines.y.push({ showTop: ATop + parseInt(AHeight), top: ATop + parseInt(AHeight) - parseInt(h) })
      })
      return lines
    },
完成
