sql t-sql_增强的PolyBase SQL 2019-使用t-SQL的外部表
sql t-sql
In this article on PolyBase, we will explore more use case scenarios for external tables using T-SQL.
在PolyBase上的本文中,我们将探讨使用T-SQL的外部表的更多用例场景。
SQL Server 2019 provides Data Virtualization through PolyBase to various data sources such as SQL Server, Oracle, Teradata, and ODBC based data sources etc. In my previous articles, we explored
SQL Server 2019通过PolyBase为各种数据源提供数据虚拟化,例如SQL Server,Oracle,Teradata和基于ODBC的数据源等。在我以前的文章中,我们探讨了
- Installation of PolyBase in SQL Server 2019 Preview (CTP 2.0) 在SQL Server 2019预览版(CTP 2.0)中安装PolyBase
- Installation of Azure Data Studio 安装Azure Data Studio
- Installation and setup database and objects in Oracle 11g Express Edition Oracle 11g Express Edition中的安装和设置数据库和对象
- Creating with Azure Data Studio 使用Azure Data Studio创建
- Accessing data 存取资料
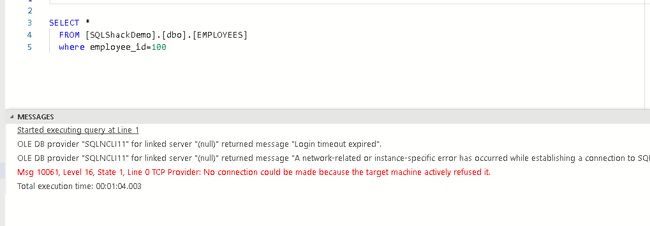
The external table works only if PolyBase is able to connect to the external data source. We might get the below error if there is an issue in the connection.
仅当PolyBase能够连接到外部数据源时,外部表才起作用。 如果连接出现问题,我们可能会收到以下错误消息。
08:32:21 Started executing query at Line 1
08:32:21在第1行开始执行查询
OLE DB provider “SQLNCLI11” for linked server “(null)” returned message “Login timeout expired”.
链接服务器“(null)”的OLE DB提供程序“ SQLNCLI11”返回消息“登录超时已过期”。
OLE DB provider “SQLNCLI11” for linked server “(null)” returned message “A network-related or instance-specific error has occurred while establishing a connection to SQL Server. Server is not found or not accessible. Check if instance name is correct and if SQL Server is configured to allow remote connections. For more information see SQL Server Books Online.”
链接服务器“(null)”的OLE DB提供程序“ SQLNCLI11”返回消息“建立与SQL Server的连接时发生了与网络相关或特定于实例的错误。 找不到服务器或无法访问服务器。 检查实例名称是否正确,以及是否将SQL Server配置为允许远程连接。 有关更多信息,请参见SQL Server联机丛书。”
Msg 10061, Level 16, State 1, Line 0 TCP Provider: No connection could be made because the target machine actively refused it.
消息10061,级别16,状态1,行0 TCP提供程序:无法建立连接,因为目标计算机主动拒绝了它。
Total execution time: 00:01:04.003
总执行时间:00:01:04.003
It might be due to the following reasons
可能是由于以下原因
- The external database is not running. 外部数据库未运行。
- PolyBase Services are not running. If the External database is up and running but we do not have a PolyBase service in running status, we also get the same error message. PolyBase服务未运行。 如果外部数据库已启动并且正在运行,但是我们没有处于运行状态的PolyBase服务,我们也会收到相同的错误消息。
In part 2 of the series, we saw that the external table could be accessed similarly to a relational database table. One more advantage is that we can join them with any relational tables.
在本系列的第2部分中,我们看到可以像访问关系数据库表一样访问外部表。 另一个优点是我们可以将它们与任何关系表连接在一起。
Let us see how we can join the external table with the relational DB tables. I have saved the data into a CSV file so we will import the table using my earlier article, SQL Server Data Import using Azure Data Studio. Therefore, you can follow the article in the same way in the Azure Data Studio also. I will just give high-level steps to import data from flat file into Azure Data Studio in this article.
让我们看看如何将外部表与关系数据库表连接起来。 我已将数据保存到CSV文件中,因此我们将使用我的较早文章“ 使用Azure Data Studio进行SQL Server数据导入”来导入表。 因此,您也可以在Azure Data Studio中以相同的方式阅读本文。 在本文中,我将仅提供高级步骤,将数据从平面文件导入Azure Data Studio。
Launch Import Wizard in Azure Data Studio
在Azure Data Studio中启动导入向导
Specify the input file, table name, and schema name.
指定输入文件,表名和模式名。
Preview data
预览资料
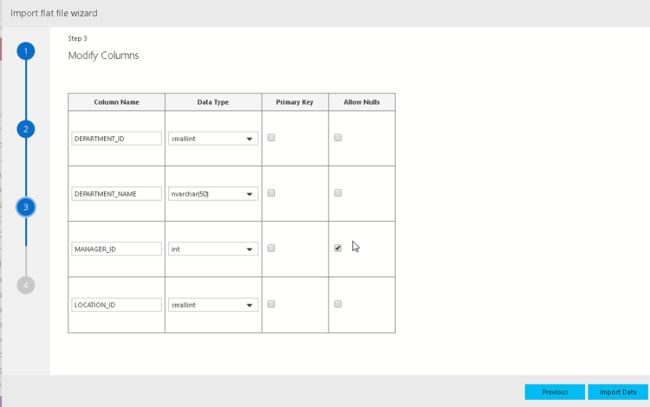
Review the column properties and make changes if required
查看列属性并根据需要进行更改
Import Data into SQL Server and we can see the successful message below:
将数据导入SQL Server,我们可以在下面看到成功的消息:
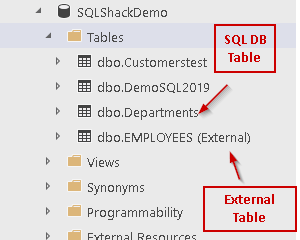
We now have two tables in our table as highlighted below:
现在,我们的表中有两个表,如下所示:
- Dbo.Departments: SQL Database relational table Dbo.Departments:SQL数据库关系表
- Dbo.Employees: External table pointing to Oracle Database Dbo.Employees:指向Oracle数据库的外部表
Now let us run the below query in Azure Data Studio to pull up data from both the tables.
现在,让我们在Azure Data Studio中运行以下查询以从两个表中提取数据。
SELECT
    e.employee_id, e.first_name, e.last_name,
     e.department_id, d.location_id,d.department_name
    FROM
     employees e,
     departments d
    WHERE e.department_id = d.department_id
We can see here that we can join the external data with a relational database table like a normal join operation only. This provides a good way to use the external tables with the way we want in our queries. In the applications as well we can pull up the required information from external data sources using Polybase without going to each data source separately.
我们在这里可以看到,我们可以将外部数据与关系数据库表连接起来,就像普通的连接操作一样。 这提供了一种使用外部表以及查询中所需方式的好方法。 在应用程序中,我们也可以使用Polybase从外部数据源中提取所需的信息,而无需分别访问每个数据源。
PolyBase external tables do not allow the update or insert data as of now. We can only select the data from that table. If we try to update one, we get the below error message:
到目前为止,PolyBase外部表不允许更新或插入数据。 我们只能从该表中选择数据。 如果我们尝试更新一个,则会收到以下错误消息:
Msg 46519, Level 16, State 16, Line 1 DML Operations are not supported with external tables.
外部表不支持消息46519,级别16,状态16,行1 DML操作。
Until now, we have used the External Table Wizard to create tables for Oracle DB. Now let us create the table using t-SQL. We will also use the SQL Server Management Studio 18.0 Preview 4.
到目前为止,我们已经使用外部表向导为Oracle DB创建表。 现在让我们使用t-SQL创建表。 我们还将使用SQL Server Management Studio 18.0 Preview 4。
In this example, we will use the below:
在此示例中,我们将使用以下内容:
- SQL Server Database: ExternalTableDemo SQL Server数据库:ExternalTableDemo
- External DataSource: Oracle Database (Service Name – XE) 外部数据源:Oracle数据库(服务名称– XE)
使用t-SQL进行配置的步骤 (Steps to configure using t-SQL)
The first step is to create a database master key. We need to specify the password to encrypt the master key in the specified DB. We should use complex password meeting the password policy.
第一步是创建数据库主密钥。 我们需要指定密码来加密指定数据库中的主密钥。 我们应该使用符合密码策略的复杂密码。
Use the below query to create a database master key in the ExternalTableDemo database.
使用以下查询在ExternalTableDemo数据库中创建数据库主键。
CREATE MASTER KEY ENCRYPTION BY PASSWORD = 'Pass@word1';
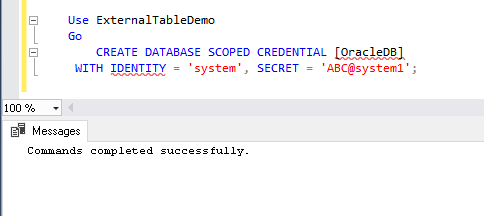
Now we need to create a database-scoped credential. SQL Server uses this credential to access the external data source. We can use the below query to create database scoped credentials. We need to specify the Identity (name of the account ) and SECRET (password) to connect to Oracle Data Source.
现在,我们需要创建一个数据库范围的凭证。 SQL Server使用此凭据访问外部数据源。 我们可以使用以下查询来创建数据库范围的凭证。 我们需要指定标识(帐户名)和SECRET(密码)以连接到Oracle数据源。
Use ExternalTableDemo
Go
CREATE DATABASE SCOPED CREDENTIAL [OracleDB]
 WITH IDENTITY = 'system', SECRET = 'ABC@system1';
In this step, we will configure the external data source. We need to specify the connection string for the data source along with the credential created in above step. The connection string should be in format of ‘
:// [: ]’. 在此步骤中,我们将配置外部数据源。 我们需要指定数据源的连接字符串以及在上一步中创建的凭据。 连接字符串的格式应为“ <供应商>:// <服务器> [:<端口>]”。
CREATE EXTERNAL DATA SOURCE [OracleDBSource]
WITH (LOCATION = 'oracle://192.168.225.185:1521', CREDENTIAL = [OracleDB]);
We can see the Location specified as oracle: //192.168.225.185:1521′ in the format specified above.
我们可以看到以上述指定的格式指定为oracle的Location://192.168.225.185:1521'。
Vendor: Oracle Server: 192.168.225.185 Port: 1521
供应商:Oracle服务器:192.168.225.185端口:1521
Now, we have completed setting up the external data source pointing to Oracle DB with the credentials specified. In this step, we need to create an external table in the SQL Server. We need to specify the table columns, data types, properties similar to a relational database table. We also need to specify the table location in the format of
. . . 现在,我们已完成使用指定的凭据设置指向Oracle DB的外部数据源。 在此步骤中,我们需要在SQL Server中创建一个外部表。 我们需要指定表列,数据类型,类似于关系数据库表的属性。 我们还需要以<数据库名称>。<模式名称>。<对象名称>的格式指定表位置。
In the below query, we can see the location as [XE].[DEMOUSER].[REGIONS] which is in the line of the format specified above.
在下面的查询中,我们可以看到位置为[XE]。[DEMOUSER]。[REGIONS],位于上面指定格式的行中。
CREATE EXTERNAL TABLE [dbo].[REGIONS]
        (
            [REGION_ID] FLOAT NOT NULL,
            [REGION_NAME] VARCHAR(25) COLLATE Latin1_General_CI_AS
        )
WITH (LOCATION = '[XE].[DEMOUSER].[REGIONS]', DATA_SOURCE = [OracleDBSource]);
Note: If there are any issues in the authentication to Oracle Data Source due to invalid username or password in the credential step, we will get the below error. You can see the error code is ORA-01017 that shows error raised by Oracle DB due to invalid credentials.
注意:如果由于凭证步骤中的用户名或密码无效而导致对Oracle数据源的身份验证出现问题,我们将得到以下错误。 您可以看到错误代码为ORA-01017,它显示由于无效凭据导致Oracle DB引发的错误。
You can either recreate the credential or alter the credential with the correct password.
您可以重新创建凭据,也可以使用正确的密码更改凭据。
Now let us run the query again to create the external table. We can see below that query is executed successfully now.
现在,让我们再次运行查询以创建外部表。 我们可以在下面看到该查询现在已成功执行。
We can view the table now in the database.
我们现在可以在数据库中查看该表。
Run the select statement to view the data into the table.
运行select语句以查看表中的数据。
To verify the records, let us view this table directly into the Oracle DB. We can see that the records are same in both the Oracle DB and the SQL DB. This also shows that the External Tables do not contains data instead they pull up the data from the external data source.
为了验证记录,让我们直接在Oracle DB中查看此表。 我们可以看到,Oracle DB和SQL DB中的记录都是相同的。 这也表明外部表不包含数据,而是从外部数据源中提取数据。
Create Statistics to improve performance.
创建统计信息以提高性能。
This is an optional step.
这是一个可选步骤。
CREATE STATISTICS RegionsKeyStatistics ON regions (region_ID) WITH FULLSCAN;We will not see much performance improvement in this example due to only a few records, but you can see the difference as shown.
由于只有很少的记录,因此在此示例中我们不会看到很多性能改进,但是您可以看到所示的区别。
结论 (Conclusion)
In this article on PolyBase, we explored the additional use case of the external case along with creating an external table with t-SQL. You can now create them using both the External table Wizard in Azure Data Studio and using t-SQL as well. I will cover creating an external table with SQL Server as Data Source in my next article. Stay tuned!
在PolyBase上的这篇文章中,我们探索了外部案例的其他用例以及使用t-SQL创建外部表的过程。 现在,您既可以使用Azure Data Studio中的“外部表向导”,也可以使用t-SQL来创建它们。 在下一篇文章中,我将介绍如何使用SQL Server作为数据源创建外部表。 敬请关注!
目录 (Table of contents)
| Enhanced PolyBase SQL 2019 – Installation and basic overview |
| Enhanced PolyBase SQL 2019 – External tables for Oracle DB |
| Enhanced PolyBase SQL 2019 – External tables using t-SQL |
| Enhanced PolyBase SQL 2019 – External tables SQL Server, Catalog view and PushDown |
| Enhanced PolyBase SQL 2019 – MongoDB and external table |
| 增强的PolyBase SQL 2019-安装和基本概述 |
| 增强的PolyBase SQL 2019-Oracle DB的外部表 |
| 增强的PolyBase SQL 2019-使用t-SQL的外部表 |
| 增强的PolyBase SQL 2019-外部表SQL Server,目录视图和下推式 |
| 增强的PolyBase SQL 2019 – MongoDB和外部表 |
翻译自: https://www.sqlshack.com/enhanced-polybase-sql-2019-external-tables-using-t-sql/
sql t-sql


