【zabbix】(一)-二进制安装
一 环境说明
这里使用为 CentOS 7.9(cat /etc/redhat-release)版本进行测试验证,Zabbix Server 采用源码包部署,数据库采用 MySQL8.0 版本,zabbix-web 使用 nginx+php 来实现。具体信息如下
| 软件名 | 版本 | 安装方式 |
|---|---|---|
| Zabbix Server | 5.0.15 | 源码安装 |
| Zabbix Agent | 5.0.15 | 源码安装 |
| MySQL | 8.0.12 | 源码安装 |
| Nginx | 1.22.1 | 源码安装 |
| Php | 7.3.33 | yum安装 |
二 部署MySQL
2.1 基础部署
基础部署参考二进制安装MySQL
2.2 创建初始化数据库以及用户
首先创建存储zabbix数据的数据库,并创建一个zabbix可以连接该库的用户(这个在后面zabbix-server的配置文件中需要填写)
mysql> create database zabbix character set utf8 collate utf8_bin;

mysql> create user 'zabbix'@'%' identified by 'LXYlxy2:024.#8u}';

mysql> grant all privileges on zabbix.* to 'zabbix'@'%' with grant option;

mysql> alter user 'zabbix'@'%' identified with mysql_native_password by 'LXYlxy2:024.#8u}';

--------------------查询-----------------------
mysql> select user,host,plugin from mysql.user;

mysql> show grants for user.zabbix;

mysql> drop user zabbix;
使用创建的用户登录数据库,保证数据库环境部署合适
/usr/local/mysql/bin/mysql -uzabbix -h 192.168.10.110 -p'LXYlxy2:024.#8u}'三 安装Zabbix
3.1 下载并解压软件包
zabbix下载官网
wget https://cdn.zabbix.com/zabbix/sources/stable/5.0/zabbix-5.0.15.tar.gz
3.2 创建zabbix用户
groupadd --system zabbix

useradd --system -g zabbix -d /usr/lib/zabbix -s /sbin/nologin -c "Zabbix Monitoring System" zabbix
3.3 创建程序目录、 安装编译所需要的依赖(根据需要模块添加依赖)
mkdir -p /usr/local/zabbix

cd zabbix-5.0.15

./configure --prefix=/usr/local/zabbix  --enable-server --enable-agent --with-mysql --enable-ipv6 --with-net-snmp --with-libcurl --with-libxml2 --with-openipmi --with-ssh2 --enable-java

make && make install
3.4 初始化数据(进入解压目录下的 database 目录下)
cd zabbix-5.0.15/database/mysql/

mysql -uzabbix -pLXYlxy2:024.#8u} zabbix < schema.sql

mysql -uzabbix -pLXYlxy2:024.#8u} zabbix < images.sql

mysql -uzabbix -pLXYlxy2:024.#8u} zabbix < data.sql
3.5 修改配置文件
vim /usr/local/zabbix/etc/zabbix_server.conf

LogFile=/erp/zabbix/logs/zabbix_server.log
PidFile=/erp/zabbix/logs/zabbix_server.pid
DBHost=192.168.10.110
DBName=zabbix
DBUser=zabbix
DBPassword=LXYlxy2:024.#8u}
Timeout=4
LogSlowQueries=3000
StatsAllowedIP=127.0.0.1
四 安装zabbix-web
这里采用
nginx+php部署来支撑zabbix-web
4.1 安装php
安装php7.3(只在zabbix_server端安装)
yum -y install https://mirrors.aliyun.com/remi/enterprise/remi-release-7.rpm
yum makecache
yum install -y php73-php-fpm php73-php-cli php73-php-bcmath php73-php-gd php73-php-json php73-php-mbstring php73-php-mcrypt php73-php-mysqlnd php73-php-opcache php73-php-pdo php73-php-pecl-crypto php73-php-pecl-mcrypt php73-php-pecl-geoip php73-php-recode php73-php-snmp php73-php-soap php73-php-xml
修改php参数
vim /etc/opt/remi/php73/php.ini

  date.timezone=Asia/Shanghai		//设置时区
  max_execution_time=300		 	//设置执行时间(秒)
  post_max_size=32M 				//Post数据最大容量
  max_input_time=300				//服务器接收时间的限制
  memory_limit=128M					//内存容量限制
启动php
systemctl start php73-php-fpm
systemctl enable php73-php-fpm
4.2 安装nginx
4.21 按照《二进制安装nginx》该文章的1-10步操作
4.22 修改nginx配置文件
vim /usr/local/nginx/conf/nginx.conf

worker_processes  1;

error_log  logs/error.log;
pid        logs/nginx.pid;
events {
    worker_connections  1024;
}

http {
    include       mime.types;
    default_type  application/octet-stream;

        fastcgi_buffers 8 16k;
        fastcgi_buffer_size 32k;
        fastcgi_connect_timeout 300;
        fastcgi_send_timeout 300;
        fastcgi_read_timeout 300;


    log_format  main  '$remote_addr - $remote_user [$time_local] "$request" '
                      '$status $body_bytes_sent "$http_referer" '
                      '"$http_user_agent" "$http_x_forwarded_for"';

    sendfile        on;
    keepalive_timeout  65;
                include                 lyzm/*.cnf;

    }
mkdir lyzm
vim /usr/local/nginx/conf/lyzm/server.cnf


    server {
        listen       80;
        server_name  localhost;
        charset utf8;

                                location / {
                        root   /usr/share/nginx/html/;
                        index index.php index.html index.htm;
                 }

                                location ~ \.php$ {
                        root           /usr/local/nginx/html;
                        fastcgi_pass   127.0.0.1:9000;
                        fastcgi_index  index.php;
                        fastcgi_param  SCRIPT_FILENAME  /usr/share/nginx/html/$fastcgi_script_name;
                        include        fastcgi_params;
                }

    }
4.23 拷贝 zabbix的静态网页到nginx中的站点目录
cp -r zabbix-5.0.15/ui/* /usr/share/nginx/html/
五 启动以及关闭命令
5.1 启动关闭命令
###MySQL启动&关闭
启动:/usr/local/mysql/bin/mysqld_safe --defaults-file=/data/mysql/conf/my.cnf &
关闭:/usr/local/mysql/bin/mysqladmin -uroot -p'LXYlxy2:024.#8u}' shutdown

###php7.3启动&关闭
systemctl start php73-php-fpm
systemctl enable php73-php-fpm

###Nginx启动&关闭
/usr/local/nginx/sbin/nginx
/usr/local/nginx/sbin/nginx -s stop

###zabbix-server启动&关闭
启动:/usr/local/zabbix/sbin/zabbix_server
关闭:-----待更新
5.2 使用systemd进行管理
这样就可以使用systemctl命令进行管理,使zabbix可以开机自启
六 Web界面配置
点点点就行,注意填写正确的数据库相关连接信息
!!!!!!!!!!进入登陆界面(默认账号/密码:Admin/zabbix)
七 Zabbix-Agent的安装与配置
想要监控哪台服务器,就在那台服务器上部署agent
7.1 创建zabbix用户
useradd -M -s /sbin/nologin zabbix  #禁止创建Home目录,禁止控制台登录
passwd zabbix
7.2 下载二进制包(uname -r查看内核版本,选择对应的)
https://cdn.zabbix.com/zabbix/binaries/stable/5.0/5.0.14/zabbix_agent-5.0.14-linux-3.0-amd64-static.tar.gz7.3 创建目录,解压tar包到程序目录
mkdir -p /usr/local/zabbix-agent/
tar -xzvf zabbix_agent-5.0.14-linux-3.0-amd64-static.tar.gz -C /usr/local/zabbix-agent/
7.4 编辑配置文件
vi /usr/local/zabbix-agent/conf/zabbix_agentd.conf

AllowRoot=0                        #使用root身份运行
LogFile=/tmp/zabbix_agentd.log     #日志文件路径(配置文件默认路径,可以不用修改)
Server=192.168.10.110              #服务端IP地址 (zabbix-server端的ip地址)
ServerActive=192.168.10.110        #主动注册模式
#HostMetadata=Yanan          #元数据值随意指定, 服务端添加需要用到
Hostname=elk1                      #客户端主机名
!!!这里的Hostname与zabbix-web界面中的主机名要对应!!!
7.5 重新加载zabbix-agent
kill -9 进程号
for i in `ps aux|grep zabbix-agent|grep -v 'grep'|awk '{print $2}'` ;do kill -9 $i ; done  #使用for循环表达式干掉进程
/usr/local/zabbix-agent/sbin/zabbix_agentd -c /usr/local/zabbix-agent/conf/zabbix_agentd.conf
netstat -antp|grep 10050
tcp 0 0 0.0.0.0:10050 0.0.0.0:* LISTEN 2003/zabbix_agentd
参考zabbix-agent部署
八 Zabbix-web界面的操作
8.1视情况设置中文语言
8.2 添加主机-选择主机群-链接相应的模板
链接相应模板后,ZXB才会检测相应的监控项目,呈现绿色即为成功
8.21 出现问题
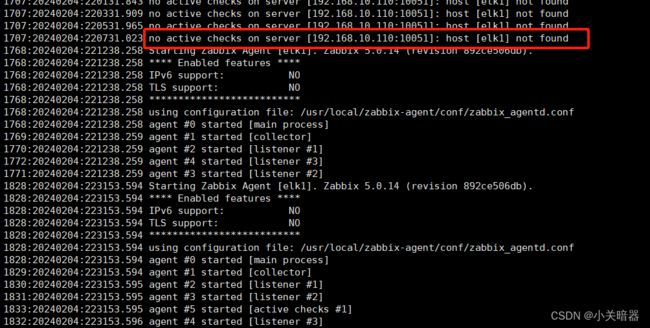
灯一直不亮,查看zabbix-agent的日志,发现server找不主机(web页面的主机名称和agent端配置文件的Hostname不一致),所以要注意上述图的问题,设置主机名 = zabbix-agent的配置文件中 Hostname,发现还是不亮: telnet 端口检测:telnet 192.168.10.110 10051没问题 ,重启后检查zabbix-agent日志发现没有报错,发现是需要链接相应模板或者选择监控项目,ZXB才会绿灯。(Zabbix通常使用颜色和图标来表示监控项的状态,所以说有监控项才会亮灯....之前是没链接模板所以即使不报错也不亮灯)


