Spring && SpringMVC && Mybatis
全网最新SSM快速练手学习项目——简单超易懂系列
-
- 前言——SSM回顾
-
- Spring
- Mybatis
- SpringMVC
- 1、导入ssm框架的基本依赖
- 2、SSM工程整合流程
-
- 2.1、数据库配置文件db.properties
- 2.2、mybatis配置文件mybatisConfig.xml
- 2.3、spring配置文件applicationContext.xml
-
- 2.3.1 applicationContext_dao.xml
- 2.3.2 applicationContext_service.xml
- 2.3.3 applicationContext_trans.xml
- 2.4、springmvc配置文件springmvc.xml
- 2.5、web.xml配置
- 2.6、SSM工程整合流程小技巧
-
- 2.6.1、逆向工程generatorConfiguration
- 3、Spring Boot 整合SSM
-
- 3.1、 准备工作
-
- 3.1.1、创建数据库
- 3.1.2、引入Mybatis整合依赖
- 3.1.3、创建配置文件
- 3.1.4、创建映射文件
- 3.2、案例代码
-
- 3.2.1、创建实体类
- 3.2.2、创建映射接口
- 3.2.3、 创建服务类
- 3.2.4、 创建控制器类
- 3.2.5、 创建主启动类
- 3.3、Spring Boot 整合SSM小结
- 3.4、整合其他数据源
-
- 3.4.1、Druid 数据源
-
- 3.4.1.1、引入 Druid 数据源
- 3.4.1.2、配置 Druid 数据源
- 3.5、编写Mapper接口的小技巧
前言——SSM回顾
Spring
Mybatis
SpringMVC
1、导入ssm框架的基本依赖
  4.0.0

  com.bjpowernode
  mimissm
  1.0
  war


    4.12
    5.2.5.RELEASE

    3.5.1
    1.3.1
    1.2.15
    8.0.22
    1.1.12
    5.1.2

    3.0.1
    2.0

    1.2
    1.6.4
    2.9.6


      org.springframework
      spring-context
      ${spring.version}


      org.springframework
      spring-beans
      ${spring.version}


      org.springframework
      spring-webmvc
      ${spring.version}


      org.springframework
      spring-jdbc
      ${spring.version}


      org.springframework
      spring-aspects
      ${spring.version}


      org.springframework
      spring-jms
      ${spring.version}


      org.springframework
      spring-context-support
      ${spring.version}


      org.springframework
      spring-test
      ${spring.version}


      org.mybatis
      mybatis
      ${mybatis.version}


      org.mybatis
      mybatis-spring
      ${mybatis.spring.version}


      com.github.miemiedev
      mybatis-paginator
      ${mybatis.paginator.version}


      com.github.pagehelper
      pagehelper
      ${pagehelper.version}


      mysql
      mysql-connector-java
      ${mysql.version}


      com.alibaba
      druid
      ${druid.version}


      junit
      junit
      ${junit.version}
      test


      jstl
      jstl
      ${jstl.version}


      javax.servlet
      javax.servlet-api
      3.0.1
      provided


      javax.servlet
      jsp-api
      provided
      ${jsp-api.version}


      com.fasterxml.jackson.core
      jackson-databind
      ${jackson.version}


      org.json
      json
      20140107


      commons-io
      commons-io
      2.4


      commons-fileupload
      commons-fileupload
      1.3.1


        org.mybatis.generator
        mybatis-generator-maven-plugin
        1.3.7


            org.mybatis.generator
            mybatis-generator-core
            1.3.7


            mysql
            mysql-connector-java
            ${mysql.version}


          org.apache.maven.plugins
          maven-compiler-plugin
          3.8.1

          1.8
          1.8
          UTF-8


        src/main/java

          **/*.properties
          **/*.xml

        false


        src/main/resources

          **/*.properties
          **/*.xml

        false
2、SSM工程整合流程
2.1、数据库配置文件db.properties
jdbc.url=jdbc:mysql://localhost:3306/xiaomissm?user=root&password=&useUnicode=true&characterEncoding=gbk&serverTimezone=Asia/Shanghai
jdbc.driverClass=com.mysql.cj.jdbc.Driver
jdbc.user=xxxx
jdbc.passward=xxxxxx
2.2、mybatis配置文件mybatisConfig.xml
2.3、spring配置文件applicationContext.xml
- applicationContext.xml
2.3.1 applicationContext_dao.xml
2.3.2 applicationContext_service.xml
2.3.3 applicationContext_trans.xml
2.4、springmvc配置文件springmvc.xml
2.5、web.xml配置
  Archetype Created Web Application


    contextConfigLocation
    classpath*:applicationContext.xml


    org.springframework.web.context.AbstractContextLoaderInitializer


    springmvc
    org.springframework.web.servlet.DispatcherServlet


      contextConfigLocation
      classpath*:springmvc.xml


    springmvc
    *.do
在上文我们成功搭建了SSM的基本框架并成功的运行出来的helloworld程序;
当然,这样的程序是十分简单的,但他的配置却十分繁琐。
而使用Spring Boot 整合SSM则可以使得搭建过程更为简单
2.6、SSM工程整合流程小技巧
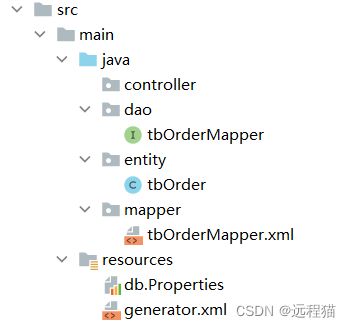
2.6.1、逆向工程generatorConfiguration
逆向生成dao/mapper/entity
generatorConfiguration
逆向工程插件
 <!-- 具体插件,逆向工程的操作是以构建过程中插件形式出现的 -->
      <plugin>
        <groupId>org.mybatis.generator</groupId>
        <artifactId>mybatis-generator-maven-plugin</artifactId>
        <version>1.3.7</version>
        <!-- 插件的依赖 -->
        <dependencies>
          <!-- 逆向工程的核心依赖 -->
          <dependency>
            <groupId>org.mybatis.generator</groupId>
            <artifactId>mybatis-generator-core</artifactId>
            <version>1.3.7</version>
          </dependency>
          <!-- MySQL驱动 -->
          <dependency>
            <groupId>mysql</groupId>
            <artifactId>mysql-connector-java</artifactId>
            <version>${mysql.version}</version>
          </dependency>
        </dependencies>
      </plugin>
逆向工程配置文件
DOCTYPE generatorConfiguration
        PUBLIC "-//mybatis.org//DTD MyBatis Generator Configuration 1.0//EN"
        "http://mybatis.org/dtd/mybatis-generator-config_1_0.dtd">

<generatorConfiguration>

    <properties resource="db.Properties"/>

    <context id="default" targetRuntime="MyBatis3">

        <commentGenerator>
            <property name="suppressData" value="false"/>
            <property name="suppressAllComments" value="false"/>
        commentGenerator>

        <jdbcConnection driverClass="${jdbc.driverClass}"
                        connectionURL="${jdbc.url}"
                        userId="${jdbc.user}"
                        password="${jdbc.passward}">


            <property name="nullCatalogMeansCurrent" value="true"/>

            <property name="useSSL" value="false"/>
 		jdbcConnection>

        <javaTypeResolver>
            <property name="forceBigDecimals" value="false"/>
        javaTypeResolver>

        <javaModelGenerator targetPackage="entity" targetProject="src/main/java">
            <property name="enableSubPackages" value="true"/>
            <property name="trimStrings" value="true"/>
        javaModelGenerator>

        <sqlMapGenerator targetPackage="mapper" targetProject="src/main/java">
            <property name="enableSubPackages" value="true"/>
        sqlMapGenerator>

        <javaClientGenerator type="XMLMAPPER" targetPackage="dao" targetProject="src/main/java">
            <property name="enableSubPackages" value="true"/>
        javaClientGenerator>


        <table tableName="tb_order" domainObjectName="tbOrder" enableCountByExample="false"
               enableUpdateByExample="false" enableDeleteByExample="false" enableSelectByExample="false"
               selectByExampleQueryId="false">


        table>
 <table tableName="tb_order" domainObjectName="tbOrder" enableCountByExample="false"
               enableUpdateByExample="false" enableDeleteByExample="false" enableSelectByExample="false"
               selectByExampleQueryId="false">
        table>

    context>
generatorConfiguration>
3、 实际效果:
按照预期生成了dao\mapper\entity
3、Spring Boot 整合SSM
3.1、 准备工作
3.1.1、创建数据库
--- 创建数据库
CREATE DATABASE IF NOT EXISTS `demo` DEFAULT CHARACTER SET utf8mb4 COLLATE utf8mb4_unicode_ci;

--- 创建数据库表
CREATE TABLE `t_user`
(
    `id`         BIGINT(20)   NOT NULL AUTO_INCREMENT COMMENT '编号',
    `login_name` VARCHAR(200) NULL DEFAULT NULL COMMENT '用户名称' COLLATE 'utf8_general_ci',
    `nick_name`  VARCHAR(200) NULL DEFAULT NULL COMMENT '用户昵称' COLLATE 'utf8_general_ci',
    `passwd`     VARCHAR(200) NULL DEFAULT NULL COMMENT '用户密码' COLLATE 'utf8_general_ci',
    PRIMARY KEY (`id`)
);

--- 插入测试数据
insert into t_user(login_name, nick_name, passwd) VALUES ('zhangsan', '张三', '123456');
3.1.2、引入Mybatis整合依赖
<parent>
    <groupId>org.springframework.boot</groupId>
    <artifactId>spring-boot-starter-parent</artifactId>
    <version>3.0.5</version>
    <relativePath/>
</parent>

<dependencies>
    <dependency>
        <groupId>com.mysql</groupId>
        <artifactId>mysql-connector-j</artifactId>
        <version>8.0.33</version>
    </dependency>
    <dependency>
        <groupId>org.mybatis.spring.boot</groupId>
        <artifactId>mybatis-spring-boot-starter</artifactId>
        <version>3.0.2</version>
    </dependency>
</dependencies>
3.1.3、创建配置文件
在项目的 /src/main/resources 目录下,创建 application.properties 配置文件,添加数据源和 MyBatis 的配置信息(如下)。
# 数据源配置
spring.datasource.driver-class-name=com.mysql.cj.jdbc.Driver
spring.datasource.type=com.zaxxer.hikari.HikariDataSource
spring.datasource.url=jdbc:mysql://127.0.0.1:3306/demo?characterEncoding=utf8&autoReconnect=true&useSSL=false&useUnicode=true&useJDBCCompliantTimezoneShift=true&useLegacyDatetimeCode=false&serverTimezone=UTC
spring.datasource.username=root
spring.datasource.password=123456

# 指定映射文件的路径
mybatis.mapper-locations=classpath:/mapper/*.xml

# 开启驼峰命名映射
mybatis.configuration.map-underscore-to-camel-case=true
3.1.4、创建映射文件
在项目的 /src/main/resources/mapper 目录下,创建 UserMapper.xml 映射文件(如下)。
<?xml version="1.0" encoding="UTF-8"?>
<!DOCTYPE mapper
        PUBLIC "-//mybatis.org//DTD Mapper 3.0//EN"
        "http://mybatis.org/dtd/mybatis-3-mapper.dtd">
<mapper namespace="com.clay.boot.mapper.UserMapper">

    <select id="getById" resultType="com.clay.boot.domain.User">
        select id, login_name, nick_name, passwd
        from `t_user`
    </select>

</mapper>
3.2、案例代码
3.2.1、创建实体类
@Data
@NoArgsConstructor
@AllArgsConstructor
public class User implements Serializable {

    /**
     * 编号
     */
    private Long id;

    /**
     * 用户名称
     */
    private String loginName;

    /**
     * 用户昵称
     */
    private String nickName;

    /**
     * 用户密码
     */
    private String passwd;

}
3.2.2、创建映射接口
@Mapper
public interface UserMapper {

}
3.2.3、 创建服务类
@Service
public class UserService {

    @Autowired
    private UserMapper userMapper;

    public User getById(Long id) {
        return userMapper.getById(id);
    }

}
3.2.4、 创建控制器类
@RestController
public class UserController {

    @Autowired
    private UserService userService;

    @GetMapping("/user/{id}")
    public User getUser(@PathVariable("id") Long id) {
        return userService.getById(id);
    }

}
3.2.5、 创建主启动类
这里需要使用 @MapperScan 注解,指定 Mapper 接口的包扫描路径。值得一提的是,也可以创建独立的 MyBatis 配置类(如 MyBatisConfiguration),然后将 @MapperScan 注解标注在配置类上。
@SpringBootApplication
@MapperScan(basePackages = "com.clay.boot.mapper")
public class MainApplication {

    public static void main(String[] args) {
        SpringApplication.run(MainApplication.class, args);
    }

}
3.3、Spring Boot 整合SSM小结
SSM 整合流程总结
- 导入 mybatis-spring-boot-starter
- 配置数据源信息
- 配置 MyBatis 的 Mapper 接口扫描与 XML 映射文件扫描
- 编写 Bean、Mapper,创建 SQL 映射文件(XML),编写 SQL 语句执行 CRUD 操作,事务等操作依然和 Spring 中的用法一样
- 实现的效果
- 所有 SQL 都可以写在 XML 中
- 所有 MyBatis 配置可以写在 application.properties 里面
第一行注释,编辑数据源
第二行注释,告诉Mybatis XML文件在哪里
第三行注释,告诉Mybatis mapper 接口文件在哪里(在主程序上添加@MapperScan(basePakage),或者在每一个Mapper接口文件上单独添加@Mapper注解)
第四行注释,将数据库中的user_name形式的命名转变为userName的驼峰命名
JDBC 场景的自动配置

MyBatisAutoConfiguration
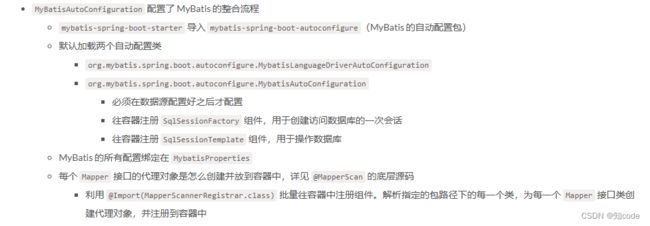
如何分析哪个场景导入以后,开启了哪些自动配置类?
在 spring.boot.autoconfigure 包里面找 classpath:/META-INF/spring/org.springframework.boot.autoconfigure.AutoConfiguration.imports 文件中配置的所有值,就是要开启的自动配置类;但是每个类可能有条件注解,基于条件注解判断哪个自动配置类会生效。
快速定位生效的自动配置,方法如下:
# 是否开启调试模式,可以详细打印开启了哪些自动配置,Positive(生效的自动配置),Negative(不生效的自动配置)
debug=true
3.4、整合其他数据源
SpringBoot 默认使用 Hikari 作为数据源。
3.4.1、Druid 数据源
若希望 MyBatis 使用 Druid 数据源,可以参考以下配置内容。值得一提的是,截止目前为止 Druid 暂时不支持 SpringBoot 3。
3.4.1.1、引入 Druid 数据源
<dependency>
    <groupId>com.alibaba</groupId>
    <artifactId>druid-spring-boot-starter</artifactId>
    <version>${druid-version}</version>
</dependency>
3.4.1.2、配置 Druid 数据源
# 数据源基本配置
spring.datasource.url=jdbc:mysql://192.168.200.100:3306/demo
spring.datasource.driver-class-name=com.mysql.cj.jdbc.Driver
spring.datasource.username=root
spring.datasource.password=123456
spring.datasource.type=com.alibaba.druid.pool.DruidDataSource

# 配置StatFilter监控
spring.datasource.druid.filter.stat.enabled=true
spring.datasource.druid.filter.stat.db-type=mysql
spring.datasource.druid.filter.stat.log-slow-sql=true
spring.datasource.druid.filter.stat.slow-sql-millis=2000

# 配置WallFilter防火墙
spring.datasource.druid.filter.wall.enabled=true
spring.datasource.druid.filter.wall.db-type=mysql
spring.datasource.druid.filter.wall.config.delete-allow=false
spring.datasource.druid.filter.wall.config.drop-table-allow=false

# 配置监控页,内置监控页面的首页是 /druid/index.html
spring.datasource.druid.stat-view-servlet.enabled=true
spring.datasource.druid.stat-view-servlet.login-username=admin
spring.datasource.druid.stat-view-servlet.login-password=admin
spring.datasource.druid.stat-view-servlet.allow=*

# 其他 Filter 的配置这里不再演示,目前支持以下 Filter 的配置,详细说明请参考官方文档或者根据 IDE 提示(spring.datasource.druid.filter.*)进行配置
# StatFilter
# WallFilter
# ConfigFilter
# EncodingConvertFilter
# Slf4jLogFilter
# Log4jFilter
# Log4j2Filter
# CommonsLogFilter
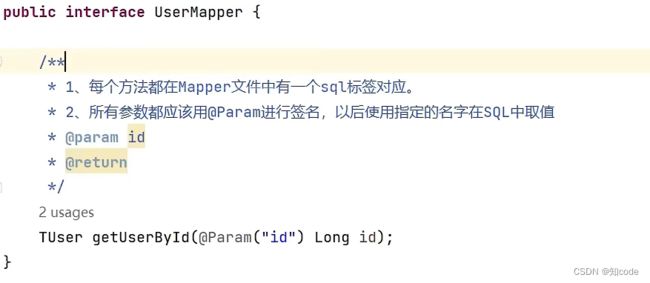
3.5、编写Mapper接口的小技巧
此处可以安装MybatisX插件,
鼠标悬浮接口上右击生成对应的XML文件
鼠标悬浮方法上右击在对应的XML文件中生成SQL语句