Redis哨兵模式
一.哨兵的作用及工作原理
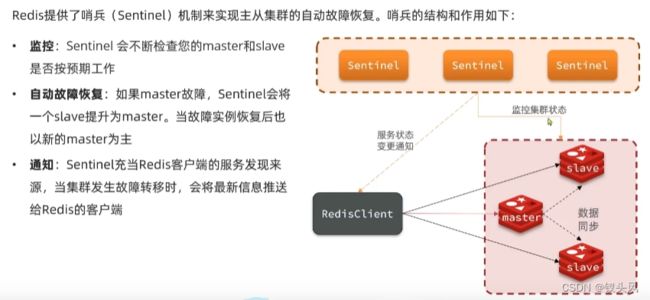
1.哨兵的作用
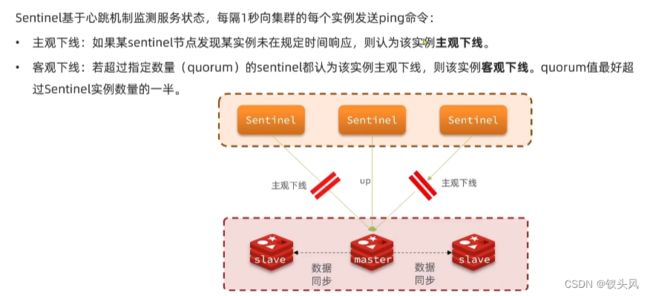
2.哨兵监测集群的方式
3.master宕机后哨兵如何从众多slave中选举一个slave作为新的master
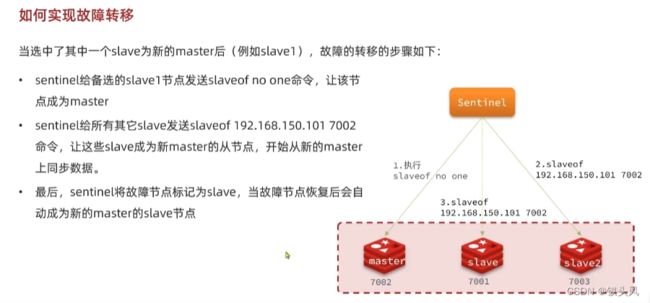
4.哨兵如何实现故障转移
5.总结
二.哨兵集群搭建
1.架构模式
2.搭建流程
说明:搭建哨兵集群只需2步
第一:搭建一个Redis主从集群;
第二:搭建哨兵去监控集群;
1.资源配置
| IP | 端口 | 角色 |
| 192.168.157.130 | 6379 | master |
| 192.168.157.131 | 6379 | slave1 |
| 192.168.157.132 | 6379 | slave2 |
2.上传redis安装包并解压
使用版本为:redis-6.2.14.tar.gz
3.安装gcc
# 三台redis节点
yum install -y gcc tcl
4.进入redis解压目录执行安装命令
# 三台Redis节点
make && make install
说明:执行make && make install命令成功后Redis的启动脚本默认放在/usr/local/bin目录下。且已自动配置好Redis的环境变量你可以在任何地方尝试使用redis-server命令去启动Reids;
5.修改三台Redis节点的redis.conf配置文件
# 允许外部所有IP访问(方便测试)
bind 0.0.0.0

# 允许以守护进程后台运行Redis
daemonize yes

# 为Redis设置访问密码(不同节点密码可不同,最终只需在slave节点中配置master节点密码即可)
requirepass 123456
6.分别在三台Redis节点的redis.conf文件中指定redis实例所绑定的IP
# 在192.168.157.130 redis.conf中添加
replica-announce-ip 192.168.157.130

# 在192.168.157.131 redis.conf中添加
replica-announce-ip 192.168.157.131

# 在192.168.157.132 redis.conf中添加
replica-announce-ip 192.168.157.132
7.在两台从节点中的redis.conf文件中添加连接主节点的密码
# 两台从节点添加,不然启动集群时从节点无法连接到主节点(192.168.157.131 ~ 192.168.157.132)
# 123456为主节点的访问密码
masterauth 123456
8.建立主从关系(在两台从节点的redis.conf中配置)
# 在两台从节点中添加绑定的主节点(192.168.157.131 ~ 192.168.157.132)
# 格式:replicaof <主节点IP> <主节点port>
replicaof 192.168.157.130 6379
9.启动集群
分别启动三台Redis节点
# 因为是在redis的解压目录下执行的,所以此处redis.conf用的是相对路径
redis-server redis.conf
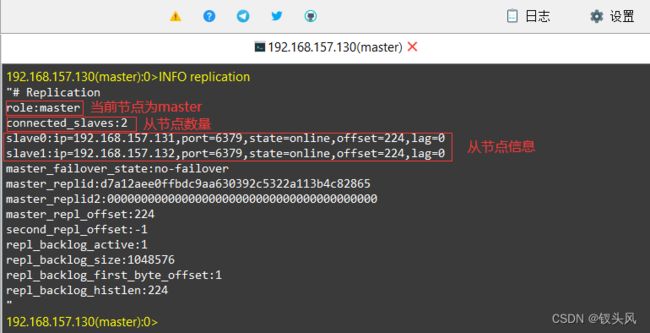
10.查看集群状态
# 查看集群状态命令
INFO replication
至此搭建Redis哨兵集群的第一部分搭建主从集群完成;下面开始完成第二部分配置哨兵;
11.三台Redis节点解压后在其根目录下都有一个sentinel.conf文件
补充:若无sentinel.conf文件可在redis解压目录下自行新建sentinel.conf配置文件(配置参数如下)
# sentinel端口
port 26379

# 配置Redis主节点密码(123456为Redis主节点设置的密码)
sentinel auth-pass mymaster 123456

# 访问sentinel密码
requirepass 654321

# sentinel绑定IP(不同sentinel节点绑定不同IP,当前sentinel在哪个Redis下就绑定哪个Redis的IP)
sentinel announce-ip 192.168.157.130

# sentinel绑定Redis集群master信息
# 格式: sentinel monitor
sentinel monitor mymaster 192.168.157.130 6379 2

# 超时时间
sentinel down-after-milliseconds mymaster 30000

# 超时时间
sentinel failover-timeout mymaster 180000

# 工作目录
dir /tmp
12.分别在三台Redis节点的sentinel.conf文件中指定sentinel(哨兵)所绑定的IP
# 在192.168.157.130 sentinel.conf中修改
sentinel announce-ip 192.168.157.130

# 在192.168.157.131 sentinel.conf中修改
sentinel announce-ip 192.168.157.131

# 在192.168.157.132 sentinel.conf中修改
sentinel announce-ip 192.168.157.132
13.分别在三台Redis节点的sentinel.conf文件中指定监控Redis主节点的信息
# 在三台Redis节点的sentinel.conf中修改(三台节点修改的信息都一样)
# 格式: sentinel monitor
# 参数说明: 如下配置值为2是因为总共只有3个sentinel节点当集群中超过一半的sentinel节点都认为当前master已主观下线则让其客观下线

sentinel monitor mymaster 192.168.157.130 6379 2 说明:为什么sentinel只配置监控master节点而不配置监控slave节点?
监控master节点后可以从master节点中获取到其它slave节点从而实现整个Redis集群节点的监控;
实现Redis节点的监控,sentinel首先要得到所有的Redis节点的信息。sentinel通过在配置文件中配置 sentinel monitor 选项来指定要监控的redis master节点的地址,然后在启动sentinel时,会创建与redis master节点的连接并向master节点发送一个info命令,master节点在收到info命令后,会将自身节点的信息和自己下面所有的slave节点的信息返回给sentinel,sentinel收到反馈后,会与新的slave节点创建连接,接下来就会每隔10秒钟向所有的redis节点发送info命令来获取最新的redis主从结构信息。
14.分别在三台Redis节点的sentinel.conf文件中配置访问Redis主节点密码&&访问sentinel密码及后台启动sentinel
# 在三台Redis节点下的sentinel.conf文件中配置Redis主节点的访问密码
sentinel auth-pass mymaster 123456

# 访问sentinel密码
requirepass 654321

# 在三台Redis节点下的sentinel.conf文件中配置sentinel的启动方式为后台启动
# 为了方便测试此处不以后台启动的方式启动sentinel。就在当前窗口启动sentinel方便查看启动sentinel时的日志信息(daemonize no)
daemonize yes
15.启动三台Redis节点中的三个sentinel实例
# 启动三台Redis节点下的三个sentinel实例(因为是在redis解压目录下启动sentinel实例所以sentinel.conf使用的是相对路径)
redis-sentinel sentinel.conf
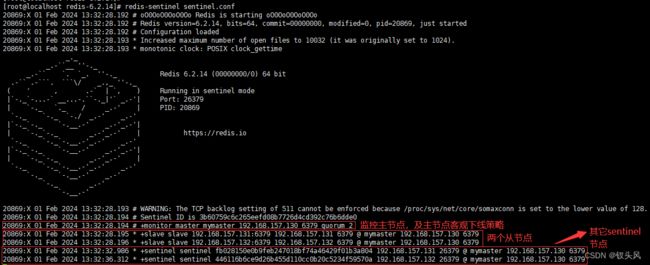
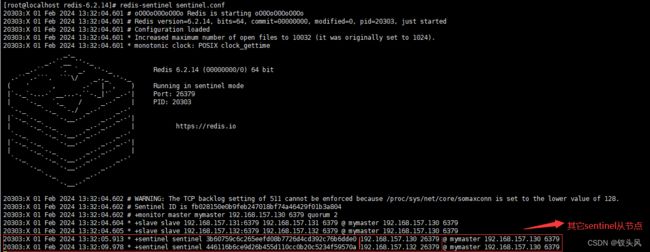
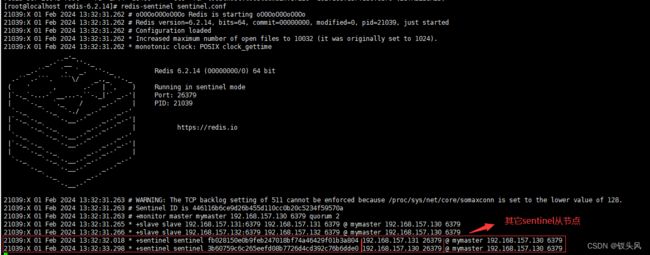
16.查看启动日志
192.168.1.130(master)
192.168.1.131(slave1)
192.168.1.132(slave2)
三.测试哨兵集群
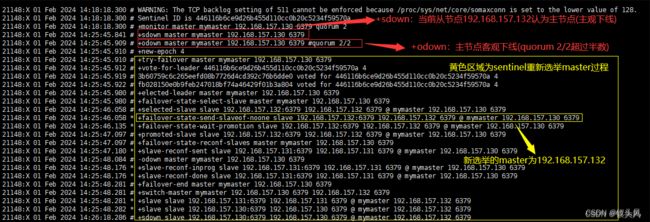
目前已知master节点为192.168.157.130。测试关闭master节点的redis服务观察sentinel(哨兵)是否会重新选举一个新的master节点出来;
1.关闭192.168.157.130master节点服务
2.观察两个从节点sentinel情况
192.168.157.131
192.168.157.132
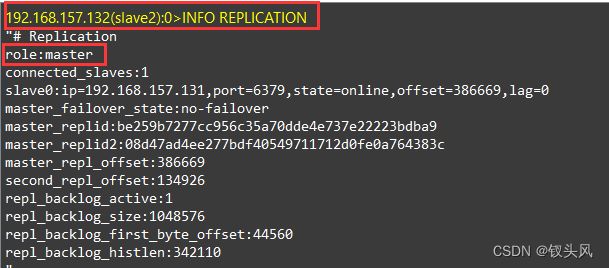
3.sentinel新选举的主节点为192.168.157.132
四.RedisTemplate连接哨兵
1.pom.xml
        org.springframework.boot
        spring-boot-starter-parent
        2.4.0


            org.springframework.boot
            spring-boot-starter-web


            org.springframework.boot
            spring-boot-starter-data-redis
2.配置yml
spring:
  redis:
    password: 123456 # redis的访问密码
    sentinel:
      master: mymaster # 指定sentinel集群名称
      password: 654321 # sentinel的访问密码
      nodes: # 指定redis-sentinel集群信息
        - 192.168.157.130:26379
        - 192.168.157.131:26379
        - 192.168.157.132:26379

# 日志相关配置
logging:
  level:
    io.lettuce.core: debug
  pattern:
    dateformat: MM-dd HH:mm:ss:SSS
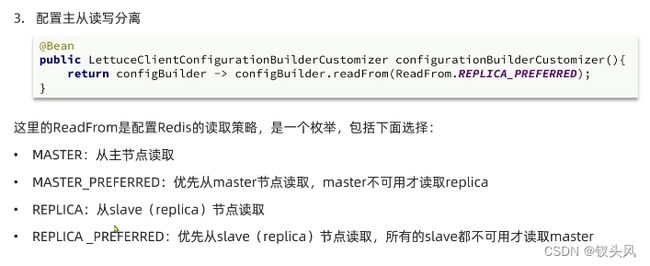
3.配置Redis读写分离
写操作:
一直都是主节点;
读操作:
可选用下面适当的读取策略;
import io.lettuce.core.ReadFrom;
import org.springframework.boot.autoconfigure.data.redis.LettuceClientConfigurationBuilderCustomizer;
import org.springframework.context.annotation.Bean;
import org.springframework.context.annotation.Configuration;
/**
 * 配置Redis集群读写分离
 */
@Configuration
public class RedisConfig {
    @Bean
    public LettuceClientConfigurationBuilderCustomizer clientConfigurationBuilderCustomizer(){
        return clientConfigurationBuilder -> clientConfigurationBuilder.readFrom(ReadFrom.REPLICA_PREFERRED);
    }
}
4.编写测试Controller
import org.springframework.beans.factory.annotation.Autowired;
import org.springframework.data.redis.core.StringRedisTemplate;
import org.springframework.web.bind.annotation.GetMapping;
import org.springframework.web.bind.annotation.PathVariable;
import org.springframework.web.bind.annotation.RequestMapping;
import org.springframework.web.bind.annotation.RestController;

@RestController
@RequestMapping("/redis")
public class RedisController {

    @Autowired
    private StringRedisTemplate stringRedisTemplate;

    /**
     * 获取值
     */
    @GetMapping("/get/{key}")
    public String getValue(@PathVariable String key){
        return stringRedisTemplate.opsForValue().get(key);
    }

    /**
     * 设置值
     */
    @GetMapping("/set/{key}/{value}")
    public String setValue(@PathVariable String key,@PathVariable String value){
        stringRedisTemplate.opsForValue().set(key,value);
        return "success";
    }
}
5.测试
上面controller中提供了两个方法,getValue(读取数据),setValue(保存数据),因为上面Redis已经配置了读写分离所以先测试读写分离;
目前集群分布情况:
主节点:192.168.157.132
从节点:192.168.157.130 ~ 192.168.157.131
1.测试读写分离
写操作:
使用了192.168.157.132这个主节点去执行了写操作;
读操作:
使用了192.168.157.131这个从节点去执行了读操作
2.测试主从故障切换
即主节点192.168.157.132宕机,哨兵重新选出主节点后测试数据读写;
1.关闭主节点192.168.157.132的Redis服务模拟宕机
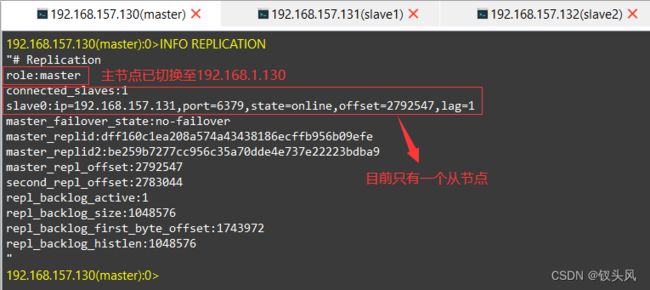
2.执行INFO REPLICATION命令查看最新的主从节点分布情况
目前主节点已自动由192.168.157.132切换至192.168.157.130;
3.测试读写操作
写操作:
使用了192.168.157.130这个主节点去执行了写操作;
读操作:
