HarmonyOS—@Observed装饰器和@ObjectLink嵌套类对象属性变化
@Observed装饰器和@ObjectLink装饰器:嵌套类对象属性变化
概述
@ObjectLink和@Observed类装饰器用于在涉及嵌套对象或数组的场景中进行双向数据同步:
- 被@Observed装饰的类,可以被观察到属性的变化;
- 子组件中@ObjectLink装饰器装饰的状态变量用于接收@Observed装饰的类的实例,和父组件中对应的状态变量建立双向数据绑定。这个实例可以是数组中的被@Observed装饰的项,或者是class
object中的属性,这个属性同样也需要被@Observed装饰。 - 单独使用@Observed是没有任何作用的,需要搭配@ObjectLink或者@Prop使用。
限制条件
- 使用@Observed装饰class会改变class原始的原型链,@Observed和其他类装饰器装饰同一个class可能会带来问题。
- @ObjectLink装饰器不能在@Entry装饰的自定义组件中使用。
// 允许@ObjectLink装饰的数据属性赋值
this.objLink.a= ...
// 不允许@ObjectLink装饰的数据自身赋值
this.objLink= ...
说明
@ObjectLink装饰的变量不能被赋值,如果要使用赋值操作,请使用@Prop。
- @Prop装饰的变量和数据源的关系是是单向同步,@Prop装饰的变量在本地拷贝了数据源,所以它允许本地更改,如果父组件中的数据源有更新,@Prop装饰的变量本地的修改将被覆盖;
- @ObjectLink装饰的变量和数据源的关系是双向同步,@ObjectLink装饰的变量相当于指向数据源的指针。如果一旦发生@ObjectLink装饰的变量的赋值,则同步链将被打断。
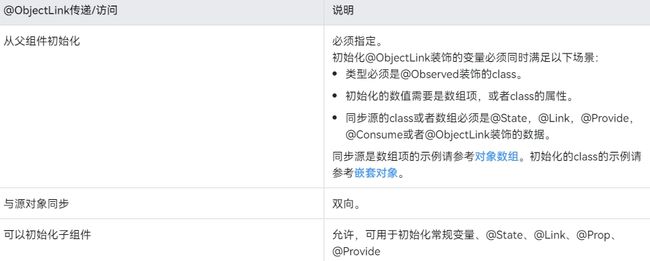
变量的传递/访问规则说明
观察的变化
@Observed装饰的类,如果其属性为非简单类型,比如class、Object或者数组,也需要被@Observed装饰,否则将观察不到其属性的变化。
class ClassA {
  public c: number;
  constructor(c: number) {
    this.c = c;
  }
}
@Observed
class ClassB {
  public a: ClassA;
  public b: number;
  constructor(a: ClassA, b: number) {
    this.a = a;
    this.b = b;
  }
}
以上示例中,ClassB被@Observed装饰,其成员变量的赋值的变化是可以被观察到的,但对于ClassA,没有被@Observed装饰,其属性的修改不能被观察到。
@ObjectLink b: ClassB
// 赋值变化可以被观察到
this.b.a = new ClassA(5)
this.b.b = 5
// ClassA没有被@Observed装饰,其属性的变化观察不到
this.b.a.c = 5
@ObjectLink:@ObjectLink只能接收被@Observed装饰class的实例,可以观察到:
- 其属性的数值的变化,其中属性是指Object.keys(observedObject)返回的所有属性,示例请参考嵌套对象。
- 如果数据源是数组,则可以观察到数组item的替换,如果数据源是class,可观察到class的属性的变化,示例请参考对象数组。
框架行为
1.初始渲染:
a.@Observed装饰的class的实例会被不透明的代理对象包装,代理了class上的属性的setter和getter方法
b.子组件中@ObjectLink装饰的从父组件初始化,接收被@Observed装饰的class的实例,@ObjectLink的包装类会将自己注册给@Observed class。
2.属性更新:当@Observed装饰的class属性改变时,会走到代理的setter和getter,然后遍历依赖它的@ObjectLink包装类,通知数据更新。
使用场景
嵌套对象
以下是嵌套类对象的数据结构。
// objectLinkNestedObjects.ets
let NextID: number = 1;
@Observed
class ClassA {
  public id: number;
  public c: number;
  constructor(c: number) {
    this.id = NextID++;
    this.c = c;
  }
}
@Observed
class ClassB {
  public a: ClassA;
  constructor(a: ClassA) {
    this.a = a;
  }
}
以下组件层次结构呈现的是嵌套类对象的数据结构。
@Component
struct ViewA {
  label: string = 'ViewA1';
  @ObjectLink a: ClassA;
  build() {
    Row() {
      Button(`ViewA [${this.label}] this.a.c=${this.a.c} +1`)
        .onClick(() => {
          this.a.c += 1;
        })
    }
  }
}
@Entry
@Component
struct ViewB {
  @State b: ClassB = new ClassB(new ClassA(0));
  build() {
    Column() {
      // in low version,DevEco may throw a warning,but it does not matter.
      // you can still compile and run.
      ViewA({ label: 'ViewA #1', a: this.b.a })
      ViewA({ label: 'ViewA #2', a: this.b.a })
      Button(`ViewB: this.b.a.c+= 1`)
        .onClick(() => {
          this.b.a.c += 1;
        })
      Button(`ViewB: this.b.a = new ClassA(0)`)
        .onClick(() => {
          this.b.a = new ClassA(0);
        })
      Button(`ViewB: this.b = new ClassB(ClassA(0))`)
        .onClick(() => {
          this.b = new ClassB(new ClassA(0));
        })
    }
  }
}
ViewB中的事件句柄:
- this.b.a = new ClassA(0) 和this.b = new ClassB(new ClassA(0)):
对@State装饰的变量b和其属性的修改。 - this.b.a.c = …
:该变化属于第二层的变化,@State无法观察到第二层的变化,但是ClassA被@Observed装饰,ClassA的属性c的变化可以被@ObjectLink观察到。
ViewA中的事件句柄:
- this.a.c += 1:对@ObjectLink变量a的修改,将触发Button组件的刷新。@ObjectLink和@Prop不同,@ObjectLink不拷贝来自父组件的数据源,而是在本地构建了指向其数据源的引用。
- @ObjectLink变量是只读的,this.a = new
ClassA(…)是不允许的,因为一旦赋值操作发生,指向数据源的引用将被重置,同步将被打断。
对象数组
对象数组是一种常用的数据结构。以下示例展示了数组对象的用法。
@Component
struct ViewA {
  // 子组件ViewA的@ObjectLink的类型是ClassA
  @ObjectLink a: ClassA;
  label: string = 'ViewA1';
  build() {
    Row() {
      Button(`ViewA [${this.label}] this.a.c = ${this.a.c} +1`)
        .onClick(() => {
          this.a.c += 1;
        })
    }
  }
}
@Entry
@Component
struct ViewB {
  // ViewB中有@State装饰的ClassA[]
  @State arrA: ClassA[] = [new ClassA(0), new ClassA(0)];
  build() {
    Column() {
      ForEach(this.arrA,
        (item) => {
          ViewA({ label: `#${item.id}`, a: item })
        },
        (item) => item.id.toString()
      )
      // 使用@State装饰的数组的数组项初始化@ObjectLink,其中数组项是被@Observed装饰的ClassA的实例
      ViewA({ label: `ViewA this.arrA[first]`, a: this.arrA[0] })
      ViewA({ label: `ViewA this.arrA[last]`, a: this.arrA[this.arrA.length-1] })

      Button(`ViewB: reset array`)
        .onClick(() => {
          this.arrA = [new ClassA(0), new ClassA(0)];
        })
      Button(`ViewB: push`)
        .onClick(() => {
          this.arrA.push(new ClassA(0))
        })
      Button(`ViewB: shift`)
        .onClick(() => {
          this.arrA.shift()
        })
      Button(`ViewB: chg item property in middle`)
        .onClick(() => {
          this.arrA[Math.floor(this.arrA.length / 2)].c = 10;
        })
      Button(`ViewB: chg item property in middle`)
        .onClick(() => {
          this.arrA[Math.floor(this.arrA.length / 2)] = new ClassA(11);
        })
    }
  }
}
-
this.arrA[Math.floor(this.arrA.length/2)] = new ClassA(…)
:该状态变量的改变触发2次更新:a.ForEach:数组项的赋值导致ForEach的itemGenerator被修改,因此数组项被识别为有更改,ForEach的item builder将执行,创建新的ViewA组件实例。
b.ViewA({ label:
ViewA this.arrA[last], a: this.arrA[this.arrA.length-1] }):上述更改改变了数组中第二个元素,所以绑定this.arrA[1]的ViewA将被更新; -
this.arrA.push(new ClassA(0)) : 将触发2次不同效果的更新:
a.ForEach:新添加的ClassA对象对于ForEach是未知的itemGenerator,ForEach的item builder将执行,创建新的ViewA组件实例。
b.ViewA({ label:
ViewA this.arrA[last], a: this.arrA[this.arrA.length-1] }):数组的最后一项有更改,因此引起第二个ViewA的实例的更改。对于ViewA({ label:ViewA this.arrA[first], a: this.arrA[0] }),数组的更改并没有触发一个数组项更改的改变,所以第一个ViewA不会刷新。 -
this.arrA[Math.floor(this.arrA.length/2)].c:@State无法观察到第二层的变化,但是ClassA被@Observed装饰,ClassA的属性的变化将被@ObjectLink观察到。
二维数组
使用@Observed观察二维数组的变化。可以声明一个被@Observed装饰的继承Array的子类。
@Observed
class StringArray extends Array {
}
使用new StringArray()来构造StringArray的实例,new运算符使得@Observed生效,@Observed观察到StringArray的属性变化。
声明一个从Array扩展的类class StringArray extends Array {},并创建StringArray的实例。@Observed装饰的类需要使用new运算符来构建class实例。
@Observed
class StringArray extends Array {
}
@Component
struct ItemPage {
  @ObjectLink itemArr: StringArray;
  build() {
    Row() {
      Text('ItemPage')
        .width(100).height(100)

      ForEach(this.itemArr,
        item => {
          Text(item)
            .width(100).height(100)
        },
        item => item
      )
    }
  }
}
@Entry
@Component
struct IndexPage {
  @State arr: Array = [new StringArray(), new StringArray(), new StringArray()];
  build() {
    Column() {
      ItemPage({ itemArr: this.arr[0] })
      ItemPage({ itemArr: this.arr[1] })
      ItemPage({ itemArr: this.arr[2] })
      Divider()
      ForEach(this.arr,
        itemArr => {
          ItemPage({ itemArr: itemArr })
        },
        itemArr => itemArr[0]
      )
      Divider()
      Button('update')
        .onClick(() => {
          console.error('Update all items in arr');
          if (this.arr[0][0] !== undefined) {
            // 正常情况下需要有一个真实的ID来与ForEach一起使用,但此处没有
            // 因此需要确保推送的字符串是唯一的。
            this.arr[0].push(`${this.arr[0].slice(-1).pop()}${this.arr[0].slice(-1).pop()}`);
            this.arr[1].push(`${this.arr[1].slice(-1).pop()}${this.arr[1].slice(-1).pop()}`);
            this.arr[2].push(`${this.arr[2].slice(-1).pop()}${this.arr[2].slice(-1).pop()}`);
          } else {
            this.arr[0].push('Hello');
            this.arr[1].push('World');
            this.arr[2].push('!');
          }
        })
    }
  }
}
作为一名合格一线开发程序员,大家心里肯定会有很多疑问!鸿蒙系统这么强大~~
为了能够让大家跟上互联网时代的技术迭代,在这里跟大家分享一下我自己近期学习心得以及参考网上资料整理出的一份最新版的鸿蒙学习提升资料,有需要的小伙伴自行领取,限时开源,先到先得~~~~
领取以下高清学习路线原图请点击→《鸿蒙全套学习指南》纯血鸿蒙HarmonyOS基础技能学习路线图

领取以上完整高清学习路线图,请点击→《鸿蒙开发学习之应用模型》小编自己整理的部分学习资料(包含有高清视频、开发文档、电子书籍等)
以上分享的学习路线都适合哪些人跟着学习?
- -应届生/计算机专业通过学习鸿蒙新兴技术,入行互联网,未来高起点就业。
- -0基础转行提前布局新方向,抓住风口,自我提升,获得更多就业机会。
- -技术提升/进阶跳槽发展瓶颈期,提升职场竞争力,快速掌握鸿蒙技术,享受蓝海红利。

最后
鸿蒙开发学习是一个系统化的过程,从基础知识的学习到实战技能的锤炼,再到对前沿技术的探索,每一环节都至关重要。希望这份教程资料能帮助您快速入门并在鸿蒙开发之路上步步攀升,成就一番事业。让我们一起乘风破浪,拥抱鸿蒙生态的广阔未来!
如果你觉得这篇内容对你有帮助,我想麻烦大家动动小手给我:点赞,转发,有你们的 『点赞和评论』,才是我创造的动力。
关注我,同时可以期待后续文章ing,不定期分享原创知识。
想要获取更多完整鸿蒙最新VIP学习资料,请点击→《鸿蒙基础入门学习指南》


