c#widows服务生成exel文件并发送邮件
这周组织上给安排个小活,做个windows服务定时从数据库中查询出数据并发送邮件给相关人员。在生成excel文件的时候,编码是个问题,在这块折腾了好半天。
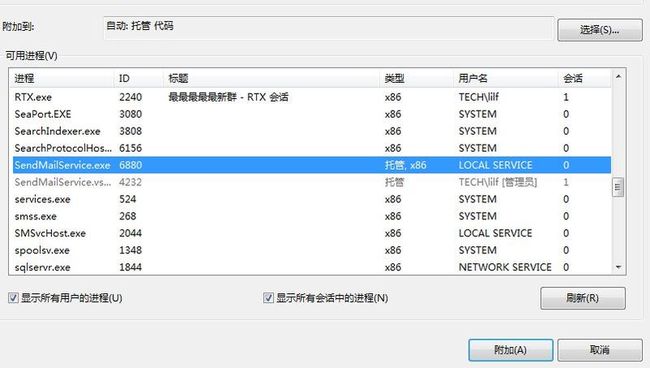
另外,很少做windows服务,对它的调试也缺乏经验,一开始就是写日志的方式来调试,后来,看网上哥们说,附件进程就可以调试,小试一把啊,果然爽的不亦乐乎啊。
其实,这东西很简单,就是很少做不熟悉而已啊,还是写出来,方便以后查阅吧。
首先,要建一windows服务项目,而后把项目名称叫做SendMailService,把Service1改名为MailService。另外,要在服务上拖一timer组件,一定是System.Timers.Timer
这个。点工具箱右键选择“选择项...”出现如图界面
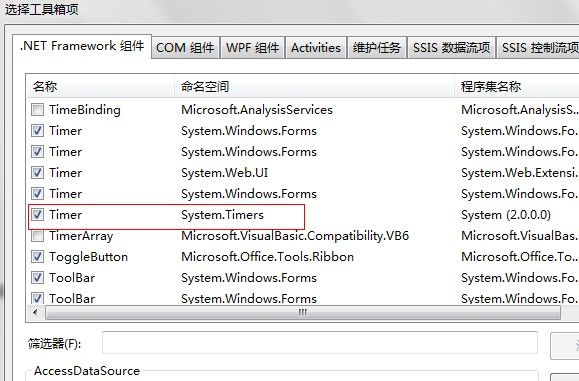
点确定后,就可以拖到服务设计界面了。右键timer1修改一些属性,改名为mailTimer,设置Interval属性,这里我设置1分钟60000。
而后双击timer,自动生成mailTimer_Elapsed()方法,查看MailService.Designer.cs自动生成的代码如下
   ///


   <summary>


   ///

    设计器支持所需的方法 - 不要


   ///

    使用代码编辑器修改此方法的内容。


   ///


   </summary>


   private


   void

    InitializeComponent()
 {


   this

   .mailTimer

   =


   new

    System.Timers.Timer();
 ((System.ComponentModel.ISupportInitialize)(

   this

   .mailTimer)).BeginInit();


   //


   //

    mailTimer


   //


   this

   .mailTimer.Enabled

   =


   true

   ;


   this

   .mailTimer.Interval

   =


   60000

   ;


   this

   .mailTimer.Elapsed

   +=


   new

    System.Timers.ElapsedEventHandler(

   this

   .mailTimer_Elapsed);


   //


   //

    MailService


   //


   this

   .ServiceName

   =


   "

   MailService

   "

   ;
 ((System.ComponentModel.ISupportInitialize)(

   this

   .mailTimer)).EndInit();

 }
整个MailService的方法如下,
   public

    MailService()
 {
 InitializeComponent();


   this

   .ServiceName

   =


   "

   MailService

   "

   ;


   this

   .EventLog.Source

   =


   "

   MailService

   "

   ;


   this

   .EventLog.Log

   =


   "

   Application

   "

   ;


   this

   .CanShutdown

   =


   true

   ;


   this

   .CanStop

   =


   true

   ;


   if

    (

   !

   EventLog.SourceExists(

   "

   MailService

   "

   ))
 EventLog.CreateEventSource(

   "

   MailService

   "

   ,

   "

   Application

   "

   );
 }


   protected


   override


   void

    OnStart(

   string

   [] args)
 {


   this

   .mailTimer.Enabled

   =


   true

   ;
 }


   protected


   override


   void

    OnStop()
 {


   this

   .mailTimer.Enabled

   =


   false

   ;
 }


   private


   void

    mailTimer_Elapsed(

   object

    sender, System.Timers.ElapsedEventArgs e)
 {


   new

    SendMailData().DeliveryMail();
 }
写了个简单的方法发送同步右键,整个类的代码如下
   using

    System;


   using

    System.Collections.Generic;


   using

    System.Linq;


   using

    System.Text;


   using

    System.Net;


   using

    System.Net.Mail;


   using

    System.IO;


   namespace

    SendMailService
{


   public


   class

    SimpleSendMail
 {


   public


   static


   void

    SendMail(

   string

    to,

   string

    from,

   string

    fromPassword,

   string

    subject,

   string

    body,

   bool

    isHtmlBody
 ,

   string

    attaFilePaths)
 {


   try


 {
 MailMessage message

   =


   new

    MailMessage(from, to, subject, body);
 message.BodyEncoding

   =

    Encoding.UTF8;
 message.IsBodyHtml

   =

    isHtmlBody;


   foreach

    (

   string

    path

   in

    attaFilePaths.Split(

   new


   char

   [] {

   '

   ,

   '

    }, StringSplitOptions.RemoveEmptyEntries))
 {


   if

    (

   !

   string

   .IsNullOrEmpty(path)

   &&

    File.Exists(path))
 {
 message.Attachments.Add(

   new

    Attachment(path));
 }
 }
 SmtpClient smtpClient

   =


   new

    SmtpClient();
 smtpClient.Host

   =


   "

   smtp.

   "


   +

    message.From.Host;
 smtpClient.UseDefaultCredentials

   =


   false

   ;
 smtpClient.Credentials

   =


   new

    NetworkCredential(from, fromPassword);
 smtpClient.DeliveryMethod

   =

    SmtpDeliveryMethod.Network;
 smtpClient.Send(message);
 }


   catch

    (Exception ex)
 {


   throw


   new

    Exception(

   "

   邮件发送失败!错误信息:

   "


   +

    ex.Message);
 }
 }
 }
}
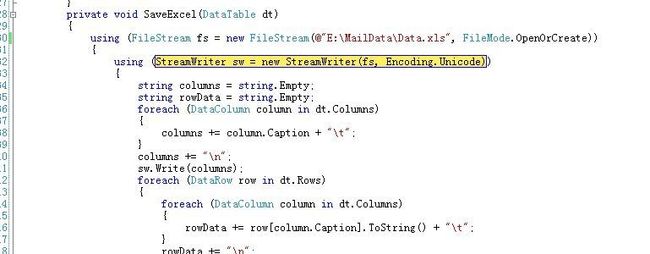
下面就是让我小费事的保存excel问题,编码问题害死人啊,整个类的代码如下
   public


   class

    SendMailData
 {


   public


   void

    DeliveryMail()
 {
 SaveExcel(GetData());
 SimpleSendMail.SendMail(

   "

   接收邮箱

   "

   ,

   "

   发送邮箱

   "

   ,

   "

   发送邮箱密码

   "

   ,

   "

   简单邮件测试

   "

   ,

   "

   简单邮件测试

   "

   ,

   true

   ,


   @"

   E:\MailData\Data.xls

   "

   );
 }


   private

    DataTable GetData()
 {


   string

    strSQL

   =


   "

   查询语句

   "

   ;


   return


   "

   执行结果

   "

   ;
 }


   private


   void

    SaveExcel(DataTable dt)
 {


   using

    (FileStream fs

   =


   new

    FileStream(

   @"

   E:\MailData\Data.xls

   "

   , FileMode.OpenOrCreate))
 {


   using

    (StreamWriter sw

   =


   new

    StreamWriter(fs, Encoding.Unicode))
 {


   string

    columns

   =


   string

   .Empty;


   string

    rowData

   =


   string

   .Empty;


   foreach

    (DataColumn column

   in

    dt.Columns)
 {
 columns

   +=

    column.Caption

   +


   "

   \t

   "

   ;
 }
 columns

   +=


   "

   \n

   "

   ;
 sw.Write(columns);


   foreach

    (DataRow row

   in

    dt.Rows)
 {


   foreach

    (DataColumn column

   in

    dt.Columns)
 {
 rowData

   +=

    row[column.Caption].ToString()

   +


   "

   \t

   "

   ;
 }
 rowData

   +=


   "

   \n

   "

   ;
 }

 sw.Write(rowData);
 sw.Flush();
 }
 }
 }

 }
一个自动查询数保存为excel并发邮件的windows服务的简单实现,就这么多了。下面介绍下安装windows服务,用.net自带的installutil.exe安装。
在MailService设计界面右键选择“添加安装程序”,系统自动添加一个名叫ProjectInstaller的组件类,设计界面有两个组件,如图
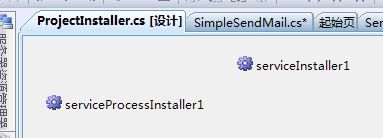
修改serviceInstaller1的StartType属性为Automatic,修改serviceProcessInstaller1的Account为LocalService。而后,点击重新生成即可。
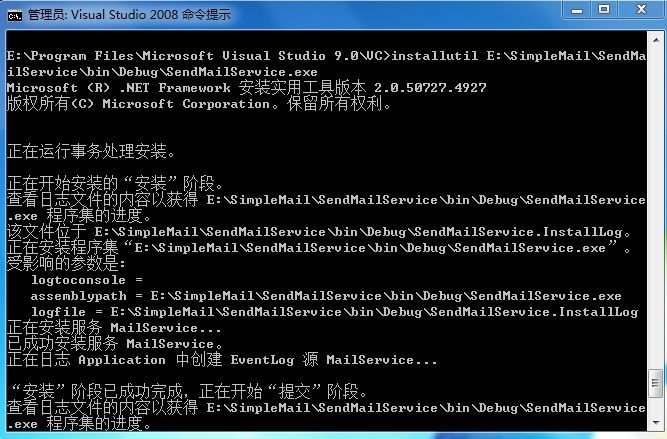
打开.net命令工具,输入如图命令,开始安装服务
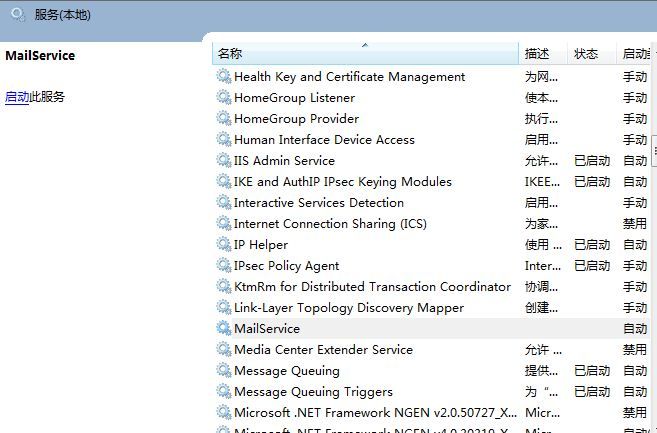
安装成功后,可以在服务管理中启用服务,如图
让服务保持运行状态,就可以在VS里面调试程序了,点击调试菜单,选择附加到进程,出现如下界面,而后选择刚才安装的服务
点击附加就可以触发断点了。
触发断点的界面如下:
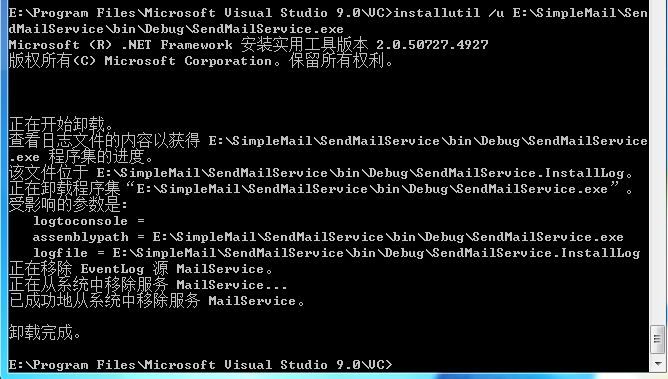
测试完毕后,把系统服务给卸了,还操作系统一个清白,卸载用如图命令即可
至此,一篇自动发送邮件的文章就忽悠完了。