Android学习之Styles And Includes
最近在看 Android Programming: The Big Nerd Ranch Guide,书写的不错,推荐级别。打算把看书学到的东西,一点一点记录下来。目前看到24章,讲的是style 和 include。
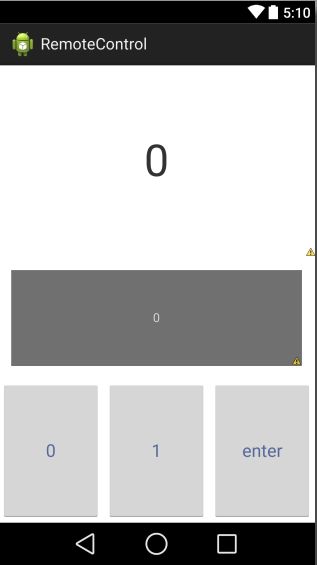
本章会制作一个简单的遥控器界面。界面最终效果如下:

顶部区域会显示当前频道,再下面那个区域是用来显示正在输入的频道。数字键就是用来输入数字的,Delete键用来清空正在输入的数字,Enter键用来把顶部的频道数字替换为输入的频道数字。就这么简单~
简单界面一
看到上面的显示图片,里面有这么多按钮,你会怎么制作这个界面呢?写个布局文件,然后再添加12个按钮?
我们先写一个只有3个按钮的界面看看效果。布局文件如下:
<?xml version="1.0" encoding="utf-8"?>

<TableLayout xmlns:android="http://schemas.android.com/apk/res/android"

    android:id="@+id/fragment_remote_control_tableLayout"

    android:layout_width="match_parent"

    android:layout_height="match_parent"

    android:stretchColumns="*" >


    <TextView

        android:id="@+id/fragment_remote_control_selectedTextView"

        android:layout_width="match_parent"

        android:layout_height="0dp"

        android:layout_weight="2"

        android:gravity="center"

        android:text="0"

        android:textSize="50dp" />


    <TextView

        android:id="@+id/fragment_remote_control_workingTextView"

        android:layout_width="match_parent"

        android:layout_height="0dp"

        android:layout_margin="15dp"

        android:layout_weight="1"

        android:background="#555555"

        android:gravity="center"

        android:text="0"

        android:textColor="#cccccc"

        android:textSize="20dp" />


    <TableRow android:layout_weight="1" >


        <Button

            android:id="@+id/fragment_remote_control_zeroButton"

            android:layout_width="0dp"

            android:layout_height="match_parent"

            android:text="0" />


        <Button

            android:id="@+id/fragment_remote_control_oneButton"

            android:layout_width="0dp"

            android:layout_height="match_parent"

            android:text="1" />


        <Button

            android:id="@+id/fragment_remote_control_enterButton"

            android:layout_width="0dp"

            android:layout_height="match_parent"

            android:text="Enter" />

    </TableRow>


</TableLayout>
这里使用的布局文件是 TableLayout,用过的应该都知道相关特性,这里还是贴出别人总结好的内容,粘贴内容来自打开链接(我以后也可以看看^_^):
- 有多少个TableRow对象就有多少行,
- 列数等于最多子控件的TableRow的列数
- 直接在TableLayout加控件,控件会占据一行
- TableLayout属性(也叫全局属性):*代表所有列
- android:shrinkColumns -------设置可收缩的列,(内容过多,则收缩,扩展到第二行,控件没布满TableLayout时不起作用)
- android:stretchColumns ------设置可伸展的列,(有空白则填充)
- 列可以同时具备stretchColumns及shrinkColumns属性
- android:collapseColumns ------设置要隐藏的列(索引列从0开始)
- 内部控件属性:
- android:layout_column -------该单元格在第几列显示
- android:layout_span -------该单元格占据列数,默认为1
看完特性,是否能想象出显示效果呢?对于上面的布局文件还有两个地方要说明一下:
- android:stretchColumns="*" 可以让每列都保持一样的宽度
- Text 的单位用的是 dp 而不是 sp,是为了让字在不同大小界面上都能保持大小固定不变
显示效果如下:
简单界面二
三个按钮的界面完成了,如果你想给按钮加一个属性的话,这里有三个按钮,你是不是要重复操作三次,如果这里有12个按钮呢?根据我多年的编程经验(大言不惭^_^),如果有一个功能会被用到两次以上,我就会把这个功能封装或者抽象出来。毕竟程序员还是很懒的,能偷懒的地方还是要偷懒。在这里 Android 给出了解决方案,就是使用 style 和 include。
关于 style 是什么,下面这段话摘自Google官方文档(我就不翻译了^_^)。
A style is a collection of properties that specify the look and format for a View or window. A style can specify properties such as height, padding, font color, font size, background color, and much more. A style is defined in an XML resource that is separate from the XML that specifies the layout.
Styles in Android share a similar philosophy to cascading stylesheets in web design—they allow you to separate the design from the content.
通过上面的话可以知道,style也是用xml书写,属于resource标签下的内容。和定义 strings.xml 类似,我们也会把 styles.xml 放在 res/values 文件夹下面。
我们在创建工程的时候,Android已经帮我们建好了 styles.xml 文件,现在去 res/values 下就可以看到。你去工程目录下看的话会发现有三个 values文件夹,values,values-v11, values-v14。分别打开文件夹下的 styles.xml 文件,然后看注释,就大概明白这几个文件夹的作用了。我们以 values-v11 下的 styles.xml 来看。
<resources>


    <!--

        Base application theme for API 11+. This theme completely replaces

        AppBaseTheme from res/values/styles.xml on API 11+ devices.

    -->

    <style name="AppBaseTheme" parent="android:Theme.Holo.Light">

        <!-- API 11 theme customizations can go here. -->

    </style>


</resources>
里面写了一个 style,看名字,是用作程序基本主题显示的,然后看注释就会发现,这个 style 是用于 API 11+(也就是 android 3.0以上)的。通过以上内容,可知这三个文件夹内的 styles.xml是用于不同SDK的,比如说你在这三个文件夹内写的是不同的 styles.xml,那么在android 3.0 + 的机子上读的就是 values-v11 下的 styles.xml,在 android 4.0+的机子上读的就是 values-v14下的 styles.xml,如果是其他版本的系统或者values-v11和values-v14下没有 styles.xml 文件,则系统就会使用values下的styles.xml。好,啰嗦完毕,回归本章。
因为我手机上的系统是4.4.4的,为了简单方便,我只在values-v14下的 styles.xml 中写了新添加的 style。我们把按钮拥有的共同属性提出来,然后作为一个 style 写到 styles.xml中。 写完后的 styles.xml 内容如下(res/values-v14):
<resources xmlns:android="http://schemas.android.com/apk/res/android">


    <!--

        Base application theme for API 14+. This theme completely replaces

        AppBaseTheme from BOTH res/values/styles.xml and

        res/values-v11/styles.xml on API 14+ devices.

    -->

    <style name="AppBaseTheme" parent="android:Theme.Holo.Light.DarkActionBar">

        <!-- API 14 theme customizations can go here. -->

    </style>


    <style name="RemoteButton">

        <item name="android:layout_width">0dp</item>

        <item name="android:layout_height">match_parent</item>

        <item name="android:textColor">#556699</item>

        <item name="android:textSize">20dp</item>

        <item name="android:layout_margin">3dp</item>

    </style>


 </resources>
RemoteButton就是添加的自定义 style。然后把这个style应用到先前写的布局文件中同时把 Button 原有的属性
android:layout_width="0dp"

android:layout_height="match_parent"
删除掉。改变的代码如下:
<TableLayout xmlns:android="http://schemas.android.com/apk/res/android" >

...


    <TableRow android:layout_weight="1" >


        <Button

            android:id="@+id/fragment_remote_control_zeroButton"

            style="@style/RemoteButton"

            android:text="0" />


        <Button

            android:id="@+id/fragment_remote_control_oneButton"

            style="@style/RemoteButton"

            android:text="1" />


        <Button

            android:id="@+id/fragment_remote_control_enterButton"

            style="@style/RemoteButton"

            android:text="Enter" />

    </TableRow>


</TableLayout>
这样改变布局代码后,显示效果是一样的,代码也重用了。
正式界面
再看最后的显示效果界面,界面中有4行按钮,每行有3个按钮,一共12个按钮,而且每个按钮基本一样,结合TableLayout特性,我们可以重用TableRow来做出 12 个按钮。
在 res/layout 下面创建一个 button_row.xml 文件,文件内容如下:
<?xml version="1.0" encoding="utf-8"?>

<TableRow xmlns:android="http://schemas.android.com/apk/res/android" >


    <Button style="@style/RemoteButton" />

    <Button style="@style/RemoteButton" />

    <Button style="@style/RemoteButton" />


</TableRow>
一个 TableRow 中有3个按钮,每个按钮使用名为RemoteButton的style。
再次修改布局文件:
<TableLayout xmlns:android="http://schemas.android.com/apk/res/android"

    xmlns:tools="http://schemas.android.com/tools"

    android:id="@+id/fragment_remote_control_tableLayout"

    android:layout_width="match_parent"

    android:layout_height="match_parent"

    android:stretchColumns="*">


    <TextView

        android:id="@+id/fragment_remote_control_selectedTextView"

        android:layout_width="match_parent"

        android:layout_height="0dp"

        android:layout_weight="2"

        android:gravity="center"

        android:text="0"

        android:textSize="50dp"/>


    <TextView

        android:id="@+id/fragment_remote_control_workingTextView"

        android:layout_width="match_parent"

        android:layout_height="0dp"

        android:layout_weight="1"

        android:layout_margin="15dp"

        android:background="#555555"

        android:gravity="center"

        android:text="0"

        android:textColor="#cccccc"/>


     <!-- <TableRow android:layout_weight="1">

        <Button

            android:id="@+id/fragment_remote_control_zeroButton"

            style="@style/RemoteButton"

            android:text="0"/>


        <Button

            android:id="@+id/fragment_remote_control_oneButton"

            style="@style/RemoteButton"

            android:text="1"/>


        <Button

            android:id="@+id/fragment_remote_control_enterButton"

            style="@style/RemoteButton"

            android:text="enter"/>

    </TableRow> -->


     <include

        android:layout_width="match_parent"

        android:layout_height="match_parent"

        android:layout_weight="1"

        layout="@layout/button_row" />


    <include

        android:layout_width="match_parent"

        android:layout_height="match_parent"

        android:layout_weight="1"

        layout="@layout/button_row"/>


    <include

        android:layout_width="match_parent"

        android:layout_height="match_parent"

        android:layout_weight="1"

        layout="@layout/button_row"/>


    <include

        android:layout_width="match_parent"

        android:layout_height="match_parent"

        android:layout_weight="1"

        layout="@layout/bottom_row"/>


</TableLayout>
先说明一下,原文章中 include 是这么写的
    <include

        android:layout_weight="1"

        layout="@layout/button_row" />


    <include

        android:layout_weight="1"

        layout="@layout/button_row" />


    <include

        android:layout_weight="1"

        layout="@layout/button_row" />
但是我写完后,会报错,说是不能单独使用 android:layout_weight属性,要使用的话必须加上 android:layout_width 和 android:layout_height。不明所以,最后还是加上了这两个属性,以至于代码看起来还是有些重复。
这里用到了 include ,include是什么以及干嘛用的呢,摘自别人的话 打开原文链接:还有一篇介绍博客 打开博客
在一个项目中我们可能会需要用到相同的布局设计,如果都写在一个xml文件中,代码显得很冗余,并且可读性也很差,所以我们可以把相同布局的代码单独写成一个模块,然后用到的时候可以通过<include /> 标签来重用layout代码。
这样写完后,我们就有了12个按钮的布局文件了。
Challenge
如何继承自定义的 style 呢?p.s.这部分内容算是课后练习,那本书每章最后都有一个 Challenge,本章的是 Challenge: Style Inheritance 。
如果留意上面写的那个 styles.xml话就会发现,Android自己写那个 "AppBaseTheme" style就继承自"android:Theme.Holo.Light.DarkActionBar"
 <style name="AppBaseTheme" parent="android:Theme.Holo.Light.DarkActionBar">

        <!-- API 14 theme customizations can go here. -->

    </style>
继承自定义的 style 的话,可以有两种方式,一种是如上面 "AppBaseTheme" 所示,用 parent="xxxx"的方式,还有一种可以用 name="父名称.子名称"的方式。
演示xml如下,两种方式都写了一个,继承 "RemoteButton",然后新加了一个 textStyle属性。
    <!-- 第一种继承方式 -->

    <style name="OtherButton" parent="RemoteButton">

        <item name="android:textStyle">bold</item>

    </style>


    <!-- 第二种继承方式 -->

    <style name="RemoteButton.Bold">

        <item name="android:textStyle">bold</item>

    </style>
仔细看第一张图片的话就会发现, Delete按钮和Enter按钮的字体是粗体。那两个按钮的 style 就是分别使用 "OtherButton","RemoteButton.Bold"。
One More Thing
AppTheme主题bug。
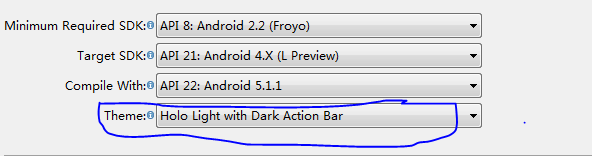
在创建工程时候,eclipse会让你选一个 Theme使用。在下拉列表中有四个选项 None, Holo Dark, Holo Light, Holo Light with Dark Action Bar。这里有个bug,就是不管你选的是 Holo Dark 还是 Holo Light,最后程序使用的还是 Holo Light。
如何解决这个 bug呢,请往下看 ^_^
首先程序使用的主题是声明在 manifest里的
<application

    android:allowBackup="true"

    android:icon="@drawable/ic_launcher"

    android:label="@string/app_name"

    android:theme="@style/AppTheme" > 使用的主题

...


</application>
鼠标光标放到 @style/AppTheme处,同时按住 Ctrl 键和鼠标左键,打开AppTheme使用文件。你会发现打开的是 res/values 下面的 styles.xml。然后修改下内容:
把
<style name="AppBaseTheme" parent="android:Theme.Light">
修改为
<style name="AppBaseTheme" parent="android:Theme">
再打开 res/values-v11下面的 styles.xml 文件,把 AppBaseTheme 主题修改为 android:Theme.Holo。此时就不需要values-v14下的 styles.xml了,把values-v14删掉。这样修改完后,再运行你的程序就可以看到 Holo.Dark生效了。
结语
本章使用的 Activity代码因为使用的是 Fragment,所以没有单独贴出,最后会把程序源码放到附件里,下载看就行了。