Asp.Net Mvc: Implement your custom ModelBinder
环境:
Windows 2008, VS 2008 SP1, Asp.Net Mvc RC1
------------------------------------------------------------------------------
上文:Asp.Net Mvc: Model Binding 机制分析 中,我们简单分析了Asp.Net Mvc中Model Binding的过程,非常粗糙,本文将探索如何实现一个自己的ModelBinder,并进一步展示前文忽略的若干细节。
假设,我们现在有一个Book类,
现在我们要实现添加Book的功能,因此,新建一个BookController,并且加入一个Action:
建立相应的View:
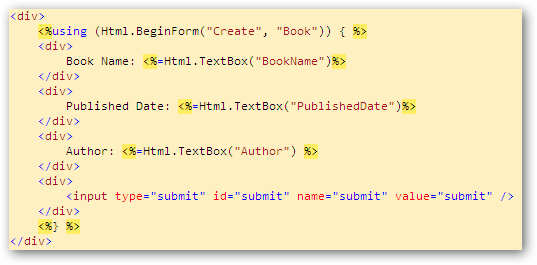
其实,到这一步,当我们提交表单的时候,在Action里面已经可以获得Book自动绑定,这归功于内建的DefaultModelBinder。但是,我们基于某种考虑,想要使用自己创建的ModelBinder。于是,我们接着创建一个SimpleModelBinder类,该类实现了IModelBinder接口(自定义的ModelBinder必须实现这个接口)。
IModelBinder只有一个方法BindModel(),这个方法接受两个参数:ControllerContext, ModelBindingContext,因此,我们在实现这个方法的时候,便需要好好利用这两个参数包含的信息。
现在来看SimpleModelBinder的具体实现:
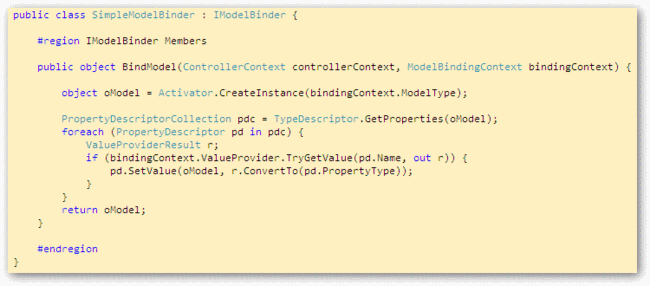
上面,我尽量避免硬编码,因为我希望这个SimpleModelBinder具有一定的通用性。此外也避免Model字段名称更改的连锁反应。这里,我们通过bindingContext.ModelType来创建一个Model实例,通过TypeDescriptor来获取Model的Property集合,通过bindingContext.ValueProvider来取得Request的表单信息,最后返回一个Model实例。
这样,我们的SimpleModelBinder就创建完了。那么,如何让它开始工作呢?
于是就引出一个问题:Asp.Net Mvc如何确定当前需要应用哪个ModelBinder?
答案是:按先后顺序:(1)Action方法中Model的参数的Attribute,(2) ModelBinders.Binders字典,(3) Model类的Attribute,(4) DefaultModelBinder
也就是说,我们有(1)(2)(3)三种方法来告诉Asp.Net Mvc当前我们期望应用哪个ModelBinder到哪个Model。
(1) 在Action的Model参数上加Attribute:

(2) 将SimpleModelBinder添加到ModelBinders.Binders字典中:
这里,我们创建了一个很简单的自定义的ModelBinder,但你是否知道它至少还缺失了一个很重要的功能,就是绑定时对Model的Property的过滤,因为一直以来我都把BindAttribute这个成员给忽视了。下篇,我们就来谈谈BindAttribute,并对SimpleModelBinder做稍稍的完善。
此外,DefaultModelBinder很强大了,什么时候需要应用自定义的ModelBinder,则需要在实际项目中慢慢琢磨。
