WPF and Silverlight 学习笔记(二十九):Brush(1)
在WPF和Silverlight中,Brush是应用很多的一种类型,主要用于填充各种图形及控件。Brush及其子类位于System.Windows.Media命名空间,其继承关系如下图所示:
一、SolidColorBrush
SolidColorBrush是最简单的一种Brush,包含一个Color属性,表示单色的画刷,例如使用红色填充一个矩形:
1: <Rectangle Margin="5" Height="50">
2: <Rectangle.Fill>
3: <SolidColorBrush Color="Red" />
4: </Rectangle.Fill>
5: </Rectangle>
另外,SolidColorBrush作为默认的画刷,可以直接使用颜色值填充,例如:
1: <Rectangle Margin="5" Height="50" Fill="Red" />
2: <Rectangle Margin="5" Height="50" Fill="#FF00FF00" />
在编程语言代码中,还可以使用Brushes类定义的一些系统画刷,例如:
1: // 以下两种方法起到相同的效果
2: // 方法一
3: SolidColorBrush brush = new SolidColorBrush(Colors.Red);
4: this.Background = brush;
5:
6: // 方法二
7: this.Background = Brushes.Red;
二、LinearGradientBrush和RadialGradientBrush
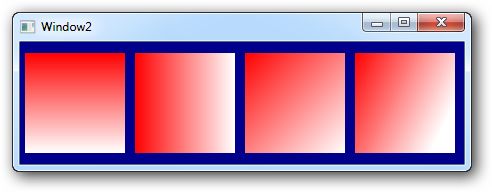
LinearGradientBrush和RadialGradientBrush属于渐变色画刷,LinearGradientBrush是按直线方向渐变,而RadialGradientBrush是从一点开始,辐射状发散渐变。
1: <StackPanel Orientation="Horizontal" Background="DarkBlue">
2: <!--竖直渐变-->
3: <Rectangle Margin="5" Width="100" Height="100">
4: <Rectangle.Fill>
5: <LinearGradientBrush StartPoint="0,0" EndPoint="0,1">
6: <GradientStop Color="Red" Offset="0" />
7: <GradientStop Color="White" Offset="1" />
8: </LinearGradientBrush>
9: </Rectangle.Fill>
10: </Rectangle>
11: <!--水平渐变-->
12: <Rectangle Margin="5" Width="100" Height="100">
13: <Rectangle.Fill>
14: <LinearGradientBrush StartPoint="0,0" EndPoint="1,0">
15: <GradientStop Color="Red" Offset="0" />
16: <GradientStop Color="White" Offset="1" />
17: </LinearGradientBrush>
18: </Rectangle.Fill>
19: </Rectangle>
20: <!--倾斜渐变-->
21: <Rectangle Margin="5" Width="100" Height="100">
22: <Rectangle.Fill>
23: <LinearGradientBrush StartPoint="0,0" EndPoint="1,1">
24: <GradientStop Color="Red" Offset="0" />
25: <GradientStop Color="White" Offset="1" />
26: </LinearGradientBrush>
27: </Rectangle.Fill>
28: </Rectangle>
29: <!--倾斜渐变-->
30: <Rectangle Margin="5" Width="100" Height="100">
31: <Rectangle.Fill>
32: <LinearGradientBrush StartPoint="0,0" EndPoint="1,0.5">
33: <GradientStop Color="Red" Offset="0" />
34: <GradientStop Color="White" Offset="1" />
35: </LinearGradientBrush>
36: </Rectangle.Fill>
37: </Rectangle>
38: </StackPanel>
这里的StartPoint和EndPoint表示渐变线的起点和终点,控件的左上角点的坐标为(0,0)右下角点的坐标为(1,1)。
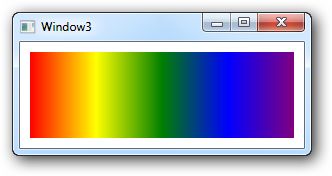
另外使用GradientStop的Offset,可以定义多个渐变点(Offset的值在0和1之间),例如模拟彩虹颜色:
1: <Rectangle Margin="10">
2: <Rectangle.Fill>
3: <LinearGradientBrush StartPoint="0,0" EndPoint="1,0">
4: <GradientStop Color="Red" Offset="0" />
5: <GradientStop Color="Yellow" Offset="0.25" />
6: <GradientStop Color="Green" Offset="0.5" />
7: <GradientStop Color="Blue" Offset="0.75" />
8: <GradientStop Color="Purple" Offset="1" />
9: </LinearGradientBrush>
10: </Rectangle.Fill>
11: </Rectangle>
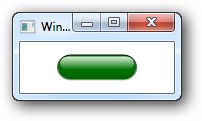
一些有经验的美工可以利用直线渐变创作一些具有层次感的界面,例如:
1: <Grid Width="80" Height="26">
2: <Grid.RowDefinitions>
3: <RowDefinition Height="2*" />
4: <RowDefinition Height="*" />
5: </Grid.RowDefinitions>
6:
7: <Rectangle Grid.RowSpan="2" RadiusX="13" RadiusY="13">
8: <Rectangle.Fill>
9: <LinearGradientBrush StartPoint="0,0" EndPoint="0,1">
10: <GradientStop Color="Green" Offset="0" />
11: <GradientStop Color="DarkGreen" Offset="1" />
12: </LinearGradientBrush>
13: </Rectangle.Fill>
14: <Rectangle.Stroke>
15: <LinearGradientBrush StartPoint="0,0" EndPoint="0,1">
16: <GradientStop Color="Black" Offset="0" />
17: <GradientStop Color="LightGray" Offset="1" />
18: </LinearGradientBrush>
19: </Rectangle.Stroke>
20: </Rectangle>
21:
22: <Rectangle Margin="3,2" RadiusX="8" RadiusY="12">
23: <Rectangle.Fill>
24: <LinearGradientBrush StartPoint="0,0" EndPoint="0,1">
25: <GradientStop Color="#dfff" Offset="0" />
26: <GradientStop Color="#0fff" Offset="1" />
27: </LinearGradientBrush>
28: </Rectangle.Fill>
29: </Rectangle>
30: </Grid>
RadialGradientBrush与LinearGradientBrush类似,只不过是将直线的渐变更换为辐射状的渐变,例如:
1: <Rectangle Margin="5">
2: <Rectangle.Fill>
3: <RadialGradientBrush Center="0.45,0.5"
4: RadiusX="0.3" RadiusY="0.5"
5: GradientOrigin="0.25,0.4">
6: <GradientStop Color="White" Offset="0" />
7: <GradientStop Color="DarkGreen" Offset="1" />
8: </RadialGradientBrush>
9: </Rectangle.Fill>
10: </Rectangle>
其中RadialGradientBrush中的三个属性:
- Center:用来设置径向渐变最外面的圆的圆心
- RadiusX和RadiusY:用来设置径向渐变最外面的圆的水平半径和竖直半径
- GradientOrigin:来用设置定义渐变开始的二维焦点的位置
再例如更酷一些的辐射填充:
1: <Grid Height="150" Width="150" Margin="10">
2: <Grid.ColumnDefinitions>
3: <ColumnDefinition Width="*" />
4: <ColumnDefinition Width="10*" />
5: <ColumnDefinition Width="*" />
6: </Grid.ColumnDefinitions>
7:
8: <Grid.RowDefinitions>
9: <RowDefinition Height="*" />
10: <RowDefinition Height="20*" />
11: <RowDefinition Height="6*" />
12: </Grid.RowDefinitions>
13:
14:
15: <Ellipse Grid.RowSpan="3" Grid.ColumnSpan="3" Margin="0.5">
16: <Ellipse.Fill>
17: <RadialGradientBrush Center="0.5,0.9" GradientOrigin="0.5,0.9"
18: RadiusX="0.7" RadiusY="0.5">
19: <GradientStop Color="PaleGreen" Offset="0" />
20: <GradientStop Color="Green" Offset="1" />
21: </RadialGradientBrush>
22: </Ellipse.Fill>
23: </Ellipse>
24: <Ellipse Grid.Row="1" Grid.Column="1">
25: <Ellipse.Fill>
26: <RadialGradientBrush Center="0.5,0.1" GradientOrigin="0.5,0.1"
27: RadiusX="0.7" RadiusY="0.5">
28: <GradientStop Color="#efff" Offset="0" />
29: <GradientStop Color="Transparent" Offset="1" />
30: </RadialGradientBrush>
31: </Ellipse.Fill>
32: </Ellipse>
33: <Ellipse Grid.RowSpan="3" Grid.ColumnSpan="3">
34: <Ellipse.Stroke>
35: <LinearGradientBrush StartPoint="0,0" EndPoint="0,1">
36: <GradientStop Color="Gray" Offset="0" />
37: <GradientStop Color="LightGray" Offset="1" />
38: </LinearGradientBrush>
39: </Ellipse.Stroke>
40: </Ellipse>
41: </Grid>
三、ImageBrush、DrawingBrush和VisualBrush
ImageBrush、DrawingBrush和VisualBrush都继承于TileBrush,ImageBrush可以填充任意一种位图,DrawingBrush用来填充矢量图,VisualBrush可以将任意UI元素作为图像填充。
在TileBrush中有一些很有用的属性:
Viewbox、ViewboxUnits、Viewport、ViewportUnits:
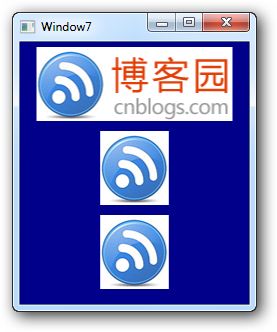
Viewbox用来截取源图的一部分将其作为Brush进行填充,ViewboxUnits用来说明截取时所采用的单位,例如:
1: <!--原图-->
2: <Rectangle Margin="5" Width="196" Height="74">
3: <Rectangle.Fill>
4: <ImageBrush ImageSource="cnblogs.gif"/>
5: </Rectangle.Fill>
6: </Rectangle>
7: <!--按比例截取,默认,可省略ViewboxUnits-->
8: <Rectangle Margin="5" Width="68.6" Height="74">
9: <Rectangle.Fill>
10: <ImageBrush ImageSource="cnblogs.gif" Viewbox="0,0,0.35,1" ViewboxUnits="RelativeToBoundingBox" />
11: </Rectangle.Fill>
12: </Rectangle>
13: <!--按绝对大小截取-->
14: <Rectangle Margin="5" Width="68.6" Height="74">
15: <Rectangle.Fill>
16: <ImageBrush ImageSource="cnblogs.gif" Viewbox="0,0,68.6,74" ViewboxUnits="Absolute"/>
17: </Rectangle.Fill>
18: </Rectangle>
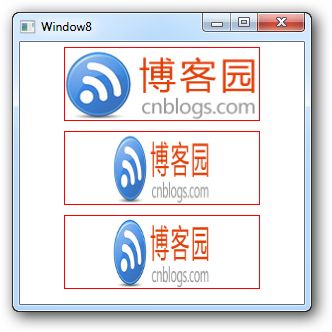
而Viewport表示作为Brush时,显示的大小,ViewportUnits作为其单位,例如:
1: <StackPanel>
2: <!--原图,默认Viewport为0,0,1,1-->
3: <Rectangle Margin="5" Width="196" Height="74" Stroke="Red">
4: <Rectangle.Fill>
5: <ImageBrush ImageSource="cnblogs.gif"/>
6: </Rectangle.Fill>
7: </Rectangle>
8: <!--按比例缩放为原来宽度的一半显示-->
9: <Rectangle Margin="5" Width="196" Height="74" Stroke="Red">
10: <Rectangle.Fill>
11: <ImageBrush ImageSource="cnblogs.gif" Viewport="0.25,0,0.5,1" ViewportUnits="RelativeToBoundingBox"/>
12: </Rectangle.Fill>
13: </Rectangle>
14: <!--按绝对大小缩放为原来宽度的一半显示-->
15: <Rectangle Margin="5" Width="196" Height="74" Stroke="Red">
16: <Rectangle.Fill>
17: <ImageBrush ImageSource="cnblogs.gif" Viewport="49,0,98,74" ViewportUnits="Absolute"/>
18: </Rectangle.Fill>
19: </Rectangle>
20: </StackPanel>
Stretch和TileMode:
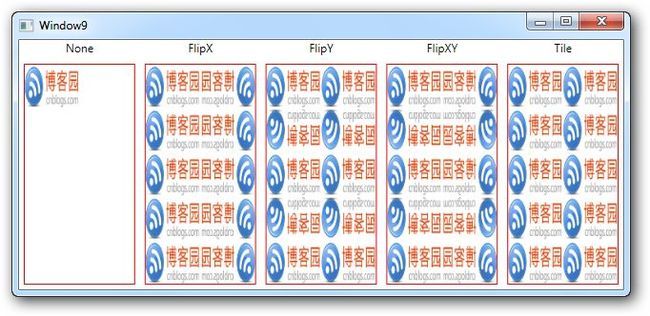
Stretch属性表示缩放的模式(在第二十六节已经介绍),TileMode表示平铺的模式,共有五种枚举值。
1: <Grid>
2: <Grid.RowDefinitions>
3: <RowDefinition Height="20" />
4: <RowDefinition />
5: </Grid.RowDefinitions>
6: <Grid.ColumnDefinitions>
7: <ColumnDefinition />
8: <ColumnDefinition />
9: <ColumnDefinition />
10: <ColumnDefinition />
11: <ColumnDefinition />
12: </Grid.ColumnDefinitions>
13:
14: <TextBlock Grid.Row="0" Grid.Column="0" Text="None" HorizontalAlignment="Center" />
15: <Rectangle Grid.Row="1" Grid.Column="0" Margin="5" Stroke="Red">
16: <Rectangle.Fill>
17: <ImageBrush ImageSource="cnblogs.gif"
18: Viewport="0,0,0.5,0.2" TileMode="None" />
19: </Rectangle.Fill>
20: </Rectangle>
21:
22: <TextBlock Grid.Row="0" Grid.Column="1" Text="FlipX" HorizontalAlignment="Center" />
23: <Rectangle Grid.Row="1" Grid.Column="1" Margin="5" Stroke="Red">
24: <Rectangle.Fill>
25: <ImageBrush ImageSource="cnblogs.gif"
26: Viewport="0,0,0.5,0.2" TileMode="FlipX" />
27: </Rectangle.Fill>
28: </Rectangle>
29:
30: <TextBlock Grid.Row="0" Grid.Column="2" Text="FlipY" HorizontalAlignment="Center" />
31: <Rectangle Grid.Row="1" Grid.Column="2" Margin="5" Stroke="Red">
32: <Rectangle.Fill>
33: <ImageBrush ImageSource="cnblogs.gif"
34: Viewport="0,0,0.5,0.2" TileMode="FlipY" />
35: </Rectangle.Fill>
36: </Rectangle>
37:
38: <TextBlock Grid.Row="0" Grid.Column="3" Text="FlipXY" HorizontalAlignment="Center" />
39: <Rectangle Grid.Row="1" Grid.Column="3" Margin="5" Stroke="Red">
40: <Rectangle.Fill>
41: <ImageBrush ImageSource="cnblogs.gif"
42: Viewport="0,0,0.5,0.2" TileMode="FlipXY" />
43: </Rectangle.Fill>
44: </Rectangle>
45:
46: <TextBlock Grid.Row="0" Grid.Column="4" Text="Tile" HorizontalAlignment="Center" />
47: <Rectangle Grid.Row="1" Grid.Column="4" Margin="5" Stroke="Red">
48: <Rectangle.Fill>
49: <ImageBrush ImageSource="cnblogs.gif"
50: Viewport="0,0,0.5,0.2" TileMode="Tile" />
51: </Rectangle.Fill>
52: </Rectangle>
53: </Grid>
下一篇将具体介绍ImageBrush、DrawingBrush和VisualBrush。敬请关注!

