Android 自定义控件笔记(如何创建自己的自定义控件,具体步骤)
前言:为什么要有自定义控件
当我们遇到现有的控件无法满足我们需求的时候,我们就可以通过自定义满足我们需求的控件来实现我们的需求。
一. 首先确定要创建的自定义控件的类型
(一)自定义组合控件
即利用现有的控件组合出我们想要的控件,适用于自定义控件可再分割的类型
(二)自定义View
当我们所需要的自定义控件无法再切分为现有的控件时,我们就需要自己编写一个自定义View,相当于Android中的单一View(如:TextView)
(三)自定义ViewGroup
当现有的ViewGroup无法满足我们的需求时,我们就需要自定义ViewGroup。例如当我们需要做一个特殊的列表时,现有的列表控件无法满足我们的需求,我们就可自定义一个列表。
二. 根据我们选择的自定义控件类型来实现自定义控件
(一)自定义组合控件的步骤
1.编写一个类(即我们的自定义控件类)继承自ViewGroup(或其子类:如LinearLayout)
2.确定你的自定义控件需要暴露出来的属性
如你现在要创建一个键盘自定义组合控件,你需要暴露出来的属性就可以是键盘按键的颜色,字体的颜色大小等
3.在res/values/attrs.xml文件下定义自定义控件的属性,格式如下:
4.在自定义控件类中获取自定义属性,一般在构造方法中获取。示例代码如下:
        //获取自定义属性
        TypedArray typedArray = context.obtainStyledAttributes(attrs, R.styleable.LoginPagerView);
        //获取自定义属性并设置默认值
        mMainColor = typedArray.getColor(R.styleable.LoginPagerView_mainColor, DEFAULT_MAIN_COLOR);
        mVerifyCodeSize = typedArray.getColor(R.styleable.LoginPagerView_verifyCodeSize, DEFAULT_VERIFY_CODE_SIZE);
        mDuration = typedArray.getColor(R.styleable.LoginPagerView_countDownDuration, DEFAULT_DURATION);
        typedArray.recycle();
注意:
context.obtainStyledAttributes(attrs, R.styleable.LoginPagerView)中的 attrs 参数是在自定义控件的构造方法中获取到的,它包含了从XML布局文件中为该视图设置的属性,故而若不将AttributeSet参数传递进来,将无法获取到从xml文件中设置的自定义属性的值!
也就是说,如果你使用了没有attrs 参数的方法来获取TypedArray的对象,你在xml布局中对自定义控件的自定义属性设置的值在java代码中都获取不到!
3. 创建一个xml文件编写自定义组合控件布局
4. 在自定义控件类中载入你写好的布局,并获取布局中的控件,初始化数据,设置监听事件等
一般也在构造方法中进行,示例代码如下:
    public LoginPagerView(Context context, @Nullable AttributeSet attrs, int defStyleAttr) {
        super(context, attrs, defStyleAttr);
        //获取自定义属性
        TypedArray typedArray = context.obtainStyledAttributes(attrs, R.styleable.LoginPagerView);//注意attrs参数必须传
        //获取自定义属性并设置默认值
        mMainColor = typedArray.getColor(R.styleable.LoginPagerView_mainColor, DEFAULT_MAIN_COLOR);
        mVerifyCodeSize = typedArray.getColor(R.styleable.LoginPagerView_verifyCodeSize, DEFAULT_VERIFY_CODE_SIZE);
        mDuration = typedArray.getColor(R.styleable.LoginPagerView_countDownDuration, DEFAULT_DURATION);
        typedArray.recycle();
        //载入布局并初始化UI和数据
        initView(context);
        //初始化事件处理
        initEvents();

    }
    private void initView(Context context) {
        LayoutInflater.from(context).inflate(R.layout.login_pager_view, this, true);
        mAccount = this.findViewById(R.id.ed_account);
        mVerifyCode = this.findViewById(R.id.ed_verify_code);
        mGetVerifyCode = this.findViewById(R.id.btn_get_verify_code);
        mCheckBox = this.findViewById(R.id.checkbox);
        mAgreement = this.findViewById(R.id.agreement);
        mConfirm = this.findViewById(R.id.btn_yes);
        //静止点击输入框拉起键盘,同时保留随手势移动的光标
        mAccount.setShowSoftInputOnFocus(false);
        mVerifyCode.setShowSoftInputOnFocus(false);
        //根据mVerifyCodeSize的大小来限制验证码输入框的最大输入长度
        mVerifyCode.setFilters(new InputFilter[]{new InputFilter.LengthFilter(mVerifyCodeSize)});
        //初始化按钮状态
        updateBtnState();
    }
5. 定义并暴露功能接口(使外界可以对此控件设置监听事件,例如Button的OnClickListener接口使得其在被点击时可以被监听)(示情况而定,不一定要有)
6. 处理相关事件、根据属性处理数据和UI
(二)自定义View的步骤
1. 创建一个类继承自View(即自定义控件类)
2. 定义并获取自定义属性(与(一)中的2,3,4同)
3. (测量)设置自身的大小
在重写父类的 onMeasure()方法中进行,相关的方法和用法作用如下:
onMeasure()方法中两个参数的含义和用法:
/**
     * 以下两个参数是父布局期望的宽高模式和大小,可不遵守
     * 可以通过以下两个方法来获取其模式和大小
     * int mode = MeasureSpec.getMode(widthMeasureSpec);
     * int size = MeasureSpec.getSize(widthMeasureSpec);
     *
     * 总共有三个模式:
     * MeasureSpec.UNSPECIFIED:指无特殊限定其大小
     * MeasureSpec.EXACTLY:指其大小是确切限定的
     * MeasureSpec.AT_MOST:指其大小没有限定,但有一个最大值,不可超过最大值
     *
     * @param widthMeasureSpec  horizontal space requirements as imposed by the parent.
     *                          The requirements are encoded with
     *                          {@link MeasureSpec}.
     * @param heightMeasureSpec vertical space requirements as imposed by the parent.
     *                          The requirements are encoded with
     *                          {@link MeasureSpec}.
     */
@Override
    protected void onMeasure(int widthMeasureSpec, int heightMeasureSpec) {}
getPaddingXXX():
用于获取在xml布局中设置的各种内边距,如getPaddingRight()获取右内边距
setMeasuredDimension(int measuredWidth, int measuredHeight):
测量自定义控件的宽高
4. 初始化相关的画笔,示例代码如下:
//初始化画笔
    private void initPaints() {
        //秒针画笔
        mSecondPaint = new Paint();
        mSecondPaint.setColor(mSecondColor);
        mSecondPaint.setStyle(Paint.Style.STROKE);//直线
        mSecondPaint.setStrokeWidth(2f);//设置直线宽度
        mSecondPaint.setAntiAlias(true);//抗锯齿
        mSecondPaint.setStrokeCap(Paint.Cap.ROUND);//设置直线尾部为圆形
        //分针画笔
        mMinPaint = new Paint();
        mMinPaint.setColor(mMinColor);
        mMinPaint.setStyle(Paint.Style.STROKE);//直线
        mMinPaint.setStrokeWidth(3f);//设置直线宽度
        mMinPaint.setAntiAlias(true);//抗锯齿
        mMinPaint.setStrokeCap(Paint.Cap.ROUND);//设置直线尾部为圆形
        //时针画笔
        mHourPaint = new Paint();
        mHourPaint.setColor(mHourColor);
        mHourPaint.setStyle(Paint.Style.STROKE);//直线
        mHourPaint.setStrokeWidth(4f);//设置直线宽度
        mHourPaint.setAntiAlias(true);//抗锯齿
        mHourPaint.setStrokeCap(Paint.Cap.ROUND);//设置直线尾部为圆形
        //表盘背景画笔
        mBackPaint = new Paint();
        mBackPaint.setColor(mBackID);
        //刻度画笔
        mScalePaint = new Paint();
        mScalePaint.setColor(mScaleColor);
        mScalePaint.setStyle(Paint.Style.STROKE);//直线
        mScalePaint.setStrokeWidth(3f);//设置直线宽度
        mScalePaint.setAntiAlias(true);//抗锯齿
        mScalePaint.setStrokeCap(Paint.Cap.ROUND);//设置直线尾部为圆形
    }
5. 绘制
在重写父类的 onDraw()方法中进行,以绘制表盘的指针为例:
//每刷新一帧调用一次
    @Override
    protected void onDraw(Canvas canvas) {
        canvas.drawColor(Color.parseColor("#FF000000"));
        //绘制表盘背景
        if (mBitmap != null) {
            canvas.drawBitmap(mBitmap, src, dst, mScalePaint);
        } else {
            //绘制表盘
            //绘制刻度
            drawScale(canvas);
        }
        //绘制中心圆环
        canvas.drawCircle(mTargetSize / 2, mTargetSize / 2, mInnerCircleRadius,mScalePaint);
        //设置时间
        long currentTimeMillis = System.currentTimeMillis();
        mCalendar.setTimeInMillis(currentTimeMillis);
        //获取当前时间
        int hour = mCalendar.get(Calendar.HOUR);
        int min = mCalendar.get(Calendar.MINUTE);
        int second = mCalendar.get(Calendar.SECOND);
        Log.d("TAG","hour-->" + hour);
        Log.d("TAG","min-->" + min);
        Log.d("TAG","second-->" + second);
        if(second == 0){
            //绘制秒针
            drawSecond(canvas,second);
            //绘制分针
            drawMin(canvas,min);
            //绘制时针
            drawHour(canvas,hour,min);
        }else{
            //绘制时针
            drawHour(canvas,hour,min);
            //绘制分针
            drawMin(canvas,min);
            //绘制秒针
            drawSecond(canvas,second);
        }

    }
private void drawSecond(Canvas canvas,int second) {
        //设置时间
        //定义秒针长度
        float secondRadius = (float) (mRadius * 0.9);
        canvas.save();
        //计算秒旋转角度
        float secondDegree = (float) (second * 360 / 60);
        canvas.rotate(secondDegree,mRadius,mRadius);
        //绘制秒针
        canvas.drawLine(mRadius,mRadius - secondRadius,mRadius,mRadius - mInnerCircleRadius,mSecondPaint);
        canvas.restore();
    }

    private void drawMin(Canvas canvas, int min) {
        //定义分针长度
        float minRadius = (float) (mRadius * 0.8);
        canvas.save();
        //计算分针旋转角度
        float minDegree = (float) (min * 60) / 10;
        canvas.rotate(minDegree,mRadius,mRadius);
        //绘制分针
        canvas.drawLine(mRadius,mRadius - minRadius,mRadius,mRadius - mInnerCircleRadius,mMinPaint);
        canvas.restore();
    }

    private void drawHour(Canvas canvas, int hour, int min) {
        //定义时针长度
        float hourRadius = (float) (mRadius * 0.6);
        canvas.save();//保存当前画布状态
        //计算时针的旋转角度
        float hourOffSet = (float) (min * 30 / 60);
        float hourDegree = hour * 30 + hourOffSet;
        Log.d("TAG","hourOffSet-->" + hourOffSet);
        Log.d("TAG","hourDegree-->" + hourDegree);
        canvas.rotate(hourDegree,mRadius,mRadius);//画布旋转一定角度
        //绘制时针
        canvas.drawLine(mRadius,mRadius - hourRadius ,mRadius,mRadius - mInnerCircleRadius,mHourPaint);
        canvas.restore();//重新加载当前画布状态
    }
6. 处理事件
7. 重新绘制
若你的自定义控件需要刷新的频率较高,例如时钟的秒针,至少需要一秒转动一次,则需要重写onAttachedToWindow方法并在其中开启子线程定时进行重新刷新界面重新绘制。
注意:onAttachedToWindow方法一般要与onDetachedFromWindow成对出现使用,在onDetachedFromWindow中释放onAttachedToWindow中使用的资源避免内存泄漏。
示例代码如下:
    private boolean mIsUpdate;

    @Override
    protected void onAttachedToWindow() {
        super.onAttachedToWindow();
        mIsUpdate = true;
        post(new Runnable() {
            @Override
            public void run() {
                if(mIsUpdate){
                    invalidate();
                    postDelayed(this,1000);//定时更新,解决秒针不转动的问题
                }else{
                    removeCallbacks(this);
                }
            }
        });

    }


    @Override
    protected void onDetachedFromWindow() {
        super.onDetachedFromWindow();
        mIsUpdate = false;//取消更新
    }
8. 定义并暴露功能接口(示情况而定,不一定要有)
(三)自定义ViewGroup的步骤
1.创建一个类继承自ViewGroup(即我们的自定义控件类)
2. 定义并获取自定义属性(同上(一)2,3,4)
3. 将子View添加进去(xml代码添加或Java代码添加)
若是在xml布局中直接添加子View,在添加完毕后会触发onFinishInflate()方法(注意在构造方法中可能还拿不到),可以重写此方法并在其中对子View进行操作
4. (测量)设置自身的大小以及设置子View的大小
在重写父类的 onMeasure()方法中进行,相关的方法和用法作用如下:
getChildAt(int index):
获取指定索引的子View
getChildCount():
获取已添加的子View的数量
MeasureSpec.makeMeasureSpec(int size, int mode):
创建一个包含大小和大小模式的int值,与onMeasure()方法的参数的数据类型相同(参考(二)中的3)
measureChild(View child, int parentWidthMeasureSpec, int parentHeightMeasureSpec):
测量子View的大小,注意其中的测量参数parentWidthMeasureSpec与parentHeightMeasureSpec必须是MeasureSpec.makeMeasureSpec(int size, int mode)创建出来的类型
getMeasuredHeight()和getMeasuredWidth():
获取测量之后的高度和宽度,在测量之后就确定了,不会改变
setMeasuredDimension(int measuredWidth, int measuredHeight):
测量自定义ViewGroup(自身)的大小
5. 布局
在重写父类的onLayout方法中进行布局,布局的主要任务就是摆放你的子View
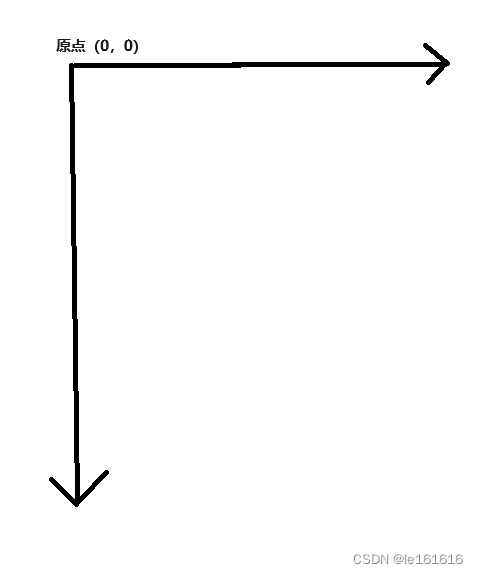
需注意:在Android中是以屏幕的左上角为原点进行布局的
相关的方法和用法作用如下:
getMeasuredHeight()和getMeasuredWidth():
获取测量之后的高度和宽度,在测量之后就确定了,不会改变
getPaddingXXX():
用于获取在xml布局中设置的各种内边距,如getPaddingRight()获取右内边距
getChildAt(int index):
获取指定索引的子View
调用者(子view).layout(int left, int top, int right, int bottom):
对调用者(子view)进行布局摆放
