ansible架构、安装、简单的使用
1.ansible运维工具
1.1 ansible介绍
一款系统开发开源的配置和自动化工具,基于python写成类似于saltstack和Puppet。
基于模块工作的,本身没有批量部署的能力,批量部署时运用的是ansible所运行的模块。
ansible只是提供一种框架,通过ssh远程管理受控节点
1.2 ansible架构图
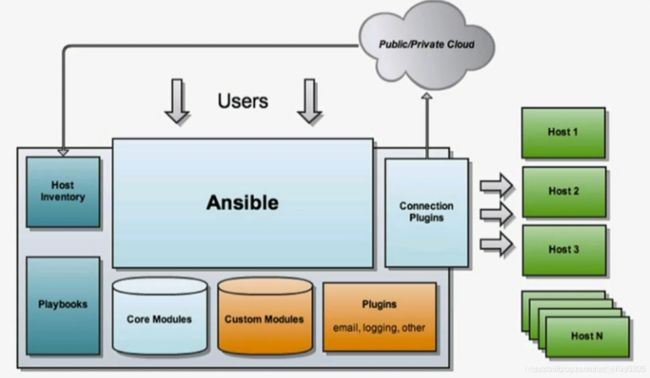
架构:核心Ansible,基于模块工作的,本身没有批量部署的功能,利用运行的模块进行批量部署,只是提供一种框架,通过ssh来远程通讯
Core Modules:自带的模块
Custom Modules:(核心模块功能不足)自定义添加的扩展模块
Plugins:通过插件来实现记录日志,发送邮件或其它功能
Playbooks: 剧本,YAML格式文件,多个任务定义在一个文件中,定义主机需要调用哪些模块来完成的功能
Connectior Plugins: ansible:基于连接插件连接到各个主机上,默认是使用ssh Host Inventory: 记录由Ansible管理的主机信息,包括端口、密码、ip等
2 ansible特点
跨平台支持:Ansible提供linux,windows,UNIX和网络设备的无代理支持,适用于物理,虚拟,容器等
易懂 :ansible playbook采用YAML语言编写,易于阅读
详细描述应用:通过ansible playbook进行更改时,可以描述和记录应用环境的每一个方面
轻松管理版本:Ansible Playbook是纯文本,视作源代码,放在现有版本控制系统中
支持动态清单:从外部源更新Ansible管理的计算机列表,随时获取所有受管服务器的现在的列表,不受影响
利用其它系统集成:利用环境中的HP SA,Puppet,Jenkins,红帽卫星和其它系统,集中到Ansible工作中
3 ansible安装要求
3.1控制主机:linux或UNIX系统
python3.5以上 python2.6以上
centos8.0版本,ansible2.9可以自动使用platform-python包
3.2 受管主机
python 2.6以上或python3.5以上(才可以运行多个模块)
启动了selinux的话 需安装:python3-libselinux包,才能使用复制,文件,模块相关的模块,工作时selinux关闭即可
4.ansible安装
各版本安装详细地址:https://docs.ansible.com/ansible-core/devel/installation_guide/intro_installation.html#prerequisites
#CentOS上安装:
yum -y install epel-release
yum -y install ansible
#rhel上安装:
yum install -y ansible

#查看版本信息
[root@localhost ~]# ansible --version
ansible 2.9.23
  config file = /etc/ansible/ansible.cfg
  configured module search path = ['/root/.ansible/plugins/modules', '/usr/share/ansible/plugins/modules]
  ansible python module location = /usr/lib/python3.6/site-packages/ansible
  executable location = /usr/bin/ansible
  python version = 3.6.8 (default, Dec  5 2019, 15:45:45) [GCC 8.3.1 20191121 (Red Hat 8.3.1-5)]
4.1 ansible简单使用
参数:
-m:指定模板名字
-a:命令行参数
-B 后台运行时间
-o:异步
-C 测试脚本能否运行,检查语法
-D 对比文件与上次是否相同,不想同打印
-e 添加额外文件yml
-f 进程数(default=5)
-h, --help show this help message and exit
-i 指定主机目录
-l 指定所有运行的组,ansible all -l test1 -a ping 防止有组之间的继承
-M 指顶模板路径
# 创建一个VVV的用户
[root@localhost project]# ls
ansible.cfg  inventory
[root@localhost project]# ansible localhost -m user -a "name=VVV state=present"
localhost | SUCCESS => {
    "append": false,
    "changed": false,
    "comment": "",
    "group": 1002,
    "home": "/home/VVV",
    "move_home": false,
    "name": "VVV",
    "shell": "/bin/bash",
    "state": "present",
    "uid": 1002
}
[root@localhost project]# id VVV
uid=1002(VVV) gid=1002(VVV) 组=1002(VVV)

# ansible-doc使用参数
root@localhost project]# ansible-doc -h
usage: ansible-doc [-h] [--version] [-v] [-M MODULE_PATH]
                   [--playbook-dir BASEDIR]
                   [-t {become,cache,callback,cliconf,connection,httpapi,inventory,lookup,netconf,shell,module,strategy,vars}]
                   [-j] [-F | -l | -s | --metadata-dump]
                   [plugin [plugin ...]]

 # 列出已安装模块
[root@localhost project]# ansible-doc -l
[WARNING]: ipagroup parsing did not produce documentation.
[WARNING]: ipahbacrule parsing did not produce documentation.
[WARNING]: ipahbacsvc parsing did not produce documentation.
[WARNING]: ipahbacsvcgroup parsing did not produce documentation.
[WARNING]: ipahost parsing did not produce documentation.
[WARNING]: ipahostgroup parsing did not produce documentation.
[WARNING]: ipapwpolicy parsing did not produce documentation.
[WARNING]: ipasudocmd parsing did not produce documentation.
[WARNING]: ipasudocmdgroup parsing did not produce documentation.
[WARNING]: ipasudorule parsing did not produce documentation.
[WARNING]: ipatopologysegment parsing did not produce documentation.
[WARNING]: ipatopologysuffix parsing did not produce documentation.
[WARNING]: ipauser parsing did not produce documentation.
a10_server                                                    Manage A10 Networks AX/SoftAX/Thunde...
a10_server_axapi3                                             Manage A10 Networks AX/SoftAX/Thunde...

# 查看具体使用模块的方法
 [root@localhost project]# ansible-doc -s command
- name: Execute commands on targets
  command:
      argv:                  # Passes the command as a list rather than a string. Use `argv' to avoid
                               quoting values that would otherwise be
                               interpreted incorrectly (for example
                               "user name"). Only the string or the
                               list form can be provided, not both.
                               One or the other must be provided.
      chdir:                 # Change into this directory before running the command.
      cmd:                   # The command to run.
      creates:               # A filename or (since 2.0) glob pattern. If it already exists, this step
                               *won't* be run.
      free_form:             # The command module takes a free form command to run. There is no actual
                               parameter named 'free form'.
      removes:               # A filename or (since 2.0) glob pattern. If it already exists, this step
                               *will* be run.
      stdin:                 # Set the stdin of the command directly to the specified value.
      stdin_add_newline:     # If set to `yes', append a newline to stdin data.
      strip_empty_ends:      # Strip empty lines from the end of stdout/stderr in result.
      warn:                  # Enable or disable task warnings.
[root@localhost project]#