day31(playbook的基本使用)
一、
1.使用ansible安装并启动ftp服务
[root@1 ~]# vim /etc/ansible/hosts
s0 ansible_ssh_host=10.0.0.12 ansible_ssh_port=22 ansible_ssh_user=root
ansible_ssh_pass=1
s1 ansible_ssh_host=10.0.0.13 ansible_ssh_port=22 ansible_ssh_user=root
ansible_ssh_pass=1
s2 ansible_ssh_host=10.0.0.14 ansible_ssh_port=22 ansible_ssh_user=root
ansible_ssh_pass=1
[s]
s0
s1
s2
# 下载最新版本的ftp软件包
[root@1 ~]# ansible s -m yum -a 'name=vsftpd state=latest'
# 开启vsftp服务并设置vsftpd服务开机自启
[root@1 ~]# ansible s -m service -a 'name=vsftpd state=started enabled=on'
# 关闭防火墙服务
[root@1 ~]# ansible s -m service -a 'name=firewalld state=stopped
enabled=off'
# 下载lftp软件包
[root@1 ~]# yum -y install lftp
# 连接文件共享服务器
[root@1 ~]# lftp 10.0.0.12
# 在共享目录中创建文件
[root@1 ~]# ansible s -m file -a 'path=/var/ftp/pub/sb state=touch'
# 连接文件共享服务器并查看共享文件
[root@1 ~]# lftp 10.0.0.12
lftp 10.0.0.12:~> ls
drwxr-xr-x 2 0 0 16 Aug 19 01:43 pub
lftp 10.0.0.12:/> ls pub/
-rw-r--r-- 1 0 0 0 Aug 19 01:43 sb
lftp 10.0.0.12:/> quit
2、使用ansible的script模块远程批量执行脚本
[root@1 ~]# vim tst.sh
[root@1 ~]# ansible s -m script -a './tst.sh'
[root@ab ~]# tree /tmp
/tmp
├── three
│ └── test
[root@ab ~]# cat /tmp/three/test
i an echo,at mt
3、使用ansible安装启动nfs服务
# 使用command模块远程批量下载nfs-utils软件
[root@1 ~]# ansible s -m command -a 'yum -y install nfs-utils'
# 使用yum模块远程批量下载rpcbind软件
[root@1 ~]# ansible s -m yum -a 'name=rpcbind state=latest'
[root@ab ~]# rpm -qa | grep rpcbind
rpcbind-0.2.0-49.el7.x86_64
[root@ab ~]# rpm -qa | grep nfs
libnfsidmap-0.25-19.el7.x86_64
nfs-utils-1.3.0-0.68.el7.2.x86_64
# 在控制机上编辑exports文件
[root@1 ~]# vim /etc/exports
/static *(ro,sync)
# 使用ansible的file模块远程批量下载static目录
[root@1 ~]# ansible s -m file -a 'path=/static state=directory'
# 使用ansible的file模块远程批量下载touch文件
[root@1 ~]# ansible s -m file -a 'path=/static/test state=touch'
# 使用ansible的copy模块将本地的exports文件拷贝到被控制机上覆盖原文件
[root@1 ~]# ansible s -m copy -a 'src=/etc/exports dest=/etc/exports'
# 使用ansible的command模块远程批量启动、查看、开机自启nfs服务
[root@1 ~]# ansible s -m command -a 'systemctl start nfs'
[root@1 ~]# ansible s -m command -a 'systemctl status nfs'
[root@1 ~]# ansible s -m command -a 'systemctl enable nfs'
# 使用ansible的service模块远程批量启动并设置开机自启rpcbind服务
[root@1 ~]# ansible s -m service -a 'name=rpcbind state=started enabled=yes'
# 在控制机上安装nfs-utils软件包
[root@1 ~]# yum -y install nfs-utils.x86_64
# 在控制机上创建nfs目录
[root@1 ~]# mkdir /nfs
# 将10.0.0.12主机上的static目录挂载到本机的nfs目录
[root@1 ~]# mount -t nfs 10.0.0.12:/static /nfs/
[root@1 ~]# ls /nfs/
test
4、playbook的简单介绍
playbook(剧本): 是ansible⽤于配置,部署,和管理被控节点的剧本。⽤于ansible操作的编排。
使⽤的格式为yaml格式(saltstack,elk,docker,dockercompose,kubernetes等也都会⽤到yaml格
式)
YMAL格式 :文件以.yaml或.yml结尾
⽂件的第⼀⾏以 "---"开始,表明YMAL⽂件的开始(可选的)
以#号开头为注释
列表中的所有成员都开始于相同的缩进级别, 并且使⽤⼀个 "- " 作为开头(⼀个横杠和⼀个空格)
⼀个字典是由⼀个简单的 键: 值 的形式组成(这个冒号后⾯必须是⼀个空格)
playbook语法:
hosts: ⽤于指定要执⾏任务的主机,其可以是⼀个或多个由冒号分隔主机组。
remote_user: ⽤于指定远程主机上的执⾏任务的⽤户。
tasks: 任务列表, 按顺序执⾏任务. 如果⼀个host执⾏task失败, 整个tasks都会回滚, 修正playbook
中的错误, 然后重新执⾏即可。
handlers: 类似task,但需要使⽤notify通知调⽤。 不管有多少个通知者进⾏了notify,等到play中
的所有task执⾏完成之后,handlers也只会被执⾏⼀次。
handlers最佳的应⽤场景是⽤来重启服务,或者触发系统重启操作。
variables: 变量 定义变量可以被多次⽅便调⽤。
master# vim /etc/ansible/playbook/example2.yaml
---
- hosts: group1
remote_user: root
vars:
- user: test1
tasks:
- name: create user
user: name={{user}} state=present
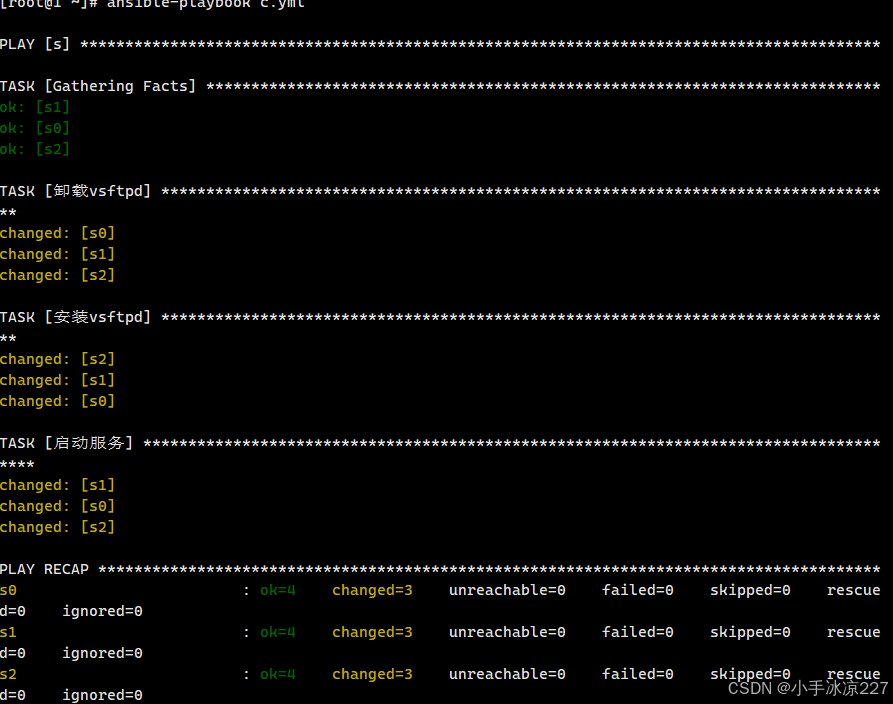
5、使用playbook卸载安装vsftpd软件包并启动ftp服务
[root@1 ~]# vim c.yml
---
- hosts: s
remote_user: root
tasks:
- name: 卸载vsftpd
yum: name=vsftpd state=absent
- name: 安装vsftpd
yum: name=vsftpd state=latest
- name: 启动服务并设置服务开机自启动
service: name=vsftpd state=started enabled=on
# 执行playbook
[root@1 ~]# ansible-playbook c.yml 
6、使用playbook完成每次修改配置文件后自动重启服务
[root@1 ~]# vim c.yml
- name: 修改配置文件
command: sed -i '/^anonymous_enable=YES/ s/YES/NO/g'
/etc/vsftpd/vsftpd.conf
notify:
- ab
handlers:
- name: ab
service: name=vsftpd state=restarted
[root@1 ~]# ansible-playbook c.yml
二、
1、简单playbook模板
--
- hosts: 组名/别名/ip/域名
remote_user: root
tasks:
- name: 任务说明
模块: key0=value0
# service: name=vsftpd state=stated enabled=on
- name: 修改配置文件
command: sed.......
notify:
- ab
handlers:
- name: ab
service: name=httpd state=restarted
2、使用playbook安装重启httpd服务
[root@1 ~]# vim httpd.yml
---
- hosts: s
remote_user: root
tasks:
- name: 复制repo文件到被控制主机
copy: src=/etc/yum.repos.d dest=/etc/
- name: 安装httpd
yum: name=httpd state=present
- name: 启动httpd
service: name=httpd state=started enabled=on
- name: 修改配置文件
command: sed -i '/Listen 80/ s/80/8080/g' /etc/httpd/conf/httpd.conf
notify:
- ab
- name: 修改默认的资源文件
shell: echo 'ansible playbook' > /var/www/html/index.html
handlers:
- name: ab
service: name=httpd state=restarted
[root@1 ~]# ansible-playbook httpd.yml
[root@1 ~]# curl 10.0.0.12:8080
ansible playbook
[root@1 ~]# curl 10.0.0.13:8080
ansible playbook
[root@1 ~]# curl 10.0.0.14:8080
ansible playbook
3、使用playbook操纵多台主机进行不同操作
[root@1 ~]# vim t.yml
---
- hosts: s1
remote_user: root
tasks:
- name: 创建一个文件
file: path=/tmp/x.txt state=touch
- hosts: s2
remote_user: root
tasks:
- name: 也创建一个文件
file: path=/tmp/c.txt state=touch
[root@1 ~]# ansible-playbook t.yml
4、使用playbook一次性搭建nfs服务器端和客户端
[root@1 ~]# vim nfs.yml
---
- hosts: s1
remote_user: root
tasks:
- name: 安装nfs
yum: name=nfs state=present
- name: 安装rpcbind
yum: name=rpcbind state=present
- name: 创建一个共享目录
file: path=/abc state=directory
- name: 创建共享文件
file: path=/abc/a.txt state=touch
- name: 修改exports文件
shell: echo '/abc *(ro,sync)' > /etc/exports
notify:
- ab
- name: 启动nfs服务
service: name=nfs state=started enabled=on
- name: 启动rpcbind服务
service: name=rpcbind state=started enabled=on
handlers:
- name: ab
service: name=nfs state=restarted
- hosts: s2
remote_user: root
tasks:
- name: 创建挂载目录
file: path=/hhabc state=directory
- name: 下载nfs-utils软件
yum: name=nfs-utils state=present
- name: 挂载共享目录
command: mount -t nfs 10.0.0.13:/abc /hhabc/
[root@ab ~]# ls /hhabc/
a.txt
